
Blackboard Collaborate Ultra Guide
Quick Access List
1. What is Blackboard Collaborate Ultra and how to access it from my iLearn course site?
2. Blackboard Collaborate Ultra course tool interface
3. How to join the Blackboard Collaborate Course Room session?
4. Why create new sessions if I have a course room
5. How do I create a session?
6. Is there an easy way to add a direct link to the course room on iLearn for my students?
7. Meeting Room Interface
8. How to set up your microphone and webcam in a Blackboard Collaborate Ultra session
9. Let others hear and see you during a Blackboard Collaborate Ultra session
10. Record sessions
11. Share content
12. Manage attendees
13. Is there any special set up for student group sessions?
14. What are Some of the best practices with Blackboard Collaborate Ultra?
15. Find help and more resources

Use the Blackboard Collaborate Ultra web conferencing tool to have live online sessions with your
students. Below are some common questions, their answers, and selected topics about Blackboard
Collaborate Ultra.
I. What is Blackboard Collaborate Ultra?
Blackboard Collaborate Ultra is a web conferencing or a webinar platform designed for use in
educational setting. Similar web conferencing tools have long been offered to businesses like WebEx
and GotoMeeting.
With Blackboard Collaborate Ultra, course instructors create virtual classroom and online meeting
spaces to share presentation material and communicate with students via synchronous audio, video
and chat tools. Virtual classrooms include a collaborative whiteboard tool that allows interaction
among participants in real time.
Desktop applications and web resources such as multimedia can be displayed directly within the web
conference room. An interactive recording can be created for each session allowing students the
opportunity to review material following the live session.
A live session is an online meeting where participants can see, hear and interact with each other in
real time. Live sessions can be joined via a course tool in iLearn site or through a link (URL) that an
instructor may provide.
During a live session several options will be available as to how you interact and communicate with
participants as well as controlling the session if you are the moderator.
If you are presenting, you will need a headset with a microphone or an embedded microphone in
your computer. If you have a webcam, you also have the option of turning on a video feed so that
other participants can see you while you have your feed active.
How Can I have Access to Blackboard Collaborate Ultra?
The link for Blackboard Collaborate Ultra exists as a course tool in all iLearn course sites. It’s
available to both instructors and students.
Instructors and students can find the Blackboard Collaborate Ultra tool with the course tools via the
course menu. Moreover, Instructors can add a direct link to the Blackboard Collaborate Ultra in any
content area of the course.

II. Blackboard Collaborate Ultra Tool Interface
When you first access Blackboard Collaborate Ultra from your course, you will be presented with the
screen for scheduling sessions and viewing recordings. Below is the default view which is for
displaying the list of sessions. By default, you should see one session if you have not scheduled any
upcoming sessions.
Each of the following items explains a numbered area on the screenshot above:
1. Toggle between the list of sessions and the list of recordings
2. View help for session moderators
3. View settings for the course room. This is also where to click to join the session
4. Display the session options
5. Create/schedule a new session
III. How to Join the Blackboard Collaborate Course Room Session?

The course room is an open session dedicated to your course. This makes it easier for you to use
Collaborate Ultra in your courses. It also provides you and your students a convenient launch point
for classes or impromptu meetings. Your students can join and use the course room even if you are
not present in the room.
To join the Course Room session:
1. Click on Course Room to view the session settings
2. Click on the Join Course Room Button to join as a moderator
3. Here you can find the phone number and meeting PIN code for participants who wish to join
using a phone
4. Default Guest Role is Participant. You may forward the Guest Link to anyone outside your
course to allow them access to the course room
IV. Why create new sessions if I have a course room?
There are a number of reasons you may want to create scheduled sessions when you have a course
room. Two examples are:
Supervised sessions: When the course room is unlocked anyone can join the session at any
time. Instructors don't have to be present for students to join the session. If you don't want
students to join a session unsupervised, lock the course room and create scheduled sessions.
Multiple sessions at once: If you want to run multiple sessions at the same time for students
to use as virtual study room, for example, you can create multiple sessions for the different
groups to join.
Create a new session if you would like to send attendance to the grade center
V. How do I Create a Session?
From the Sessions list, select Create Session. Give the session a
name.
Event Details - The event needs some basic details before creating:
Set the date and time the session starts and ends. You can
choose to keep a session open or repeat. You can also
select if students can enter the session prior to the start
time. Collaborate uses your computer’s local time zone for
session start and end times
Type a detailed description of the meeting. This helps
students find the right session

Session settings: Decide who can do what in your sessions.
Allow recording downloads from the Recordings page as
well as on the recording play back page
Show the profile pictures of moderators only
Allow participants to use audio, video, chat, and the
whiteboard editing tools
Allow users to join the session using a telephone for their
audio
VI. Is There an Easy Way to Add a Direct Link to the Course Room on iLearn for my students?
You can add a direct URL link to the session inside any of your course content areas. Copy the guest
link and add it as a web link in a course area that's easy for your students to find.

VII. Meeting Room Interface
The Collaborate meeting interface is organized into three convenient areas: a media space, the
Session menu, and a Collaborate panel.
1. Media Space:
The media space in Collaborate is where the content of the session is displayed. Content you share is
automatically the main focus of your screen. The screenshot above shows a meeting room where
the media space is occupied by a shared content.
If you’re not sharing content, the focus is on participant profiles or video. You can switch between a
grid view and a view that follows the speaker. With the follow-the-speaker view, the focus moves to
the current speaker as the discussion unfolds.

The following tools are available in the Media Space:

2. Session Menu
The Session menu opens a collection of high level session actions and information. Open it using the
Session menu button at the top left of the screen.
The following tools are available on the Session Menu:
Icon
Tool
Description
Start/Stop Recording
Open the session menu and
Select Start Recording
Use your phone
Use phone for audio during the
session
Report an issue
Report an issue with the
session to Blackboard
Tell more about
Collaborate
Opens user interface tours
Help
Go to Blackboard Collaborate
help
Privacy Policy
Displays the Blackboard Privacy
Statement
Leave Session
Let you leave the session

3. Collaborate Panel
The Collaborate panel takes your session experience to the next level. You now have a single space
to go to engage other participants with all the great collaborate tools.
Here are some functions you can do using the Collaborate Menu:
Chat with everyone in the session or privately with other moderators
View participants and their roles
Moderators and presenters can show a poll or a questions and collect responses
Set your audio and video settings
Share content, entire screen, or an application window
Send participants to breakout rooms
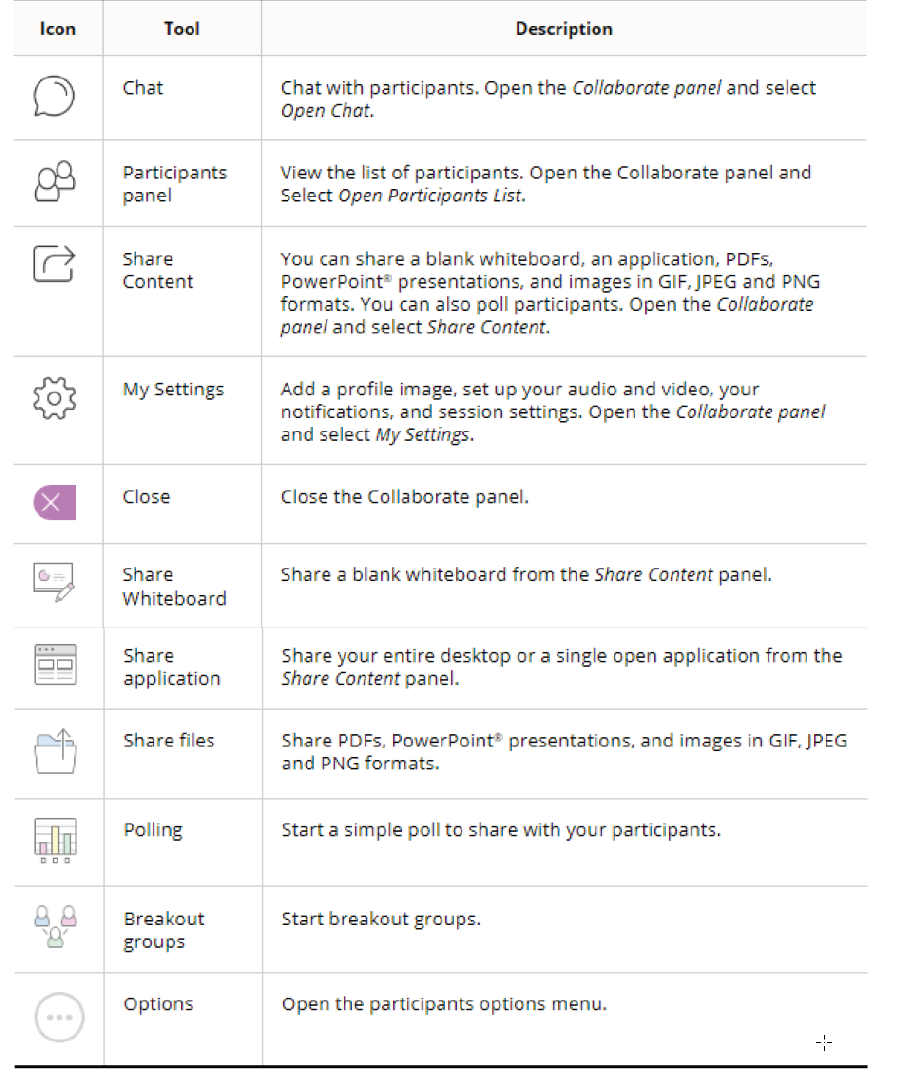
The following tools are available in the Collaborate panel:
VIII. How to Set Up Your Microphone and Webcam in a Blackboard Collaborate Ultra Session?
You must give the browser permission to use audio and video to participate in a session. This is
necessary so that you are seen and heard. You’ll be asked to do this when you first join a session or
when you first go to share your audio or video.

You can set up audio and video at any time in My Settings
1. Open the Collaborate panel
2. Select My Settings
3. Select Set Up Your
Camera and
Microphone
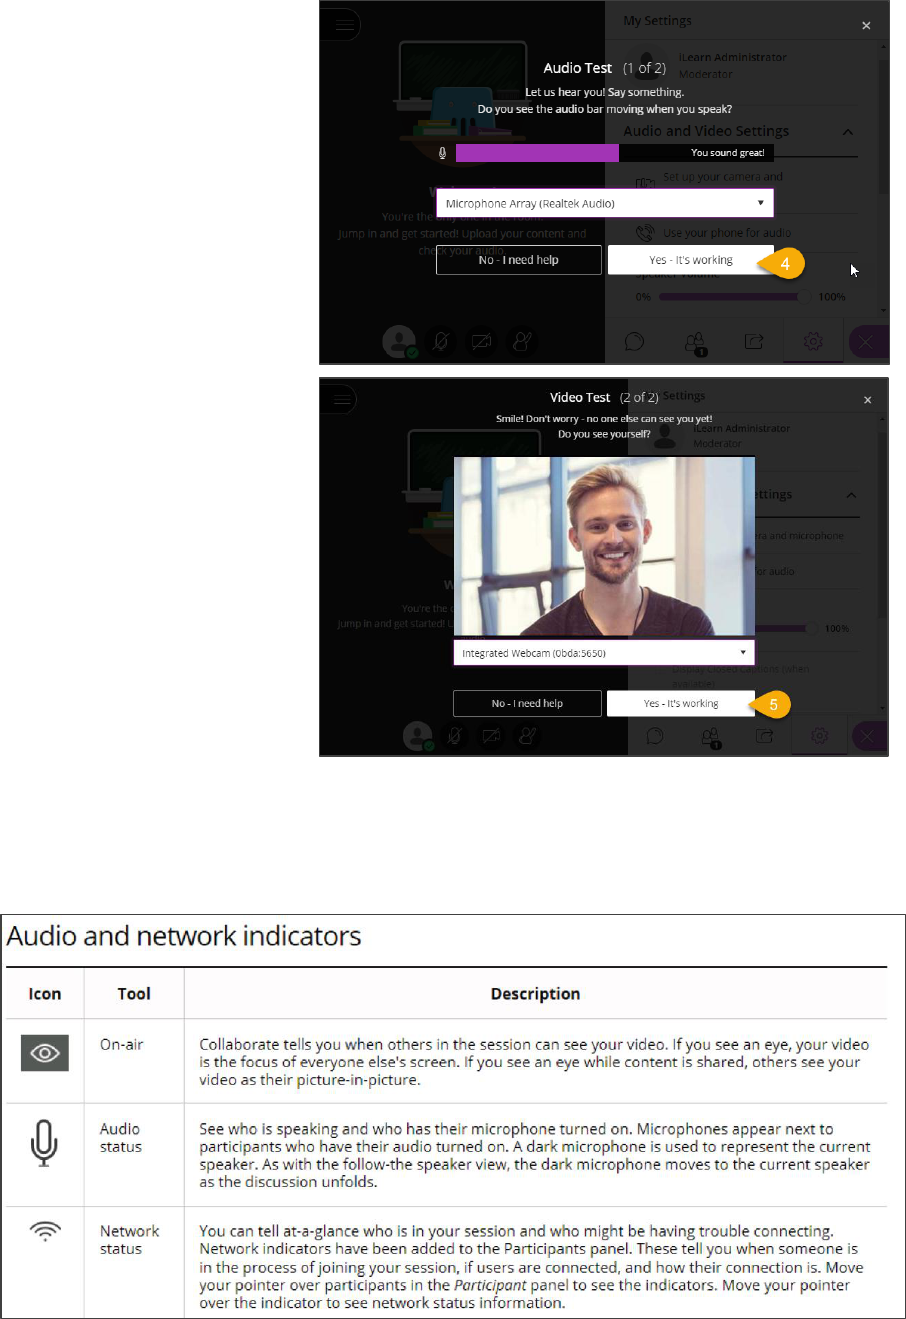
4. Choose the
microphone you want
to use. Collaborate tells
you that you sound
great when it is
receiving your audio.
Select Yes, it’s working
to proceed.
5. Choose the camera you
want to use.
Collaborate tells you
that you look great
when it is receiving
your video. Select Yes,
it’s working to proceed
By default, you are hidden and muted after you complete the setup. Select the microphone and
camera icons to begin full meeting participation. You can adjust your speaker and microphone
volume any time in My Settings.

IX. Let Others Hear and See You during a Blackboard Collaborate Ultra Session
You can select the microphone and video camera icons any time during a meeting to turn them on
or off. You can also use your keyboard: Press Alt + M to turn your microphone on and off. Press Alt +
C to turn your camera on and off.
The microphone automatically turns on after you enable it, but you will get to preview how you’ll
look on screen before sharing your video.
X. Record Sessions
Record your sessions so that your students can access presentations whenever they need them.
Stop and restart whenever you need to, and when finished, post the session to your course page.
Recordings capture the audio, video, and any content that is shared during a session. Recordings also
capture any real time captions or subtitles available during the session.
You can have multiple recordings during one session. If you decide to continue recording a session
after you have stopped, a new recording is saved and added to the list of recordings for that session.
Open the Session menu
Select Start Recording. The recording camera appears on
with a red dot while recording is in progress. To finish
recording, open the Session menu and select Stop
Recording.
Note: Recorded sessions are not posted immediately in Blackboard.
It could take up to 30 minutes for them to appear in the tool.

XI. Share Content
Blackboard Collaborate Ultra makes it easy to share your knowledge. You can upload content,
including PowerPoint presentations, PDF documents, and image files, or share your desktop screen
to show more details.
Here is a quick overview of the content sharing options in Blackboard Collaborate Ultra. For more in
depth information, you may check this Blackboard Collaborate Ultra article
1. Open the Collaborate panel
2. Select Share Content
3. Select to share a blank
whiteboard to Collaborate
with your students drawing or
just jot down notes
4. Share your desktop or a
software application to teach
students about a topic.
Whenever you move through
the application or desktop,
your students automatically
follow along
5. Upload GIF, JPEG and PNG
images, PDF files, or
PowerPoint presentations of

60MB or lower to your session. You can upload multiple presentations, however the total size
allowed is 125 MB or lower for any particular session
6. Use polls to engage your students and keep them interested in the topic
7. Set a timer and let your attendees know how much time is left for an activity they are working on
or before you show them a correct answer to a question
8. To facilitate small group collaboration, you can create breakout groups that are separate from
the main room and assign attendees to them
Here are some links to guide articles selected tools mentioned above:
Watch: Video about sharing PowerPoints in Collaborate
More on using the Whiteboard
Using the Breakout Groups
Watch: Video about polls
XII. Manage Attendees
Where can I find attendees?
1. Open the Collaborate panel
2. Select Attendees
At-a-glance you see:
The roles of each attendee. We've grouped
attendees by roles to make it easier to see
who can do what in the session.
Attendees with their hand raised. Those with
their hand raised appear at the top of their
role list.
Attendee status or feedback.
Attendees with their microphone turned on.
Browse through the list of attendees or open More
options at the top of the panel and select Search.
Point to an attendee to view more information, such
as their network connection. Moderators can select
Attendee controls next to an attendee's name to
promote them, mute them, or remove them.
Keep the Attendees panel open at all times
You can leave the Attendees panel open all the time. Chat with others and see everyone in the
session at the same time. You can tell who is away, has their microphone on or is having network
connection trouble. All while chatting and participating in the session.

Mute attendees
Moderators can mute individual attendees or everyone in a session. This includes attendees using
the Blackboard app or the Blackboard Instructor app.
Mute individual attendees: From the Attendees panel, point to an attendee with their audio
on. Select Attendee controls. Select Mute
Mute all attendees: Select More options at the top of the Attendees panel. Select Mute All
Manage raised hands
Attendees can raise their hands any time during your session. They do this to get your attention or
ask a question. You can choose to call on them now or close the notification and call on them later.
Turn on notifications for when someone raises their hand. An image of a person raising a hand
appears beside attendees with their hand raised. Those attendees are also brought to the top of
their role list in the Attendees panel so they aren't forgotten and are easily found.
You can lower hands from the Attendees panel. Point to the attendee with their hand raised and
select Attendees controls. Select Lower hand.

What can the different roles do?
Users can be moderators, presenters, participants, and captioners in the Ultra experience.
Moderator: Moderators have full control over all content being shared. They can make any
attendee a presenter or a moderator. Moderators see hand raise notifications and can lower
hands. They can remove attendees from a session, but they cannot remove other
moderators. Moderators can set the session settings, including deciding what participants
can and can't do. Moderators get email with links to their session recordings.
Presenter: The presenter role is designed to allow students to present without giving them
full moderator privileges. Presenters can upload, share, edit, and stop sharing content. They
can also see hand raise notifications and can lower hands.
Participant: Participants can enable and disable notifications, such as when participants
enter and leave a session or when someone has posted something to the chat. Moderators
decide if participants share audio and video, chat, and draw on the whiteboard or shared
files.
Captioner: The captioner role is designed to provide an accessible learning experience for
students who are deaf or hard of hearing, as well as for students whose native language is
different from the moderator's. An attendee is assigned this role by a moderator. The
captioner is given an area to type what is being said. Other attendees can view what the
captioner is typing in real time. You can have multiple captioners for multiple languages.
Remove attendees
Remove an attendee any time you need.
Point to an attendee in the Attendees panel and
select Attendee controls. Select Remove from
session.
Can an attendee rejoin?
No. Attendees are notified about the
disconnection, and they aren't allowed to
reconnect.
Can I remove other moderators?
No. Moderators can't be removed. You can only
remove participants, presenters, and captioners.
Attendance
Let Collaborate take attendance for you. Collaborate tracks when attendees joined and left sessions.
It also gives you an idea of how long attendees were present in the session on average.
You can view the Session attendance report for each session.
If you are using Collaborate from your Blackboard Learn course, you can choose to have Collaborate
send student attendance to your Blackboard Learn Course Attendance page. This must be set in a
new session you create and cannot be done with the existing course room. Find out more about
setting attendance through this online help guide.
XIII. Is There any Special Set up for Group Sessions?
Improve critical thinking, problem solving, adaptability, and communication with group sessions.
There are different ways you can set up group sessions.
Breakout groups: Use breakout groups during a session for in the moment group
collaboration
Multiple sessions: Create multiple sessions. If you want to run multiple sessions at the same
time for students to use as virtual study room, for example, you can create multiple sessions
for the different groups to join
Course group tool: If it's for long term group work, create groups in your course and give
access to a Collaborate session
XIV. What are Some of the Best Practices with Blackboard Collaborate Ultra?
Prepare for your session with these easy steps:
Schedule a meeting. Send your attendees what they need to attend your session
Check your audio, video, and application sharing
Prep your materials. Upload files and arrange the windows. The first time you share your
application screen, your browser may require you to install the Desktop Sharing extension
Determine audience participation. Use your personal and session settings to set how you
want to interact with attendees during your session
While you are in the session:
Just because you are not physically in the same room with your students doesn't mean that
your lecture should be drab.
Allow early arrivers. Let your participants join the session early. This gives new participants a
chance to get familiar with the room and what they can and can't do. Join the session early
yourself and practice using the tools.
Introduce guest speakers. You can invite a guest speaker or encourage group collaboration
in your course by promoting any participant to be a presenter or a moderator. Presenters
are allowed to share their screens and upload images or PowerPoint® files, but cannot
modify other users' permissions the way a moderator can.
Highlight key points in your presentation. Move through PowerPoint presentations using the
arrows available. Use the annotation tools on the whiteboard or in presentations to add
text, pointers, or different shapes.
Include Q&A. Encourage participants to ask questions. As more participants speak, the Ultra
experience of Blackboard Collaborate automatically follows-the-leader, displaying the name
of the current speaker on the screen.
Mute yourself when not speaking. Nothing is more distracting than hearing outside sounds
like typing or a side conversation.
Make eye contact. If you are sharing your video, look at the camera and not the session. It
may feel weird but it helps participants feel more like they are a part of the session and less
isolated.

XV. Find Help Further Resources
For campus support, please call 06-515-2121 or send an email to itservicedesk@aus.edu.
You may also consider the following video guides:
Blackboard Collaborate Ultra User Interface Tour
Breakout Groups in Blackboard Collaborate Ultra
Share Files to Breakout Groups in Blackboard Collaborate Ultra
Sharing PowerPoint Files in Blackboard Collaborate Ultra
Session Settings in Blackboard Collaborate Ultra
Polling in Blackboard Collaborate Ultra
