
Operator’s Manual
Operator s Manual’
12 Speed


© 2017 PACCAR Inc. - All Rights Reserved
This
manual illustrates and describes the operation of features or equipment which may be either
standard or optional on this vehicle. This manual may also include a description of features and
equipment which are no longer available or were not ordered on this vehicle. Please disregard any
illustrations or descriptions relating to features or equipment which are not on this vehicle. PACCAR
reserves the right to discontinue, change specifications, or change the design of its vehicles at any
time without notice and without incurring any obligation. The information contained in this manual is
proprietary to PACCAR. Reproduction, in whole or in part, by any means is strictly prohibited without
prior written authorization from PACCAR Inc.
Contents

Chapter 1 | SAFETY
In this Chapter:
Using this Manual
..................................................................................................................................5
Safety Alerts..........................................................................................................................................5
Illustrations............................................................................................................................................6
General Safety Instructions...................................................................................................................7
Warnings and Cautions.........................................................................................................................9
A Special Word About Repairs..............................................................................................................9
SAFETY -
4 Y53-1272-1B1 (08/17)
1

Using this Manual
Please take the time to get acquainted with
your vehicle by reading this Operator’s
Manual. We recommend that you read and
understand this manual from beginning to
end before you operate this equipment.
This manual contains useful information for
the safe and efficient operation of this
equipment. It also provides service
information, with an outline for performing
safety checks and basic preventive
maintenance inspections. We have tried to
present the information you’ll need to learn
about functions, controls, and operation—
and to present it as clearly as possible. We
hope you’ll find this manual easy to use.
There will be times when you need to take
this manual out of the glovebox. When you
do, please be sure to return it when you
are finished using it. That way it will be
there when you need it the next time or
when you pass the vehicle on to the next
user.
NOTE
After you’ve read this manual, it should
be
stored in the cab for convenient ref-
erence and remain with this truck
when sold.
Your vehicle may not have all the features
or options mentioned in this manual.
Therefore, you should pay careful attention
to the instructions that pertain to just your
vehicle. In addition, if your vehicle is
equipped with special equipment or options
not discussed in this manual, consult your
dealer or the manufacturer of the
equipment.
There are several tools built into this
manual to help you find what you need
quickly and easily
. First is the Quick Table
of Contents. Located at the front of the
manual, this lists the main subjects
covered and gives section numbers where
you can find these subjects. Use the Quick
Table of Contents to find information on a
large subject like “Maintenance.” Cross-
referenced citations also help you get the
information you need. If some other part of
the manual contains further information on
the subject you are reading about, we’ll
indicate that in a cross-reference like this:
(See Safety Alerts on page 5
). You won’t
have to go searching for more information.
Finally you’ll find a helpful Subject Index.
It’s in the back of the manual and
alphabetically lists the subjects covered.
So if you want information on brakes, for
example, just look under Brake in the
Subject Index. You’ll find all the pages
listed where brakes or braking are
discussed.
All information contained in this manual is
based on the latest production information
available at the time of publication.
Kenworth Truck Company Peterbilt Motors
Company reserves the right to make
changes at any time without notice.
Safety Alerts
Please read and follow all of the safety
alerts contained in this manual. They are
there for your protection and information.
These alerts can help you avoid injury to
yourself, your passengers and help prevent
costly damage to the vehicle. Safety alerts
are highlighted by safety alert symbols and
signal words such as “WARNING”,
SAFETY - Using this Manual
Y53-1272-1B1 (08/17) 5
1

“CAUTION”, or “NOTE”. Please DO NOT
ignore any of these alerts.
W
arnings
The safety message following this symbol
and signal word provides a warning against
operating procedures which could cause
death or injury
. They could also cause
equipment or property damage. The alert
will identify the hazard, how to avoid it and
the probable consequence of not avoiding
the hazard.
WARNING
Hot engine oil can be dangerous. You
could
be burned. Let the engine oil
cool down before changing it. Failure
to comply may result in death, person-
al injury, equipment or property dam-
age.
Cautions
The safety message following this symbol
and signal word provides a caution against
operating procedures which could cause
equipment or property damage. The alert
will identify the hazard, how to avoid it, and
the probable consequence of not avoiding
the hazard.
CAUTION
Continuing to operate your vehicle with
insuf
ficient oil pressure will cause seri-
ous engine damage. Failure to comply
may result in equipment or property
damage.
Notes
The message following this symbol and
signal word provides important information
that is not safety related but should be
followed. The alert will highlight things that
may not be obvious and is useful to your
ef
ficient operation of the vehicle.
NOTE
Pumping the accelerator will not assist
in starting the engine.
Illustrations
Some of the illustrations throughout this
manual are generic and will NOT look
exactly like the engine or parts used in
your application. The illustrations can
contain symbols to indicate an action
required and\or an acceptable or NOT
acceptable condition.
The illustrations are intended to show
repair or replacement procedures. The
procedure will be the same for all
applications, although the illustration may
dif
fer.
SAFETY - Illustrations
6 Y53-1272-1B1 (08/17)
1

General Safety
Instructions
Important safety notices about operating
and servicing your engine.
WARNING
Improper practices, carelessness, or
ignoring
any warnings may cause
death, personal injury, equipment or
property damage.
Before performing any repair, read and
understand all of the safety precautions
and warnings. The following is a list of
general safety precautions that must be
followed to provide personal safety
. Failure
to follow these instructions may cause
death or injury. Special safety precautions
are included in the procedures when they
apply.
Keep in mind that even a well maintained
vehicle must be operated within the range
of its mechanical capabilities and the limits
of its load ratings. See the Weight Ratings
label on the driver's door edge.
Every new vehicle is designed to conform
to all Federal Motor Vehicle Safety
Standards applicable at the time of
manufacture. Even with these safety
features, continued safe and reliable
operation depends greatly upon regular
vehicle maintenance. Follow the
maintenance recommendations found in
Preventive Maintenance section. This will
help preserve your investment.
Make sure your vehicle is in top working
condition before heading out on the road, it
is the responsible driver's duty to do so.
Inspect the vehicle according to the
Driver's Check List.
•
Use the proper tool for manually
rotating the engine. DO NOT
attempt to rotate the crankshaft by
pulling or prying on the fan. This
practice can cause death, personal
injury, equipment damage, or
damage to the fan blades, causing
premature fan failure.
• Work areas should be dry, well lit,
well ventilated, free from clutter,
loose tools, parts, ignition sources
and hazardous substances.
• Wear protective glasses and
protective shoes when working.
• DO NOT wear loose-fitting or torn
clothing. Tie back and/or tuck in
long hair. Remove all jewelry when
working.
• Before beginning any repair,
disconnect the battery (negative [-]
cable) and discharge any
capacitors.
• Put a “DO NOT OPERATE” tag in
the operator's compartment or on
the controls.
• Allow the engine to cool before
slowly loosening the coolant filler
cap to relieve the pressure from the
cooling system.
WARNING
Removing the fill cap on a hot engine
can
cause scalding coolant to spray
out and burn you badly. If the engine
has been in operation within the previ-
ous 30 minutes, be very careful in re-
moving the fill cap. Protect face,
hands, and arms against escaping flu-
id and steam by covering the cap with
a large, thick rag. DO NOT try to re-
move it until the surge tank cools down
or if you see any steam or coolant es-
caping. In any situation, remove the
cap very slowly and carefully. Be ready
to back off if any steam or coolant be-
gins to escape.
SAFETY - General Safety Instructions
Y53-1272-1B1 (08/17) 7
1

• Always use wheel chocks or proper
jack stands to support the vehicle
or vehicle components before
performing any service work. DO
NOT work on anything that is
supported only by lifting jacks or a
hoist. Before resting a vehicle on
jack stands, be sure the stands are
rated for the load you will be
placing on them.
•
Before removing or disconnecting
any lines, fittings, or related items,
relieve all pressure in the air, oil,
fuel, and cooling systems. Remain
alert for possible pressure when
disconnecting any device from a
system that contains pressure.
High pressure oil or fuel can cause
death or personal injury.
• Always wear protective clothing
when working on any refrigerant
lines and make sure that the
workplace is well ventilated.
Inhalation of fumes can cause
death or personal injury. To protect
the environment, liquid refrigerant
systems must be properly emptied
and filled using equipment that
prevents the release of refrigerant
gas. Federal law requires capturing
and recycling refrigerant.
• When moving or lifting any heavy
equipment or parts, make sure to
use proper techniques and
assistance. Ensure all lifting
devices such as chains, hooks, or
slings are in good condition and
are of the correct load capacity.
Make sure all lifting devices are
positioned correctly.
• Corrosion inhibitors and lubricating
oils may contain alkali. DO NOT
get the substance in eyes and
avoid prolonged or repeated
contact with skin. DO NOT
swallow. If ingested, seek
immediate medical attention. DO
NOT induce vomiting. In case of
contact, immediately wash skin
with soap and water. In case of
harmful contact, immediately
contact a physician. Always keep
any chemicals OUT OF REACH
OF CHILDREN.
• Naptha and Methyl Ethyl Ketone
(MEK) are flammable materials and
must be used with caution. Follow
the manufacturer's instructions to
ensure safety when using these
materials. Always keep any
chemicals OUT OF REACH OF
CHILDREN.
• When working on the vehicle, be
alert for hot parts on systems that
have just been turned off, exhaust
gas flow, and hot fluids in lines,
tubes, and compartments. Contact
with any hot surface may cause
burns.
• Always use tools that are in good
condition. Make sure you have the
proper understanding of how to use
the tools before performing any
service work. Use only genuine
replacement parts from PACCAR.
• Always use the same fastener part
number (or equivalent) when
replacing items. DO NOT use a
fastener of lesser quality if
replacements are necessary. (e.g.,
Do not replace a 10.9 grade with
8.8 grade fastener.)
• Always torque fasteners and fuel
connections to the required
specifications. Overtightening or
under-tightening can allow leakage.
• Close the manual fuel valves prior
to performing maintenance and
repairs, and when storing the
vehicle inside.
• DO NOT perform any repair when
impaired, tired, fatigued or after
SAFETY - General Safety Instructions
8 Y53-1272-1B1 (08/17)
1

consuming alcohol or drugs that
can impair your functioning.
•
Some state and federal agencies in
the United States of America have
determined that used engine oil
can be carcinogenic and can cause
reproductive toxicity. Avoid
inhalation of vapors, ingestion, and
prolonged contact with used engine
oil.
• DO NOT connect the jump starting
or battery charging cables to any
ignition or governor control wiring.
This can cause electrical damage
to the ignition or governor.
• Coolant is toxic. If not reused,
dispose of coolant in accordance
with local environmental
regulations.
CAUTION
Corrosive chemicals can damage the
engine. DO NOT use corrosive chemi-
cals on the engine. Failure to comply
may result in equipment, or property
damage.
California Proposition 65 Warning
•
Diesel engine exhaust and some of
its constituents are known to the
State of California to cause cancer,
birth defects, and other
reproductive harm.
• The catalyst substrate located in
the Diesel Particulate Filter (DPF)
contains vanadium pentoxide,
which has been determined by the
State of California to cause cancer.
Always wear protective clothing
and eye protection when handling
the catalyst assembly. Dispose of
the catalyst in accordance with
local regulations. If catalyst
material gets into the eyes,
immediately flood eyes with water
for a minimum of 15 minutes. Avoid
prolonged contact with skin. In
case of contact, immediately wash
skin with soap and water. In case
of harmful contact, immediately
contact a physician.
• Other chemicals in this vehicle are
also known to the State of
California to cause cancer, birth
defects or other reproductive harm.
• Battery posts, terminals, and
related accessories contain lead
and lead compounds, chemicals
known to the State of California to
cause cancer and reproductive
harm. W
ash hands after handling.
Warnings and Cautions
A Special Word About
Repairs
WARNING
Do not attempt repair work without suf-
ficient
training, service manuals, and
the proper tools. You could be killed or
injured, or you could make your vehi-
cle unsafe. Do only those tasks you
are fully qualified to do.
SAFETY - Warnings and Cautions
Y53-1272-1B1 (08/17) 9
1

WARNING
Modifying your vehicle can make it un-
safe.
Some modifications can affect
your vehicle's electrical system, stabili-
ty, or other important functions. Before
modifying your vehicle, check with
your dealer to make sure it can be
done safely. Improper modifications
can cause death or personal injury.
CAUTION
The installation of electronic devices to
the
On Board Diagnostics (OBD) con-
nector, the vehicle Controller Area Net-
work (CAN), or their associated wiring
is not permitted. Doing so can ad-
versely affect vehicle performance
and/or cause fault codes to be record-
ed. The OBD connector is provided for
temporary connection of service tools
and for diagnostic purposes only.
Your dealer’s service center is the best
place to have your vehicle repaired. Y
ou
can find dealers all over the country with
the equipment and trained personnel to get
you back on the road quickly—and keep
you there.
Y
our vehicle is a complex machine.
Anyone attempting repairs on it needs
good mechanical training and the proper
tools. If you are sure you have these
requirements, then you can probably
perform some repairs yourself. However,
all warranty repairs must be performed by
an authorized service facility. If you aren’t
an experienced mechanic, or don’t have
the right equipment, please leave all
repairs to an authorized service facility.
They are the ones equipped to do the job
safely and correctly.
Maintenance Manuals
If you do decide to do any complex repair
work, you’ll need the maintenance
manuals. Order them from your authorized
dealer. Please provide your Chassis Serial
Number when you order, to be sure you
get the correct manuals for your vehicle.
Allow about four weeks for delivery. There
will be a charge for these manuals.
Final Chassis Bill of Material
A complete, non-illustrated computer
printout listing of the parts used to custom-
build your vehicle is available through the
dealer from whom you purchased your
vehicle.
SAFETY - A Special Word About Repairs
10 Y53-1272-1B1 (08/17)
1

SAFETY - A Special Word About Repairs
Y53-1272-1B1 (08/17) 11
1

Chapter 2 | DRIVING
In this Chapter:
Controls on the Right Hand of the Steering Column
...........................................................................13
Drive Neutral Reverse Selector...........................................................................................................13
Up or Down Shifting............................................................................................................................ 15
Engine Brake Operation for a Vehicle with Automated Transmission.................................................17
Using the Manual - Automatic Button..................................................................................................18
Start-Up and Power Down.................................................................................................................. 19
Transmission Power Take Off (PTO)...................................................................................................20
Snow/Ice Operation.............................................................................................................................21
Trailer Operation................................................................................................................................. 21
Features..............................................................................................................................................21
DRIVING -
12 Y53-1272-1B1 (08/17)
2

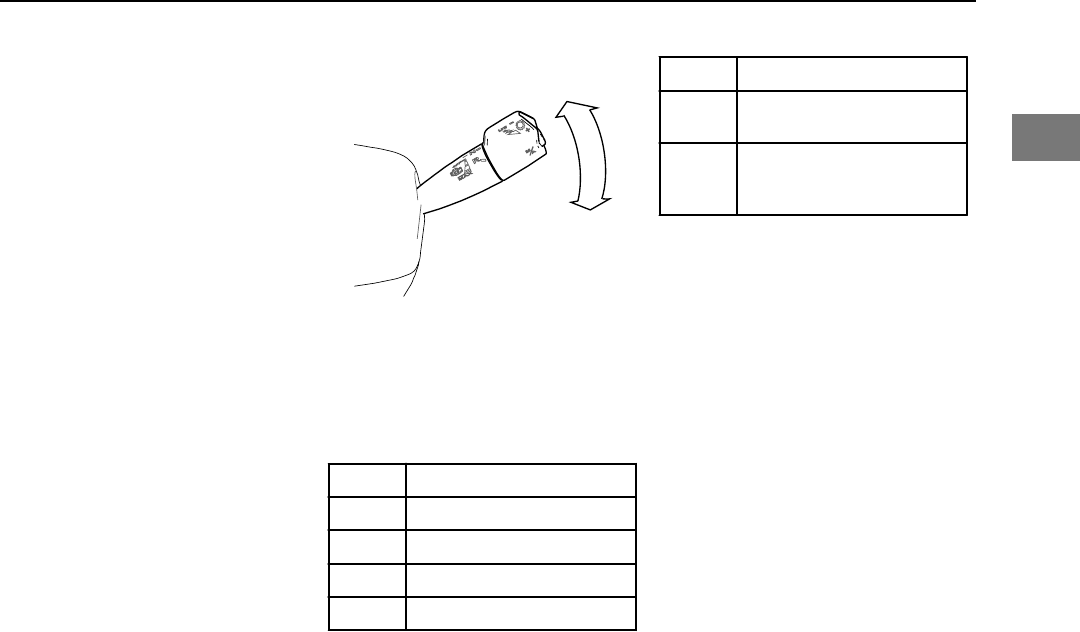
Controls on the Right
Hand of the Steering
Column
This vehicle may be equiped with the
PACCAR Transmission. The lever on the
right hand side of the steering column will
operate the transmission functions in
addition to operating the engine brake.
1 Transmission D - N
- R Function
2 Up (+) and Down (-) Shift and Low Mode
3 Engine Brake and Max Mode
4 Manual (M) / Automatic (A) Mode Button
Related concepts
Related tasks
Drive Neutral Reverse
Selector
Transmission mode is selected by rotating
the lever's outer knob. There is a detent for
Drive, Neutral, Reverse.
The instrument cluster will display the
corresponding mode.
For Kenworth Vehicles
For Peterbilt Vehicles
DRIVING - Controls on the Right Hand of the Steering Column
Y53-1272-1B1 (08/17) 13
2

NOTE
Selector (the transmission) must be in
N
(Neutral) to start the truck.
Neutral Mode
•
Selects Neutral.
• Initial Gear position after Start-Up.
WARNING
Apply parking brake and follow vehicle
manufacturer parking instructions. Fail-
ure to follow these instructions could
cause unintended vehicle movement re-
sulting in death, serious injury or dam-
age to property
.
NOTE
When attempting to start the engine and
the engine does not crank, confirm Neu-
tral is selected, vehicle parking brake is
applied and service brake is depressed.
Reverse Mode
•
Reverse mode selects the default
Reverse gear.
NOTE
If the driver attempts to select a non-
neutral mode without depressing the
service brakes the transmission will not
shift into gear and you will have to return
to Neutral and depress the service
brakes before selecting the desired
mode again.
• Each time Reverse is selected from
Neutral, the default Reverse gear is
engaged.
Drive Mode (Auto Mode)
•
Intelligent Start Gear Selection will
automatically select the start gear
depending on inputs such as, load,
grade, and axle/transmission ratio.
This start gear can be changed by
using the up/downshift request
procedure, as long as the selection
still falls into a gear that would
allow the vehicle to launch without
causing damage to the
transmission.
NOTE
If the driver attempts to select a non-
neutral mode without depressing the
service brakes the transmission will not
shift into gear
. The driver must re-select
Neutral and depress the service brakes
before selecting the desired mode
again.
• If the start gear is changed using
the up/downshift request
procedure, it will remain as the
default until the vehicle is powered
down or the selection is changed.
However
, conditions such as,
grade, may still override the default
start gear selection.
• A shift can be advanced by using
the up/downshift request procedure
when the transmission is near the
shift point.
DRIVING - Drive Neutral Reverse Selector
14 Y53-1272-1B1 (08/17)
2

NOTE
Multiple gear upshifts and downshifts
may be allowed when the up/downshift
request procedure is performed multiple
times (Each request equals one gear
change request).
• The transmission may also deny a
shift while ascending or
descending grades if the load of
the vehicle and grade of the terrain
in combination with the drivetrain
ratio and engine torque will fall
outside of the acceptable range to
perform a shift. If the shift is denied
it will sound a tone.
Up or Down Shifting
When in the Manual mode, the
transmission gears can be manually
selected by pushing or pulling on the lever
.
Pushing the lever forward will down shift.
Pushing and holding the lever forward will
engage the LOW gear range. Pulling the
lever towards the driver will upshift the
transmission.
Some vehicles may have a feature that
prompts the operator to shift for optimal
fuel economy.
For Kenworth Vehicle with Shift Assist
For Peterbilt Vehicles with Shift Assist
If the prompt appears in the instrument
cluster
, use the manual gear selector lever
to change gears.
DRIVING - Up or Down Shifting
Y53-1272-1B1 (08/17) 15
2

The instument cluster will illuminate with
the corresponding gear
.
Gear Display
LOW Mode
LOW mode should be used any time you
want to maximize engine braking and
minimize the use of the brake pedal. For
example, when driving down long grades
or when coming to a stop.
•
Selects lowest available gear for
start gear. The starting gear cannot
be changed in LOW mode.
NOTE
If the driver attempts to select a non-
neutral mode without depressing the
service brakes the transmission will not
shift into gear
. The driver must re-select
Neutral and depress the service brakes
before selecting the desired mode
again.
• If LOW is selected while moving,
the transmission will not upshift
(except for the T
ransmission
Override conditions noted on the
previous page). The transmission
system will downshift at the earliest
opportunity to enable higher than
normal engine RPM to provide
maximum engine braking.
WARNING
On slippery surfaces minimize engine
braking in LOW mode. Excessive en-
gine braking at higher engine RPM
could cause a loss of traction and vehi-
cle control.
NOTE
The PACCAR Automated Transmission
initiates upshifts from MANUAL and
LOW for engine overspeed protection.
How to Deactivate MAX Mode
V
ehicles with automated transmissions will
have the engine brake function integrated
with the transmission controls. Follow
these steps to deactivate MAX engine
brake mode.
1. Accelerate with the throttle pedal.
2. Upshift, see Up or Down Shifting
on page 15.
3. Wait for the transmission coast
down gear to engage.
DRIVING - Up or Down Shifting
16 Y53-1272-1B1 (08/17)
2
4. Reduce engine brake level, see
Engine Brake Operation for a
V
ehicle with Automated
Transmission on page 17.
5. Re-initiate MAX mode, see Engine
Brake Operation for a Vehicle with
Automated Transmission on page
17.
6. Select Neutral N, see Drive Neutral
Reverse Selector on page 13.
7. Select LOW mode, see Engine
Brake Operation for a Vehicle with
Automated Transmission on page
17.
Engine Brake Operation
for a Vehicle with
Automated Transmission
Moving the lever clockwise will engage the
engine brake. Increase the amount of
engine brake by moving the lever further
clockwise. Each position has a
corresponding level of engine brake.
Position Amount of Engine Brake
Off 0 %
1 33%
2 66%
3 100%
Position Amount of Engine Brake
4* 100% AND will engage
transmission low gear
* This position is momentary
and will revert back to position
3 when the lever is released.
The corresponding engine brake level (or
MAX mode) will be illuminated in the
instrument cluster
.
DRIVING - Engine Brake Operation for a Vehicle with Automated Transmission
Y53-1272-1B1 (08/17) 17
2

Related tasks
Using the Manual -
Automatic Button
This button will put the transmission into
manual mode. Manual mode will allow the
operator to select the gear
. See Up or
Down Shifting on page 15.
To activate, put the gear selector in the D
(drive) mode and then depress the M/A
button. The instrument cluster will display
the corresponding selection.
For Peterbilt Vehicles
For Kenworth Vehicles
MANUAL Mode
MANUAL mode should be used whenever
the driver wants to select the shifts instead
of letting the transmission select them
automatically
.
• Driver manually selects the start
gear and uses the up/downshift
request to shift.
NOTE
Multiple gear upshifts and downshifts
may
be allowed when the up/downshift
request procedure is performed multi-
ple times (Each request equals one
gear change request).
• If the driver attempts to select a
non-neutral mode without
depressing the service brakes the
transmission will not shift into gear
.
The driver must re-select Neutral
and depress the service brakes
before selecting the desired mode
again.
• System holds current gear unless
otherwise prompted by using up/
downshift request, except for the
“Transmission Manual Override”
conditions noted below.
DRIVING - Using the Manual - Automatic Button
18 Y53-1272-1B1 (08/17)
2

NOTE
For optimal vehicle performance, it is
recommended
the vehicle be operated
in “D” Drive mode.
Transmission Manual Override
If the vehicle is being back-driven and the
engine is approaching a higher than
normal RPM level, the transmission system
will override the MANUAL position and
perform an upshift.
NOTE
The transmission initiates upshifts
from
MANUAL and LOW for engine
overspeed protection.
If the start gear is changed and it causes
the engine to lug at takeof
f, the
transmission system will override the
MANUAL position and select the best
available gear.
Start-Up and Power Down
Start-Up
1.
Ensure N, Neutral, is selected on
the Transmission Driver Interface
Device.
NOTE
The transmission will not allow the en-
gine
to crank if a mode other than
Neutral is selected, on Transmission
Driver Interface Device, when attempt-
ing to start the engine.
2. Turn the ignition key to “ON” and
allow the P
ACCAR Automated
Transmission to power-up.
NOTE
Engine cranking is delayed until the
transmission
power-up is complete
and the gear display shows a solid N.
If Neutral, N, is not shown in the gear
display, ensure that the vehicle air sys-
tem is at normal operating range be-
fore attempting to start the vehicle.
3. Start the engine.
4.
Allow vehicle air system pressure
to build to normal operating range.
5. Apply service brake.
NOTE
If the service brake is not applied while
selecting
a starting gear, the initial
start gear will not be engaged and the
driver will have to reselect Neutral and
press the brake while re-selecting the
desired mode.
6. Select the desired mode and
starting gear on the T
ransmission
Driver Interface Device.
NOTE
The transmission will override inappro-
priate
start gear selections to avoid
driveline damage.
7. Release the vehicle parking
brakes.
8.
Release service brake and Urge to
Move will allow the vehicle to
DRIVING - Start-Up and Power Down
Y53-1272-1B1 (08/17) 19
2

automatically launch and creep at
constant engine idle.
•
Upshifts and downshifts can be
made while at constant engine
idle by utilizing the up/downshift
request procedure. The
transmission may deny a shift
and sound a tone if the load of
the vehicle or grade of the
terrain falls outside the
acceptable range to perform a
shift.
Power Down
1. Select N Neutral on the
Transmission Driver Interface
Device.
• If gear display does not show
solidN , neutral has not yet
been obtained.
NOTE
Neutral should always be reached be-
fore
initiating power down, except in
cases of emergency.
2. Set the vehicle parking brakes.
WARNING
Apply parking brake and follow vehicle
manufacturer
parking instructions.
Failure to follow these instructions
could cause unintended vehicle move-
ment resulting in death, serious injury
or damage to property.
3. Turn ignition key to OFF and allow
the engine to shut down.
T
ransmission Power Take
Off (PTO)
The transmission may have a PTO
installed. Engaging the PTO differs if it is
operating in either a mobile or a stationary
application.
Stationary PTO Operation
The transmission countershaft PTO is used
in this application. To engage the PTO for
stationary operation, perform the following
steps:
1. Bring the vehicle to a complete
stop and apply the parking brake.
WARNING
Apply parking brake and follow vehicle
manufacturer parking instructions. Fail-
ure to follow these instructions could
cause unintended vehicle movement re-
sulting in death, serious injury or dam-
age to property
.
2. Select “N” on the Transmission
Driver Interface Device.
3.
Select the transmission PTO
switch.
4. Raise engine speed as required to
operate PTO.
NOTE
Use the transmission PTO switch to dis-
engage the PT
O.
Mobile PTO Operation
The transmission countershaft PT
O is used
in this application and provides limited
mobile operation in the start gears. To
engage the PTO for mobile operation,
perform the following steps:
DRIVING - Transmission Power Take Off (PTO)
20 Y53-1272-1B1 (08/17)
2

1. Bring the vehicle to a complete
stop and depress the service
brake.
2.
Select “N” on the Transmission
Driver Interface Device.
3. Select the transmission PTO
switch.
4. Select “Drive” or "Reverse" as
required for vehicle movement.
5. Release the service brake to
engage the clutch and the PTO.
6. Raise engine speed as required to
operate PTO.
NOTE
Use the transmission PTO switch to
disengage the PT
O.
Snow/Ice Operation
The P
ACCAR Automated Transmission is
designed to work in coordination with the
ATC system to ensure optimal operation.
However, if the driver observes low friction
road conditions (snow, rain, ice, etc.) and
does not want the transmission to shift,
risking wheel slippage, the driver should
select MANUAL mode. MANUAL mode
holds the current gear position under most
operating conditions- the transmission will
only shift when the driver uses the up/
downshift request. Once road conditions
improve, the driver should revert back to
Drive mode.
T
railer Operation
Trailer Connecting
• Prior to backing under the trailer,
ensure proper trailer height.
• Use Low mode (1st gear) for
forward direction and Reverse (R1)
for reverse direction.
Sliding Trailer Axle
• Ensure axle rails and locks are
properly maintained.
• Follow proper procedure for
unlocking and sliding the trailer
axles.
• Use Low mode (1st gear) for
forward direction and Reverse (R1)
for reverse direction.
• Avoid repeat attempts if the sliding
axle is not moving.
NOTE
If repeat attempts are made and the au-
tomated clutch starts to overheat, the
display will indicate “CA” along with a
warning tone.
Features
Hill Start Aid Operation (HSA)
Hill Start Aid defaults to the “On” position.
In P
ACCAR Automated Transmissions, it
can be turned “Off” by pressing and
releasing the Hill Start Aid switch, however,
it will turn back on after the first successful
launch. If the switch is turned off, the lamp
in the Hill Start switch will flash.
The grade at which Hill Start Aid is active is
defaulted to 1% but can be configured to
activate on a 2% or 3% grade.
Vehicle Facing Uphill – Forward
Mode
DRIVING - Snow/Ice Operation
Y53-1272-1B1 (08/17) 21
2

1. Vehicle must be on incline greater
than 1% and in a forward mode.
2.
Bring vehicle to a stop and depress
the service brakes then release the
service brakes to launch the
vehicle.
WARNING
Apply the vehicle service brakes or
launch the vehicle using the accelerator
pedal after Hill Start Aid releases. Fail-
ure to do so could result in unintended
vehicle movement resulting in death, se-
rious injury or damage to property
.
Vehicle Facing Downhill - Reverse
Mode
1. Vehicle must be on a decline
greater than 1% and in Reverse
mode.
2. Bring vehicle to a stop and depress
the service brakes then release the
service brakes to launch the
vehicle.
WARNING
Apply the vehicle service brakes or
launch the vehicle using the accelerator
pedal after Hill Start Aid releases. Fail-
ure to do so could result in unintended
vehicle movement resulting in death, se-
rious injury or damage to property
.
Clutch Abuse Protection
CAUTION
The PACCAR Automated Transmis-
sion
clutch can overheat and slip with
improper use.
• DO select the lowest possible start
gear for the application. If moving
slowly is required, select 1st or R1.
•
DO use the Service Brakes and let
Hill Start Aid assist you when
launching on an incline.
• Do NOT use the accelerator pedal
to hold the vehicle on an incline.
(Use Service Brakes).
• Do NOT use the accelerator pedal
to stop roll back on an incline after
Hill Start Aid disengages. (Use
Service Brakes and then relaunch).
•
If the PACCAR Automated
Transmission clutch does start to
overheat, the display will show
“CA” along with a warning tone. If
“CA” is active in the gear display,
immediately discontinue the
operation that is being performed
which is causing the clutch to
overheat.
• If the driver continues abusive
operation, the system will either
open the clutch if the
accelerator pedal is not applied
or close the clutch if the
accelerator pedal is applied.
• If the abuse continues, the
system will open the clutch and
take away accelerator pedal
control for a short period of time
to allow the clutch to cool down.
Urge to Move may be
inoperable when the clutch is
overheated.
Engine Overspeed Protection
• The transmission system will
upshift if necessary to prevent
DRIVING - Features
22 Y53-1272-1B1 (08/17)
2

engine overspeed in Drive,
MANUAL and LOW modes.
Shuttle Shifting
•
Shuttle shifting from Reverse to
any forward mode is only allowed if
the vehicle speed is approximately
zero.
Intelligent Start Gear Selection
• Intelligent Start Gear Selection will
automatically select the start gear
depending on inputs such as load,
grade and axle/transmission ratio.
• The start gear selection can be
changed using the up/downshift
request, however, if the selection
requested could cause damage or
engine lugging the request will be
denied and an audible tone will
sound.
Skip Shifting
• The Automated Transmission will
shift multiple gears at one time
(skip shift) with moderate to high
accelerator pedal input while in
Drive mode, up to 8th gear.
Auto Neutral
•
The transmission system will
automatically shift to neutral if the
vehicle is left in Drive and the
parking brakes are set.
• “AN” will appear in the gear display.
The driver must then select the
desired forward or reverse mode
with the service brake applied.
Load Based Shifting
• The transmission system will adapt
to the conditions of the vehicle to
change the shift points based on
the followings inputs:
• Vehicle grade
• Engine RPM
• Accelerator pedal position
• Vehicle load
• After changing loads or powering
up the transmission system needs
to relearn these inputs for the first
few shifts to make the proper
adjustments.
Coast Mode
• When coasting to a stop, in Drive
mode, on level terrain the
transmission system may not
downshift into lower gears. This
allows the transmission to coast to
a stop.
Cruise Control
•
This transmission system is
compatible with cruise control.
Neutral Coast Mode
Neutral Coast Mode allows the
transmission to disengage the driveline by
pulling out of gear on slight downhill
grades, where little to no engine power is
required, when the vehicle is in cruise
control and the transmission is in Drive
mode.
• When Neutral Coast Mode is
active, the engine will drop to idle
speed and the transmission will
disengage.
• The gear display may flash a gear
number or indicate Neutral when
Neutral Coast Mode is active,
depending upon specific OEM
implementation.
• If a flashing number is indicated in
the gear display, this represents the
gear that the transmission will
DRIVING - Features
Y53-1272-1B1 (08/17) 23
2

select when it is necessary to
engage a gear
.
• The transmission will exit Neutral
Coast Mode and reengage an
appropriate gear under any of the
following conditions:
• Vehicle brakes are applied
• Driver depresses accelerator
pedal
• Cruise control is canceled
• A mode other than Drive is
selected
• Driver performs up/downshift
requests
• Cruise high or low set speeds
are exceeded
• Maximum vehicle grade is
exceeded
• Request by an adaptive cruise
system
• Various brand names may be used
for Neutral Coast systems.
Urge to Move
Urge to Move allows the vehicle to
automatically start moving when the
transmission is in gear and the driver
releases the service brake. After the
vehicle has launched the vehicle will creep
at a constant speed at engine idle without
the need to apply the accelerator pedal.
The configuration is useful for stop and go
applications allowing the vehicle to launch
and creep without applying the accelerator.
Creep Mode
Creep allows the vehicle to be driven at a
constant speed at engine idle without the
need to apply the accelerator pedal. The
configuration is useful for slow speed
applications where steady vehicle speed is
required. Upshifts and downshifts can be
requested to increase or decrease vehicle
speed.
DRIVING - Features
24 Y53-1272-1B1 (08/17)
2

DRIVING - Features
Y53-1272-1B1 (08/17) 25
2

Chapter 3 | MAINTENANCE
In this Chapter:
What is a Maintenance Program?
.......................................................................................................27
What is the Air System?......................................................................................................................29
Air Dryer Maintenance........................................................................................................................ 32
Proper Transmission Lubrication.........................................................................................................32
Vehicle Towing.................................................................................................................................... 33
How to Drain Fluid...............................................................................................................................33
How to Fill Fluid...................................................................................................................................34
Troubleshooting...................................................................................................................................34
MAINTENANCE -
26 Y53-1272-1B1 (08/17)
3

What is a Maintenance
Program?
Preventive maintenance program begins
with the daily checks. Routine vehicle
checks can help avoid many large,
expensive, and time consuming repairs.
The vehicle will operate better, be safer,
and last longer. Neglect of recommended
maintenance can void your vehicle’s
warranty. Some maintenance operations
demand skills and equipment you may not
have. For such situations, please take your
vehicle to an authorized Service Center.
WARNING
Always support the vehicle with appro-
priate safety stands if it is necessary to
work underneath the vehicle. A jack is
not adequate for this purpose. Failure
to comply may result in death, person-
al injury, equipment or property dam-
age.
WARNING
When working underneath the vehicle
without
appropriate safety stands but
with the wheels on the ground (not
supported), make sure that (1) the ve-
hicle is on hard level ground, (2) the
parking brake is applied, (3) all wheels
are blocked (front and rear) and (4) re-
move the ignition key so that the en-
gine cannot be started. Failure to com-
ply may result in death, personal in-
jury, equipment or property damage.
The following pages contain a table of
maintenance tasks with the related
intervals for each task on the right side of
the table. The top of the table displays a
guide to a maintenance interval and its
schedule. Some tasks are dependent on
the vehicle application. These tasks will be
shown as separate tasks and will have the
words “ON HIGHWAY”, “CITY DELIVERY”
or “OFF-HIGHW
AY” after the description.
These tasks are differentiated because
they are dependent on the vehicle’s
operating environment. On highway is
defined for applications where the vehicle
is NOT used off of a paved road during
normal operation. City Delivery is defined
for applications where frequent start and
stopping is required during normal
operation and the highway is used
infrequently and for short periods of time.
Off highway is defined for applications
where the vehicle may be driven off the
pavement on a regular basis, even if it is
an infrequent basis and/or for a brief time
period. Please contact an authorized
service dealership if there are questions
regarding which interval to follow. Consult
the supplier for specific recommendations
where discrepancies develop between
these recommendations in this table and
component supplier recommendations.
PACCAR Transmission
Maintenance Schedule
MAINTENANCE - What is a Maintenance Program?
Y53-1272-1B1 (08/17) 27
3

I A B C D E
At first 15,000 mi/
24,000 km or at first
PM
15,000 mi/24,000
km/Monthly
30,000 mi/48,000
km
60,000 mi/96,000
km/ 6 Months
120,000 mi/ 192,000
km/ Annually
240,000 mi/ 384,000
km
System Component Task I A B C D E
Air Air Compressor Governor Replace air strainer. •
Air Lines Check condition and routing to prevent
chafing.
•
System Lubricate; see What is the Air System?
on page
29.
•
Inline Filters Replace elements or clean with solvent. •
Air Dryer Perform the checks listed. •
Air Dryer (Oil-Coalescing Desiccant
Cartridge)
Replace Cartridge
Annually regardless of mileage
MAINTENANCE - What is a Maintenance Program?
28 Y53-1272-1B1 (08/17)
3

System Component Task I A B C D E
Main and
Auxiliary
T
ransmission
Main and Auxiliary Transmission and
Transfer Case
Inspect for visible damage, signs of
overheating, and leaks.
• •
Check the drain plugs for tightness. •
Mounting Brackets and Fasteners Check the condition of the fasteners and
their torque. Tighten to the specified
torque value as required.
•
Oil Cooler Clean the fins (air-to-oil type) and body.
Check the hose condition and for leaks:
replace as required.
•
Main and Auxiliary Transmission Check the oil level: refill as required. •
Main and Auxiliary Transmission (ON
HIGHWAY)
Drain lubricant while warm. Flush each
unit with clean flushing oil.
500,000 miles/ 800,000 km
Main and Auxiliary Transmission (OFF
HIGHWAY)
Drain lubricant while warm. Flush each
unit with clean flushing oil.
• •
Related concepts
Related reference
What is the Air System?
Important safety information about your
vehicle's air system.
The operation of the vehicle’s braking
system and many vehicle accessories
depends upon the storage and application
of a high-pressure air supply
.
MAINTENANCE - What is the Air System?
Y53-1272-1B1 (08/17) 29
3

WARNING
Do not attempt to modify, alter, repair
or disconnect any component of the air
system. Repairs or modifications to the
air
system, other than what is descri-
bed in this section, should only be per-
formed by an authorized dealer. Fail-
ure to comply may result in death or
personal injury.
WARNING
Prior to the removal of any air system
component,
always block and hold the
vehicle by a secure means other than
the vehicle's own brakes. Depleting air
system pressure may cause the vehi-
cle to roll unexpectedly resulting in an
accident causing death or personal in-
juries. Keep hands away from cham-
ber push rods and slack adjusters,
they may apply as system pressure
drops.
WARNING
After completing any repairs to the air
system,
always test for air leaks, and
check the brakes for safe operation
before putting the vehicle in service.
Failure to comply may result in death,
personal injury, equipment or property
damage.
WARNING
Never connect or disconnect a hose or
line
containing air pressure. It may
whip as air escapes. Never remove a
component or pipe plug unless you are
certain all system pressure has been
depleted. Failure to comply may result
in death, personal injury, equipment or
property damage.
WARNING
Never exceed recommended air pres-
sure
and always wear safety glasses
when working with air pressure. Never
look into air jets or direct them at any-
one. Failure to comply may result in
death,
personal injury, equipment or
property damage.
WARNING
Never attempt to disassemble a com-
ponent
until you have read and under-
stood recommended procedures.
Some components contain powerful
springs and injury can result if not
properly disassembled. Use only prop-
er tools and observe all precautions
pertaining to use of those tools. Failure
to comply may result in death, person-
al injury, equipment or property dam-
age.
MAINTENANCE - What is the Air System?
30 Y53-1272-1B1 (08/17)
3

WARNING
Completely bypassing a Bendix®
ADIS
air dryer will bypass the system’s
pressure protection valves. This could
lead to loss of air pressure or damage
to the vehicle’s air system, which could
cause an accident involving death or
personal injury. Always adhere to the
manufacturer’s procedure if it is nec-
essary in an emergency to temporarily
bypass an ADIS series air dryer. Fail-
ure to comply may result in death, per-
sonal injury, equipment or property
damage.
WARNING
If a different air dryer brand or model is
installed
on the vehicle other than
what was originally installed, it could
cause the air system to not perform
correctly unless the full air system de-
sign is reviewed and modifications
made to comply with Federal Motor
Vehicle Safety Standards (FMVSS)
121 AirBrake Systems. Failure to
abide by this warning and maintain
compliance to FMVSS 121 could
cause
loss of vehicle control and may
lead to death or serious personal in-
jury.
WARNING
If the supply and service air tanks are
not
drained at the recommended fre-
quency, water could enter the air lines
and valves. This could cause corrosion
or blockage, which could compromise
the brake system safety and potential-
ly cause an accident. Failure to comply
may result in death, personal injury,
equipment or property damage.
Your vehicle’s compressor takes outside air
and compresses it, usually to 100-120 psi
(689-827 kPa). The compressed air then
goes to the reservoirs to be stored until
needed. When you operate your air
brakes, the stored compressed air flows
into the chambers where it is used to apply
your truck and trailer brakes. That is why
,
when you push down on your brake pedal,
you don’t feel the same amount of
pressure on the pedal that you do when
you apply the brakes on your car. All you
are doing on your truck is opening an air
valve to allow air to flow into the brake
chambers. Contamination of the air supply
system is the major cause of problems in
air-operated components such as brake
valves, and suspension height control
valves. T
o keep contaminants to the lowest
possible level, follow these maintenance
procedures.
Daily Checks
• Drain moisture from the supply and
service air tanks.
• Operate air devices to circulate
lubricants within the unit.
Periodically
• Clean filter screens ahead of the
valves by removing the screens
and soaking them in solvent. Blow
them dry with pressurized air
before reinstalling them.
Twice a Year
• Maintain the air compressor to
prevent excessive oil by-pass. See
your maintenance manual for
details.
• Replace worn seals in valves and
air motors as they are needed.
MAINTENANCE - What is the Air System?
Y53-1272-1B1 (08/17) 31
3

Air Dryer Maintenance
Vehicles equiped with a PACCAR
Transmission will have an air dryer fitted
with an oil-coalescing desiccant cartride.
This air dryer cartridge must be replaced
every 1 year regardless of mileage.
CAUTION
Replace oil-coalescing desiccant air
dryer
cartridge every 1 year regardless
of mileage. Only use oil-coalescing
desiccant replacement cartridge when
replacing. Failure to perform this main-
tenance task will void the PACCAR
Transmission warranty and may result
in expensive transmission damage.
Proper Transmission
Lubrication
Proper lubrication procedures are key to a
good all-around maintenance program. If
the lubricant is not doing its job or if the
lubricant level is ignored, all other
maintenance procedures are not going to
keep the transmission running or assure
long transmission life.
T
ransmission internal parts are amply
lubricated if these procedures are closely
followed:
1. Maintain lubricant level and inspect
regularly.
2. Follow maintenance intervals, see
Transmission Lubrication Change
Intervals on page 33.
3. Use the correct grade and type of
lubricant, see PACCAR
Transmission Lube Specification on
page 37.
4. Buy lubricant from an approved
dealer.
Mixing of Oil Types
CAUTION
Do not mix engine and gear oil in the
same transmission. Mixing engine and
gear oils could cause damage to the
transmission.
Engine oils and gear oils may not be
compatible; mixing can cause breakdown
of the lubricant and affect component
performance. When switching between
types of lubricants, all areas of each
af
fected component must be thoroughly
flushed.
NOTE
For a list of Approved Synthetic Lubri-
cants, see vehicle operator manual.
NOTE
Additives and friction modifiers must not
be introduced.
Proper Transmission Lubrication
Level
Make sure the transmission lubricant is
level with the bottom of the fill opening.
Being able to reach the lubricant with your
finger does not mean the lubricant is at the
proper level.
MAINTENANCE - Air Dryer Maintenance
32 Y53-1272-1B1 (08/17)
3

NOTE
Before checking the oil level, the en-
gine
must be idling and the transmis-
sion in neutral for at least 2 minutes.
Lubricant temperature must be be-
tween 60 °F and 120 °F (15.5 °C and
48.8 °C).
If the transmission operating angle is more
than 12° (or roughly a 21% grade),
improper lubrication will occur
. The
operating angle is the transmission
mounting angle in the chassis plus the
percent of upgrade (expressed in degrees).
T
ransmission Lubrication Change
Intervals
Lubricant changes should be based on a
combination of the intervals shown in
vehicle operator manual Lubrication
Specification Manual, and user judgment
based on the application and operating
environment. Extending drain intervals
beyond those shown in the tables is not
recommended and will put warranties at
risk.
Inspect the transmission exterior for leaks.
Look around the oil filter and exterior seals
for damage and replace as necessary.
On-Highway
Check fluid levels and inspect for leaks at
regular PM maintenance intervals, not to
exceed 12,000miles. Drain and replace
lubricant every 500,000 miles / 800,000
km.
Off-Highway
Check fluid levels and inspect for leaks
every week. Drain and replace lubricant
interval should not exceed 60,000 mi /
96,000 km / 6 Months.
Vehicle Towing
When towing the vehicle, the output shaft
of the transmission must not be allowed to
spin or turn. If the vehicle is towed with the
drive wheels still in contact with the road
surface, the vehicle axle shafts or driveline
must be removed or disconnected.
CAUTION
Always follow proper manufacturer
towing procedures. Failure to follow
proper towing procedures could result
in damage to the transmission.
How to Drain Fluid
1.
Use a drain pan under the
transmission drain plug to collect
oil from the bottom of the
transmission.
MAINTENANCE - Vehicle Towing
Y53-1272-1B1 (08/17) 33
3

2. Make sure the oil temperature is
cool.
3.
Clean around drain plug and
remove plug.
4. Allow transmission oil to drain out.
5. Clean drain plug and torque as
required.
How to Fill Fluid
1. Remove transmission oil fill plug.
2. Make sure drain plug is properly
installed.
3. Fill with approved oil until the oil
starts flowing out the fill hole.
4. Clean, install, and properly and
torque fill plug.
Troubleshooting
Diagnostics
In the event there is a problem with an
Automated Transmission, there are three
primary tasks the driver should perform:
1. Note the driving condition under
which the problem occurred.
2. Note the condition of the
transmission under which the
problem occurred (i.e. operation
mode (Drive, MANUAL, LOW),
current gear, engine speed, etc.).
3. Reset system.
Transmission Reset Procedure
In some cases, proper transmission
operation can be restored by “resetting” the
Transmission Control Module (TCM). Use
the following procedure to reset the TCM.
1. Continue to drive the vehicle to a
safe location before selecting “N”
NEUTRAL.
NOTE
Once “N” NEUTRAL is selected, a gear
engagement may not be allowed de-
pending on the nature of the problem.
2. Place the Transmission Driver
Interface Device in Neutral “N”.
3.
Set the vehicle parking brake.
WARNING
Apply parking brake and follow vehicle
manufacturer parking instructions. Fail-
ure to follow these instructions could
cause unintended vehicle movement re-
sulting in death, serious injury or dam-
age to property
.
4. Turn the vehicle ignition to the “off”
position.
5.
Wait at least 2 minutes.
6. Restart the engine.
7. If the problem continues, contact a
service facility to have the vehicle
and transmission system
evaluated.
Transmission Air Supply
For optimal performance, the PACCAR
Automated Transmission requires a
nominal air supply operating range
between 90 psi (5.9 bar) and 130 psi (9.0
bar).
MAINTENANCE - How to Fill Fluid
34 Y53-1272-1B1 (08/17)
3

WARNING
Maintain specified transmission air sys-
tem pressure range between 90 psi (5.9
bar) and 130 psi (9.0 bar). Failure to
maintain proper air system pressure
could result in degraded or complete
loss of transmission engagement and
shift capabilities resulting in death, seri-
ous injury or damage to property
.
Roadside Assistance
What to do in an emergency and roadside
assistance information.
Call toll-free to talk to someone at the
PACCAR Customer Center:
• Kenworth customers call: 1-800-
KW-Assist (1-800-592-7747) |
Peterbilt customers call:
1-800-4Peterbilt (800-473-8372)
• Open 24-7-365 days a year.
• They can help you get roadside
assistance.
• They have a custom mapping
system which locates authorized
PACCAR engine dealers and
Independent Service Providers
(ISPs) near you and lists types of
services of
fered, hours of operation
and contact information.
• They can assist with jump and pull
starts, tires, trailers, fines and
permits, chains, towing, hazardous
clean-up, out of fuel (roadside),
mechanical repairs and preventive
maintenance services.
• They have multilingual agents and
access to a translation service to
ensure quality assistance for
customers in any language.
• They can’t answer your warranty
questions, but can get you in
contact with an authorized dealer
who can.
• The PACCAR Customer Center
service is FREE.
MAINTENANCE - Troubleshooting
Y53-1272-1B1 (08/17) 35
3

Chapter 4 | INFORMATION
In this Chapter:
General Model Information
..................................................................................................................37
PACCAR Transmission Lubricant Capacities......................................................................................37
PACCAR Transmission Lube Specification.........................................................................................37
INFORMATION -
36 Y53-1272-1B1 (08/17)
4

General Model Information
Nomenclature
Following is a nomenclature tree that
describes the multiple configurations of the
transmission model numbers:
1 PACCAR Transmission
2 Overdrive
3 Torque Capacity (ft-lb) # x 100 +50
4 Design Level
5 Forward Speeds
6 Ratio Set
Transmission Identification
Nomenclature
The blank spaces provided below are for
recording transmission identification data
and part numbers of maintenance items.
All transmissions are identified by the
model and serial number
. This information
is stamped on the transmission
identification tag and affixed to the case.
NOTE
Do not remove or destroy the trans-
mission identification tag.
The blank spaces provided below are for
recording transmission identification data.
Have these reference numbers handy
when ordering replacement parts or
requesting service information:
Transmissio
n Model
Transmisiso
n Serial
Number
PACCAR Transmission
Lubricant Capacities
T
ransmissions equipped with Power Take
Off (PTO) or oil coolers are great than the
capacities listed here. These values are
approximate. Always use the fill hole as a
finale reference.
Pints (US) Liters
16 7.5
PACCAR Transmission
Lube Specification
PACCAR approves the PACCAR Genuine
PS-386 (Eaton approved) synthetic
transmission fluid to ensure the highest
performing lubricants for maximum
performance. All other approved
INFORMATION - General Model Information
Y53-1272-1B1 (08/17) 37
4

rebranders for PS-386 are also acceptable.
INFORMATION - PACCAR Transmission Lube Specification
38 Y53-1272-1B1 (08/17)
4

INFORMATION - PACCAR Transmission Lube Specification
Y53-1272-1B1 (08/17) 39
4

Index
A
Air Dryer Maintenance 32
C
Column Mounted Transmission Control 13, 15, 18
E
Engine Brake 13
Engine Brake Column Mounted Transmission Control 17
Engine Brake PACCAR Transmission 17
F
Fluid Level 32
G
Gear Display 16
General Safety Instructions 7
I
Illustrations 6
L
LOW Mode 16
Lube Interval
33
Lube Specification 37
M
Maintenance Schedule 27
Manual Mode 18
O
Override 19
P
PACCAR AMT 13
PACCAR AMT Shifting gears 15
PACCAR Transmission 27, 33
PACCAR Transmission Controls 13
PACCAR Transmission Lubrication Specification 37
PACCAR TransmissionAir Dryer 32
PACCAR TransmissionDrain Fluid 33
PACCAR TransmissionFill Fluid 34
Power Down 20
Index


x 1518
vue
A 98009
PACRI
P.O
. Bo
x 1518
Bellevue
, W
A 98009
Powertrain
Y53-1272-1B1
