
SAP Business One v10 –
How to create UDF &
UDT in SAP Business
One
www.innormax.com
619-241-4100

Table of Contents
Introduction 1.
2. Adding User Defined Fields
3. Marketing document Header and Row fields
3.1 Header level
3.2 Moving User Defined Fields – Header level
3.3 Settings for User Defined Fields
3.4 Copying UDF values in Marketing Documents
3.5 Row Level
3.6 Editing User Defined Fields – Row Level
4. Properties of User Defined Fields.
5. Type and Structure
5.1 Alphanumeric
5.2 Numeric
5.3 Date/Time
5.4 Units and Totals
5.5 General
6. Validation Options
6.1 Linked to Entities
6.2 Valid Values
6.3 Advanced
7. Default and Mandatory Fields
8. Adding User Defined Tables
8.1 Object Type for User Defined Tables
8.2 Information about User Defined Tables

9. Linking a User Defined Table to a UDF
10. Entering Data in a New Table
11. Adding Columns to a UDT
12. Viewing the Columns Added to a UDT
13. Queries
14. Linking the table to a UDF
15. Using the UDT in a Document
16. Selecting the Value from the UDT
17. Linking a UDT as a User Defined Object
18. Registering the New Table as an Object
19. Adding the Object to the Main Menu
20. Style of the New Table
Table of Contents

The UDF (User Defined Fields) are fields that the system does not
have by default; it is possible to add these additional fields to the
master data and documents to adapt the specific needs or processes
of each business. In addition to UDFs, you can add new tables to the
database; the UDT (User Defined Tables) give you the ability to store
additional, related sets of data.
In the next pages, you can find how to add your own fields to objects
in the SAP Business One database. You will be able to define fields
with different types and structure, including mandatory fields, and
set validation rules, default values, and lists of values to assist users in
data entry.
Introduction
You can add new fields to most business objects, including business
partner and item master data, and marketing documents. These
fields are stored in the database and table of the business object.
1) Only authorized users can add user-defined fields. The general
authorization is Tools >Customization Tools > User-Defined Fields >
Management.
Adding User Defined Fields

You can add fields to both the header area and to the rows of
marketing documents.
When you add a user-defined field to the marketing documents
object, the new field is added to all logistics document types,
including all sales and purchasing document types, and some
inventory documents such as Goods Receipt and Goods Issue.
Marketing document Header
and Row fields
When you add User Defined Fields (UDFs) at the header level, the
new fields appear in a separate window positioned by default to
the right of the existing document window.
This window is not visible immediately. To open this window,
choose View > User Defined Fields from the top menu bar, or use
the key sequence Ctrl+Shift+U. You can reposition this window to
the left or bottom of the existing window.
UDF’s added to the header are editable after the document has
been added.
If the User Defined Fields are not used in a marketing document,
the new window can remain closed.
3.1 Header Level

Authorized users can use the Tools > Edit Form UI function to
drag relevant user-defined fields from the side window to the
main form area, thus dispensing with the side window.
In the UI configuration template, select the form that has the
UDFs added, then drag the fields into position. The template can
then be assigned to users.
Authorized users can make this change just for their own use or for
other users by creating a UI Configuration template.
3.2 Moving User Defined Fields – Header level

If you decide to keep User Defined Fields in the side window, you
can manage them using the settings window. To open the
settings window for user-defined fields, press Ctrl+Shift+B, or
choose Tools > Customization Tools > Settings. The menu only
shows active when you select a form with User Defined Fields.
The user can make the User Defined Fields visible or invisible, and
active or inactive, in the User Defined Fields side window. For
example, you can make all the fields relevant for a sales order invisible
in a purchase order.
There is also the option to define new categories to group related
fields and only display the fields for a category.
When using the Copy To/ Copy From function to generate a new
document from a base document, the value of a User Defined Field is
transferred to the target document. This also applies to documents
generated through the Document Generation Wizard.
If multiple base documents are copied to a target document, and the
User Defined Field has different values in these base documents, the
field value is not copied.
3.3 Settings for User Defined Fields
3.4 Copying UDF values in Marketing Documents

When you add a field at the row level, the system adds this field as an
additional column in the row. The field is visible and active by default.
You can change these settings or move the field to a new position on
the row using standard form settings.
3.5 Row Level

You can allow editing row level UDF’s from the Administration >
System Initialization > Document Settings > Per Document.
Row level UDF’s are behaving the same as system columns. For
example, if a sales order is open, and rows can be updated, so are the
UDF’s. Once the order is closed, the UDF’s are also blocked.
In addition, you can use the general authorization to determine
which user can edit row level UDF’s on the sales and purchasing
modules.
3.6 Editing User Defined Fields – Row Level

User Defined Fields are added to the respective database table for
the object. They can be quickly identified in the table since they have
the prefix “U_”. In the example below you can see a new field added
to the order row table RDR1.
User Defined Fields are retained during an upgrade to a new release.
An important point about User Defined Fields is that when you add a
new field to an object, the new field is added to all instances of the
object, including records already saved in the database.
UDFs function as normal fields and can therefore be used in queries
and reports.
You can also import data into User Defined Fields using the Data
Transfer Workbench. In the DTW template, simply add these fields at
the end of the spreadsheet. Enter the name of the field in the header
row and enter the value as you would for a standard field.
Properties of User Defined Fields
Try Again: You can notify the users close their work and wait until
they have logged out of the system.
Ignore: The system will force close all open documents for all
connected users.
It is important to remember that, when you add a user-defined field,
the database structure is updated. Therefore, you should only add
new fields when no other users are logged in.
If you try to add a new field, the system will warn you if there are
logged in users. You have the option to:

When you create a user-defined field you can select a Type and
optionally a Structure for each User Defined Field.
The Structure is dependent on the Type and influences the format of
the field.
Be aware that you cannot change the type and structure after you
have added the field to the database. If you mistakenly choose the
wrong type or structure, you can remove the field and start again.
Type and Structure
Fields with Alphanumeric type can have one of the structures shown
here. A Regular structure can hold up to a maximum of 254
characters. A Text structure can accommodate 2 GB of text in header
fields and 255 KB of text in row fields.
5.1 Alphanumeric

Fields with Numeric type can only hold integers, therefore there is no
structure.
Fields selected with the Date/Time type can have Date or Hour as the
structure.
These fields behave in exactly the same way as other date and time
fields in the system; for example, the calendar icon is available in a
field with the date structure.
5.2 Numeric
5.3 Date/Time

To enter fractions as well as integer numbers in the new field, use the
Units and Totals type and select one of the structures shown here.
Decimal places will display in the new field according to the
initialization settings on the Display tab of the General Settings.
Fields with the Image structure can accommodate pictures. You
must first define the default path to the Pictures folder, in the
General Settings.
If you select the General type, the new field can hold links or
graphics.You must first define the default path to the Attachments
folder, in the General Settings.
The user can, at any time, change an image or web address by
pressing the Ctrl key and double-clicking the image or web address.
5.4 Units and Totals
5.5 General

Linked to Entities
Valid Values
Advanced
In addition to the type and structure for a user-defined field, you have
the option of specifying validation options:
Validation Options
The option Linked to Entities allows you to set up a direct link
between a user-defined field in a form and a system object, a User
Defined Table, or a user-defined object. In the example below we
have linked a User Defined Field in the service contract form with the
A/R invoice object.
The link is established by the user who creates the form. In the User
Defined Field the user will be shown all the instances of the chosen
object and can select one to create the direct link.
Be aware that the user must select the correct instance, since the
system shows all rows stored in the database for the chosen object.
6.1 Linked to Entities

If Valid values option is chosen, you can
define a list of possible values for the User
Defined Field. This definition is made when
you add the UDF.
In the example to the right, you can see
that there are three possible values for the
field: silver, gold and platinum.
This list is available in the document as a
dropdown list, allowing the user to select
one of the values.
The user cannot update the values in the
list. The list values can only be updated by
the authorized user from the User Defined
Fields – Management window.
If the Advanced option is selected the system lets you set some
simple validation rules for when the user enters data in the User
Defined Field.
The validation rules apply to all UDF types except for General type.
The validation controls vary according to the type and structure of
the UDFs. For example, for alphanumeric type the rules can check
which characters the user can enter in the field, and how many
characters.
Other rules allow you to validate that the value entered is equal to,
less than, or greater than a value entered when you add the User
Defined Field.
6.2 Valid Values
6.3 Advanced

You can optionally set a default value for any User Defined Field.
In the example, we have selected a default time from the list of valid
values.
The default value set for a field will appear in all new instances of the
object.
You can optionally set the User Defined Field as mandatory. The user
will not be able to add a new record without entering data into the
mandatory field.
When you set a UDF as mandatory, you need to initially supply a
default value, to maintain the integrity of the database. After you
have added the user-defined field you can remove the default value.
Default and Mandatory Fields

In addition to User Defined Fields, you can add new tables to the
database. User Defined Tables (UDTs) give you the ability to store
additional, related sets of data.
The User Defined Table becomes part of the company database. The
system identifies this tables by the ‘@’ prefix so you can easily
distinguish them from system tables.
When you create a new company, you have the option to copy User
Defined Tables from the currently selected company to the new
company.
Adding User Defined Tables
Choose Master Data if the object will hold master data. You can
also create child tables by selecting Master Data Rows as the
object type.
Choose Document if the object will hold transactional data. You
can also create child tables by selecting Document Rows as the
object type.
User Defined Tables (UDT) can be linked to a User Defined Field (UDF)
in a document or form. To do this you must choose the correct object
type when you create the table.
To link to a UDF choose No Object or No Object with Auto Increment.
To link to a User Defined Object (UDO) choose one of the other
options:
8.1 Object Type for User Defined Tables

Information about each new table is stored in the OUTB system table.
Information includes the object type.
8.2 Information about User Defined Tables
Note that you cannot change the Object Type after you have added
the user table to the system.

Access a newly created User Defined Table by selecting the table
from the Tools menu.
To link table to user-defined field (UDF) in a document or form, you
create the table with the object type No Object.
The table initially contains two columns, code and name.
Linking a User Defined Table to a UDF
If you choose No Object as the object type when you create the
table, the Code column is editable and you can enter a unique
value for each row.
If you choose No Object with Auto Increment as the object type,
the Code column is not editable and the value will be auto
incremented for each row of data you enter. We chose this option
so the primary key is updated for us.
In our example, we want to use the table in a User Defined Field in a
delivery document. Therefore, when we set up the table, we could
choose either No Object or No Object with Auto Increment as the
object type.
The Code is the primary key and the Name must be unique for each
row that you add to the table. In addition, you have the option to
select any field or combination of fields from the user table as a new
key. This option can speed up searches.
Entering Data in a New Table

Select the name of the table in the User Defined Fields management
window. Then add a User Defined Field for each column.
In order to be useful, a User Defined Table needs additional columns.
Each column is added as a User Defined Field.
In the example, we have added four additional columns – Name, Shift,
Available, and Location to the Delivery Drivers table. In these fields we
will record the name of the driver, the hours they work, if they are
available for assignment, and their location. With this information, a user
will be able to select the best driver for the delivery.
Adding Columns to a UDT

After the additional columns have been added to the table, you can
enter data or add new rows by then choosing Menu > Tools > User-
Defined Windows. Choose and select the table.
If the new columns are not visible in the window, you may need to
adjust the width of the columns to bring the new fields into view.
Viewing the Columns Added to a UDT
At this point the user-defined table is not attached to any form or
document so it is not accessible to the user. However, you can use the
table in queries, and you can import data into the table using the
Data Transfer Workbench.
Queries

To make a user table directly visible to users in a form or document,
you link the table to a User Defined Field in the document or form.
Note that user tables can only be linked to UDFs with the
Alphanumeric type and Regular structure.
In the example, a User Defined Field called Drivers is added to the
title area of the marketing documents object. When you add the User
Defined Field choose the Set Linked Table validation option. Then
select the User Defined Table from the dropdown list.
You can link the same User Defined Table to multiple User Defined
Fields in different objects, at both the header and the row level. For
example, you could link the trucks table to a User Defined Field in the
pick list document in addition to the delivery document.
Linking the table to a UDF
When you select the User Defined Field, you can see the first two
columns. Choose Define New to view and access all columns in the
table.
The user can edit and add rows to the table.
Using the UDT in a Document

In this example, the customer has requested an evening delivery,
therefore a driver is selected who is available in for an evening
delivery.
The Name from the User Defined Table is now stored in the User
Defined Field in the document.
Selecting the Value from the UDT

To link a user table as a User Defined Object (UDO) make sure you
created the table with the object type MasterData or Document.
A User Defined Object consists of a User Defined Table and added
User Defined Fields. These fields will hold the data for the new
business object.
You can add UDFs using the SAP Business One application or via the
DI API. In the example we created a user table called Company Cars,
as a master data object.
We have added 4 User Defined Fields.
Linking a UDT as a User Defined Object
Enter a unique ID and select the User Defined Table name.
As you progress through the wizard you will be prompted to
select the services for the object, for example, Add, Update, Find,
Delete. Add and Update are basic services and cannot be
deselected.
Once you have created the user table with the User Defined Fields
you need to register it as an object in SAP Business One using the
Objects Registration Wizard. The registration is per company.
You can optionally select a child table, that will appear as rows in the
master data or document object. Child tables are created by selecting
the object type as Document Rows or Master Data Rows.
Registering the New Table as an Object
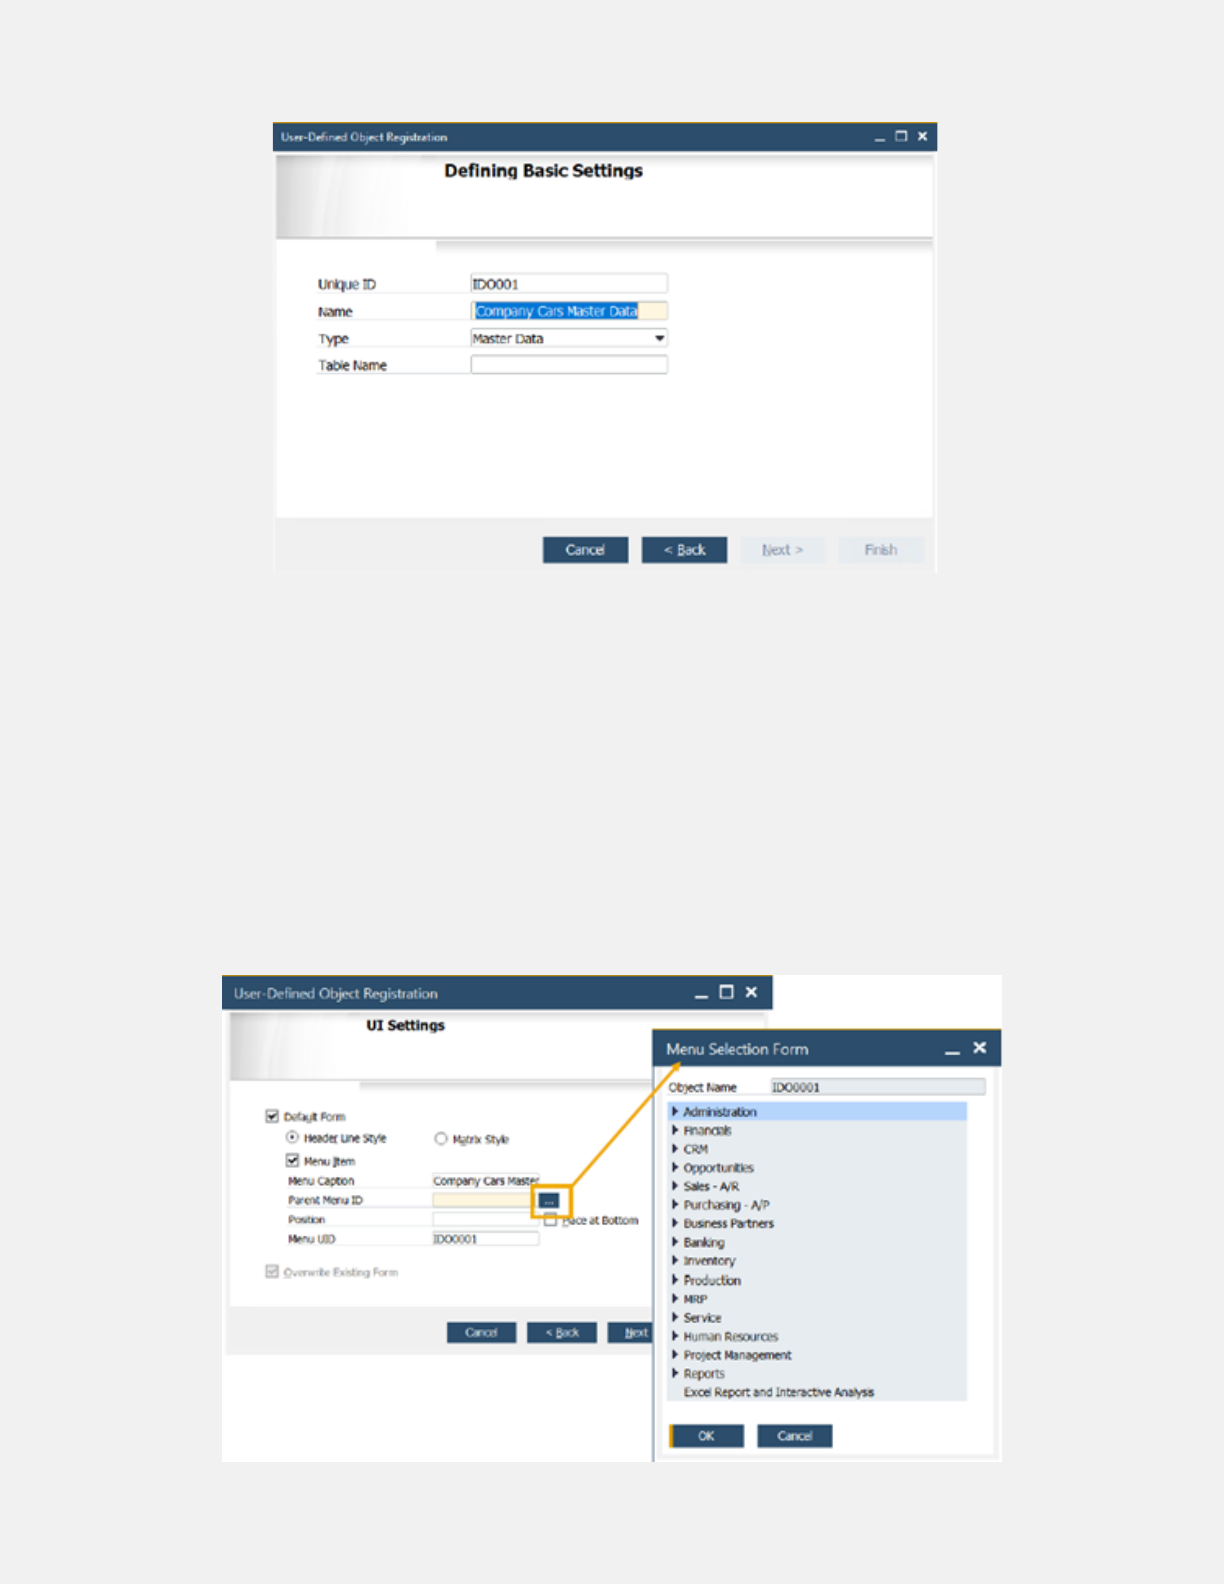
You can add the object to the main menu by selecting the Menu
Item checkbox in the wizard.
You then select the module from the selection form, and the position
within the module menu.
Adding the Object to the Main Menu

You can select either Header Line Style or Matrix Style in the wizard.
This affects how the table displays when the user access it.
Style of the New Table

Innormax can help guide you through the analysis and
implementation of the most suitable solution for your company. Our
consultants have a long track record of helping businesses of all
shapes and sizes succeed in many different industries in the area of
traceability.
Using our resources and supporting technology like SAP Business
One Lot Tracking & Batch Traceability, we are the trusted advisors you
need to help your business succeed.
Contact Innormax today to get started with your customized solution.
SAP Business One v10 –
How to create UDF & UDT in SAP
Business One
© Copyright Innormax, LLC
Not to be reproduced without the express consent of Innormax, LLC

