
Spider 6.4
T
echnical Reference (Installation,
Configuration, Troubleshooting)
Legal Information
Copyright Notice
Copyright © 2023 Flexera
This publication contains proprietary and confidential information and creative works owned by Flexera and its licensors, if any. Any use, copying,
publication, distribution, display, modification, or transmission of such publication in whole or in part in any form or by any means without the prior
express written permission of Flexera is strictly prohibited. Except where expressly provided by Flexera in writing, possession of this publication shall not
be construed to confer any license or rights under any Flexera intellectual property rights, whether by estoppel, implication, or otherwise.
All copies of the technology and related information, if allowed by Flexera, must display this notice of copyright and ownership in full.
Intellectual Property
For a list of trademarks and patents that are owned by Flexera, see https://www.flexera.com/legal/intellectual-property.html. All other brand and product
names mentioned in Flexera products, product documentation, and marketing materials are the trademarks and registered trademarks of their respective
owners.
Restricted Rights Legend
The Software is commercial computer software. If the user or licensee of the Software is an agency, department, or other entity of the United States
Government, the use, duplication, reproduction, release, modification, disclosure, or transfer of the Software, or any related documentation of any kind,
including technical data and manuals, is restricted by a license agreement or by the terms of this Agreement in accordance with Federal Acquisition
Regulation 12.212 for civilian purposes and Defense Federal Acquisition Regulation Supplement 227.7202 for military purposes. The Software was
developed fully at private expense. All other use is prohibited.
Book Name:
Part Number:
Product Release Date:
Spider 6.4 Technical Reference Guide
SP-0001-TR01
17 January 2022

Spider Technical Reference - Installation, Configuration, Troubleshooting
17-01-2022 / EN
3/208
Contents
1 General 7
1.1 Typographical conventions ......................................................................................................................................7
1.2 Help ..........................................................................................................................................................................7
2 Introduction 8
2.1 Chronological order for new installations ................................................................................................................8
3 Spider 8
3.1 System requirements ...............................................................................................................................................8
3.1.1 Application server .........................................................................................................................................8
3.1.2 Database - Microsoft SQL Server ............................................................................................................... 10
3.1.3 Indexing - OneSearch ................................................................................................................................. 11
3.1.4 Hardware requirements............................................................................................................................. 11
3.1.5 Clients / Browser ........................................................................................................................................ 12
3.1.6 Implementation system ............................................................................................................................. 12
3.1.7 Permission requirements ........................................................................................................................... 13
3.1.8 Hardware-Scaling ....................................................................................................................................... 14
Scenario 1: Database and application server in one system ........................................................................................ 14
Scenario 2: Database and application servers on separate systems ............................................................................ 15
Scenario 3: Databases are installed in an SQL cluster .................................................................................................. 16
Scenario 4: Using a web farm ....................................................................................................................................... 17
3.2 Installation ............................................................................................................................................................. 18
3.2.1 Start of the installation .............................................................................................................................. 18
3.2.2 License agreement ..................................................................................................................................... 19
3.2.3 New installation or update ........................................................................................................................ 20
3.2.4 License file.................................................................................................................................................. 21
3.2.5 Installation directory .................................................................................................................................. 23
3.2.6 Start menu item ......................................................................................................................................... 24
3.2.7 Database server ......................................................................................................................................... 25
3.2.8 Index proxy server ..................................................................................................................................... 26
3.2.9 Web Logins ................................................................................................................................................. 28
Spider ........................................................................................................................................................................... 28
SpiderAdmin ................................................................................................................................................................. 31
3.2.10 Database names ......................................................................................................................................... 33
3.2.11 Language and format settings ................................................................................................................... 35
3.2.12 SMTP settings ............................................................................................................................................. 36
3.2.13 Administration account ............................................................................................................................. 37
3.2.14 IIS configuration ......................................................................................................................................... 38
3.2.15 Transfer directory ...................................................................................................................................... 39
3.2.16 Installation ................................................................................................................................................. 40
3.2.17 Activate the license .................................................................................................................................... 41
3.3 Advanced configuration ........................................................................................................................................ 43
3.3.1 Operation with domain account ................................................................................................................ 43
Prepare SQL server ....................................................................................................................................................... 43
Grant IIS rights to the domain account ........................................................................................................................ 46
Adapt the identity of the application pools.................................................................................................................. 50
Conversion of the access data ...................................................................................................................................... 53
3.3.2 Subsequent setup of the index proxy ........................................................................................................ 58
Configuration entries ................................................................................................................................................... 58
IIS application connectionStrings.config ...................................................................................................................... 58
Settings in the registry ................................................................................................................................................. 59
3.3.3 Conversion to SSL operation ...................................................................................................................... 60
Configure IIS default web site ...................................................................................................................................... 60

Spider Technical Reference - Installation, Configuration, Troubleshooting
17-01-2022 / EN
4/208
Configuration entries ................................................................................................................................................... 66
Restart the IIS ............................................................................................................................................................... 66
3.3.4 HTTP(S) Redirect ........................................................................................................................................ 68
3.3.5 Setup of Active Directory login .................................................................................................................. 72
Settings in Spider .......................................................................................................................................................... 72
IIS settings - Authentication ......................................................................................................................................... 78
3.3.6 Info page - support.config .......................................................................................................................... 81
3.3.7 Available languages - culture.config .......................................................................................................... 83
3.3.8 Settings in the Config table ........................................................................................................................ 84
3.3.9 Display of advanced error messages.......................................................................................................... 85
3.3.10 Encryption of the configuration ................................................................................................................. 88
3.3.11 Error handling system ................................................................................................................................ 92
3.4 Update ................................................................................................................................................................... 93
3.4.1 Start of the update ..................................................................................................................................... 93
3.4.2 Update ....................................................................................................................................................... 94
3.4.3 Selection of the Instance............................................................................................................................ 95
3.4.4 Database server ......................................................................................................................................... 96
3.4.5 Index proxy server ..................................................................................................................................... 97
3.4.6 Select updates .......................................................................................................................................... 100
3.4.7 Installation ............................................................................................................................................... 102
4 Spider Web API 103
4.1 Technical information ......................................................................................................................................... 103
4.1.1 REST API ................................................................................................................................................... 103
4.1.2 Version management ............................................................................................................................... 104
4.1.3 Tenant selection ....................................................................................................................................... 104
4.1.4 Request .................................................................................................................................................... 104
4.1.5 Response .................................................................................................................................................. 105
4.2 Authentication .................................................................................................................................................... 105
4.2.1 Generation of tokens ............................................................................................................................... 106
4.2.2 Use of tokens ........................................................................................................................................... 106
4.2.3 Validity of tokens ..................................................................................................................................... 106
4.2.4 Management of tokens ............................................................................................................................ 106
4.3 Admin section...................................................................................................................................................... 107
4.3.1 Mandator ................................................................................................................................................. 107
4.3.2 User .......................................................................................................................................................... 107
4.3.3 Profile ....................................................................................................................................................... 107
4.4 Entity section ....................................................................................................................................................... 107
4.4.1 Entity access ............................................................................................................................................. 107
4.4.2 Entity history access ................................................................................................................................. 108
4.4.3 Entity document access ........................................................................................................................... 108
4.4.4 Entity reminder access ............................................................................................................................. 108
4.4.5 Entity relationship access......................................................................................................................... 108
4.5 Search section ..................................................................................................................................................... 109
4.5.1 Parameterization ..................................................................................................................................... 110
4.6 Report section ..................................................................................................................................................... 111
4.6.1 Parameterization ..................................................................................................................................... 112
4.7 Meta section ....................................................................................................................................................... 113
4.7.1 Mandator ................................................................................................................................................. 113
4.7.2 Admin ....................................................................................................................................................... 113
4.7.3 Entity ........................................................................................................................................................ 113
4.7.4 Search ...................................................................................................................................................... 114
4.7.5 Report ...................................................................................................................................................... 114
4.8 Version information ............................................................................................................................................ 115
4.8.1 Simple version information ...................................................................................................................... 115
4.8.2 Advanced version information ................................................................................................................. 115

Spider Technical Reference - Installation, Configuration, Troubleshooting
17-01-2022 / EN
5/208
4.9 Swagger ............................................................................................................................................................... 115
4.9.1 OpenAPI Document ................................................................................................................................. 116
4.9.2 Swagger UI ............................................................................................................................................... 116
4.10 Web API documentation ..................................................................................................................................... 119
4.11 Spider Web API Explorer ..................................................................................................................................... 123
4.11.1 Expected users ......................................................................................................................................... 123
4.11.2 Authentication ......................................................................................................................................... 123
4.11.3 Session parameters (tenant, language, version) ...................................................................................... 124
4.11.4 Communication with the Spider Web API ............................................................................................... 124
Response .................................................................................................................................................................... 124
Response model ......................................................................................................................................................... 124
4.11.5 Web API Explorer sections ....................................................................................................................... 126
Search API .................................................................................................................................................................. 127
Report API .................................................................................................................................................................. 130
Entity API .................................................................................................................................................................... 132
4.12 Code examples .................................................................................................................................................... 142
4.12.1 Authentication ......................................................................................................................................... 142
4.12.2 Entities ..................................................................................................................................................... 143
4.12.3 Object Search ........................................................................................................................................... 149
4.12.4 Reports ..................................................................................................................................................... 151
4.12.5 Meta area ................................................................................................................................................. 153
5 Software Services (Catalogs and Recognition) 160
5.1 System requirements .......................................................................................................................................... 160
5.1.1 Application server .................................................................................................................................... 160
5.1.2 Database server ....................................................................................................................................... 162
Required database ..................................................................................................................................................... 162
Required SQL user ...................................................................................................................................................... 162
Overview of required rights ....................................................................................................................................... 163
5.2 Installation ........................................................................................................................................................... 164
5.2.1 Start of the installation ............................................................................................................................ 164
5.2.2 License agreement ................................................................................................................................... 165
5.2.3 License file................................................................................................................................................ 166
5.2.4 Installation directory ................................................................................................................................ 168
5.2.5 Database server ....................................................................................................................................... 169
5.2.6 Database & Data Receiver ....................................................................................................................... 171
5.2.7 SQL login, service user ............................................................................................................................. 171
5.2.8 Summary .................................................................................................................................................. 173
5.2.9 Installation ............................................................................................................................................... 174
5.3 Advanced configuration ...................................................................................................................................... 176
5.3.1 Data Receiver ........................................................................................................................................... 176
SSL Secured Transmission .......................................................................................................................................... 176
5.3.2 EDC Monitor ............................................................................................................................................. 177
5.3.3 Operation with domain account .............................................................................................................. 178
Prepare SQL server ..................................................................................................................................................... 178
Folder permissions ..................................................................................................................................................... 179
Adapt the service account .......................................................................................................................................... 180
Adapt the connection string ....................................................................................................................................... 180
5.4 Update ................................................................................................................................................................. 181
5.4.1 Start of the update ................................................................................................................................... 181
5.4.2 License agreement ................................................................................................................................... 182
5.4.3 License file................................................................................................................................................ 183
5.4.4 Installation directory ................................................................................................................................ 185
5.4.5 Database server ....................................................................................................................................... 186
5.4.6 Summary .................................................................................................................................................. 187
5.4.7 Installation ............................................................................................................................................... 188

Spider Technical Reference - Installation, Configuration, Troubleshooting
17-01-2022 / EN
6/208
6 Data Center Module (nova ratio appliance) 190
6.1 Sizing of the virtual machine ............................................................................................................................... 190
6.2 Launching of the appliance ................................................................................................................................. 191
6.2.1 Import of the VM ..................................................................................................................................... 191
6.2.2 Operating system users ........................................................................................................................... 192
6.2.3 Adaptation of the host name ................................................................................................................... 192
6.2.4 Adaptation of the IP address ................................................................................................................... 192
6.2.5 Creating a certificate ................................................................................................................................ 193
6.3 Setting up the data center module ..................................................................................................................... 195
6.3.1 General information ................................................................................................................................ 195
6.3.2 Registration .............................................................................................................................................. 195
6.3.3 Tenant assignment ................................................................................................................................... 196
7 GDPR requirements in Spider 198
7.1 Personal data....................................................................................................................................................... 198
7.1.1 Which data categories are processed in Spider products? ...................................................................... 198
7.1.2 Special categories of personal data (Article 9, Section 1 GDPR) .............................................................. 198
Individual customer expansions must be checked!.................................................................................................... 198
7.1.3 Processing of personal data (Article 4, No. 2 GDPR) ................................................................................ 199
7.2 Personal data fields related to selected Spider data objects .............................................................................. 199
7.2.1 Personal data related to employees ........................................................................................................ 199
7.2.2 Personal data related to assets ................................................................................................................ 200
7.2.3 Personal data related to Spider users ...................................................................................................... 201
7.2.4 Personal data related to contact persons ................................................................................................ 202
7.3 Principles relating to processing of personal data (Article 5 GDPR) ................................................................... 203
7.3.1 Adequacy and relevance of personal data as well as limitation of their processing to the extend
absolutely necessary (Article 5, No. 1, lit. c GDPR) ............................................................................................. 203
7.3.2 Adequate storage of personal data as well as their possible anonymization (Article 5, No. 1, lit. e GDPR)203
7.3.3 Rights of the data subject ........................................................................................................................ 203
Right of access by the data subject (Article 15 GDPR) ................................................................................................ 203
Rectification or erasure of personal data (Article 5, No. 1, lit. d GDPR) ..................................................................... 204
Right to rectification (Article 16 GDPR) ...................................................................................................................... 204
Right to erasure (Article 17 GDPR) ............................................................................................................................. 204
Right to restriction of processing (Article 18 GDPR)................................................................................................... 205
Notification obligation (Article 19 GDPR) ................................................................................................................... 205
Right to data portability (Article 20 GDPR)................................................................................................................. 205
Right to object (Article 21 GDPR) ............................................................................................................................... 205
Suitable methods for demonstrating compliance with the requirements in accountability cases (Article 5, No. 2
GDPR) ......................................................................................................................................................................... 205
7.4 Lawfulness of processing (Article 6 GDPR) .......................................................................................................... 205
7.5 Data protection by design and by default (Article 25 GDPR) .............................................................................. 206
7.5.1 Confidentiality (Art. 32, Section 1, lit. b GDPR) ........................................................................................ 206
7.5.2 Integrity (Art. 32, Section 1, lit. b GDPR) .................................................................................................. 206
7.5.3 Availability and resilience (Art. 32, Section 1, lit. b GDPR) ...................................................................... 206
7.6 Conditions for consent (Article 7 GDPR) ............................................................................................................. 206
7.6.1 Self-service functions ............................................................................................................................... 207
7.6.2 Consent for personal data from external systems or for collection of additional data ........................... 207
7.7 Information obligation (Article 13 and 14 GDPR) ................................................................................................ 207
7.7.1 Processing of employment data .............................................................................................................. 207
7.7.2 Direct notification of the data subject ..................................................................................................... 207
7.8 Records of processing activities (Article 30 GDPR) ............................................................................................. 207
8 Log files 208
8.1 Brainware.log ...................................................................................................................................................... 208
8.2 Smart-Inspect log files (*.sil) ............................................................................................................................... 208
Spider Technical Reference - Installation, Configuration, Troubleshooting
17-01-2022 / EN
7/208
1.1 Typographical conventions
This manual uses various formats to highlight certain terms and actions. Specific notes and tips are shown with a dif-
ferent background color, according to their importance.
Format
Description
Bold font
Elements in the software or in the operating system, such as menu items, buttons or elements of
a selection list
Italic font
Emphases (important details) and links to other chapters or documents
Triangle symbol "➢"
Instruction step
Angle bracket ">"
Command menu sequences, e.g. File > Open
System font
Directories, code and script samples
CAPITAL LETTERS
Key names, e.g. SHIFT, CTRL, or ALT
KEY+KEY
Key combinations, i.e. the user has to hold one key and press another simultaneously, e.g.
CTRL+P or ALT+F4.
Note Used for notes or tips which facilitate the work or for additional information which enhances under-
standing for the product.
Important Information which should be observed by the user, because otherwise problems or additional work
may be caused in operation.
Attention Information which should be observed by the user in order to prevent malfunctions of the system
(crashes, data loss, system failure).
1.2 Help
For additional information and support, we recommend the Flexera Community (https://community.flexera.com/).
Here you will find product documentation, download links and access to support.
1 General

Spider Technical Reference - Installation, Configuration, Troubleshooting
17-01-2022 / EN
8/208
This document describes:
• System Requirements
• Installation
• Update
• Configuration of the products
• Spider
• Recognition
2.1 Chronological order for new installations
For a new installation, you have to observe the following installation order:
➢ Spider
➢ Software catalog
➢ Recognition
To read and transfer data from inventory systems, the Spider Data Collector (SDC) should be used.
Notes for the installation and setup are described in a separate document (Spider Data Collector - UserManual).
3.1 System requirements
3.1.1 Application server
Operating system
Recommended version:
Windows Server 2019 Standard
Supported versions:
• 2022
• 2019
• 2016
• 2012 / 2012 R2
Supported editions:
• Standard
• Datacenter
Microsoft .NET Framework
Microsoft .NET Framework Version 4.7.2
2 Introduction
3 Spider

Spider Technical Reference - Installation, Configuration, Troubleshooting
17-01-2022 / EN
9/208
Microsoft Internet Information Server (IIS)
• Internet Information Service (IIS) Manager
• Installed role service "IIS Management Scripts and Tools"

Spider Technical Reference - Installation, Configuration, Troubleshooting
17-01-2022 / EN
10/208
3.1.2 Database - Microsoft SQL Server
Recommended versions:
Microsoft SQL Server 2016 Standard (64 bit) or
Microsoft SQL Server 2017 Standard (64 bit)
Supported versions:
• 2019
• 2017
• 2016
• 2014
• 2012
Supported editions:*
• Standard - for Spider environments with one mandator
• Enterprise - for large multi-mandator-environments
• Express* ** - for very small environments; some restrictions will ap-
ply
Required settings:
The TCP/IP protocol and Named Pipes must be activated for the SQL
server in the SQL Server Configuration Manager.
During installation the SQL server has to be run with Mixed Mode Au-
thentication (SQL And Windows Authentication). After the first Installa-
tion and changing database access to domain authentication, the SQL
server can be changed to Windows Authentication only.
Note: *The function Always On is not supported
**The full text search requires an Express edition with Advanced Services.
For the editions Spider SAM, ITM or Enterprise, 8 databases are required:
• Core
• Core_TempDB
• Asset
• Licence
• Contract
• Recognition
• SessionDB
• Integration (optional)
For Spider Contract, 5 databases are required:
• Core
• Core_TempDB
• Contract
• SessionDB
• Integration (optional)
Pay attention to the following:
• The names can be chosen individually. The name may not start with a number nor exceed the length of 50 characters.
• All Spider databases have to have the same collation. It has to be a case-insensitive collation (CI-Collation), e.g.
SQL_Latin1_General_CP1_CI_AS.

Spider Technical Reference - Installation, Configuration, Troubleshooting
17-01-2022 / EN
11/208
• The databases must be completely empty.
• The rule for the Spider Core temporary database has to be observed, it is the core database name with an attached
suffix of „_TempDB“, e.g. SpiderCore_TempDB.
• The rule for the Spider Core SessionState database has to be observed, it is the core database name with an attached
suffix of „_SessionState", e.g. SpiderCore_SessionState.
3.1.3 Indexing - OneSearch
With the OneSearch function, the brainwaregroup Enterprise Services Infrastructure (ESI) is introduced as an additional
component which will be more and more integrated in future versions.
The indexing infrastructure can be installed on a Spider Application server or on a separate server.
• approx. 750 MB installation files (incl. embedded Java)
• >= 3GB HDD space for index files, depending on the data volume
• 1 to 1.5 GB RAM
Further information is to be found in the document "Brainwaregroup ESI Release Notes".
3.1.4 Hardware requirements
Regarding the hardware requirements for the application and database server, we would like to recommend an indi-
vidual server sizing for medium to large system sizes.
The following general orientation values will apply for production instances. Smaller configurations can be used for test
instances.
Processor
Recommendation:
Quad Core Processor system with 2 GHz or higher
Small system:
1+ Quad Core processor(s)
Medium system:
2+ Quad Core processors
Large system:
4+ Quad Core processors
RAM
Small system:
4 - 8 GB RAM
Medium system:
8 - 32 GB RAM
Large system:
32 GB RAM min.
Hard disk capacity
Application directory:
300 MB
Database:
Database and transaction memory are depending on
the managed data, documents and change histories.
Backup memory:
Depending on the backup strategy and based on the
data volume of databases and transactions, a factor
of 1-2 memory capacity must be reserved for back-
ups.

Spider Technical Reference - Installation, Configuration, Troubleshooting
17-01-2022 / EN
12/208
Small system:
5 - 20 GB
Medium system:
10 - 50 GB
Large system:
> 50 GB
3.1.5 Clients / Browser
Supported browsers
Internet Explorer
• Version 11
• Version 10
• Older versions and compatibility levels are not support-
ed.
Edge
Firefox
ab Version 38 (ESR)
Chrome
ab Version 46
Note: Active Scripting (IE) or Java Script (Firefox) must be activated.
Recommended software
Microsoft Excel
Viewing and editing of Excel files
PDF Viewer
PDF Viewer, e.g. Acrobat Reader
3.1.6 Implementation system
The implementation system is a workplace system which can be used to run the Spider implementation.
The following software is required:
• Microsoft SQL Server Management Studio
• Microsoft Office (Word, Excel)
• PDF Viewer, e.g. Acrobat Reader
• Spider Administration Tool
The following access options must be enabled:
• Remote access to the application server
• Access to the Spider databases

Spider Technical Reference - Installation, Configuration, Troubleshooting
17-01-2022 / EN
13/208
3.1.7 Permission requirements
For the installation, configuration and realization of the application as well as the relevant interfaces, the following ac-
cess rights and settings are required:
Type
Name
Description
Account
SQL account for installations
Installation user. DBO- permissions only for the Spider databases.
Account
SQL accounts "Spider" and
"SpiderAdmin"
Standard account for Spider. Receive the rights to the Spider data-
bases during the setup.
Account
Domain Login account for the appli-
cation server
Account with administrator rights on application server
Account
Interfaces for domain users
Permanent service account without password
change / expiry policy for the continuous
interfaces.
Network policy
Communication between application
and database server
The two servers must be able to communicate
if they are running on two different
server platforms.
SQL Standard Port 1433
FW policy
Configuration of firewall
Checking of the firewall configuration to
make sure that the defined accesses to the
external systems (incl. interfaces for the InventoryScanner)
are enabled.
Please refer to the table below for the required rights for execution of the setup
Task
Rights to
Right(s)
Creating logins
Server
ALTER ANY LOGIN
Creating databases
Server
CREATE DATABASE
CREATE ANY DATABASE
ALTER ANY DATABASE
Creating extended properties
Database
ALTER
Setting up the SessionState database
Database
msdb -> EXECUTE
Required SQL users
If the SQL installation user does not have the permission to create new logins on the database server, these logins must
be created beforehand. 2 SQL users are required for the setup. The login data are requested during the installation. The
setup will then grant the permissions to the Spider databases.
1. Spider Login
The Spider login is required as application login for Spider. The web application and the services are using this login for
accessing the databases.
2. Spider Admin login
This user is intended for usage with the Admin tool.

Spider Technical Reference - Installation, Configuration, Troubleshooting
17-01-2022 / EN
14/208
3.1.8 Hardware-Scaling
Please find below the description of the system sizes and four different scenarios. These recommendations are based
on experience values from numerous customer environments. For large systems, we would like to recommend an indi-
vidual server sizing.
System sizing
Size
Product
Figures
Scenario(s)
Small
Asset
< 5.000 Systems
1
Contract
< 2.500 Contracts
Medium
Asset
5.000 – 20.000 Systems
1 or 2
Contract
2.500 – 10.000 Contracts
Large
Asset
> 20.000 Systems
2, 3, or 4
Contract
> 10.000 Contracts
Scenario 1: Database and application server in one system
• Database and application server reside on one system
• 64-bit system for application server and database
• Possible scaling of processors / cores and RAM
• Software Load Balancing (SLB): Requests are distributed to deployed processes
• For a virtual machine a good I / O performance for the database must be ensured

Spider Technical Reference - Installation, Configuration, Troubleshooting
17-01-2022 / EN
15/208
Scenario 2: Database and application servers on separate systems
• Database and application servers are located on separate systems.
• 64-bit systems for application server and database.
• Possible scaling via processors/cores and RAM per system.
• Software Load Balancing (SLB): Requests are distributed among the provided processes.
• For a virtual system, the database must have a good I/O performance.

Spider Technical Reference - Installation, Configuration, Troubleshooting
17-01-2022 / EN
16/208
Scenario 3: Databases are installed in an SQL cluster
• Based on the 2nd scenario
• The databases are installed in an SQL server cluster.
• Possible scaling via processors/cores and RAM per system.
• Software Load Balancing (SLB): Requests are distributed among the provided processes.
Spider Technical Reference - Installation, Configuration, Troubleshooting
17-01-2022 / EN
17/208
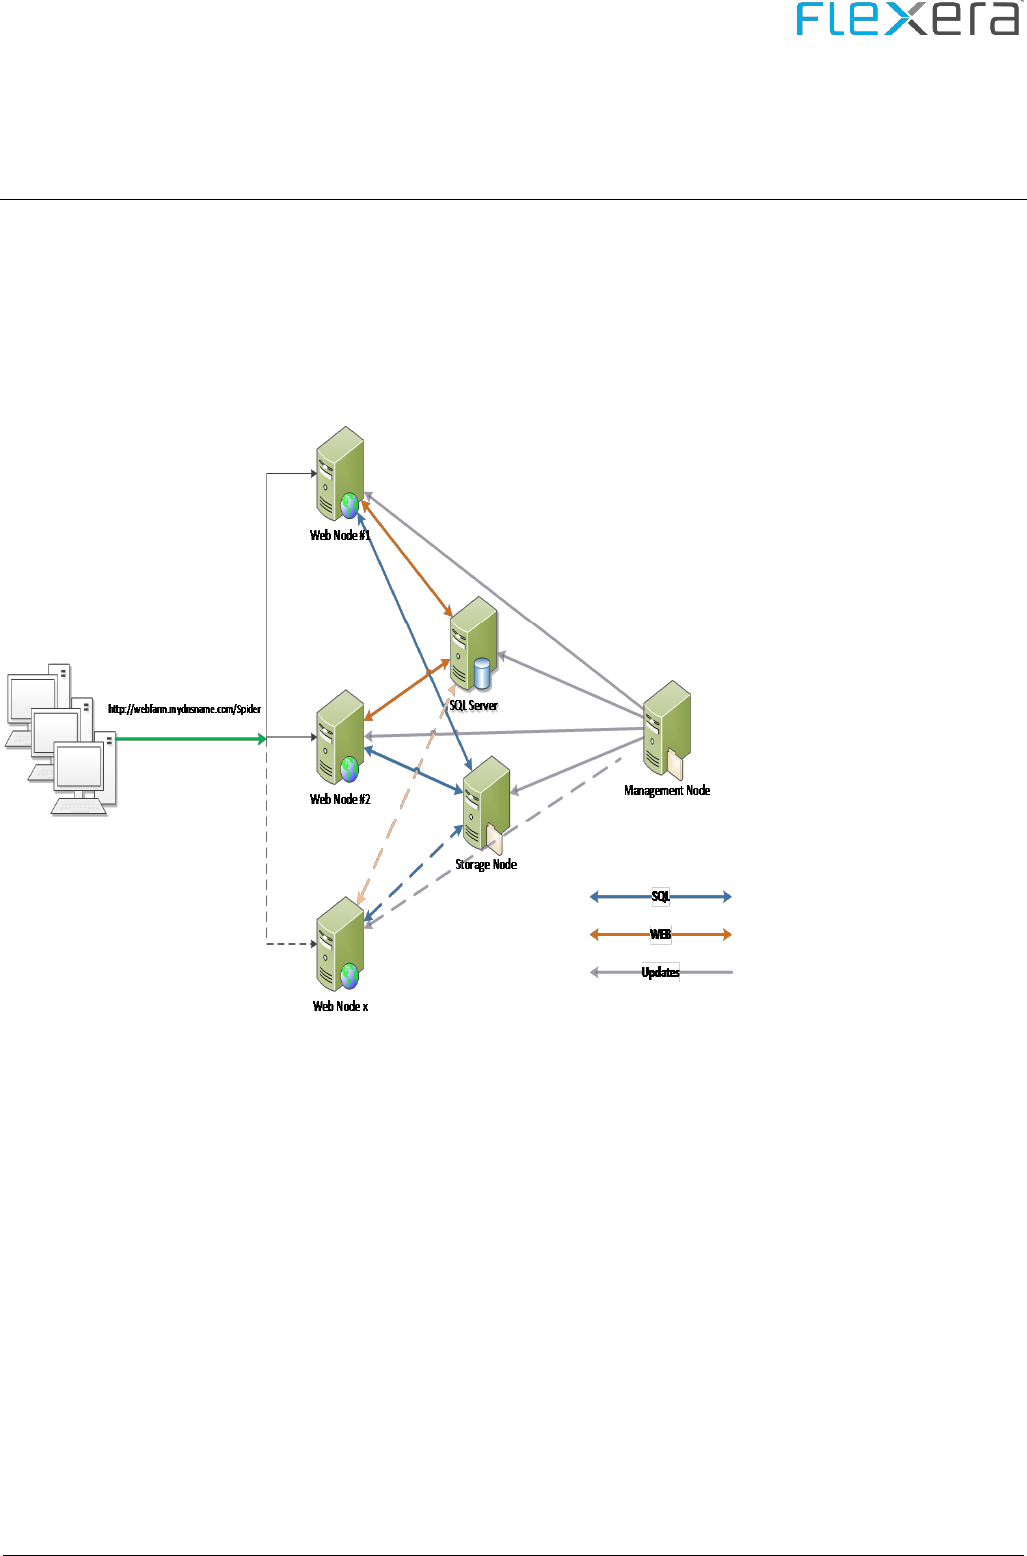
Scenario 4: Using a web farm
• Based on the 2nd and 3rd scenario
• A web farm is operated from multiple web nodes and one management node. The initial Spider web installation, Li-
cense Service and Spider Services are located on the management node.
• Possible scaling of processors / cores and RAM per system
• A combination of Network Load Balancing of the web farm and Software Load Balancing of each web server on the
web farm
• Software Load Balancing (SLB): Requests are distributed to deployed processes

Spider Technical Reference - Installation, Configuration, Troubleshooting
17-01-2022 / EN
18/208
3.2 Installation
3.2.1 Start of the installation
Start the installation by executing Spider 6.x Setup.exe.
At first, you are asked to select the language for the installation assistant. To do this, click on the desired language in
the selection box and confirm your input with "OK".
After that, the installation assistant for Spider will open. This assistant will guide you through the setup installation in
the selected language. Click on "Next" to start the installation.

Spider Technical Reference - Installation, Configuration, Troubleshooting
17-01-2022 / EN
19/208
3.2.2 License agreement
In the next step, you are asked to read and accept the license agreement before starting the installation. The setup
can only be continued after accepting the license agreement.

Spider Technical Reference - Installation, Configuration, Troubleshooting
17-01-2022 / EN
20/208
3.2.3 New installation or update
If an instance of Spider is already installed, you will be prompted to decide for one type of installation.

Spider Technical Reference - Installation, Configuration, Troubleshooting
17-01-2022 / EN
21/208
3.2.4 License file
Select the matching license file to continue the setup. The setup cannot be continued without the license file.
Click on "..." Button:
Select the license and then click "Open".

Spider Technical Reference - Installation, Configuration, Troubleshooting
17-01-2022 / EN
22/208
The selected license will be loaded and its details are shown.
Note If a license is found in the same directory which has been used to start the setup, it will be loaded au-
tomatically into the dialog (if valid).

Spider Technical Reference - Installation, Configuration, Troubleshooting
17-01-2022 / EN
23/208
3.2.5 Installation directory
In the following step, you can select a target directory for the installation. You may change the proposed default
path.
Spider Technical Reference - Installation, Configuration, Troubleshooting
17-01-2022 / EN
24/208
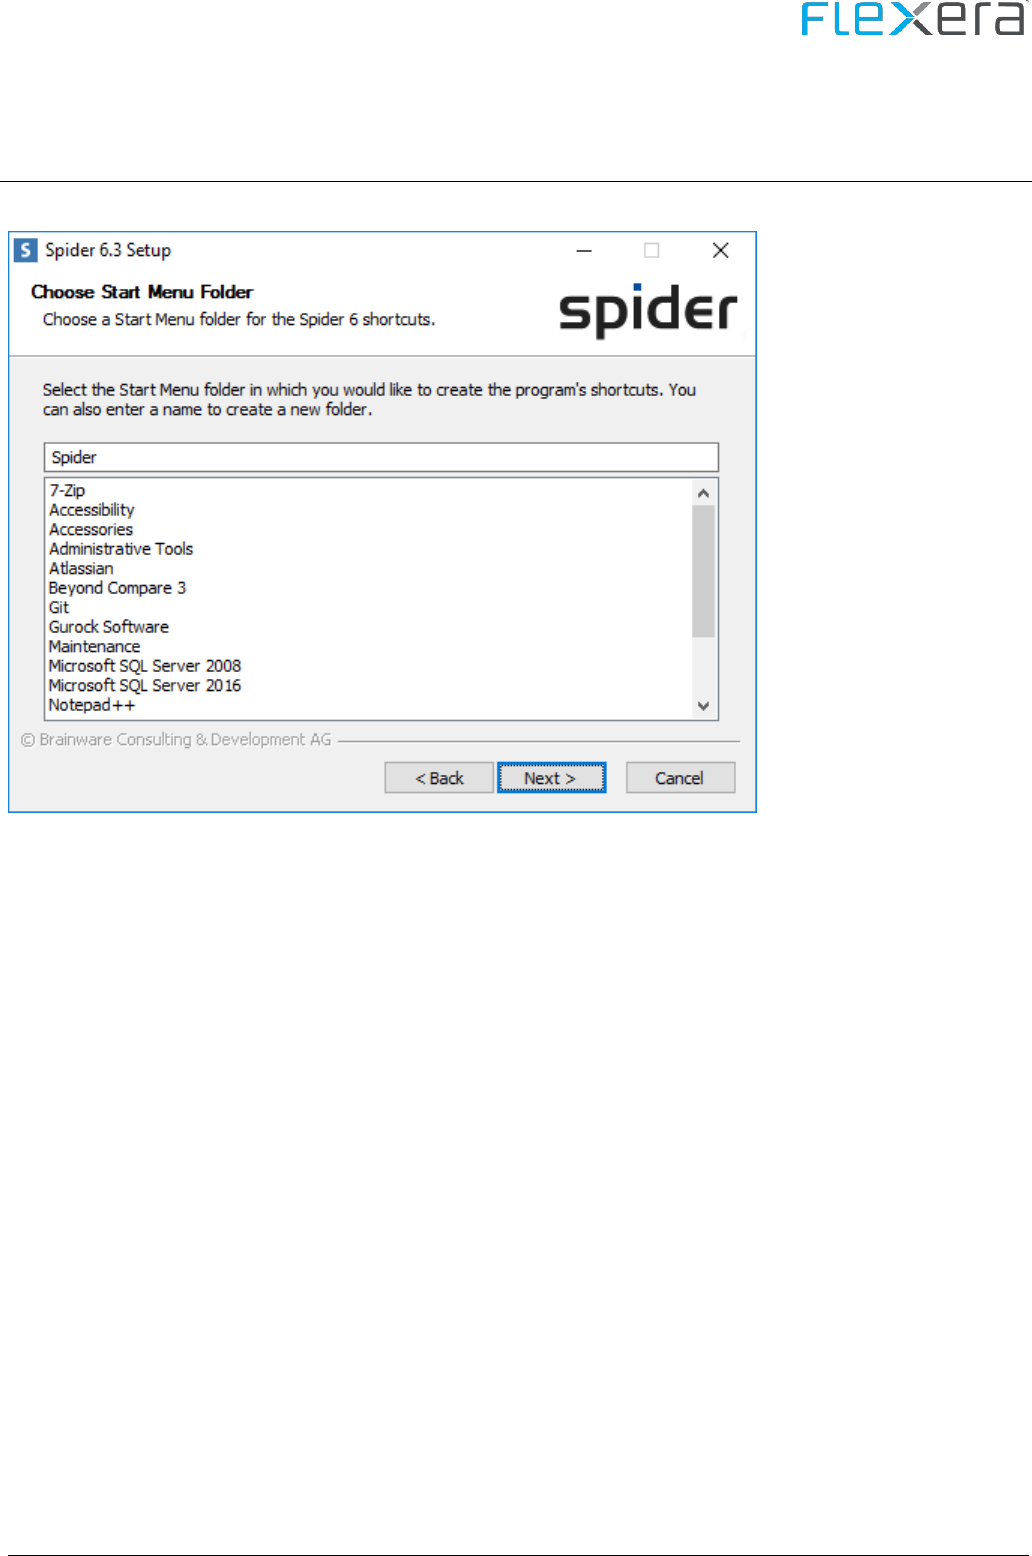
3.2.6 Start menu item
Here, you can determine the folder used by Spider for the start menu.

Spider Technical Reference - Installation, Configuration, Troubleshooting
17-01-2022 / EN
25/208
3.2.7 Database server
In the following step, the installation assistant will ask you to specify the name and the instance of a Microsoft SQL
Server, on which the Spider databases are to be installed.
The user, with which the connection is established, can either be the logged-in (Windows) user or an SQL user.

Spider Technical Reference - Installation, Configuration, Troubleshooting
17-01-2022 / EN
26/208
To be able to use an SQL user, you must tick the check box Use SQL user for database connection and fill in the fields
User name and Password with the desired data.
Note The users have to be set up beforehand on the database server with the corresponding rights. De-
pending on the rights of the user, the subsequent dialogs will show different options.
Field
Description
SQL server name
Name of the SQL server, including instance name
and port if required
e.g. SQLSERVER\SQLINSTANZ,1234
Using SQL users for database connec-
tion
Select whether to use the logged-in domain user or
an SQL user.
User name
Name of SQL user.
Password
Password of the SQL user.
3.2.8 Index proxy server
Next, you can select whether the index proxy shall be configured during the setup.

Spider Technical Reference - Installation, Configuration, Troubleshooting
17-01-2022 / EN
27/208
The Index Proxy Server is part of the Enterprise Services Infrastructure (ESI).
By ticking the check box, the dialog will be activated and the required data can be entered.
Field
Description
Use the index proxy
Activation of the dialog and query of the details

Spider Technical Reference - Installation, Configuration, Troubleshooting
17-01-2022 / EN
28/208
Field
Description
Name of the index proxy portal server
Name (FQDN) of the server, on which the index proxy is installed,
Port of the index proxy portal servers
Port (default: 7080) on which the index proxy reacts to requests
User name of the token service account
The client ID of the user which shall be used for the connection to the index
proxy; the client ID has been created during the installation of the index
proxy.
Observe capital and small letters for the client ID!
Password of the token service account
Password belonging to the client ID.
After entering all data and selecting the Next > button, the connection to the index proxy will be checked.
If an error should occur, the following message will be displayed.
Button
Description
Abort
The check may be aborted to correct the values. Then the values will be rechecked.
Retry
New try with the current values
Ignore
The dialog can be closed without a positive check result. The installation will be carried out
with the values specified in the dialog.
3.2.9 Web Logins
Spider
The Spider Web login is a database user, which is required by the product components for accessing the databases. It
is used by Spider Web and the Spider services.
For the Web Login, you can either create new users or use existing users if the SQL installation user possesses the rights
to create a new login on the database server.

Spider Technical Reference - Installation, Configuration, Troubleshooting
17-01-2022 / EN
29/208
Use an existing user
Field
Description
Use an existing user
Select the radio button to enter the data of an existing user
User name
The drop-down can be used to select the users found on the SQL server.
Password
Password of the selected user

Spider Technical Reference - Installation, Configuration, Troubleshooting
17-01-2022 / EN
30/208
Create new user
Field
Description
Create new user
Select the radio button to let the setup create a new user.
User name
Desired user name
Password
Password for the user to be created.
Note The option to create a user will only be provided if the corresponding rights have been granted. The
users have to be set up beforehand on the database server with the corresponding rights.
Please select a password which corresponds to the complexity guidelines of your domain and/or your
SQL server.

Spider Technical Reference - Installation, Configuration, Troubleshooting
17-01-2022 / EN
31/208
SpiderAdmin
The Spider admin login is used to access the Admin tool for administrating the database on the business layer.
As long as the SQL installation user possesses the rights for creating a new login on the database server, a new user
may be created here. Otherwise, an existing user can be used.
Use an existing user
Field
Description
Use an existing user
Select the radio button to enter the data of an existing user
User name
The drop-down can be used to select the users found on the SQL server.
Password
Password of the selected user

Spider Technical Reference - Installation, Configuration, Troubleshooting
17-01-2022 / EN
32/208
Create new user
Field
Description
Create new user
Select the radio button to let the setup create a new user.
User name
Desired user name
Password
Password for the user to be created.
Note If is only possible to create a user if the corresponding rights have been granted, i.e. users must be
setup in advance on the database server with the appropriate rights.
Please select a password which corresponds to the complexity guidelines of your domain and/or your
SQL server.

Spider Technical Reference - Installation, Configuration, Troubleshooting
17-01-2022 / EN
33/208
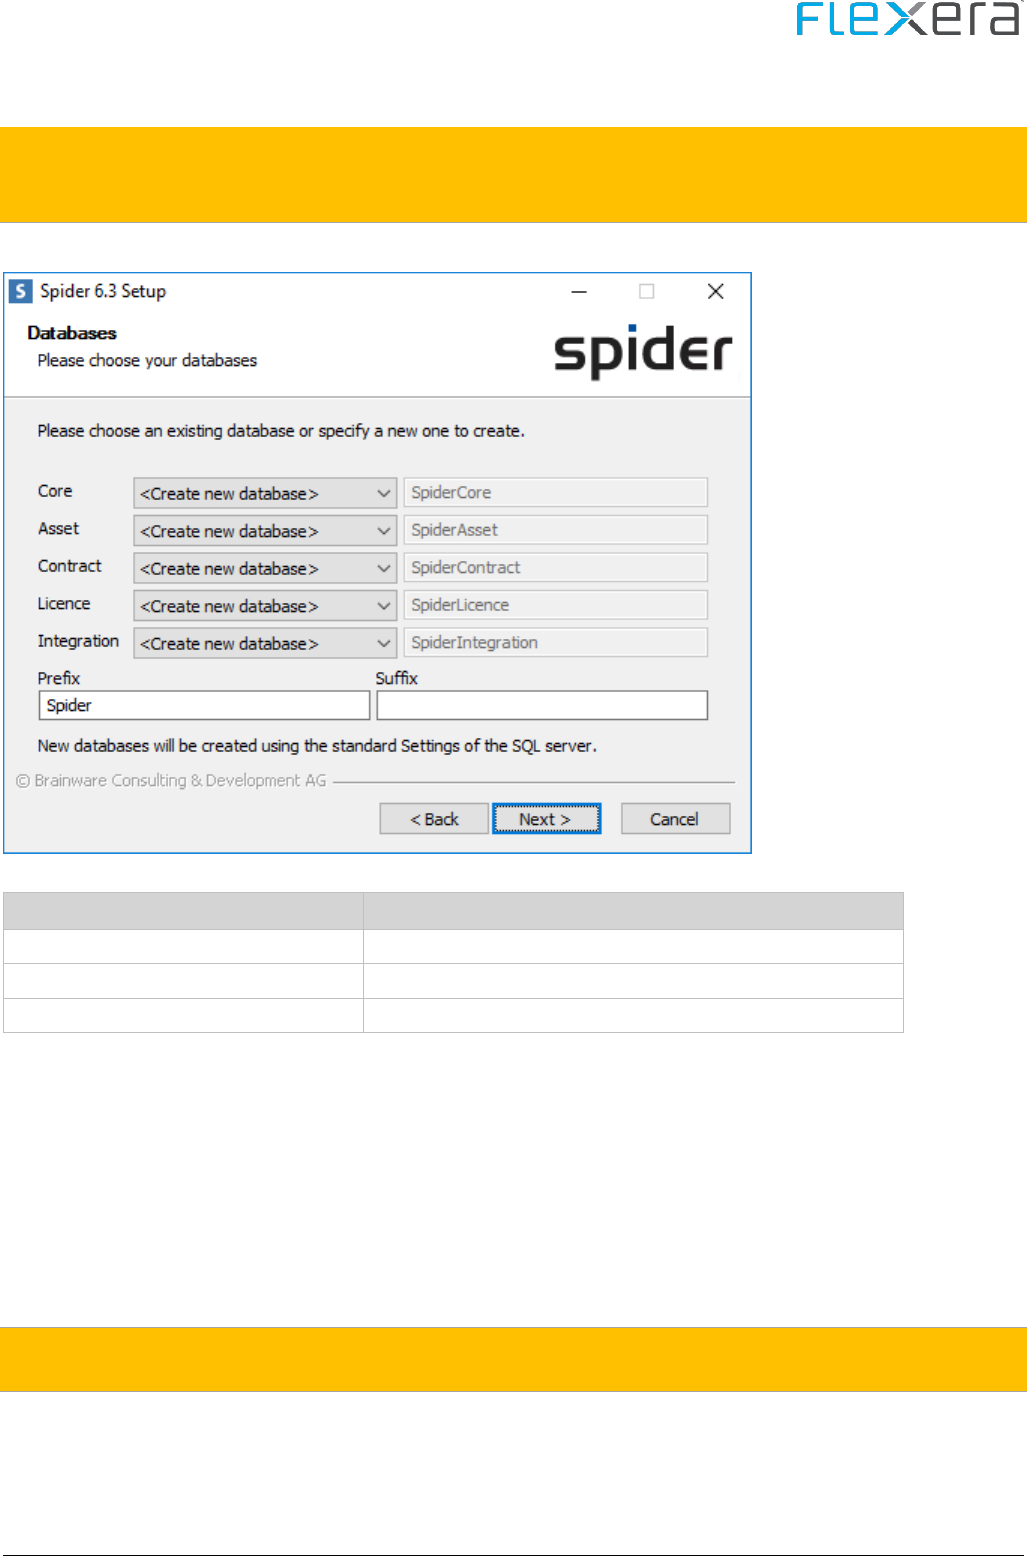
3.2.10 Database names
The databases can be either created in advance or by the setup.
Note The new databases are created using the default settings of the SQL server. If you need specific set-
tings, the database must be provided in advance on the SQL server.
Spider supports database names with up to 50 characters.
Select database created in advance
Select the databases detected on the SQL server from the corresponding drop-down for each product.
Note The Integration database is only available for specific license types.
The following databases are required for the installation:
• Core
• Core_TempDB
• Core_SesstionState
• Asset
• License
• Contract
• (Integration)
Attention The database names may be chosen freely; if the databases are created in advance, you have to ob-
serve that the TempDB and the SessionState databases must be created according to the template
Spider Technical Reference - Installation, Configuration, Troubleshooting
17-01-2022 / EN
34/208
<Name of the core database>_TempDB
<Name of the Core database>_SessionState.
The database names must not exceed a length of 50 characters.
Let databases be created by the setup.
Field
Description
Core, Asset, Contract, License, Integration
Name of the databases which are available for selection.
Prefix
Prefix which is put in front of all(!) database names.
Suffix
Suffix which is put at the back of all(!) database names.
The names of the product databases are pre-defined as
• Core
• Asset
• Contract
• License
• Integration
Changes can be made via adaptation of the prefix or suffix.
Attention Theoretically, also a mix of newly created and existing databases may be possible. However, we do
not recommend to use a mixed creation of databases.

Spider Technical Reference - Installation, Configuration, Troubleshooting
17-01-2022 / EN
35/208
3.2.11 Language and format settings
The language selected for Settings determines the basic language with which the Settings are installed. These settings
cannot be changed later on.
The default culture for Spider, however, may also be changed later on.

Spider Technical Reference - Installation, Configuration, Troubleshooting
17-01-2022 / EN
36/208
3.2.12 SMTP settings
The SMTP server is used to send the different e-mail reminders from Spider. You will need a user for access to the
SMTP server.
Field
Description
SMTP server
FQDN of the SMTP server
SMTP user
User ID used to authenticate oneself for the SMTP server
Password
Password of the above mentioned user
Sender
Sending address used to send the e-mails of Spider.
Use SSL
If selected, the communication with the SMTP server is tried with SSL (if supported by the SMTP server)
Note These data will be entered in each product and used by the Spider services to send e-mails. A later setup or
change of the SMTP settings has to be made in each product.

Spider Technical Reference - Installation, Configuration, Troubleshooting
17-01-2022 / EN
37/208
3.2.13 Administration account
The Administrator account is the account for managing Spider. This account obtains administrative rights in parts of
Spider and is available after installation for the access of the <Spider> Web.
Field
Description
Login
Login of the user with which a login to Spider-Web is possible.
User name
Name of the user
Password
Password used for creating the login.

Spider Technical Reference - Installation, Configuration, Troubleshooting
17-01-2022 / EN
38/208
3.2.14 IIS configuration
You can determine the IIS application name for the Spider Web, the default is "Spider". The Spider Web will then be
available under http://server name/Spider.
All other settings result from the selected application name and cannot be altered. In this step, you can set the en-
cryption of the configuration files only.
Field
Description
IIS application name
Name given to the IIS application in the course of the installation.
Encrypt configuration files.
By selecting the check box, the details, which are stored for the connection between <Spider>
Web and database, will be encrypted.
Note Details for encryption and decryption of the IIS configuration can be found in chapter Encryption of the
configuration (on page 88).
Larger environments or frequent connection timeouts may require to add the parameter Max Pool
Size=50000;Pooling=True; to your web config file

Spider Technical Reference - Installation, Configuration, Troubleshooting
17-01-2022 / EN
39/208
3.2.15 Transfer directory
In the last step of the installation, you will be asked to specify a directory for the file transfer.
The transfer directory provides the working path for imports and exports of various services of Spider.
Then click on "Install" to start the installation.

Spider Technical Reference - Installation, Configuration, Troubleshooting
17-01-2022 / EN
40/208
3.2.16 Installation
The installation assistant will now install Spider. This can take some time. Please wait, until the installation is com-
pleted.
The successful completion of the installation will be shown in the progress dialog.

Spider Technical Reference - Installation, Configuration, Troubleshooting
17-01-2022 / EN
41/208
The setup has been completed successfully and can now be closed.
After completion of the installation, a log file will be written. For details to the log files, please refer to chapter Log
files (on page 208).
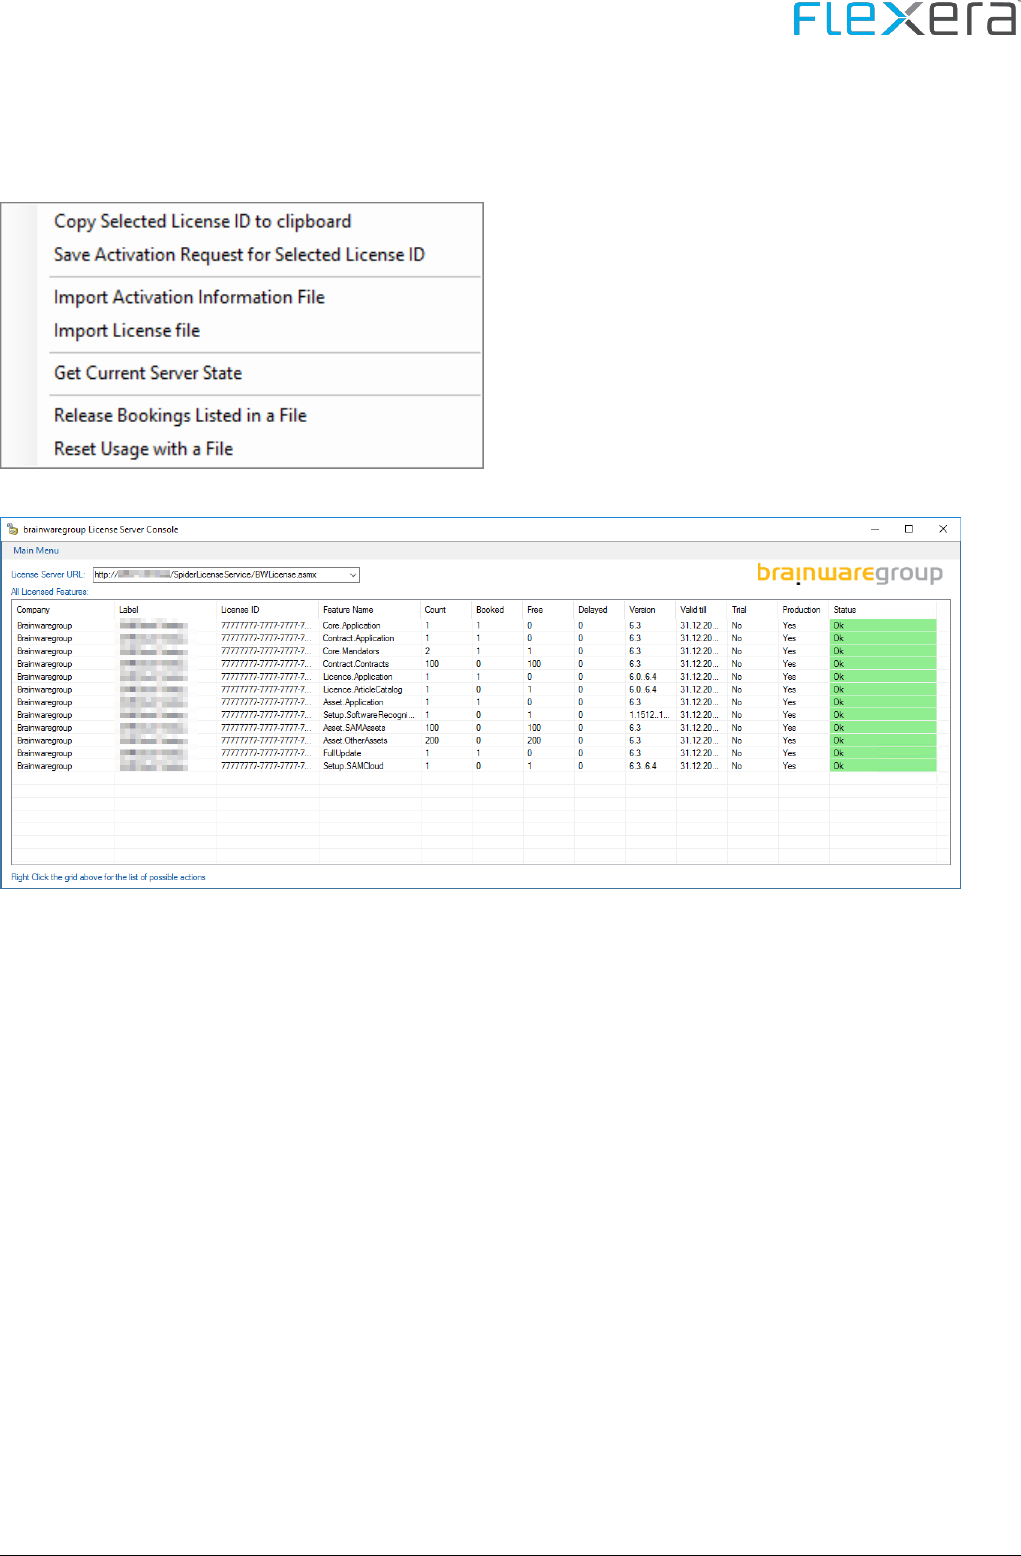
3.2.17 Activate the license
The installation of Spider requires a valid license. In order to be able to use Spider after the installation, this license
must be activated. The license is activated via the license console (via Start menu -> Spider -> License Console).
Use the context menu to create a file for the license activation request. Select the item Save Activation Information
File, save the created file and send it to Flexera
Spider Technical Reference - Installation, Configuration, Troubleshooting
17-01-2022 / EN
42/208
Flexera creates an activation file, which is imported via the item Import Activation Information File of the context
menu.
Spider is now ready to use. The first login on a client can be made with the user data used in the setup.

Spider Technical Reference - Installation, Configuration, Troubleshooting
17-01-2022 / EN
43/208
3.3 Advanced configuration
In this chapter, advanced configurations for Spider are described.
3.3.1 Operation with domain account
Alternatively to the operation with SQL users, Spider can also be operated with a domain user.
Please find following steps below for a more detailed explanation
• Preparation of the SQL server
• Permission of the IIS
• Adaption of the IIS application pool
• Conversion of the service accounts
• Conversion of the connection strings
Precondition:
• A domain account with user rights in the domain
Prepare SQL server
The desired user account must obtain the usage rights in SQL server.
➢ Start Microsoft SQL Server Management Studio and connect to the desired database [\Instance].
➢ Right click on Security > Logins > New Login

Spider Technical Reference - Installation, Configuration, Troubleshooting
17-01-2022 / EN
44/208
➢ Enter the Login name:

Spider Technical Reference - Installation, Configuration, Troubleshooting
17-01-2022 / EN
45/208
➢ Navigate to menu item User Mapping
➢ Entering the Roles memberships for the Spider databases by setting the tick on Map and selecting the member-
ship in the lower part of the dialog.
Database
Database role membership
Asset
public, sr_user
Contract
public, sr_user
Core
public, sr_user
Core_SessionState
public
Core_TempDB
public, sr_user
Integration
public, sr_user
License
public, sr_user

Spider Technical Reference - Installation, Configuration, Troubleshooting
17-01-2022 / EN
46/208
Note The Integration database is not included in all installations or can have another name.
➢ Navigate to the menu item Status and check whether the connecting right has been granted and the login has
been activate.
➢ Exit the dialog with OK.
Grant IIS rights to the domain account
➢ Start the Management Control Panel of the computer
➢ Computer Management (local) > System Tool > Local Users and Groups > Groups

Spider Technical Reference - Installation, Configuration, Troubleshooting
17-01-2022 / EN
47/208
➢ Double click on the group IIS_IUSRS

Spider Technical Reference - Installation, Configuration, Troubleshooting
17-01-2022 / EN
48/208
➢ Add... Click on button
➢ Enter the domain user name and then exit the dialog with Check Names > OK

Spider Technical Reference - Installation, Configuration, Troubleshooting
17-01-2022 / EN
49/208
➢ Exit the dialog with OK and close the Computer Management

Spider Technical Reference - Installation, Configuration, Troubleshooting
17-01-2022 / EN
50/208
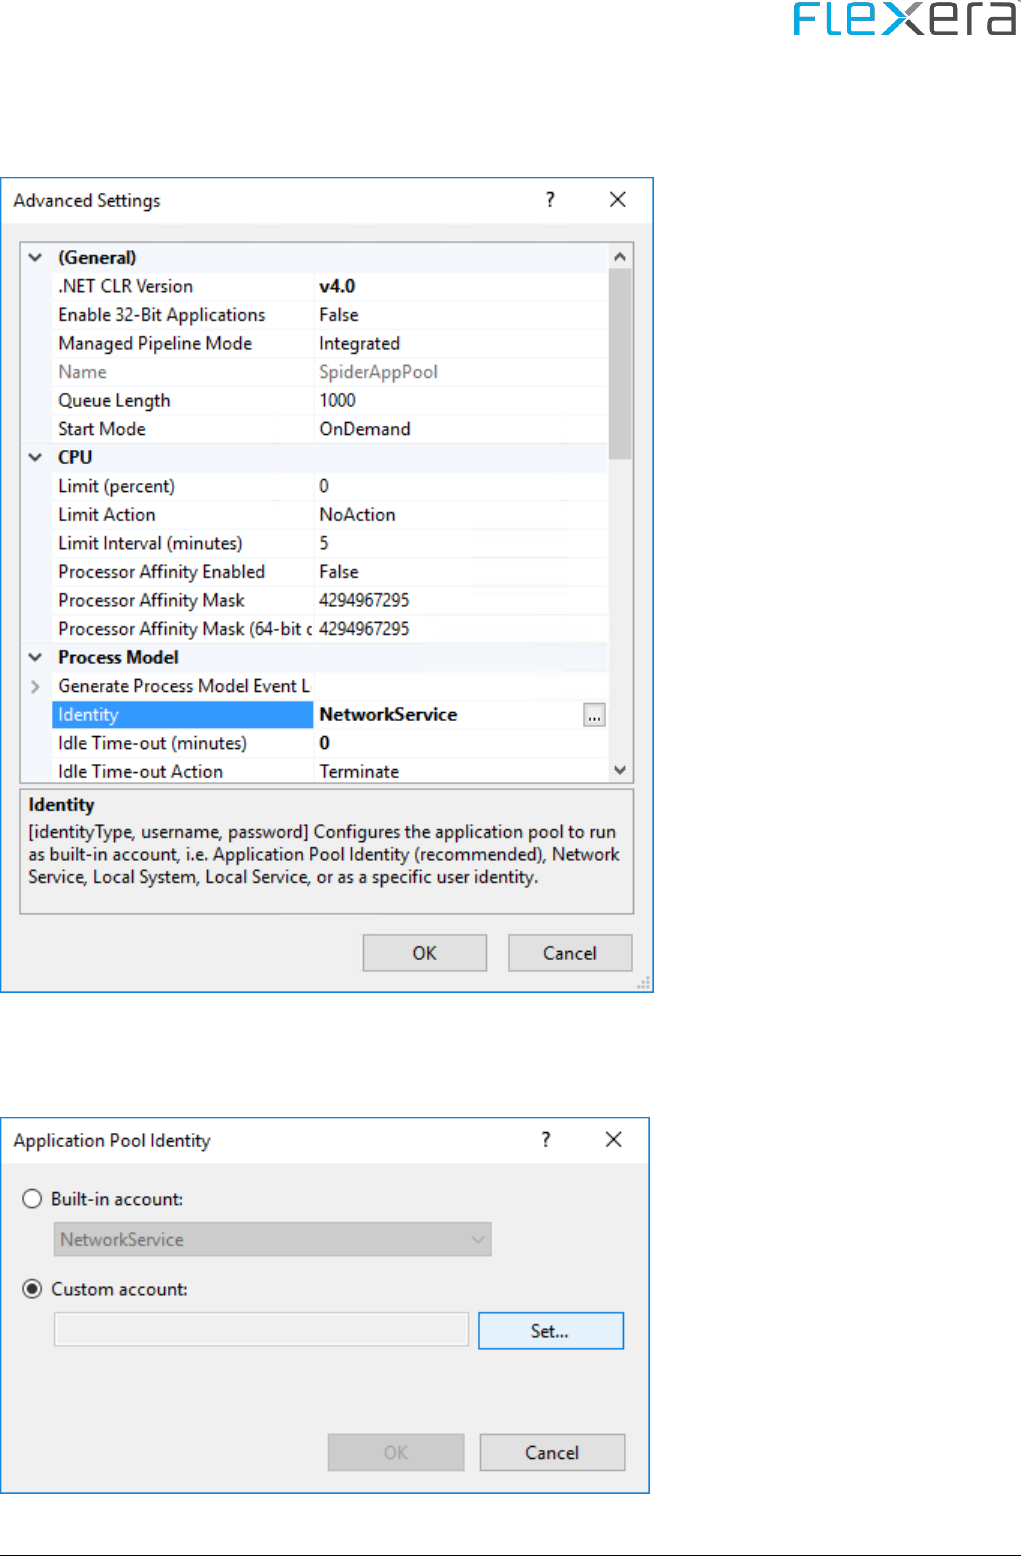
Adapt the identity of the application pools
➢ Start the Internet Information Services (IIS) Manager
➢ Start Page > Application Pools
➢ Select the application pool
➢ Right click on the application pool and select Advanced Settings... from the context menu (the name of the appli-
cation pool has been defined during the installation under IIS configuration (on page 38))
Spider Technical Reference - Installation, Configuration, Troubleshooting
17-01-2022 / EN
51/208
➢ Select under Process Model > Identity the ... button
➢ Select the radio button under Custom Account: and click on the Set... button.

Spider Technical Reference - Installation, Configuration, Troubleshooting
17-01-2022 / EN
52/208
➢ Enter the user name and password of the domain user and click on OK .
➢ Exit all dialogs with OK.
➢ Repeat all previous steps with the application pool with suffix IndexAppPool
➢ To finish the process, restart the IIS with command iisreset .

Spider Technical Reference - Installation, Configuration, Troubleshooting
17-01-2022 / EN
53/208
Conversion of the access data
In order to use the domain user also for the connection, the different components must be informed about this.
Adapt service accounts
The Spider services must be adapted for the use with the domain user.
➢ Start the Management Control Panel of the computer
➢ Select Spider Service and open it with a double click

Spider Technical Reference - Installation, Configuration, Troubleshooting
17-01-2022 / EN
54/208
➢ Go to the Log On ribbon, select This account and adapt the data of the domain user.
➢ OK and exit the dialog.

Spider Technical Reference - Installation, Configuration, Troubleshooting
17-01-2022 / EN
55/208
Note In some cases, dialogs may be displayed which inform about the fact that the user has been granted
the Log-on-as-a-service right resp. that the service has to be restarted, before the change becomes ac-
tive.
➢ Repeat the procedure for all Spider services belonging to this instance(CoreServer_xx).
• Asset
• Contract
• Core
• License
• Integration (not always installed)
Attention The services do not have to be started now, but only after the Connection Strings have been adapted.

Spider Technical Reference - Installation, Configuration, Troubleshooting
17-01-2022 / EN
56/208
Adapt the connection strings
The file ConnectionStrings.config is used for the access of application and services. This file must be adapted for each
different component.
Storage locations of the connection strings
Component
Storage location
Spider Web
C:\Program Files\Spider\CoreServer_XX\Web\_Settings\connectionStrings.config
SessionState
C:\Program Files\Spider\CoreServer_XX\Web\_Settings\SessionState.config
IndexProxyApi
C:\Program Files\Spider\CoreServer_XX\IndexProxy\_Settings\connectionStrings.config
Services
C:\Program Files\Spider\CoreServer_00\Services\<ServiceName>\Spider.<ServiceName>.Service.Exe.config
The entries uid=... and pwd=... must be replaced by Integrated Security=True.
Spider Web and IndexProxyApi connectionStrings.config
<?xml version="1.0" encoding="utf-8"?>
<connectionStrings>
<add name="CoreConnectionString" connectionString="server=.\;
database=SpiderCore;
uid=Spider;
pwd=abcde;
application name=Spider;
persist security info=True;
packet size=4096"
providerName="System.Data.SqlClient" />
</connectionStrings>
<?xml version="1.0" encoding="utf-8"?>
<connectionStrings>
<add name="CoreConnectionString" connectionString="server=.\;
database=SpiderCore;
Integrated Security=True;
application name=Spider;
persist security info=True;
packet size=4096"
providerName="System.Data.SqlClient" />
</connectionStrings>
Session State Database
<?xml version="1.0" encoding="utf-8"?>
<SessionState mode="SQLServer" sqlConnectionString="Data Source=.\;
Database=SpiderCore_SessionState;

Spider Technical Reference - Installation, Configuration, Troubleshooting
17-01-2022 / EN
57/208
User Id=Spider;
Password=abcde"
cookieless="UseCookies" timeout="30" allowCustomSqlDatabase="true" />
<?xml version="1.0" encoding="utf-8"?>
<SessionState mode="SQLServer" sqlConnectionString="Data Source=.\;
Database=SpiderCore_SessionState;
Integrated Security=True"
cookieless="UseCookies" timeout="30" allowCustomSqlDatabase="true" />
Services
<?xml version="1.0" encoding="utf-8"?>
<configuration>
<appSettings>
<add key="ServiceName" value="Spider Asset Service (CoreServer_00)" />
<add key="ConnectionString" value="data source=.\;
initial catalog=SpiderAsset;
User Id=Spider;
password=abcde;
persist security info=True;
Application name=SPAssetSvc_CoreServer_00;
packet size=4096" />
<add key="InitializeTimeoutSeconds" value="300" />
</appSettings>
</configuration>
<?xml version="1.0" encoding="utf-8"?>
<configuration>
<appSettings>
<add key="ServiceName" value="Spider Asset Service (CoreServer_00)" />
<add key="ConnectionString" value="data source=.\;
initial catalog=SpiderAsset;
Integrated Security = True;
persist security info=True;
Application name=SPAssetSvc_CoreServer_00;
packet size=4096" />
<add key="InitializeTimeoutSeconds" value="300" />
</appSettings>
</configuration>
Attention It could happen that the content of certain .config files is encrypted. The decryption process is de-
scribed in chapter Encryption of the access data (see "" on page 88).

Spider Technical Reference - Installation, Configuration, Troubleshooting
17-01-2022 / EN
58/208
3.3.2 Subsequent setup of the index proxy
The subsequent setup of the index proxy installation can be carried out via a regular update. There, you will be
prompted in each update to set up the Index Proxy (see "" on page 26) as long as this has not be done, yet.
If this is not working, execute the following steps:
Configuration entries
Entries in the [dbo].[config] table in the Core database
Area: Application.Indexing
Key
Value
Enabled
True
IndexProxyEndpoint
http://<ESIServer>:<Port>/indexproxy/api/2/
e.g. http://sername.domain:7080/indexproxy/api/2/
PortalClientId
User name given in the ESI setup
PortalClientSecret
Password for user name given above
PortalEndpoint
http://<ESIServer>:<Port>/portal/api/2/
e.g. http://sername.domain:7080/portal/api/2/
IIS application connectionStrings.config
The IIS application will be installed parallel to the instance of Spider (Path ..\CoreServer_XX\IndexProxy\_Settings). In
order to establish a connection between application and database, a so-called connectionStrings.config file must be
created in the subfolder _Settings.
Note In case of a manual installation at a later time, the folder "_Settings" must be created first.
The required values can be taken from the connectionStrings.config file of the Spider IIS application (Path: Path
..\CoreServer_XX\Web\_Settings).
Login with integrated security
<?xml version="1.0" encoding="utf-8"?>
<connectionStrings>
<add name="CoreConnectionString"
providerName="System.Data.SqlClient"
connectionString="server=<SQL server>;
database=<Core database>;
Integrated Security=True;
application name=SpiderIndex;
persist security info=True;
Spider Technical Reference - Installation, Configuration, Troubleshooting
17-01-2022 / EN
59/208
packet size=4096" />
</connectionStrings>
Login with SQL user
<?xml version="1.0" encoding="utf-8"?>
<connectionStrings>
<add name="CoreConnectionString"
providerName="System.Data.SqlClient"
connectionString="server=<SQL server>;
database=<Core database>;
uid=<SQL User>;
pwd=<SQL User Password>
Integrated Security=True;
application name=SpiderIndex;
persist security info=True;
packet size=4096" />
</connectionStrings>
Note If using SQL users, it might be desirable to locally encrypt the data. You can find the corresponding
instructions in Encryption of the configuration (on page 88).
Settings in the registry
In order to prevent the setup form asking again for the details in the next update, some entries have to be made in the
registry.
Key: HKEY_LOCAL_MACHINE\SOFTWARE\WOW6432Node\brainwaregroup\Spider\CoreServer_XX\IndexProxy
Name
Type
Data
IndexProxyClientID
REG_SZ
<User name for the connection with the ESI>
The password is not stored on purpose.
IndexProxyServerName
REG_SZ
FQDN of the ESI server
IndexProxyServerPort
REG_SZ
Port of the ESI server (standard: 7080)
UseIndexProxy
REG_SZ
1

Spider Technical Reference - Installation, Configuration, Troubleshooting
17-01-2022 / EN
60/208
3.3.3 Conversion to SSL operation
In order to protect the communication, accessing Spider via SSL can be enabled.
Attention The IIS application of the license service is not SSL-capable. Please find below information about how
to configure this as an exception.
Important A prerequisite for the operation is a valid SSL certificate that is issued to the Spider application server
Configure IIS default web site
➢ Start the Internet Information Services (IIS) Manager
➢ Select server > Server certificates

Spider Technical Reference - Installation, Configuration, Troubleshooting
17-01-2022 / EN
61/208
➢ Actions > Import
➢ Select the certificate > Enter password > Select certificate store: Web Hosting > OK

Spider Technical Reference - Installation, Configuration, Troubleshooting
17-01-2022 / EN
62/208
➢ Default web site > Edit site > Bindings

Spider Technical Reference - Installation, Configuration, Troubleshooting
17-01-2022 / EN
63/208
➢ Add...
Field
Contents
Type
https
IP address:
All Unassigned, or if the server shall receive requests only from one IP address (from several configured
addresses).
Host name:
Host name stored in the certificate
SSL certificate
Select the corresponding certificate.
➢ OK

Spider Technical Reference - Installation, Configuration, Troubleshooting
17-01-2022 / EN
64/208
➢ Marking the http binding > Edit...
Enter localhost in "Host name:" to ensure that applications such as the license service or IndexProxyApi can continue to
communicate with the local machine.

Spider Technical Reference - Installation, Configuration, Troubleshooting
17-01-2022 / EN
65/208
➢ OK
➢ Close

Spider Technical Reference - Installation, Configuration, Troubleshooting
17-01-2022 / EN
66/208
Now it is ensured that the server communicates externally via HTTPS, while HTTP is used for the local communication.
Attention The communication with the license server via HTTP is a precondition for the setup to be able to up-
date the system.
Configuration entries
Entries in the [dbo].[config] table in the Core database
Area: Application
Key
Value
Server
httpS://server.domain.local
server.domain.local must be replaced by the FQDN stated in the certificate.
Restart the IIS
To ensure that all changes are correctly accepted, the IIS must be restarted with the iisreset command.
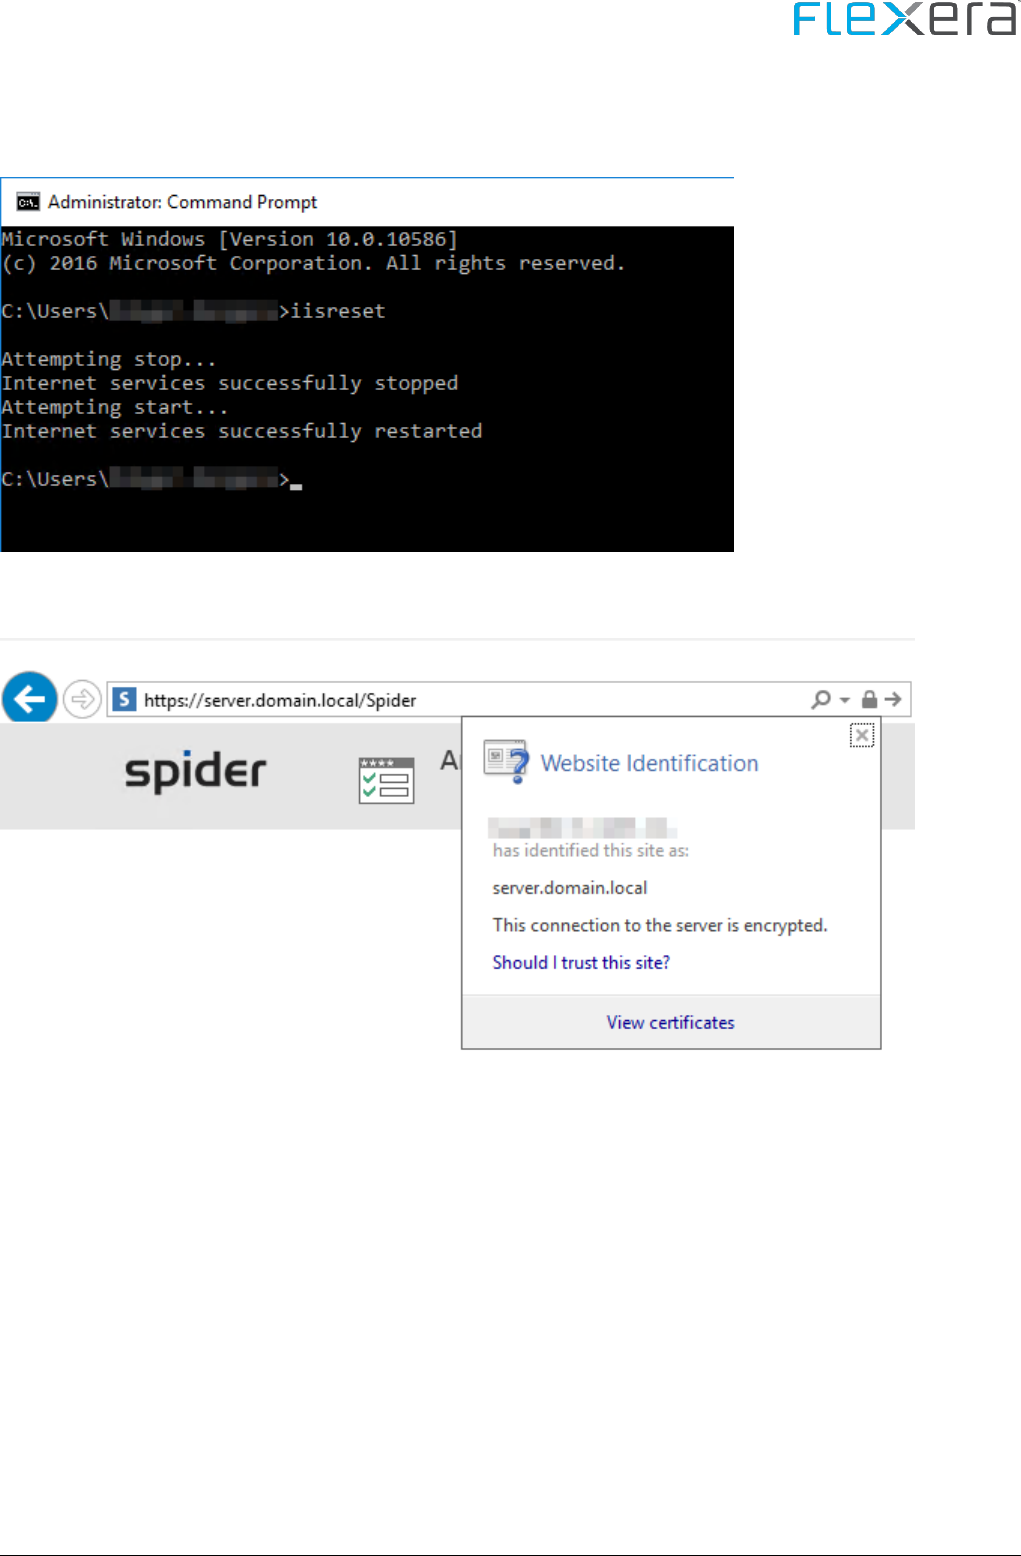
Spider Technical Reference - Installation, Configuration, Troubleshooting
17-01-2022 / EN
67/208
Now, the communication with the Spider application via SSL is possible.

Spider Technical Reference - Installation, Configuration, Troubleshooting
17-01-2022 / EN
68/208
3.3.4 HTTP(S) Redirect
If the address of the IIS server is called up directly (Example https://server.domain.local), the IIS default web site will be
displayed in general.
In order to ensure that the address of the IIS server will also show the Spider application, a redirection can be config-
ured.
➢ Start the Internet Information Services (IIS) Manager
➢ Default Web Site > IIS > HTTP Redirect

Spider Technical Reference - Installation, Configuration, Troubleshooting
17-01-2022 / EN
69/208
➢ Enter the target web site (ensure correct HTTP/S) and click on Apply.

Spider Technical Reference - Installation, Configuration, Troubleshooting
17-01-2022 / EN
70/208
Note Should the menu item HTTP Redirect be missing, the Roles feature may have to be installed:

Spider Technical Reference - Installation, Configuration, Troubleshooting
17-01-2022 / EN
71/208
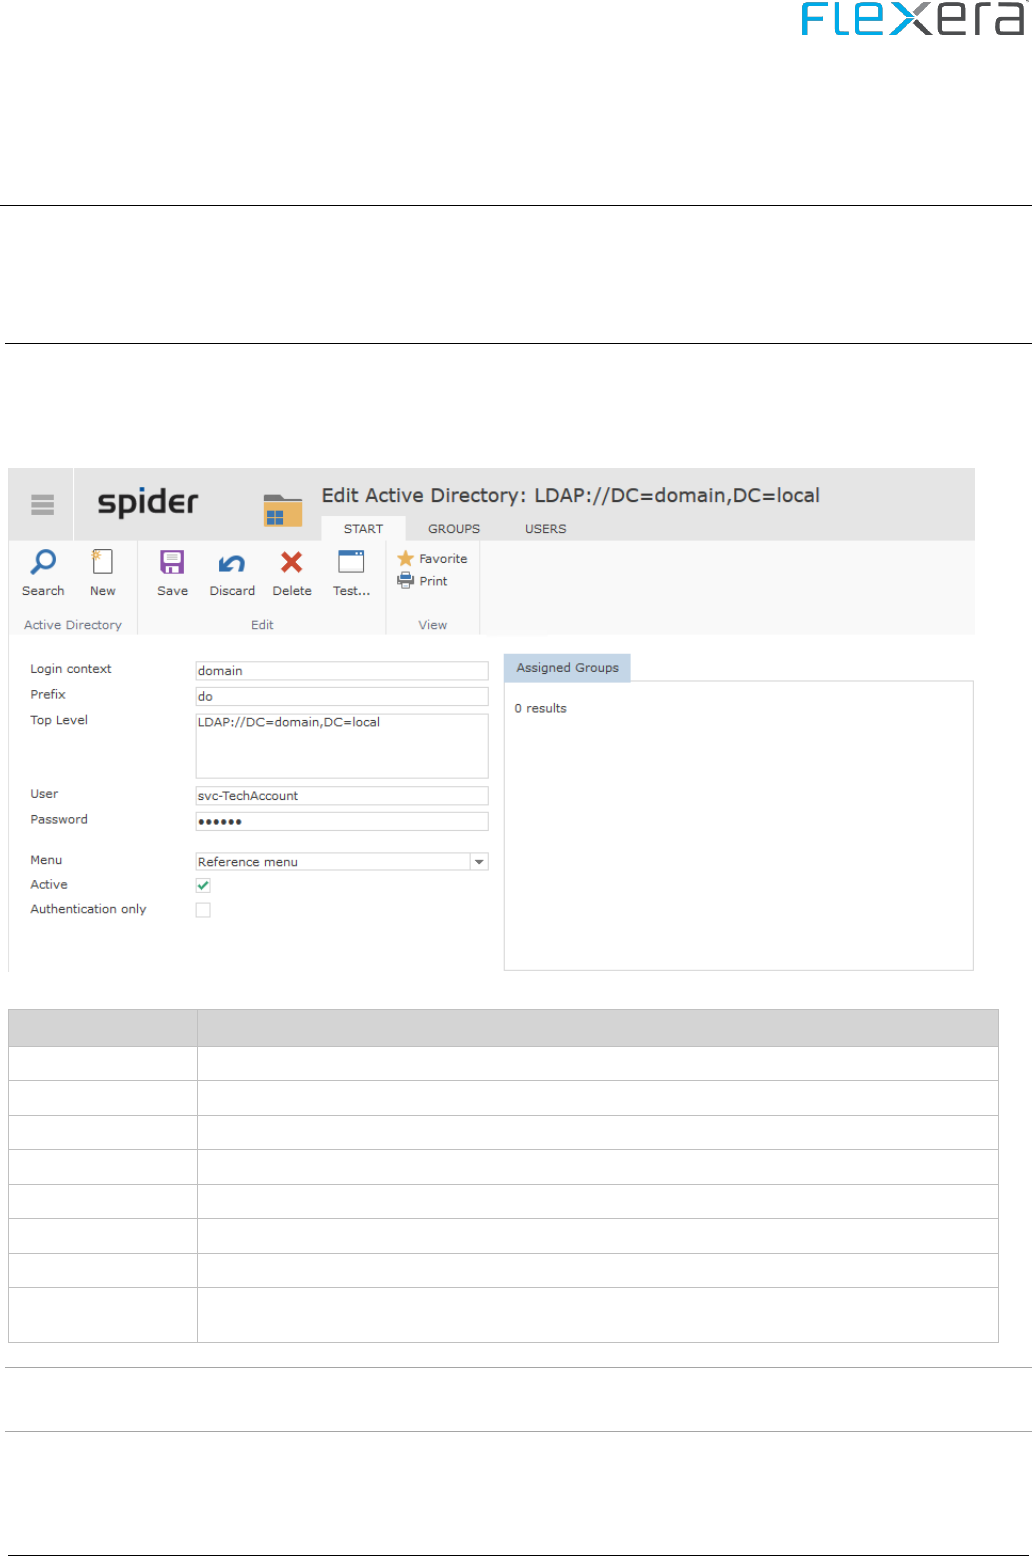
Spider Technical Reference - Installation, Configuration, Troubleshooting
17-01-2022 / EN
72/208
3.3.5 Setup of Active Directory login
In order to enable domain users to access the Spider system, the Active Directory may be used.
The setup will require groups in the Active Directory, which are assigned to one or more Spider roles.
Settings in Spider
➢ Call up the Spider web site (as administrator)
➢ System > Active Directories > New
Field
Description
Login context
NetBios name of the domain
Prefix
Selected prefix for identification
Top level
LDAP entry of the top level of the domain to be connected.
User
AD user which is used to establish the connection to the AD.
Password
Password of the above mentioned AD user
Menu
Default menu for this AD
Active
The Active Directory entry is active and can be used.
Only authentication
The AD will only be used for the authentication of the users; rights and roles are managed in Spi-
der as usual.
Note: By adding port information in the "top level" setting, a secure/signed LDAP-connection can be config-
ured. In case of a standard configuration the string ":636" needs to be added.

Spider Technical Reference - Installation, Configuration, Troubleshooting
17-01-2022 / EN
73/208
➢ Test...
➢ Save
➢ Ribbon Groups > Assign groups
➢ Enter domain user used for determination of the groups
➢ Search

Spider Technical Reference - Installation, Configuration, Troubleshooting
17-01-2022 / EN
74/208
➢ Highlight desired groups > Transfer

Spider Technical Reference - Installation, Configuration, Troubleshooting
17-01-2022 / EN
75/208
➢ Start
➢ Selection of a group from Assigned groups

Spider Technical Reference - Installation, Configuration, Troubleshooting
17-01-2022 / EN
76/208
➢ Ribbon mandator
➢ Add mandator > Select mandator > Assign
➢ Ribbon Roles

Spider Technical Reference - Installation, Configuration, Troubleshooting
17-01-2022 / EN
77/208
➢ Highlight desired roles > Add roles
This will complete the assignment of mandators and roles to an Active Directory group. If required, this must be re-
peated for other groups, mandators or roles.

Spider Technical Reference - Installation, Configuration, Troubleshooting
17-01-2022 / EN
78/208
Note When setting the boolean key "DebugInformation" in the configuration area "Applica-
tion.Security.ActiveDirectory" of the Spider Core database to "true", additional AD information will be
shown on the login page in case of an unsuccessful AD login attempt.
IIS settings - Authentication
Note If the setting of the Windows authentication is not available, the role feature must be installed if re-
quired:
➢ Start the Internet Information Services (IIS) Manager

Spider Technical Reference - Installation, Configuration, Troubleshooting
17-01-2022 / EN
79/208
➢ Select the server > Sites > Default web site > Spider Web site > Authentication
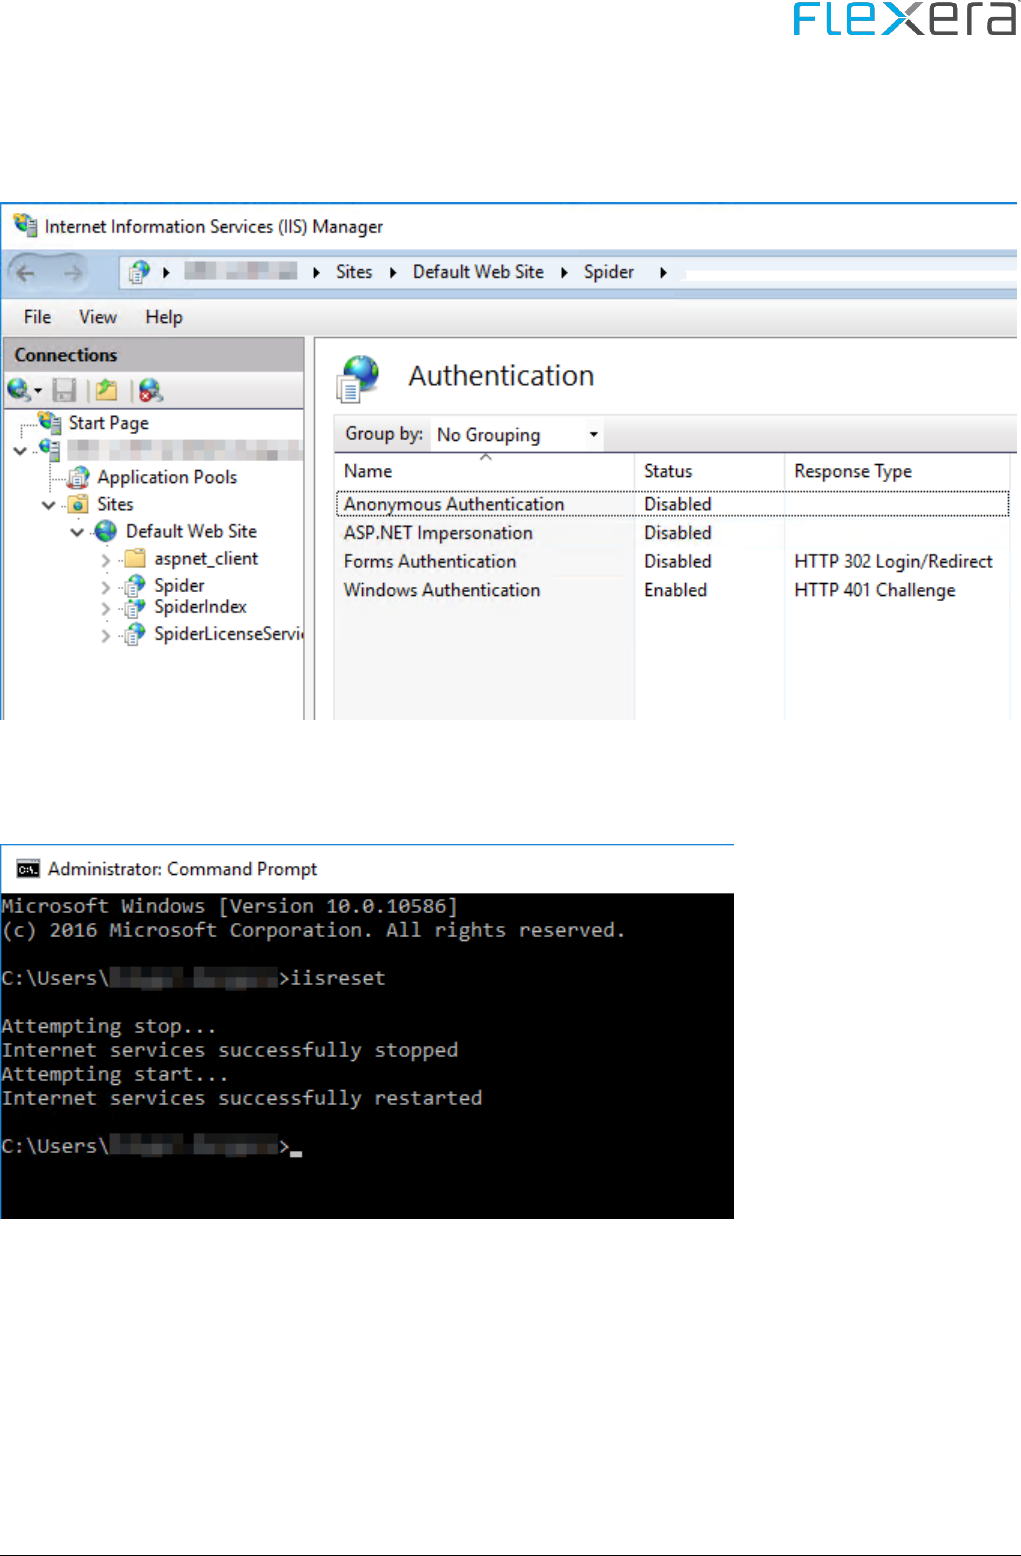
Spider Technical Reference - Installation, Configuration, Troubleshooting
17-01-2022 / EN
80/208
➢ Set all authentication types except the Windows authentication to Disabled , and set Windows Authentication to
Enabled.
To ensure that all changes are correctly accepted, the IIS must be restarted with the iisreset command.

Spider Technical Reference - Installation, Configuration, Troubleshooting
17-01-2022 / EN
81/208
3.3.6 Info page - support.config
In the delivery state, there is no information about the support on the Info page which can be reached by a click on the
Info button in the menu or in the login screen.
To store your own information there, the file support.config in the path <In-
stallDir>\Spider\CoreServer_XX\Web\_settings must be edited.
This file contains an XML structure, which can be used to store language-specific information.
<Intro>
<LanguageCode>DE</LanguageCode>
<Text>Before contacting our helpdesk regarding your support request, please first refer to the product documentation and our
knowledge base.</Text>
</Intro>
The intro allows to show a general text on the info page. In addition, there are the contact entries which can be used
to configure one or more contact types.
<Contact>
<LanguageCode>DE</LanguageCode>
<Name>Knowledgebase</Name>
<Icon>SupportKnowledgebase</Icon>
<Text>Knowledgebase</Text>
<Url></Url>
</Contact>
Field
Description
LanguageCode
The language abbreviation to be entered can be found in the column "639-1" on the page
https://en.wikipedia.org/wiki/List_of_ISO_639-1_codes.

Spider Technical Reference - Installation, Configuration, Troubleshooting
17-01-2022 / EN
82/208
Field
Description
Name
Entry which defines the type of the resource to be shown.
Page (a web site)
Form (a form on a web site)
E-mail (an e-mail address)
Phone (a phone number)
Icon
The icon to be shown, see table below.
Text
The text to be displayed
URL
If an entry of the type Page, Form, or Email has been made in the Name field, the target URL may be
entered here.
Caution, for an e-mail address, a mailto: must be put in front!
Icon code
Icon
SupportKnowledgebase
SupportPage
SupportForm
SupportEmail
SupportPhone
Important You can use only one "Name" per language code! The combination of LanguageCode and Name
must be unique.
<Contact>
<LanguageCode>DE</LanguageCode>
<Name>Page</Name>
<Icon>SupportPage</Icon>
<Text>Support page</Text>
<Url>https://support.brainwaregroup.com/</Url>
</Contact>
<Contact>
<LanguageCode>DE</LanguageCode>
<Name>Form</Name>
<Icon>SupportForm</Icon>
<Text>Support form</Text>
<Url>http://support.brainwaregroup.com/form/</Url>
</Contact>
<Contact>
<LanguageCode>DE</LanguageCode>
<Name>Email</Name>
<Icon>SupportEmail</Icon>
<Text>E-mail</Text>
<Url>mailto:support@brainwaregroup.com</Url>
</Contact>

Spider Technical Reference - Installation, Configuration, Troubleshooting
17-01-2022 / EN
83/208
<Contact>
<LanguageCode>DE</LanguageCode>
<Name>Phone</Name>
<Icon>SupportPhone</Icon>
<Text>Phone: +41 41 748 22 11</Text>
<Url />
</Contact>
results in:
3.3.7 Available languages - culture.config
The languages available in the web can be configured in the file culture.config (Path <In-
stallDir>\Spider\CoreServer_XX\Web\_settings).
<?xml version="1.0" ?>
<culture>
<availableCultures>
<clear />
<add cultureCode="en-GB" />
<add cultureCode="en-US" />
<add cultureCode="en-ZA" />
<add cultureCode="de-DE" />
<add cultureCode="de-CH" />
<add cultureCode="de-AT" />
<add cultureCode="yes-JP" />
</availableCultures>
<defaultCulture cultureCode="de-DE" />
</culture>

Spider Technical Reference - Installation, Configuration, Troubleshooting
17-01-2022 / EN
84/208
A list of available culture codes can be found in the table on https://msdn.microsoft.com/library/ee825488.aspx, in the
column Language Culture Name.
The list can be edited by adding or deleting entries.
The entry <defaultCulture cultureCode="" /> determines which language will be shown when a user opens the page.
Important Adding a new language in the file culture.config does not mean that there are any translations for this
language. If there are no translations for the culture code, terms of the default culture will be shown
automatically.
3.3.8 Settings in the Config table
Via the settings in the Config table, it is possible to adjust the behavior of Spider. Not all entries can be edited via the
Spider admin or the web frontend.
Area
Key
Value
Description
Authentication
BrowserEnableAutocomplete
True | False
Via this item, the standard behav-
ior for automatic filling of sensitive
fields such as the password field
on the login page can be set.
Caution: Not every
browser supports or reacts to this
setting. The functionality of this
setting can only be ensured with a
browser which actually evaluates
this setting.

Spider Technical Reference - Installation, Configuration, Troubleshooting
17-01-2022 / EN
85/208
3.3.9 Display of advanced error messages
The exception handling implemented in Spider enables the display of error messages on a specific error page. Due to
security reasons, the page will not show all information about an exception. To display detailed error messages of the
IIS, Spider must be configured with the following settings.
Therefore, some files must be modified with an editor:
customErrors.config (..\Spider\CoreServer_XX\Web\_Settings)
<?xml version="1.0" encoding="utf-8"?>
<!--
For DEBUG switch customErrors mode to "Off" (with upper-case "O") and
httpErrors errorMode to "Detailed" and then restart the ApplicationPool
in IIS. Without a restart the changes will not be applied!
(An ApplicationPool restart can also be achieved by saving the
Web.config file without any changes. The IIS recognizes the file has
been saved and then restarts the application pool.)
If you encounter an HTTP 500 error message, ensure that httpErrors
existingResponse is set to "Auto"!
-->
<customErrors
mode="On"
defaultRedirect="~/Info/Error.aspx">
<!-- NEVER redirect a 401 error! This will cause various problems in the application! -->
<error statusCode="403" redirect="~/Default.aspx" />
<error statusCode="404" redirect="~/Default.aspx" />
<error statusCode="405" redirect="~/Info/Error.aspx?Category=8" />
<error statusCode="406" redirect="~/Info/Error.aspx?Category=8" />
<error statusCode="412" redirect="~/Info/Error.aspx?Category=8" />
<error statusCode="500" redirect="~/Info/Error.htm" />
<error statusCode="501" redirect="~/Info/Error.htm" />
<error statusCode="502" redirect="~/Info/Error.htm" />
</customErrors>.
<?xml version="1.0" encoding="utf-8"?>
<!--
For DEBUG switch customErrors mode to "Off" (with upper-case "O") and
httpErrors errorMode to "Detailed" and then restart the ApplicationPool
in IIS. Without a restart the changes will not be applied!
(An ApplicationPool restart can also be achieved by saving the
Web.config file without any changes. The IIS recognizes the file has
been saved and then restarts the application pool.)
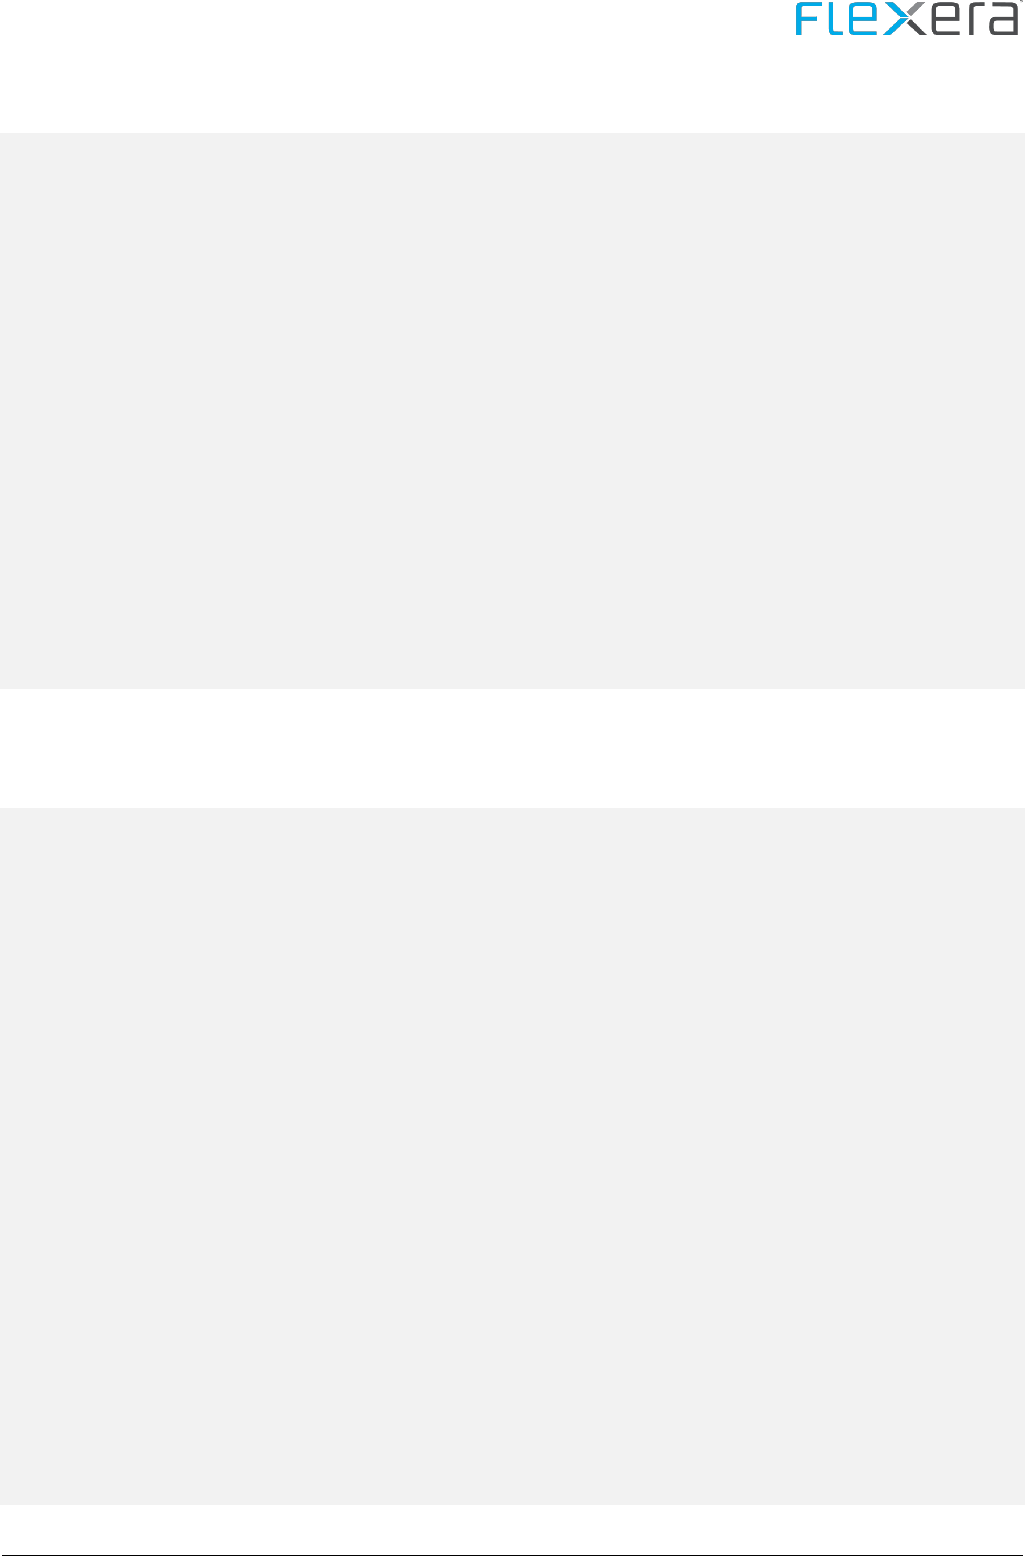
Spider Technical Reference - Installation, Configuration, Troubleshooting
17-01-2022 / EN
86/208
If you encounter an HTTP 500 error message, ensure that httpErrors
existingResponse is set to "Auto"!
-->
<customErrors
mode="Off"
defaultRedirect="~/Info/Error.aspx">
<!-- NEVER redirect a 401 error! This will cause various problems in the application! -->
<error statusCode="403" redirect="~/Default.aspx" />
<error statusCode="404" redirect="~/Default.aspx" />
<error statusCode="405" redirect="~/Info/Error.aspx?Category=8" />
<error statusCode="406" redirect="~/Info/Error.aspx?Category=8" />
<error statusCode="412" redirect="~/Info/Error.aspx?Category=8" />
<error statusCode="500" redirect="~/Info/Error.htm" />
<error statusCode="501" redirect="~/Info/Error.htm" />
<error statusCode="502" redirect="~/Info/Error.htm" />
</customErrors>.
httpErrors.config (..\Spider\CoreServer_XX\Web\_Settings)
<?xml version="1.0" ?>
<!--
For DEBUG switch customErrors mode to "Off" (with upper-case "O") and
httpErrors errorMode to "Detailed" and then restart the ApplicationPool
in IIS. Without a restart the changes will not be applied!
(An ApplicationPool restart can also be achieved by saving the
Web.config file without any changes. The IIS recognizes the file has
been saved and then restarts the application pool.)
If you encounter an HTTP 500 error message, ensure that httpErrors
existingResponse is set to "Auto"!
-->
<httpErrors errorMode="Custom" defaultResponseMode="Redirect" existingResponse="Auto">
<!-- NEVER redirect a 401 error! This will cause various problems in the application! -->
<remove statusCode="403" subStatusCode="-1" />
<remove statusCode="404" subStatusCode="-1" />
<remove statusCode="405" subStatusCode="-1" />
<remove statusCode="406" subStatusCode="-1" />
<remove statusCode="412" subStatusCode="-1" />
<remove statusCode="500" subStatusCode="-1" />
<remove statusCode="501" subStatusCode="-1" />
<remove statusCode="502" subStatusCode="-1" />
<!-- Replace "/Spider/" in path attribute with the path of the application. "~" is not allowed here! -->
<error statusCode="403" prefixLanguageFilePath="" path="/Spider/Default.aspx" responseMode="Redirect" />
<error statusCode="404" prefixLanguageFilePath="" path="/Spider/Default.aspx" responseMode="Redirect" />
<error statusCode="405" prefixLanguageFilePath="" path="/Spider/Info/Error.aspx?Category=8" responseMode="ExecuteURL" />
<error statusCode="406" prefixLanguageFilePath="" path="/Spider/Info/Error.aspx?Category=8" responseMode="ExecuteURL" />

Spider Technical Reference - Installation, Configuration, Troubleshooting
17-01-2022 / EN
87/208
<error statusCode="412" prefixLanguageFilePath="" path="/Spider/Info/Error.aspx?Category=8" responseMode="ExecuteURL" />
<error statusCode="500" prefixLanguageFilePath="" path="/Spider/Info/Error.htm" responseMode="Redirect" />
<error statusCode="501" prefixLanguageFilePath="" path="/Spider/Info/Error.htm" responseMode="Redirect" />
<error statusCode="502" prefixLanguageFilePath="" path="/Spider/Info/Error.htm" responseMode="Redirect" />
</httpErrors>
<?xml version="1.0" ?>
<!--
For DEBUG switch customErrors mode to "Off" (with upper-case "O") and
httpErrors errorMode to "Detailed" and then restart the ApplicationPool
in IIS. Without a restart the changes will not be applied!
(An ApplicationPool restart can also be achieved by saving the
Web.config file without any changes. The IIS recognizes the file has
been saved and then restarts the application pool.)
If you encounter an HTTP 500 error message, ensure that httpErrors
existingResponse is set to "Auto"!
-->
<httpErrors errorMode="'Detailed" defaultResponseMode="Redirect" existingResponse="Auto">
<!-- NEVER redirect a 401 error! This will cause various problems in the application! -->
<remove statusCode="403" subStatusCode="-1" />
<remove statusCode="404" subStatusCode="-1" />
<remove statusCode="405" subStatusCode="-1" />
<remove statusCode="406" subStatusCode="-1" />
<remove statusCode="412" subStatusCode="-1" />
<remove statusCode="500" subStatusCode="-1" />
<remove statusCode="501" subStatusCode="-1" />
<remove statusCode="502" subStatusCode="-1" />
<!-- Replace "/Spider/" in path attribute with the path of the application. "~" is not allowed here! -->
<error statusCode="403" prefixLanguageFilePath="" path="/Spider/Default.aspx" responseMode="Redirect" />
<error statusCode="404" prefixLanguageFilePath="" path="/Spider/Default.aspx" responseMode="Redirect" />
<error statusCode="405" prefixLanguageFilePath="" path="/Spider/Info/Error.aspx?Category=8" responseMode="ExecuteURL" />
<error statusCode="406" prefixLanguageFilePath="" path="/Spider/Info/Error.aspx?Category=8" responseMode="ExecuteURL" />
<error statusCode="412" prefixLanguageFilePath="" path="/Spider/Info/Error.aspx?Category=8" responseMode="ExecuteURL" />
<error statusCode="500" prefixLanguageFilePath="" path="/Spider/Info/Error.htm" responseMode="Redirect" />
<error statusCode="501" prefixLanguageFilePath="" path="/Spider/Info/Error.htm" responseMode="Redirect" />
<error statusCode="502" prefixLanguageFilePath="" path="/Spider/Info/Error.htm" responseMode="Redirect" />
</httpErrors>
Attention Please observe capital and small letters when changing settings in the files!

Spider Technical Reference - Installation, Configuration, Troubleshooting
17-01-2022 / EN
88/208
3.3.10 Encryption of the configuration
If the plain text information of the SQL access are stored in the configuration, the connection strings can be encrypted.
In the Utilities folder (..\Spider\CoreServer_00\Utilities\Spider web.config Crypter.cmd) of the Spider instance, you can
find a batch file which can be used for encrypting and decrypting.
Encryption
➢ Execution of Spider web.config Crypter.cmd
➢ Press button to continue

Spider Technical Reference - Installation, Configuration, Troubleshooting
17-01-2022 / EN
89/208
➢ Select whether to decrypt or encrypt
➢ Select the section to be encrypted

Spider Technical Reference - Installation, Configuration, Troubleshooting
17-01-2022 / EN
90/208
➢ Enter the name of the IIS application
The connection strings of the Spider-Web application and/or the Spider IndexProxyApi can be processed.
➢ Confirm summary by pressing a button

Spider Technical Reference - Installation, Configuration, Troubleshooting
17-01-2022 / EN
91/208
➢ Press button to continue
You can use the same procedure to decrypt the corresponding files.
Example for encryption without the batch file
%WINDIR%\Microsoft.NET\Framework64\v4.0.30319\aspnet_regiis.exe -pe connectionStrings /app /<IIS application
name>
Example for decryption without the batch file
%WINDIR%\Microsoft.NET\Framework64\v4.0.30319\aspnet_regiis.exe -pd connectionStrings /app /<IIS application
name>
Example for encryption of the SessionState configuration without the batch file
%WINDIR%\Microsoft.NET\Framework64\v4.0.30319\aspnet_regiis.exe -pe system.web/sessionState /app /<IIS appli-
cation name>
Example for decryption of the SessionState configuration without the batch file
%WINDIR%\Microsoft.NET\Framework64\v4.0.30319\aspnet_regiis.exe -pd system.web/sessionState /app /<IIS appli-
cation name>
Example for decrypted file
<?xml version="1.0" encoding="utf-8"?>
<connectionStrings>
<add name="CoreConnectionString" connectionString="server=.\;

Spider Technical Reference - Installation, Configuration, Troubleshooting
17-01-2022 / EN
92/208
database=SpiderCore;
Integrated Security=True;
application name=Spider;
persist security info=True;
packet size=4096"
providerName="System.Data.SqlClient" />
</connectionStrings>
Example for encrypted file
<?xml version="1.0" encoding="utf-8"?>
<connectionStrings configProtectionProvider="RsaProtectedConfigurationProvider">
<EncryptedData Type="http://www.w3.org/2001/04/xmlenc#Element"
xmlns="http://www.w3.org/2001/04/xmlenc#">
<EncryptionMethod Algorithm="http://www.w3.org/2001/04/xmlenc#tripledes-cbc" />
<KeyInfo xmlns="http://www.w3.org/2000/09/xmldsig#">
<EncryptedKey xmlns="http://www.w3.org/2001/04/xmlenc#">
<EncryptionMethod Algorithm="http://www.w3.org/2001/04/xmlenc#rsa-1_5" />
<KeyInfo xmlns="http://www.w3.org/2000/09/xmldsig#">
<KeyName>Rsa Key</KeyName>
</KeyInfo>
<CipherData>
<CipherValue>BWpqFNjS0A9dhKo0UxNK+me2pTQ/p4GixYvuGNJ6DRd3zTFJJQxJl4uZrW585ulXtlIx1oEs8MMUDCmoyuCs0hcwO+7pKTt0m4EODghL+Hfo72x
FGikQfkXFKh6enNaRWP32BsxuobAQ8gB8+uNlOeJJTBl8gaJDjQ306K4Q72gm1Kmvm0F600K+r/ceyOyvabjvnX2rceFfF4R0WOStXa3jCF3mcP5TJThIY3BmWI9
Pyoab+42o0P+RlK5R2jOLn6Qj1Hhm2tHb+FCGF/b4cUrLUApKf9S3iMuwrvBpAw0pGJfgMqrlst5yihbsMb+FMAvOQMqg7tGTqt9WICtKfQ==</CipherValue>
</CipherData>
</EncryptedKey>
</KeyInfo>
<CipherData>
<CipherValue>90Dl2S8Oi6ouIZ/1KZRjxIx3HvRzEqWzS1TfvXpDZXxDBuNxRMFzEG92RLme1+f6fvim9pZqzW2el26FIHNhx/XYQQ5UhI7x0khVLL+cXvxfQX5
lHr1cLHJ2GWNFUsPucWaAX2LXDXwA9XcAjQeOZqR2sW8TyfADsDzLJYib+Iv7F30H4hXv5D5+TuwCkOq6OT+oeFsLiVojJFyyB1hy0GwgPzkwahD06fkPNl4UQrG
ik3bV3k+iSx3kBalDL8130gtgJPLoEn9ZdpXwc9kRXdvXompUyNBOW6p617jRYaE6xdC5y7I39hqyyO35EhBnkjT9p1TTonRPKe39Z4WJPFCOGMAy23IhZ+YTW+J
vgcLd7zB4ZfnU+GTBHC2sfMbdylEl55181qKBcHaE7m5BDGXTnnUH1A26R3UtkhWgmqlH9MnRlKJDEQ==</CipherValue>
</CipherData>
</EncryptedData>
</connectionStrings>
3.3.11 Error handling system
In general, the following will apply: Spider has a unified error handling system. However, due to the used technol-
ogy (ASP.NET) it is only possible to handle certain error classes. Some exceptions are automatically handled by the
web server (IIS) and it is not possible in our application to manipulate the view of these server responses. Microsoft
gives the following information: "You cannot customize the following HTTP error messages: 400, 403.9, 411, 414,
500, 500.11, 500.14, 500.15, 501, 503, and 505."
Details: Configuring HTTP error responses in IIS 7

Spider Technical Reference - Installation, Configuration, Troubleshooting
17-01-2022 / EN
93/208
3.4 Update
This chapter describes the update of a Spider installation.
3.4.1 Start of the update
Start the installation by executing Spider 6.x Setup.exe.
At first, you are asked to select the language for the installation assistant. To do this, click on the desired language in
the selection box and confirm your input with "OK".
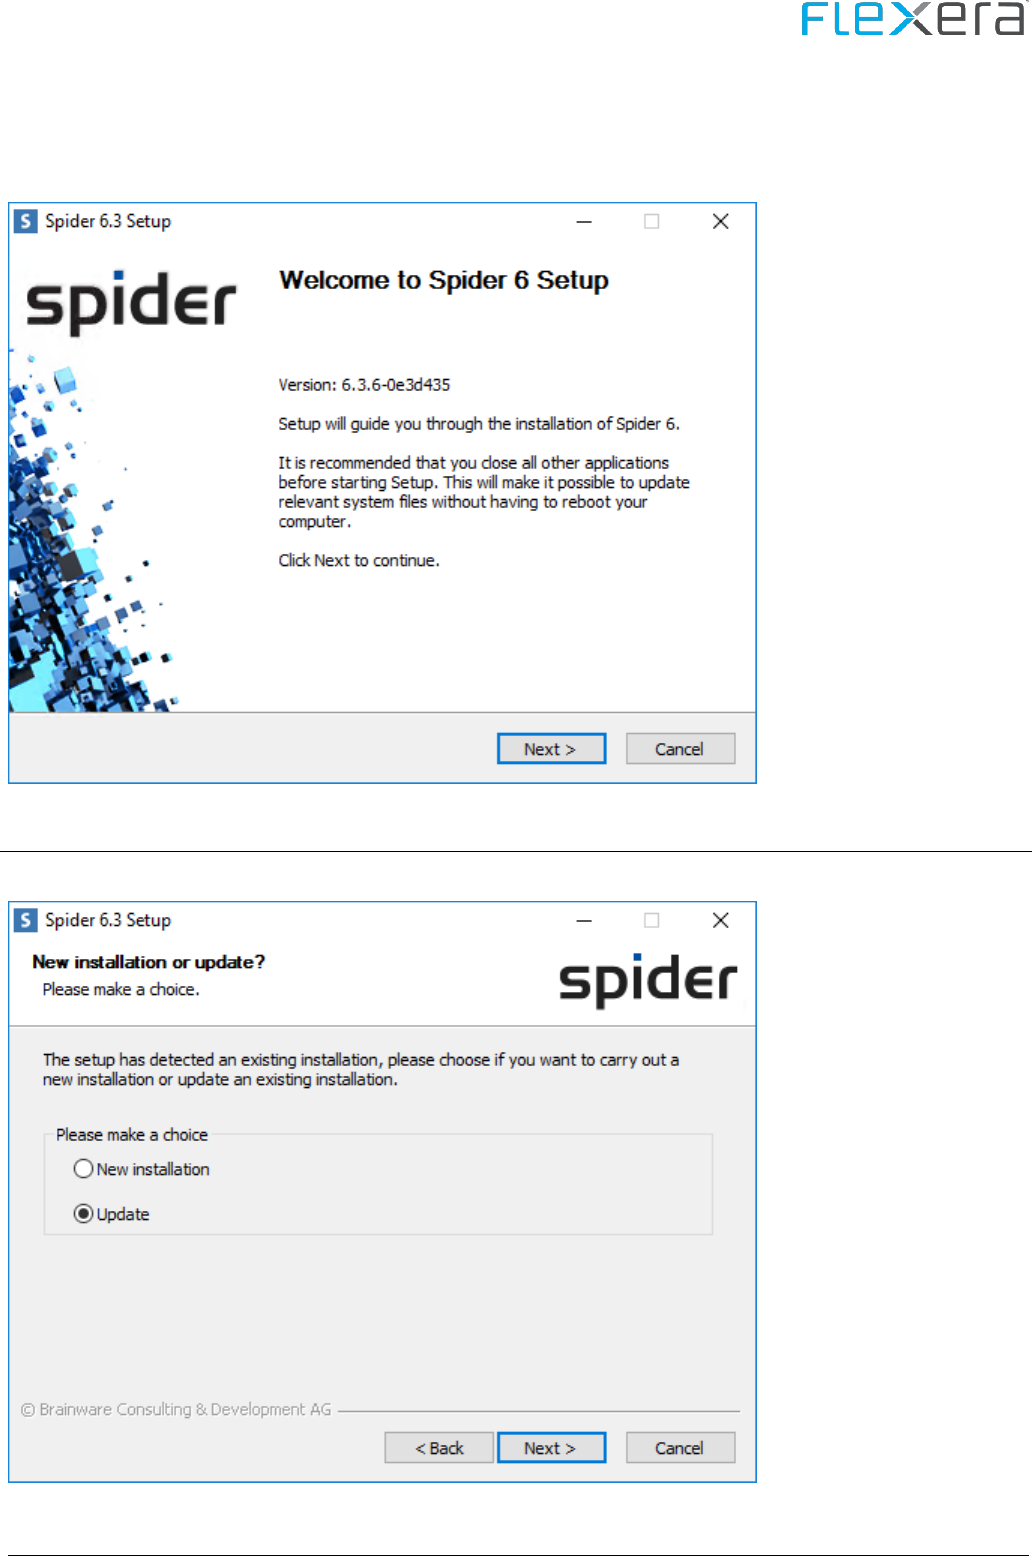
Spider Technical Reference - Installation, Configuration, Troubleshooting
17-01-2022 / EN
94/208
After that, the installation assistant for Spider will open. This assistant will guide you through the setup installation in
the selected language. Click on "Next" to start the installation.
3.4.2 Update
If an instance of Spider is already installed, you will be prompted to decide for one type of installation.

Spider Technical Reference - Installation, Configuration, Troubleshooting
17-01-2022 / EN
95/208
3.4.3 Selection of the Instance
Select the instance to be updated. If there is only one instance, it will be selected already in the selection field.

Spider Technical Reference - Installation, Configuration, Troubleshooting
17-01-2022 / EN
96/208
3.4.4 Database server
In the following step, the installation assistant will ask you to specify the name and the instance of a Microsoft SQL
Server, on which the Spider databases are to be installed.
The user, with which the connection is established, can either be the logged-in (Windows) user or an SQL user.

Spider Technical Reference - Installation, Configuration, Troubleshooting
17-01-2022 / EN
97/208
To be able to use an SQL user, you must tick the check box Use SQL user for database connection and fill in the fields
User name and Password with the desired data.
Note The users have to be set up beforehand on the database server with the corresponding rights. De-
pending on the rights of the user, the subsequent dialogs will show different options.
Field
Description
SQL server name
Name of the SQL server, including instance name
and port if required
e.g. SQLSERVER\SQLINSTANZ,1234
Using SQL users for database connec-
tion
Select whether to use the logged-in domain user or
an SQL user.
User name
Name of SQL user.
Password
Password of the SQL user.
3.4.5 Index proxy server
If the index proxy server has not yet been configured so far, this can be made up for with each Spider update.
Next, you can select whether the index proxy shall be configured during the setup.

Spider Technical Reference - Installation, Configuration, Troubleshooting
17-01-2022 / EN
98/208
The Index Proxy Server is part of the Enterprise Services Infrastructure (ESI).
By ticking the check box, the dialog will be activated and the required data can be entered.
Field
Description
Use the index proxy
Activation of the dialog and query of the details
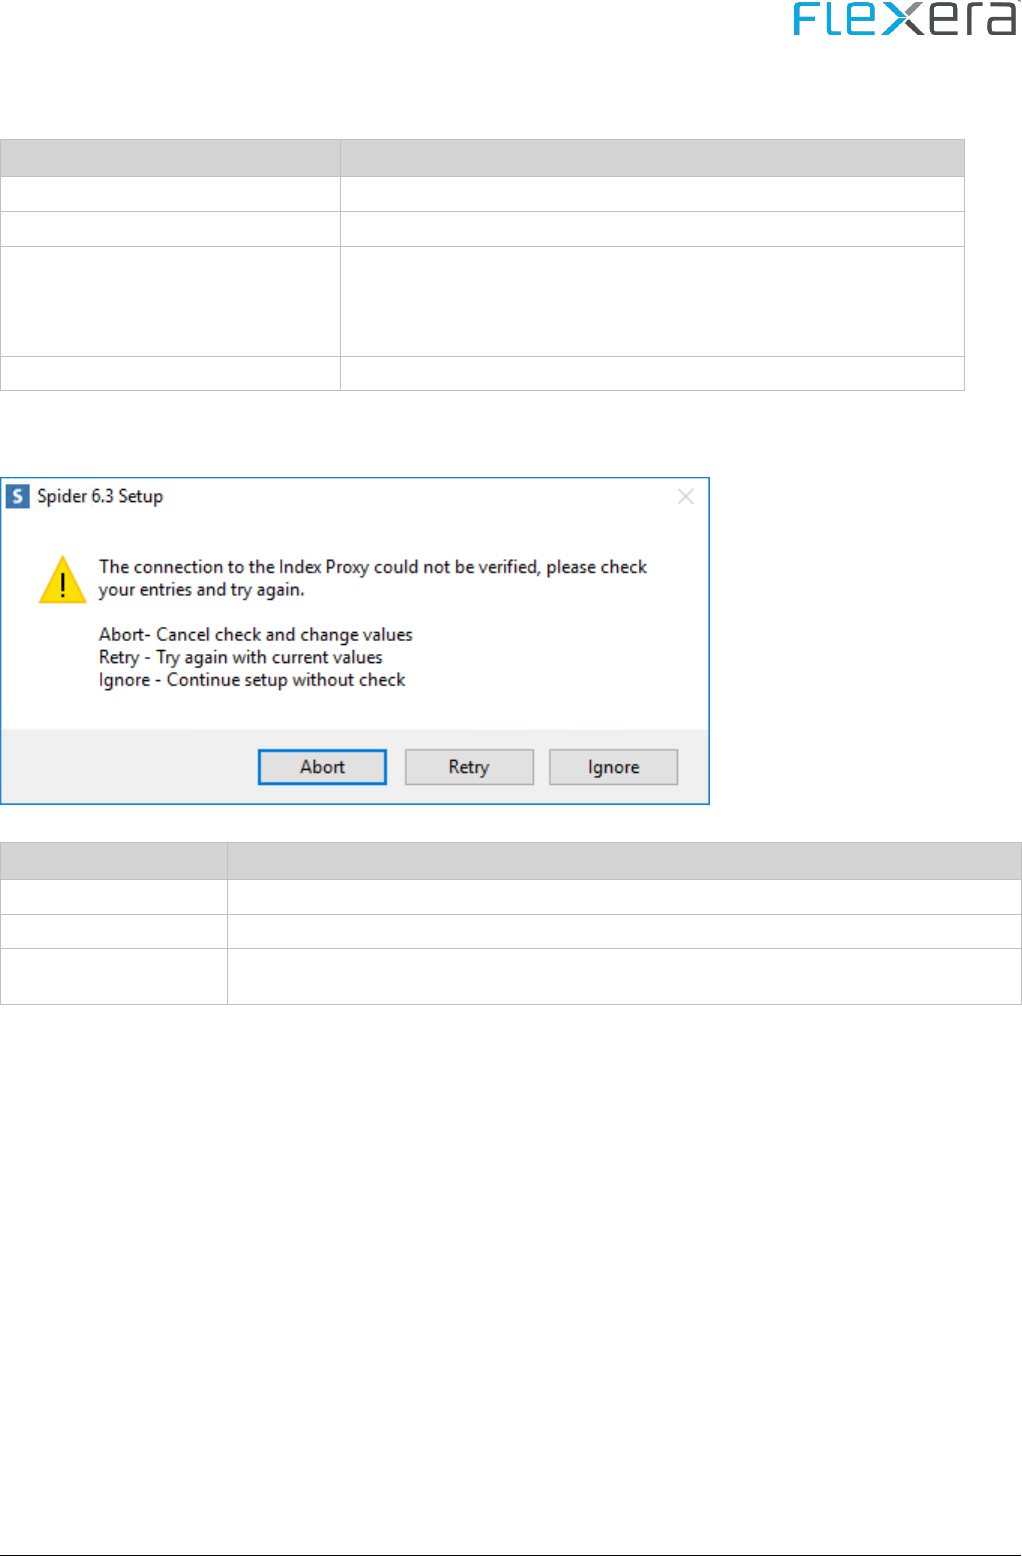
Spider Technical Reference - Installation, Configuration, Troubleshooting
17-01-2022 / EN
99/208
Field
Description
Name of the index proxy portal server
Name (FQDN) of the server, on which the index proxy is installed,
Port of the index proxy portal servers
Port (default: 7080) on which the index proxy reacts to requests
User name of the token service account
The client ID of the user which shall be used for the connection to the index
proxy; the client ID has been created during the installation of the index
proxy.
Observe capital and small letters for the client ID!
Password of the token service account
Password belonging to the client ID.
After entering all data and selecting the Next > button, the connection to the index proxy will be checked.
If an error should occur, the following message will be displayed.
Button
Description
Abort
The check may be aborted to correct the values. Then the values will be rechecked.
Retry
New try with the current values
Ignore
The dialog can be closed without a positive check result. The installation will be carried out
with the values specified in the dialog.

Spider Technical Reference - Installation, Configuration, Troubleshooting
17-01-2022 / EN
100/208
3.4.6 Select updates
If the update is carried out for the first time, all product must be selected for update. The dialog is filled in already
and cannot be changed anymore.
If one of the products has been updated earlier, it could happen that not all of the products are offered for updating.

Spider Technical Reference - Installation, Configuration, Troubleshooting
17-01-2022 / EN
101/208
If necessary, these products can nevertheless be selected for updating.

Spider Technical Reference - Installation, Configuration, Troubleshooting
17-01-2022 / EN
102/208
3.4.7 Installation
The installation assistant will now install Spider. This can take some time. Please wait, until the installation is com-
pleted.
The successful completion of the installation will be shown in the progress dialog.

Spider Technical Reference - Installation, Configuration, Troubleshooting
17-01-2022 / EN
103/208
The setup has been completed successfully and can now be closed.
After completion of the installation, a log file will be written. For details to the log files, please refer to chapter Log
files (on page 208).
As of Spider 6.4, a programming interface(Spider Web API) based on the REST standard will be provided. On the one
hand, it is meant to improve the integration of the Spider and Columbus products with each other. On the other hand,
however, it is mainly meant to improve the integration of Spider with the customer's existing systems and external
systems. The Spider Web API allows for carrying out search queries and requesting reports as well as for creating,
changing, assigning, disconnecting, and deleting objects. The Spider Web API is an regular feature of Spider 6.4 and
available immediately after installation. The Spider Web API features its own documentation section with information
on all functions, their parameters, and return values. The Spider Web API Explorer is provided for testing and develop-
ment purposes. This makes it easier to get started with using the interface and is also intended to simplify the analysis
possible errors. Swagger is provided for more substantial development tasks such as the construction of new interfac-
es.
4.1 Technical information
4.1.1 REST API
The Spider Web API is based on the principle of RESTful service. This means that each defined URL represents a re-
source on which one or multiple HTTP methods can be used. The HTTP methods GET, PUT, POST and DELETE are used
4 Spider Web API

Spider Technical Reference - Installation, Configuration, Troubleshooting
17-01-2022 / EN
104/208
to obtain, edit, add, and erase resources. The communication can be carried out via HTTP or HTTPS, depending on the
customer's configuration. The Spider Web API receives and sends data in JSON format. The data is encoded in UTF-8.
4.1.2 Version management
The functions of the Spider Web API are versioned. The version of the requested function is specified in the URL. If the
version is omitted in the URL, the newest version of the function will be used.
Example
Asset search without version specification
http(s)://{ServerName}/{SpiderApiInstance}/{Mandator}/search/asset
Asset search with version specification (V1)
http(s)://{ServerName}/{SpiderApiInstance}/v1/{Mandator}/search/asset
4.1.3 Tenant selection
Many functions of the Spider Web API require a tenant to perform. The designation or the ID of the tenant must then
be included in the URL in the correct position.
http(s)://{ServerName}/{SpiderApiInstance}/{Mandator}/search/asset
For the list of the tenants available for the user, refer to the chapter Mandator (on page 113).
4.1.4 Request
Parameters may be added to any request sent to the Spider Web API. The possible parameters differ depending on the
resource. However, the CultureCode parameter, which controls the language of notes and error messages as well
translatable results, may be added to any request.
In general, the parameters are transmitted as URL parameters. Only the data and parameters used when creating and
editing entities must be included in the request body.
Example
Request with parameters in the URL for an asset search:
GET http(s)://{ServerName}/{SpiderApiInstance}/{Mandator}/search/asset?culturecode=de&orderby=assetno&distinct=true
Request with parameters in the request body for editing the asset with the ID5:
PUT http(s)://{ServerName}/{SpiderApiInstance}/{Mandator}/search/asset/5
with the body:
{
"fields": {
"AssetNo": "Test",
"CPUCount": 1,
"Status": 1
}
}

Spider Technical Reference - Installation, Configuration, Troubleshooting
17-01-2022 / EN
105/208
4.1.5 Response
Each request sent to the Spider Web API results in a standardized response. This response includes a self-URL, the pa-
rameters of the request, the processing time of the request and, if available, notes and error messages which have
been generated during execution of the request.
Example
An asset search returns the result
{
"Count": 2204,
"Result": [
{
"id": 2,
"assetNo": "Access card-0002",
"hostname": null,
"assetType": "Access card",
"status": "Active",
"functionUnitID": null,
"functionUnit": null
}
],
"IsResultTruncated": false,
"Notifications": [],
"Duration": 713,
"SelfLink": "http://www.SpiderServer.com/SpiderWebApi/100/search/Asset?MaxRows=1&Firstrow=1&Orderby=AssetNo",
"Parameter": {
"Conditions": [],
"MaxRows": 1,
"FirstRow": 1,
"OrderBy": "AssetNo",
"Distinct": false,
"Fields": [],
"AllFields": false,
"CultureCode": null
}
}
Authorized requests of the Spider Web API always return the HTTP status code 200. The only exception to this rule are
successful requests for adding objects. These end with the HTTP status code 201.
Unauthorized requests return the HTTP status code 401.
4.2 Authentication
A token is used for the authentication of attempts to access the Spider Web API. This token is included with each re-
quest during its lifetime. Thanks to the token, it is not necessary to include the login data with each access.

Spider Technical Reference - Installation, Configuration, Troubleshooting
17-01-2022 / EN
106/208
4.2.1 Generation of tokens
The authentication token can be obtained via a GET request by means of basic authentication The token is then re-
turned in the header of the response.
For basic authentication, the username and the password can be included directly in the request URL.
http(s)://{UserName}:{Password}@{ServerName}/{SpiderApiInstance}/token
Alternatively, username and password can be transferred in the header of the request.
http(s)://{ServerName}/{SpiderApiInstance}/token
For this purpose, username and password are linked with a colon. The resulting text is converted to Base64 and trans-
ferred under Authorization.
Base64 converts Username:Password to VXNlcm5hbWU6UGFzc3dvcnQ= which must follows the keyword Basic under
Authorization in the header.
Host: ServerName
User-Agent: WebAPI-Accessor
Authorization: Basic VXNlcm5hbWU6UGFzc3dvcnQ=
4.2.2 Use of tokens
The token must be included in the header of each subsequent request. The Spider Web API uses the token to identify
the Spider user and the user's permissions.
Example
The token is transferred in the request header under Authorization.
Host: ServerName
User-Agent: WebAPI-Accessor
Authorization: Token ed901b25-2f7e-4461-86bd-604212f4e859
Content-Length: 220
Content-Type: application/json; charset=utf-8
4.2.3 Validity of tokens
For increased security, the token is only valid for a limited amount of time. The actual length in minutes can be Set in
the Spider Core Config. By default, it is set to 15 minutes.
After the token has expired, the token can no longer be used for authentication. The processing of requests which are
already in progress will be continued. A new token can be generated via token generation.
4.2.4 Management of tokens
The tokens are centrally managed so that all Spider Web API instances can access the same tokens in a web farm sce-
nario. This way, it is irrelevant to the user which instance processes the request.
Furthermore, multiple valid tokens may be assigned to one user since e.g. different services may access the Spider Web
API with the same login at the same time.

Spider Technical Reference - Installation, Configuration, Troubleshooting
17-01-2022 / EN
107/208
4.3 Admin section
In the admin section of the Spider Web API, authorized users may list, read, link, and partially edit, add, or delete ad-
ministrative Spider objects.
Restrictions
The admin section does not cover the same scope of functions as the Spider Web interface. Thus, there is no access to
application forms, menu objects, role objects, Active Directory objects, password objects, and system message objects.
4.3.1 Mandator
Using the Spider Web API, tenants can be listed, read, edited, added, and deleted. Furthermore it is possible to assign a
user to and disconnect a user from a tenant.
4.3.2 User
Using the Spider Web API, users can be listed, read, edited, added, and deleted. Furthermore it is possible to assign
tenants, profiles, and business units to a user and disconnect these from a user accordingly.
4.3.3 Profile
Using the Spider Web API, profiles can be listed and read. Furthermore it is possible to assign users and business units
to a profile and disconnect these from the a profile accordingly. Deleting and adding of profiles is not provided for.
4.4 Entity section
In the entity section of the Spider Web API, users may access different Spider entities. The permission of a user with
regard to entities and their fields is defined by the roles assigned to said user.
Limitation
Only entities whose technical designation is unique across all Spider applications can be addressed via the Spider Web
API. Furthermore, access to certain entities is explicitly excluded since these e.g. only serve as a link between two other
entities or have an administrative function.
4.4.1 Entity access
Depending on the permissions available, a user may read, edit, add, or delete entities. Custom entities are also availa-
ble in the Spider Web API as long as they do comply with the restrictions. Note, however, that only business logic from
assigned custom rules and not from custom kernel objects is applied here.
The objects are referred to via their technical designation and their ID. Typed objects can be addressed by the designa-
tion of their parent object.
Example
A server with the asset ID 1 can be displayed directly via the type.

Spider Technical Reference - Installation, Configuration, Troubleshooting
17-01-2022 / EN
108/208
http(s)://{ServerName}/{SpiderApiInstance}/{Mandator}/entity/server/1
Alternatively, the same result may be obtained via the parent object asset.
http(s)://{ServerName}/{SpiderApiInstance}/{Mandator}/entity/asset/1
4.4.2 Entity history access
For many entities, Spider maintains a change history. This change history may be filtered and listed based on change
period and changed fields.
4.4.3 Entity document access
Many entities may be assigned to Spider documents. This is done within a folder structure which may be navigated
with the Spider Web API. The different versions of the documents may be accessed as well. Furthermore, documents
may be created and new versions may be added.
4.4.4 Entity reminder access
Some entities may be assigned to Spider reminders. These are to be created, displayed, edited, and deleted in the con-
text of the entity.
4.4.5 Entity relationship access
Many entities in Spider are linked to each other. These links may be realized via relationship tables or via direct refer-
ence using a field of the entity. The Spider Web API may be used to list the entities assigned to a specific entity, estab-
lish new assignments, and disconnect existing assignments.
Restrictions
There are two special cases in which access to the relationships between entities is not possible in the Spider Web API:
• when the relationship exists between two entities of the same type (e.g. link between two contractors via a legal
succession) or
• when the relationship has been realized via a typed relationship entity (e.g. link of two function units via a function
unit relationship).
Relationship definition
The possibility of customizing entities and their relationships requires the list of possible entity relationships to be de-
fined in an extendable way. This information can be found in the Spider Core database within the weba-
pi.EntityRelationships table.
An entity relationship, in this case, is an unambiguous relationship from one entity to another entity. The return path
from the other entity to the first entity is a separate relationship.
A relationship definition always consists of
• a MainEntity,
• a RelatedEntity,
• a search view,
• the field name of the MainEntityID in the search view
• and the application on whose database the search view must be executed.
Based on this information, it is possible to list the assigned entities.

Spider Technical Reference - Installation, Configuration, Troubleshooting
17-01-2022 / EN
109/208
Also, if required, the following takes place via a separate entity when creating a link:
• the name of the entity,
• the fieldname of the ID field of the MainEntity,
• the fieldname of the ID field of the RelatedEntity,
• are transferred to an SQL script for translating the ID value of the MainEntity (e.g. for determining the FunctionUni-
tID in case of a relationship from asset to employee),
• are transferred to an SQL script for translation of the ID value of the RelatedEntity.
By specifying this information, assignments can be created and resolved.
4.5 Search section
In the search section of the Spider Web API, users may access the search functions for the different Spider entities. The
search result and the search fields can be influenced by the permissions of the user and the roles assigned to the user.
Example
Result of an asset search
{
"count": 201,
"result": [
{
"id": 2,
"assetNo": "LAPTOP-OBST003.domain.corp",
"hostname": "LAPTOP-OBST003",
"assetType": "Laptop",
"status": "Active",
"functionUnitID": 2,
"functionUnit": "LAPTOP-OBST003.domain.corp"
}
],
"isResultTruncated": false,
"notifications": [],
"duration": 4409,
"selfLink":
"http://www.SpiderServer.com/SpiderWebApi/v1/0/search/asset?maxRows=1&firstRow=1&distinct=true&allFields=false",
"parameter": {
"conditions": [],
"maxRows": 1,
"firstRow": 1,
"orderBy": "",
"distinct": true,
"fields": [],
"allFields": false,
"cultureCode": null
}
}
Limitation

Spider Technical Reference - Installation, Configuration, Troubleshooting
17-01-2022 / EN
110/208
Only entities whose technical designation is unique across all Spider applications can be addressed in the search section
via the Spider Web API. Furthermore, access to certain entities is explicitly excluded since these e.g. only serve as a link
between two other entities or have an administrative function.
4.5.1 Parameterization
The parameters of the search are transferred in the URL.
Example
A list of the first 100 assets with all fields sorted by the asset number.
http(s)://{ServerName}/{SpiderApiInstance}/{Mandator}/search/asset?allfields=true&firstrow=1&maxrows=100&orderby=assetno
Parameter
Description
AllFields
This URL parameter must contain a Boolean value which defines whether all fields are to be included in the
search. The value is false by default.
Condition
This URL parameter can be included in the URL multiple times. Each parameter includes a filter. A filter consists
of
• a logical link,
• an optional flag for negation,
• a field name,
• a comparison type
• and a comparison value.
The individual components must be separated by a pipe character ("|").
Example
The list of non-active assets from the business unit "A":
http(s)://{ServerName}/{SpiderApiInstance}/{Mandator}/search/asset?condition=and|not|status|=|active&condition
=and||LegalEntityPath|=|A
CultureCode
This URL parameter must contain a text which represents a valid language code. This language setting is used
for translatable results of the search. The default language is identical with the server language.
Distinct
The URL parameter must contain a Boolean value which defines whether lines with identical content can ap-
pear in the result multiple times. The value is false by default.

Spider Technical Reference - Installation, Configuration, Troubleshooting
17-01-2022 / EN
111/208
Parameter
Description
Fields
This URL parameter should contain a list of field names from the search separated by commas. The standard
fields differ based on the search entity.
The Fields parameter is ignored if the parameter AllFields is set to true.
Example
The list of non-assets with the fields ID, AssetNo, AssetType, AssetStatusID, Status, LegalEntityID, and LegalEn-
tityPath:
http(s)://{ServerName}/{SpiderApiInstance}/{Mandator}/search/asset?fields=id,assetno,assettype,assetstatusid,s
tatus,legalentityid,legalentitypath
FirstRow
This URL parameter must contain a numerical value which defines as of which line the result is to be trans-
ferred. The value is 1 by default.
MaxRows
This URL parameter must contain a numerical value which defines the maximum number of lines to be includ-
ed in the result. The value is 500 by default.
OrderBy
This URL parameter must contain a field name which determines the sorting method. Optionally, the sorting
direction can be defined by adding "ASC" for ascending order and "DESC" for descending order. By default, the
sorting method is determined by the database.
4.6 Report section
In the report section of the Spider Web API, users may access the reports defined in Spider. A report may be accessed
via its ID or its GUID.
Example
If the report "Assets with outdated Scandate" has the ID 1, it can be accessed as follows:
http(s)://{ServerName}/{SpiderApiInstance}/{Mandator}/report/1
Alternatively, the same report may be accessed via its GUID:
http(s)://{ServerName}/{SpiderApiInstance}/{Mandator}/report/3428E63A-082B-3C9D-D318-04AFA7DCCFBD
The report would deliver a similar result:
{
"meta": {
"displayCategory": "Inventory",
"displayName": "Assets with outdated scan date",
"displayDescription": "Assets with outdated scan date (older than 90 days)",
"guid": "3428e63a-082b-3c9d-d318-04afa7dccfbd",
"category": "Inventory",
"name": "Assets with outdated scan date",
"description": "Assets, which have a scan date that is at least 90 days old",
"id": 5,
"applicationName": "Spider Asset",
"applicationGuid": "38f96e97-c314-44b8-b137-c966d35a3ba0"
},
"count": 27,
"result": [

Spider Technical Reference - Installation, Configuration, Troubleshooting
17-01-2022 / EN
112/208
{
"assetID": 222,
"asset": "DP000001",
"hostName": "heraetrdy",
"assetStatus": "Active",
"invLastScanDate": null,
"swrUpdateDate": null
}
],
"isResultTruncated": false,
"notifications": [],
"duration": 553,
"selfLink": "http://www.SpiderServer.com/SpiderWebApi/v1/0/report/3428e63a-082b-3c9d-d318-04afa7dccfbd",
"parameter": {
"conditions": [],
"maxRows": 1,
"firstRow": 1,
"orderBy": "",
"distinct": false,
"fields": [],
"allFields": false,
"cultureCode": null
}
}
Limitation
The Spider Web API only allows access to query-based reports
4.6.1 Parameterization
The parameters of the report are transferred in the URL.
Parameter
Description
AllFields
This URL parameter must contain a Boolean value which defines whether all fields are to be included in the
report. The value is false by default.
Condition
This URL parameter can be included in the URL multiple times. Each parameter includes a filter. A filter con-
sists of
• a logical link,
• an flag for negation,
• a field name,
• a comparison type
• and a comparison value.
Example
Report results must contain the text "srv" in the asset no.
condition=AND||AssetNo|LIKE|%srv%
Report results must not have an "Active" status.
Condition=AND|NOT|Status|=|Active

Spider Technical Reference - Installation, Configuration, Troubleshooting
17-01-2022 / EN
113/208
Parameter
Description
CultureCode
This URL parameter must contain a text which represents a valid language code. This language setting is used
for translatable results of the report. The default language is identical with the server language.
Distinct
The URL parameter must contain a Boolean value which defines whether lines are allowed to appear in the
result twice. The value is false by default.
Fields
This URL parameter must contain a list of field names from the search separated by commas. The standard
fields differ based on the search entity.
The Fields parameter is ignored if the parameter AllFields is set to true.
FirstRow
This URL parameter must contain a numerical value which defines as of which line the result is to be trans-
ferred. The value is 1 by default.
MaxRows
This URL parameter must contain a numerical value which defines the maximum number of lines to be in-
cluded in the result. The value is 500 by default.
OrderBy
This URL parameter must contain a field name which determines the sorting method. Optionally, the sorting
direction can be defined by adding "ASC" for ascending order and "DESC" for descending order. By default,
the sorting method is determined by the database.
4.7 Meta section
In the meta section of the Spider Web API, users may access the meta data for the other sections.
In addition to the lists of available tenants, entities, searches, and reports, this meta data, depending on the function,
also includes information on the fields in searches and reports as well as information for creating and editing entities.
4.7.1 Mandator
In the meta section, the user may call up a list of the tenants which have been assigned to them.
http(s)://{ServerName}/{SpiderApiInstance}/meta/mandator
4.7.2 Admin
In the meta section, the user may call up the meta data for creating and editing tenants as well as users.
Example
The meta information required for creating a tenants can be obtained under:
http(s)://{ServerName}/{SpiderApiInstance}/meta/admin/mandator
The meta information for editing the user with the ID 5 can be obtained under:
http(s)://{ServerName}/{SpiderApiInstance}/meta/admin/user/5
4.7.3 Entity
In the meta section, the user may call up the entities available in the Web API. Additionally, there are functions for
calling up the meta data for creating and editing.
Example
The list of possible entities is available under:

Spider Technical Reference - Installation, Configuration, Troubleshooting
17-01-2022 / EN
114/208
http(s)://{ServerName}/{SpiderApiInstance}/{Mandator}/meta/entities
The meta information required for creating a manufacturer can be obtained under:
http(s)://{ServerName}/{SpiderApiInstance}/{Mandator}/meta/entity/manufacturer
The meta information for editing the contract with the ID 5 can be obtained under:
http(s)://{ServerName}/{SpiderApiInstance}/{Mandator}/meta/entity/contract/5
Furthermore, there is a list of available, related search field meta data and meta data for creating and editing relation-
ships.
Example
The list of entities which can be linked to assets is available under:
http(s)://{ServerName}/{SpiderApiInstance}/{Mandator}/meta/entity/asset/relationship
The required meta information for search fields of the list of software which is assigned to an asset:
http(s)://{ServerName}/{SpiderApiInstance}/{Mandator}/meta/entity/asset/relationship/software
Furthermore, there is a list of Spider EntityTypes which are non-entities and their possible values.
Example
The list of EntityTypes used in a contract is available under:
http(s)://{ServerName}/{SpiderApiInstance}/{Mandator}/meta/entity/contract/entityType
4.7.4 Search
In the meta section, the user may call up the entities available in the Web API as well as the related result fields.
Example
The list of possible search entities is available under:
http(s)://{ServerName}/{SpiderApiInstance}/{Mandator}/meta/search
The field information for a manufacturer search can be obtained under:
http(s)://{ServerName}/{SpiderApiInstance}/{Mandator}/meta/search/manufacturer
4.7.5 Report
In the meta section, the user may call up the reports available in the Web API as well as the related result fields.
Example
The list of possible reports is available under:
http(s)://{ServerName}/{SpiderApiInstance}/{Mandator}/meta/report
The field information for the report "Assets with outdated Scandate" can be obtained under:
http(s)://{ServerName}/{SpiderApiInstance}/{Mandator}/meta/search/3428E63A-082B-3C9D-D318-04AFA7DCCFBD

Spider Technical Reference - Installation, Configuration, Troubleshooting
17-01-2022 / EN
115/208
4.8 Version information
If a user required information on the Spider version used, there are 2 resources from which this information can be
obtained.
4.8.1 Simple version information
The simple version information provides a 4-part Spider build number and can be obtained under the following URL.
http(s)://{ServerName}/{SpiderApiInstance}/version
Example
{
"build": "6.4.0.301",
"notifications": [],
"duration": 0,
"selfLink": "http://www.SpiderServer.com/SpiderWebApi/version",
"parameter": null
}
4.8.2 Advanced version information
In addition to the build number, the advanced version information also provides the recognition version and the edi-
tion as well as information on whether the instance in question is a full update version. It can be obtained under the
following URL.
http(s)://{ServerName}/{SpiderApiInstance}/versioninfo
Example
{
"build": "6.4.0.301",
"setup": "6.4.0-4154089",
"edition": "Spider Enterprise",
"recognition": "1.1805.2.2",
"isFullUpdate": true,
"settingsVersion": "6.4.0.301",
"notifications": [],
"duration": 267,
"selfLink": "http://www.SpiderServer.com/SpiderWebApi/versioninfo",
"parameter": null
}
4.9 Swagger
The Spider Web API uses Swagger as interactive API documentation. Swagger is the largest framework of API developer
tools for the OpenAPI Specification (OAS) and allows for development during the entire API lifecycle - from design and
documentation to testing and publishing.
Swagger can be accessed under the following URL:
http(s)://{ServerName}/{SpiderApiInstance}/swagger/ui/index

Spider Technical Reference - Installation, Configuration, Troubleshooting
17-01-2022 / EN
116/208
4.9.1 OpenAPI Document
The OpenAPI document is a document (or a group of documents) which defines or describes an API. It can be read by
humans as well as machines. The document can be used by a developer to automatically generate an interface to the
Spider Web API.
The document may be called up via a URL which can be found in the header of the Swagger interface. The URL usually
features the following structure:
http(s)://{ServerName}/{SpiderApiInstance}/swagger/docs/v1
4.9.2 Swagger UI
Via the Swagger UI, the user may directly access the functions of the Spider Web API.
Note If you want to use Swagger in Internet Explorer, you must turn off the compatibility mode. Swagger is
not compatible with Internet Explorer in compatibility mode.
Token authentication
A valid authentication is also required when accessing the functions from the Swagger UI. The user may generate a
valid token under
http(s)://{ServerName}/{SpiderApiInstance}/swagger/ui/index#!/Token/Authenticate_Authenticate.
There, a valid basic authentication must be specified in the Authorization field. It has the format
"Basic {Base64 coding of "{UserName}:{Password}"}"
There are various tools and online resources available for encoding username and password to Base64 on the internet.

Spider Technical Reference - Installation, Configuration, Troubleshooting
17-01-2022 / EN
117/208
Example

Spider Technical Reference - Installation, Configuration, Troubleshooting
17-01-2022 / EN
118/208
After actuating the "Try it out!" button, the query is processed and the result is displayed. The generated access token
is displayed in the response header section if processing was successful.

Spider Technical Reference - Installation, Configuration, Troubleshooting
17-01-2022 / EN
119/208
In this example, the authorization text for other queries is "Token 5d37878d-42f2-d262-43e7-51e4819ed9ec" until the
token expires.
4.10 Web API documentation
The Spider Web API features a non-interactive documentation. It contains websites with information on all functions,
their parameters, and return values.
The documentation can be accessed under the following URL
http(s)://{ServerName}/{SpiderApiInstance}/help

Spider Technical Reference - Installation, Configuration, Troubleshooting
17-01-2022 / EN
120/208
Example 1: Main page

Spider Technical Reference - Installation, Configuration, Troubleshooting
17-01-2022 / EN
121/208
Example 2: Detail view

Spider Technical Reference - Installation, Configuration, Troubleshooting
17-01-2022 / EN
122/208
Example 3: Return object

Spider Technical Reference - Installation, Configuration, Troubleshooting
17-01-2022 / EN
123/208
4.11 Spider Web API Explorer
The Spider Web API Explorer is a web application which allows for an easier access to all relevant functions of the Spi-
der Web API for testing and development purposes.
Spider Web API Explorer allow data operations such as creating, searching, changing, and deleting data (CRUD: Create,
Read, Update, Delete). You may select whether the results are displayed in JSON or HTML.
4.11.1 Expected users
The expected users of the Spider Web API Explorer are testers, quality assurance officers, business analysts, adminis-
trators, or software engineers who want to test the functions of the Spider Web API. Basic knowledge of Spider is re-
quired.
4.11.2 Authentication
The authentication for access to the Web API Explorer is carried out via a Spider user account. In the Web API Explorer,
users have the same permissions as in the Web API itself.
The API Explorer can be accessed under the following URL:
http(s)://{ServerName}/{SpiderApiExplorerInstance}

Spider Technical Reference - Installation, Configuration, Troubleshooting
17-01-2022 / EN
124/208
4.11.3 Session parameters (tenant, language, version)
After logging in, the session parameters are determined. Here, a tenant must be selected. At this time, it is also possi-
ble to select the language and the API version. By default, the latest version of the API is preselected. If no language is
selected, English is used as the default API language.
The session parameters can be changed at any given time.
4.11.4 Communication with the Spider Web API
Communication with the Spider Web API via the HTTP / HTTPS protocol is protected by means of a token mechanism.
The token is stored in the browser cache.
Response
The response page of the Spider API explorer consists of 2 tabs: HTML and JSON. Here, you may select whether the re-
sults are displayed in HTML or in JSON.
Response model
The following fields are returned:
Field
Description
Duration
Duration of the query in seconds.
Selflink
Returns a URL of the query.
Notification
Returns the error messages from the kernel (category and message).
CultureCode
Returns the language used in the query.
The other fields depend on the query.
HTTP status code: The Spider Web API Explorer always receives HTTP status code 200 as response from the Spider Web
API. Error messages are always included in the return object. Unauthorized requests return the HTTP status code 401.
Example:
The response to an asset search

Spider Technical Reference - Installation, Configuration, Troubleshooting
17-01-2022 / EN
125/208
1. HTML format:

Spider Technical Reference - Installation, Configuration, Troubleshooting
17-01-2022 / EN
126/208
2. JSON format
4.11.5 Web API Explorer sections
There are three sections:
• Search API
• Report API

Spider Technical Reference - Installation, Configuration, Troubleshooting
17-01-2022 / EN
127/208
• Entity API
Search API
Spider entities can be searched in the "Search API" section. Search section (on page 109)
The search can be accessed under the following URL:
http(s)://{ServerName}/{SpiderApiExplorerInstance}/search

Spider Technical Reference - Installation, Configuration, Troubleshooting
17-01-2022 / EN
128/208


Spider Technical Reference - Installation, Configuration, Troubleshooting
17-01-2022 / EN
130/208
Report API
The "Report API" section allows searching for reports available for the selected tenant.
The Report API can be accessed under the following URL:

Spider Technical Reference - Installation, Configuration, Troubleshooting
17-01-2022 / EN
131/208
http(s)://{ServerName}/{SpiderApiExplorerInstance}/report

Spider Technical Reference - Installation, Configuration, Troubleshooting
17-01-2022 / EN
132/208
Parameter
The parameters of the Report API are entered via the web front-end analogously to the Search API. For more detailed
information, refer to chapter Parameterization (on page 112).
Entity API
The Entity section allows data operations (CRUD) such as creating, reading, changing, and deleting entities. For more
detailed information, refer to chapter Entity section (on page 107).

Spider Technical Reference - Installation, Configuration, Troubleshooting
17-01-2022 / EN
133/208
The Entity API can be accessed under the following URL
http(s)://{ServerName}/{SpiderApiExplorerInstance}/entity
The Entity API consists of six sections:
Get Entity
This section can be used to query entities.
Parameters: name and ID of the entity.
Example: Querying an asset with ID=1 and having the result displayed in JSON.

Spider Technical Reference - Installation, Configuration, Troubleshooting
17-01-2022 / EN
134/208

Spider Technical Reference - Installation, Configuration, Troubleshooting
17-01-2022 / EN
135/208
Create Entity
This section can be used to create entities.
Parameters: Entity name, entity fields as JSON.
Example: Creating desktop entity:
1. Select desktop entity.
2. Enter usage data in JSON format:
{"fields":
{"Mandator":0,
"AssetNo":"123456789",
"HostName":"MyHostname",
"AssetStatusID":1,
"CommentStatus":"Just want to try to create a desktop",
"SerialNo":"123649875547945789",
}}

Spider Technical Reference - Installation, Configuration, Troubleshooting
17-01-2022 / EN
136/208
3. Click <Send Request> button.

Spider Technical Reference - Installation, Configuration, Troubleshooting
17-01-2022 / EN
137/208
Update Entity
This section can be used to change entities.
Parameter: Entity name, entity fields as JSON and ID of the entity.
Example: Changing the host name of a desktop entity with ID=1
1. Select asset.
2. Enter usage data in JSON format:
{"fields": {
"Hostname":"The hostname of My Test Desktop has changed"
}}
3. Enter the ID of the entity.

Spider Technical Reference - Installation, Configuration, Troubleshooting
17-01-2022 / EN
138/208
4. Click <Send Request> button.

Spider Technical Reference - Installation, Configuration, Troubleshooting
17-01-2022 / EN
139/208
Delete Entity
This section can be used to delete entities.
Parameters: name and ID of the entity.
Example: Deleting a desktop entity with ID=1
1. Select asset.
2. Enter the ID of the entity.
3. Click <Send Request> button.
EntityTypes section
This section belongs to the entity meta data. See chapter Entity section (on page 107), EntityTypes describe prede-
fined states and values which individual fields of entities may assume.
Parameters: entity name and EntityType.
Example: Displaying EntityTypes available for assets:
1. Select asset.

Spider Technical Reference - Installation, Configuration, Troubleshooting
17-01-2022 / EN
140/208
2. Click <Send Request> button.
EntityTypeValues section
EntityTypeValues are the defined states and values which individual fields of entities may assume.
Parameters: entity name and EntityType.
Example: Displaying available EntityValues for EntityType AssetStatusID:
1. Select asset.

Spider Technical Reference - Installation, Configuration, Troubleshooting
17-01-2022 / EN
141/208
2. Select EntityType AssetStatusID.
3. Click <Send Request> button.

Spider Technical Reference - Installation, Configuration, Troubleshooting
17-01-2022 / EN
142/208
4.12 Code examples
This chapter shows practical examples on how to use the different features of the Web API in coded projects. These
examples are written in C# and use third party libraries like RestSharp as rest client.
The code examples can also be viewed via the following community article:
https://community.flexera.com/t5/Spider-Knowledge-Base/Spider-Web-API-code-examples/ta-p/220723
4.12.1 Authentication
A token is required for authentication to the Spider Web API, which must be included in every request.
The authentication token can be obtained via a GET request using basic authentication. The token is then returned in
the server response header.
Example: GetToken
private string GetUserTokenExample() {
// The Url of the Spider Web API
var yourApiUrl = "http://yourWebServer/SpiderWebApi";
// Spider Username
var username = "YourSpiderUsername";
//Spider Password
var password = "YourSpiderPassword";
// Create a BasicAuthenticator RestClient with your API Url, user and Password
// The rest Client is an restsharp Client in the example
RestClient client = new RestClient
{
BaseUrl = new Uri(yourApiUrl),
Authenticator = new HttpBasicAuthenticator(username, password)
};
// Create a Rest request and pass the API resource Name 'token'
RestRequest request = new RestRequest {Resource = "token"};
// Optional, trust the security certificate
ServicePointManager.ServerCertificateValidationCallback +=
(sender, certificate, chain, sslPolicyErrors) => true;
// Send request to the Web API
IRestResponse response = client.Execute<HttpResponseMessage>(request);
// Optional: Exception handling
if (response.ErrorException != null){
const string message = "Error retrieving response. Check inner details for more info.";
var yourException = new ApplicationException(message, response.ErrorException);
throw yourException;
}
// Get the token from the headers of the response
string yourSpiderAPiToken = "";

Spider Technical Reference - Installation, Configuration, Troubleshooting
17-01-2022 / EN
143/208
if (response?.Headers == null) return "";
// The token is located in a http Header with name 'Token'
foreach (Parameter header in response.Headers.ToList())
switch (header?.Name)
{
case "Token":
if (header.Value != null) yourSpiderAPiToken = header.Value.ToString();
break;
default: continue;
}
//Return the Token
return yourSpiderAPiToken;
}
4.12.2 Entities
The entity scope enables data operations such as creating, reading, modifying and deleting entities (CRUD).
Example: read an Entity
private void GetEntityExample(string token)
{
// The url of mandator you from the web api help page
var url = "{mandatorid}/entity/asset/{entityid}";
// example 0/entity/Asset/1
// The Url of the Spider Web API
var yourApiUrl = "http://yourWebServer/SpiderWebApi";
// the token you have from the first Token example, and you will use this token in every request
// Create a Rest Client
RestClient client = new RestClient {BaseUrl = new Uri(yourApiUrl)};
// Initialize your Rest Request
RestRequest request = new RestRequest
{
Resource = url,
RequestFormat = DataFormat.Json
};
//Format Header
request.AddHeader("Accept", "application/json, text/json");
//Authentication add your token as an Authentication to your request object.
request.AddHeader("Authorization", "Token " + token);
//Optional, Trust the security certificate
//ServicePointManager.ServerCertificateValidationCallback += (sender, certificate, chain, sslPolicyErrors) => true;

Spider Technical Reference - Installation, Configuration, Troubleshooting
17-01-2022 / EN
144/208
//Send the Request
IRestResponse response = client.Execute(request);
// the Response should look like the following
// "fields": {
// "type": "Laptop",
// "id": 1,
// "scObjectID": 35,
// "mandatorID": 0,
// "legalEntityID": 0,
// "assetNo": "LAPTOP-BRBR002.domain.corp",
// "uuid": "4c4c4544-0037-5110-805a-b5c04f315131",
// "domain": "domain.corp",
// "netBiosDomain": "DOMAIN",
// "hostName": "LAPTOP-BRBR002",
// "name": null,
// "assetStatusID": 5,
// "commentStatus": null,
// "serialNo": "57QZ1Q1",
// "modelName": "Latitude E6320",
// "inventoryNo": null,
// "comment": "Geändert!",
// "deliveryNoteID": null,
// "functionUnitID": 1,
// "accountingApproachID": null,
// "serviceLevelID": null,
// "locationID": null,
// "purchaseDate": "2018-07-01T00:00:00",
// "businessValue": 2000.0000,
// "businessValueEUR": 2000.0000,
// "costCentreID": null,
// "commentCostCentre": null,
// "contract": null,
// "contractCommercial": null,
// "contractService": null,
// "purchaseCostCentreID": null,
// "bookMainNumber": null,
// "bookSecondNumber": null,
// "actualBookValue": null,
// "actualBookValueEUR": null,
// "yearDepreciation": null,
// "yearDepreciationEUR": null,
// "currencyCode": "EUR",
// "invLastScanDate": "2018-05-29T06:47:19",
// "invMessage": null,
// "invExists": true,
// "swrDeviceID": 1,
// "sysInsertUser": "Spider-System",
// "sysUpdateUser": "tf",
// "sysInsertDate": "2018-05-31T14:27:04.12",
// "sysUpdateDate": "2018-06-21T13:34:35.387",
// "sysTemplate": false,
// "sysTemplateActive": false,
// "sysTemplateID": null,
// "sysArchived": false,
// "sysTypeChangeId": null,

Spider Technical Reference - Installation, Configuration, Troubleshooting
17-01-2022 / EN
145/208
// "swrUpdateDate": "2018-05-31T14:58:39.307",
// "cpuLogicalCount": 4,
// "graphicMemoryMB": null,
// "cpuCount": 1,
// "cpuSpeedInMhz": 2601,
// "corePerCPU": 2,
// "responsibleEmployeeID": 116,
// "diskTotalInGb": 466,
// "importSourceID": null,
// "osTypeID": null,
// "ramInMb": 8073,
// "socketCount": null,
// "orderDate": "2018-06-01T00:00:00",
// "warrantyExpires": "2020-05-31T00:00:00",
// "invoiceDate": "2018-06-04T00:00:00",
// "installDate": null,
// "manufacturer": "Dell Inc.",
// "invScanSystem": "Generic - ColumbusInventoryAgent.exe 7.5.4.22",
// "cpuArchitecture": "x64",
// "graphicAdapter": null,
// "testksy": null,
// "supplier": null,
// "cpuType": "Intel(R) Core(TM) i5-2540M CPU @ 2.60GHz",
// "mlTestETField1": "1",
// "financingType": "Investment",
// "invoiceNumber": "abcde-1",
// "orderPosition": null,
// "orderNumber": null,
// "serviceTag": null,
// "qualifiedDesktop": false,
// "imei": null,
// "phoneNumber": null,
// "cusT_MLTest_NEU": null,
// "displaySize": null,
// "applicationGUID": "38f96e97-c314-44b8-b137-c966d35a3ba0"
// },
// "notifications": [],
// "duration": 790,
// "selfLink": "http://yourserver/SpiderAPI/0/entity/Asset/1",
// "parameter": {
// "cultureCode": null
// }
//}
// Optional: Exception handling
if (response.ErrorException != null)
{
const string message = "Error retrieving response. Check inner details for more info.";
var yourException = new ApplicationException(message, response.ErrorException);
throw yourException;
}
}
Example: create an Entity

Spider Technical Reference - Installation, Configuration, Troubleshooting
17-01-2022 / EN
146/208
private void CreateEntityExample(string token)
{
// The url of mandator you from the web api help page
var url = "{mandatorid}/entity/{entity}/";
// example 0/entity/tablet
// json to create the asset
//{
// "fields":
// {
// "hostname":"Test Hostname",
// "Mandator":0,
// "assetNo": "Test no",
// "name": "Test Asset name",
// "assetStatusID": 1,
// "commentStatus": "comment test",
// "serialNo": "123456",
// "modelName": "Latitude E6320",
// }
//}
// Escape the " with \ in your create entity json
var jsonToSend =
" {\"fields\":\r\n {\r\n\"hostname\":\"Test Hostname\",\r\n\"Mandator\":0,\r\n\"assetNo\": \"Test
no\",\r\n\"name\": \"Test Asset name\",\r\n\"assetStatusID\": 1,\r\n\"commentStatus\": \"comment test\",\r\n\"serialNo\":
\"123456\",\r\n\"modelName\": \"Latitude E6320\",\r\n}\r\n}";
// The Url of the Spider Web API
var yourApiUrl = "http://yourWebServer/SpiderWebApi";
// the token you have from the first Token example, and you will use this token in every request
// Create a Rest Client
RestClient client = new RestClient {BaseUrl = new Uri(yourApiUrl)};
// Initialize your Rest Request set the http post method
RestRequest request = new RestRequest
{
Resource = url,
RequestFormat = DataFormat.Json,
Method = Method.POST
};
//Format Header
request.AddHeader("Accept", "application/json, text/json");
//Authentication add your token as an Authentication to your request object.
request.AddHeader("Authorization", "Token " + token);
//Optional, Trust the security certificate
//ServicePointManager.ServerCertificateValidationCallback += (sender, certificate, chain, sslPolicyErrors) => true;
//Set the body of the request
if (!string.IsNullOrEmpty(jsonToSend))
{
request.AddParameter("application/json; charset=utf-8", jsonToSend, ParameterType.RequestBody);
}

Spider Technical Reference - Installation, Configuration, Troubleshooting
17-01-2022 / EN
147/208
//Send the Request
IRestResponse response = client.Execute(request);
// the result should look like the following
//{
// "ID": 42154,
// "Notifications": [
// {
// "Category": 2,
// "Message": "Column 'Mandator' could not be found."
// }
// ],
// "Duration": 1080,
// "SelfLink": "http://yourWebServer/SpiderAPI/0/entity/Tablet",
// "Parameter": {
// "Fields": {
// "hostname": "Test Hostname",
// "mandator": 0,
// "assetNo": "Test no",
// "name": "Test asset name",
// "assetStatusID": 1,
// "commentStatus": "comment test",
// "serialNo": "123456",
// "modelName": "Latitude E6320"
// },
// "CultureCode": null
// }
//}
// Optional: Exception handling
if (response.ErrorException != null)
{
const string message = "Error retrieving response. Check inner details for more info.";
var yourException = new ApplicationException(message, response.ErrorException);
throw yourException;
}
}
Example: update an Entity
private void UpdateEntityExample(string token)
{
// The url of mandator you from the Web API help page
var url = "{mandatorid}/entity/{entity}/";
// example 0/entity/tablet
// Escape the " with \ in your update entity json
var jsonToSend = " {\"fields\":{\"hostname\":\" New Hostname\"}";
// The Url of the Spider Web API
var yourApiUrl = "http://yourWebServer/SpiderWebApi";

Spider Technical Reference - Installation, Configuration, Troubleshooting
17-01-2022 / EN
148/208
// the token you have from the first Token example, and you will use this token in every request
// Create a Rest Client
RestClient client = new RestClient {BaseUrl = new Uri(yourApiUrl)};
// Initialize your Rest Request set the http post method
RestRequest request = new RestRequest
{
Resource = url,
RequestFormat = DataFormat.Json,
Method = Method.PUT
};
//Format Header
request.AddHeader("Accept", "application/json, text/json");
//Authentication add your token as an Authentication to your request object.
request.AddHeader("Authorization", "Token " + token);
//Optional, Trust the security certificate
//ServicePointManager.ServerCertificateValidationCallback += (sender, certificate, chain, sslPolicyErrors) => true;
//Set the body of the request
if (!string.IsNullOrEmpty(jsonToSend))
{
request.AddParameter("application/json; charset=utf-8", jsonToSend, ParameterType.RequestBody);
}
//Send the Request
IRestResponse response = client.Execute(request);
// the result should look like the following
// Optional: Exception handling
if (response.ErrorException != null)
{
const string message = "Error retrieving response. Check inner details for more info.";
var yourException = new ApplicationException(message, response.ErrorException);
throw yourException;
}
}
Example: delete an Entity
private void DeleteEntityExample(string token)
{
// The url of mandator you from the web api help page
var url = "{mandatorid}/entity/asset/{entityid}";
// example 0/entity/Asset/1
// The Url of the Spider Web API
var yourApiUrl = "http://yourWebServer/SpiderWebApi";
// Create a Rest Client

Spider Technical Reference - Installation, Configuration, Troubleshooting
17-01-2022 / EN
149/208
RestClient client = new RestClient {BaseUrl = new Uri(yourApiUrl)};
// Initialize your Rest Request
RestRequest request = new RestRequest
{
Resource = url,
RequestFormat = DataFormat.Json,
Method = Method.DELETE
};
//Format Header
request.AddHeader("Accept", "application/json, text/json");
//Authentication add your token as an Authentication to your request object.
request.AddHeader("Authorization", "Token " + token);
//Optional, Trust the security certificate
//ServicePointManager.ServerCertificateValidationCallback += (sender, certificate, chain, sslPolicyErrors) => true;
//Send the Request
IRestResponse response = client.Execute(request);
// Optional: Exception handling
if (response.ErrorException != null)
{
const string message = "Error retrieving response. Check inner details for more info.";
var yourException = new ApplicationException(message, response.ErrorException);
throw yourException;
}
}
4.12.3 Object Search
The object search functions are used to search, filter and find spider entities.
Example: Search
private void SearchExample(string token)
{
// The url of mandator you from the web api help page
var url = "{mandatorid}/search/Asset?Orderby=AssetNo&MaxRows=10&Firstrow=1";
// The Url of the Spider Web API
var yourApiUrl = "http://yourWebServer/SpiderWebApi";
// Create a Rest Client
RestClient client = new RestClient {BaseUrl = new Uri(yourApiUrl)};
// Initialize your Rest Request
RestRequest request = new RestRequest
{
Resource = url,
RequestFormat = DataFormat.Json

Spider Technical Reference - Installation, Configuration, Troubleshooting
17-01-2022 / EN
150/208
};
//Format Header
request.AddHeader("Accept", "application/json, text/json");
//Authentication add your token as an Authentication to your request object.
request.AddHeader("Authorization", "Token " + token);
//Optional, Trust the security certificate
//ServicePointManager.ServerCertificateValidationCallback += (sender, certificate, chain, sslPolicyErrors) => true;
//Send the Request
IRestResponse response = client.Execute(request);
// Optional: Exception handling
if (response.ErrorException != null)
{
const string message = "Error retrieving response. Check inner details for more info.";
var yourException = new ApplicationException(message, response.ErrorException);
throw yourException;
}
}
}
// the response content should look like the following
// "Result": [
// {
// "id": 11,
// "assetNo": "ESXHOST003.domain.CORP",
// "hostname": "ESXHOST003",
// "assetType": "Server",
// "status": "Aktiv",
// "functionUnitID": 11,
// "functionUnit": "ESXHOST003.domain.CORP",
// "serialNo": null
// },
// {
// "id": 12,
// "assetNo": "ESXHOST004.domain.CORP",
// "hostname": "ESXHOST004",
// "assetType": "Server",
// "status": "Aktiv",
// "functionUnitID": 12,
// "functionUnit": "ESXHOST004.domain.CORP",
// "serialNo": null
// },
// {
// "id": 10,
// "assetNo": "ESXHOST005.domain.CORP",
// "hostname": "ESXHOST005",
// "assetType": "Server",
// "status": "Aktiv",
// "functionUnitID": 10,
// "functionUnit": "ESXHOST005.domain.CORP",
// "serialNo": null
// },

Spider Technical Reference - Installation, Configuration, Troubleshooting
17-01-2022 / EN
151/208
// }
// ],
// "IsResultTruncated": true,
// "Notifications": [],
// "Duration": 720,
// "SelfLink": "http://yourserver/SpiderAPI/0/search/Asset?MaxRows=10&Firstrow=1&Orderby=AssetNo",
// "Parameter": {
// "Conditions": [],
// "MaxRows": 10,
// "FirstRow": 1,
// "OrderBy": "AssetNo",
// "Distinct": false,
// "Fields": null,
// "AllFields": false,
// "CultureCode": null
// }
//}
4.12.4 Reports
The report area enables the generation, filtering and retrieval of reports stored in Spider.
Example: Querying a Report
private void GetReportsExample(string token)
{
// The url of mandator you from the web api help page
var url = "{mandatorid}/report/{reportid}";
// The Url of the Spider Web API
var yourApiUrl = "http://yourWebServer/SpiderWebApi";
// the token you have from the first Token example, and you will use this token in every request
// Create a Rest Client
RestClient client = new RestClient {BaseUrl = new Uri(yourApiUrl)};
// Initialize your Rest Request
RestRequest request = new RestRequest
{
Resource = url,
RequestFormat = DataFormat.Json
};
//Format Header
request.AddHeader("Accept", "application/json, text/json");
//Authentication add your token as an Authentication to your request object.
request.AddHeader("Authorization", "Token " + token);
//Optional, Trust the security certificate
//ServicePointManager.ServerCertificateValidationCallback += (sender, certificate, chain, sslPolicyErrors) => true;
//Send the Request

Spider Technical Reference - Installation, Configuration, Troubleshooting
17-01-2022 / EN
152/208
IRestResponse response = client.Execute(request);
// the Response should look like the following
//{
// "Meta": {
// "DisplayCategory": "Compliance",
// "DisplayName": "Productversion compliance per Legal Entity",
// "DisplayDescription": "Shows Compliance overview per Productversion and Legal Entity",
// "Guid": "b35ab679-55a5-4219-a9fe-230e7934f68d",
// "Category": "Compliance",
// "Name": "Productversion compliance per Legal Entity",
// "Description": "Shows Compliance overview per Legal Entity",
// "ID": 52,
// "ApplicationName": "Spider Licence",
// "ApplicationGuid": "135ea316-a932-44c9-bffb-fbd128754884"
// },
// "Count": 92,
// "Result": [
// {
// "manufacturer": "Microsoft",
// "productVersionID": 19,
// "productVersion": "Access 2016 (Device, Win)",
// "legalEntity": null,
// "complianceICON": "PROBLEM",
// "licencePosition": -1,
// "licenceRequirement": 1,
// "licenceEntitlement": 0,
// "downgradeAllocation": 0,
// "poolingAllocation": 0,
// "consumed": 0,
// "remainingLicencesShort": 0
// },
// {
// "manufacturer": "Microsoft",
// "productVersionID": 10445,
// "productVersion": "Access 2019 (Device, Win)",
// "legalEntity": "Zentrale/Software Entwicklung/Administration 3A",
// "complianceICON": "OK",
// "licencePosition": 0,
// "licenceRequirement": 0,
// "licenceEntitlement": 5,
// "downgradeAllocation": -5,
// "poolingAllocation": 0,
// "consumed": 0,
// "remainingLicencesShort": 0
// },
// ],
// "IsResultTruncated": false,
// "Notifications": [],
// "Duration": 527,
// "SelfLink": "http://yourserver/Spiderapi/mandatorid/report/52?MaxRows=10&Firstrow=1&Orderby=Consumed",
// "Parameter": {
// "Conditions": [],
// "MaxRows": 10,
// "FirstRow": 1,

Spider Technical Reference - Installation, Configuration, Troubleshooting
17-01-2022 / EN
153/208
// "OrderBy": "Consumed",
// "Distinct": false,
// "Fields": null,
// "AllFields": false,
// "CultureCode": null
// }
//}
// Optional: Exception handling
if (response.ErrorException != null)
{
const string message = "Error retrieving response. Check inner details for more info.";
var yourException = new ApplicationException(message, response.ErrorException);
throw yourException;
}
}
4.12.5 Meta area
The Spider Web API meta area provides information about the fields in search results and reports, as well as infor-
mation about creating and editing entities.
In addition to the lists of available tenants, entities, searches, and reports, metadata contain additional information
depending on the used function.
Example: retrieving tenant (Mandator) information
private MandatorObject GetMandatorsExample(string token)
{
// The url of mandator you from the Web API Help
var url = "meta/mandator";
// The Url of the Spider Web API
var yourApiUrl = "http://yourWebServer/SpiderWebApi";
// The token you have from the first token example, and you will use this token in each request
// Create a Rest Client
RestClient client = new RestClient {BaseUrl = new Uri(yourApiUrl)};
// Initialize Rest Request
RestRequest request = new RestRequest
{
Resource = url,
RequestFormat = DataFormat.Json
};
//Format the header
request.AddHeader("Accept", "application/json, text/json");
//Authentication: Add your token as an Authentication header to your request object.
request.AddHeader("Authorization", "Token " + token);

Spider Technical Reference - Installation, Configuration, Troubleshooting
17-01-2022 / EN
154/208
//Optional, trust the security certificate
//ServicePointManager.ServerCertificateValidationCallback += (sender, certificate, chain, sslPolicyErrors) => true;
//Send the Request
IRestResponse response = client.Execute(request);
// Optional: Exception handling
if (response.ErrorException != null {
const string message = "Error retrieving response. Check inner details for more info.";
var yourException = new ApplicationException(message, response.ErrorException);
throw yourException;
}
//you can finally deserialize the result in your own object
// As an example the see below the MandatorObject definition
MandatorObject result = new MandatorObject();
if (response.StatusCode == HttpStatusCode.OK)
{
result = JsonConvert.DeserializeObject<MandatorObject>(response?.Content);}
return result;
}
public class MandatorObject
{
public System.Data.DataTable Result { get; set; }
public string CultureCode { get; set; }
}
Example: Asset search information
private void GetMetaSearchAssetExample(string token)
{
// The url of mandator you from the web api help page
var url = "{mandatorid}/meta/search/asset";
// The Url of the Spider Web API
var yourApiUrl = "http://yourWebServer/SpiderWebApi";
// Create a Rest Client
RestClient client = new RestClient {BaseUrl = new Uri(yourApiUrl)};
// Initialize your Rest Request
RestRequest request = new RestRequest
{
Resource = url,
RequestFormat = DataFormat.Json
};
//Format the header
request.AddHeader("Accept", "application/json, text/json");
//Authentication: Add your token as an Authentication header to your request object.

Spider Technical Reference - Installation, Configuration, Troubleshooting
17-01-2022 / EN
155/208
request.AddHeader("Authorization", "Token " + token);
//Optional, Trust the security certificate
//ServicePointManager.ServerCertificateValidationCallback += (sender, certificate, chain, sslPolicyErrors) => true;
//Send the Request
IRestResponse response = client.Execute(request);
//the content should look like the following
//{
// "fields": [
// {
// "inResult": false,
// "fieldName": "ID",
// "displayName": "ID",
// "dataType": "int"
// },
// {
// "inResult": true,
// "fieldName": "AssetNo",
// "displayName": "AssetNo",
// "dataType": "nvarchar"
// },
// ],
// "notifications": [],
// "duration": 55,
// "selfLink": "http://yourServer/SpiderWebApi/0/meta/search/Asset",
// "parameter": {
// "cultureCode": null
// }
//}
// Optional: Exception handling
if (response.ErrorException != null)
{
const string message = "Error retrieving response. Check inner details for more info.";
var yourException = new ApplicationException(message, response.ErrorException);
throw yourException;
}
}
Example: Report information
private void GetMetaReportExample(string token)
{
// The url of mandator you from the web api help page
var url = "{mandatorid}/meta/report/{reporid}";
// The Url of the Spider Web API
var yourApiUrl = "http://yourWebServer/SpiderWebApi";
// the token you have from the first Token example, and you will use this token in every request
// Create a Rest client

Spider Technical Reference - Installation, Configuration, Troubleshooting
17-01-2022 / EN
156/208
RestClient client = new RestClient {BaseUrl = new Uri(yourApiUrl)};
// Initialize your Rest Request
RestRequest request = new RestRequest
{
Resource = url,
RequestFormat = DataFormat.Json
};
//Format the header
request.AddHeader("Accept", "application/json, text/json");
//Authentication. add your token as an Authentication header to your request
request.AddHeader("Authorization", "Token " + token);
//Optional, Trust the security certificate
//ServicePointManager.ServerCertificateValidationCallback += (sender, certificate, chain, sslPolicyErrors) => true;
//Send the Request
IRestResponse response = client.Execute(request);
// the Response should look like the following
// {
// "meta": {
// "displayCategory": "Compliance",
// "displayName": "Productversion compliance per Legal Entity",
// "displayDescription": "Shows Compliance overview per Productversion and Legal Entity",
// "guid": "b35ab679-55a5-4219-a9fe-230e7934f68d",
// "category": "Compliance",
// "name": "Productversion compliance per Legal Entity",
// "description": "Shows Compliance overview per Legal Entity",
// "id": 52,
// "applicationName": "Spider Licence",
// "applicationGuid": "135ea316-a932-44c9-bffb-fbd128754884"
// },
// "fields": [
// {
// "inResult": false,
// "fieldName": "ManufacturerID",
// "displayName": "Manufacturer",
// "dataType": "int"
// },
// {
// "inResult": true,
// "fieldName": "Manufacturer",
// "displayName": "Manufacturer",
// "dataType": "nvarchar"
// },
// {
// "inResult": false,
// "fieldName": "ProductVersionID",
// "displayName": "ProductVersionID",
// "dataType": "int"
// },
// {

Spider Technical Reference - Installation, Configuration, Troubleshooting
17-01-2022 / EN
157/208
// "inResult": true,
// "fieldName": "ProductVersion",
// "displayName": "Product version",
// "dataType": "nvarchar"
// },
// {
// "inResult": false,
// "fieldName": "LegalEntityID",
// "displayName": "Legal Entity",
// "dataType": "int"
// },
// {
// "inResult": true,
// "fieldName": "LegalEntity",
// "displayName": "Legal Entity",
// "dataType": "nvarchar"
// },
// {
// "inResult": true,
// "fieldName": "ComplianceICON",
// "displayName": "ComplianceICON",
// "dataType": "nvarchar"
// },
// {
// "inResult": true,
// "fieldName": "LicencePosition",
// "displayName": "LicencePosition",
// "dataType": "int"
// },
// {
// "inResult": true,
// "fieldName": "LicenceRequirement",
// "displayName": "License Requirement",
// "dataType": "int"
// },
// {
// "inResult": true,
// "fieldName": "LicenceEntitlement",
// "displayName": "LicenceEntitlement",
// "dataType": "int"
// },
// {
// "inResult": true,
// "fieldName": "DowngradeAllocation",
// "displayName": "DowngradeAllocation",
// "dataType": "int"
// },
// {
// "inResult": true,
// "fieldName": "PoolingAllocation",
// "displayName": "PoolingAllocation",
// "dataType": "int"
// },
// {
// "inResult": true,

Spider Technical Reference - Installation, Configuration, Troubleshooting
17-01-2022 / EN
158/208
// "fieldName": "Consumed",
// "displayName": "Consumed",
// "dataType": "int"
// },
// {
// "inResult": true,
// "fieldName": "RemainingLicencesShort",
// "displayName": "RemainingLicencesShort",
// "dataType": "int"
// }
// ],
// "notifications": [],
// "duration": 479,
// "selfLink": "http://yourWebServer/SpiderAPI/0/meta/report/52",
// "parameter": {
// "cultureCode": null
// }
//}
// Optional: Exception handling
if (response.ErrorException != null)
{
const string message = "Error retrieving response. Check inner details for more info.";
var yourException = new ApplicationException(message, response.ErrorException);
throw yourException;
}
}
Example: Entity information
private void GetMetaEntitiesExample(string token)
{
// The url of mandator you from the web api help page
var url = "{mandatorid}/meta/entities";
// The Url of the Spider Web API
var yourApiUrl = "http://yourWebServer/SpiderWebApi";
// Create a Rest Client
RestClient client = new RestClient {BaseUrl = new Uri(yourApiUrl)};
// Initialize your Rest Request
RestRequest request = new RestRequest
{
Resource = url,
RequestFormat = DataFormat.Json
};
//Format the Header
request.AddHeader("Accept", "application/json, text/json");
//Authentication add your token to your request object.
request.AddHeader("Authorization", "Token " + token);

Spider Technical Reference - Installation, Configuration, Troubleshooting
17-01-2022 / EN
159/208
//Optional, Trust the security certificate
//ServicePointManager.ServerCertificateValidationCallback += (sender, certificate, chain, sslPolicyErrors) => true;
//Send the Request
IRestResponse response = client.Execute(request);
//the response content should look like the following
//{
// "entities": [
// {
// "name": "Article",
// "displayName": "Article",
// "parentName": "",
// "parentDisplayName": ""
// },
// {
// "name": "LicenceAllocation",
// "displayName": "LicenceAllocation",
// "parentName": "",
// "parentDisplayName": ""
// },
// {
// "name": "LicenceKey",
// "displayName": "License key",
// "parentName": "",
// "parentDisplayName": ""
// },
// {
// "name": "Product Licence",
// "displayName": "Product Licence",
// "parentName": "Licence",
// "parentDisplayName": "License"
// },
// {
// "name": "Product Change Licence",
// "displayName": "Product Change Licence",
// "parentName": "Licence",
// "parentDisplayName": "License"
// },
// {
// "name": "OEM Licence",
// "displayName": "OEM Licence",
// "parentName": "Licence",
// "parentDisplayName": "License"
// },
// ],
// "notifications": [],
// "duration": 7,
// "selfLink": "http://yourServer/SpiderWebApi/0/meta/entities",
// "parameter": {
// "cultureCode": null
// }

Spider Technical Reference - Installation, Configuration, Troubleshooting
17-01-2022 / EN
160/208
//}
// Optional: Exception handling
if (response.ErrorException != null)
{
const string message = "Error retrieving response. Check inner details for more info.";
var yourException = new ApplicationException(message, response.ErrorException);
throw yourException;
}
}
5.1 System requirements
5.1.1 Application server
The installation of the Recognition can either be done on the system where Spider has been installed or on a separate
system.
Additional services for the functionality of the Recognition are installed.
• EDC monitor
• Spider Data Receiver
• Software Recognition Center upload (optional)
The databases must be stored on the same server (and Instance), which is also used for storing the databases for Spi-
der.
During the setup, the connection to the database server is prompted.
The following conditions must be observed:
• The setup has to be executed with administrative rights.
• Recognition (RC) and Spider Data Collector have to run on separate systems. These may also be separated virtual
environments.
• On the Spider application server, the RC or the Spider Data Collector may be installed.
• Port for the communication of software recognition with Spider Data Collector(s) to be connected; the port can be se-
lected freely. By default, port 1685 is used.
• In case of productive systems, the address and port for the upload to the software recognition center must be reacha-
ble from the server
• Address: edcsrv1.brainwaregroup.com
• Port: 1337
Note Test systems without upload to the software recognition center.
5 Software Services (Catalogs and Recognition)

Spider Technical Reference - Installation, Configuration, Troubleshooting
17-01-2022 / EN
161/208
Here, you can install software recognition and Spider Data Collector parallel.

Spider Technical Reference - Installation, Configuration, Troubleshooting
17-01-2022 / EN
162/208
5.1.2 Database server
A Microsoft SQL server, Version 2008 or later, is required as database server. For a successful setup, the following
preconditions must be met on the database server.
The database server must be the same server on which the Spider databases are installed.
• You must activate the TCP/IP protocol in the "SQL Server Configuration" of the SQL server configuration manager.
• A database login for the SQL installation user is required.
• If the SQL installation user does not possess the right to create databases, it must be provided before starting the in-
stallation.
If the SQL installation user does not possess the rights to create other SQL logins on the database server, the required
SQL login must be set up beforehand and made available for the setup. It is recommended to use the same user
which has been used for the Spider installation, since the Spider services must also have access to the software recog-
nition database.
• The SQL installation user will at least need the right to execute the SQL scripts for creating and changing the database
objects as well as the database properties (Extended Properties) in the Spider databases.
Required database
To create databases during the installation, the SQL installation user will need the corresponding rights. If these can-
not be granted, the product databases have to be created before execution of the setup. The setup supports the us-
age of empty databases which have been created beforehand. Especially if the databases shall not be created with
default properties, the required databases can be provided using the desired settings.
The following databases are required for the installation:
• Spider Recognition
Important It is recommended to use the suffix (later in the example: "CoreServer_00_") used for the installation
of Spider, also for the recognition database. This makes the identification on the SQL server easier.
Please note the following:
• The name can be chosen freely. The database name must not start with a number.
• All Spider databases must have the same Database collation. A case insensitive collation (CI collation) must be se-
lected, e.g. SQL_Latin1_General_CP1_CI_AS.
• The databases must be completely empty before installation.
Required SQL user
If the SQL installation user does not have the permission to create new logins on the database server, this login must be
created beforehand. An SQL user is required for the setup. The login data are requested during the installation.
The user must be the same as the one used for the Spider installation, since the services of Spider must have access to
the software recognition database.

Spider Technical Reference - Installation, Configuration, Troubleshooting
17-01-2022 / EN
163/208
Overview of required rights
Please refer to the table below for the rights required to execute the setup:
Task
Rights to
Right(s)
Creating logins
Server
ALERT ANY LOGIN
Creating databases
Server
CREATE DATABASE
CREATE ANY DATABASE
ALTER ANY DATABASE
Creating extended properties
Database
ALTER

Spider Technical Reference - Installation, Configuration, Troubleshooting
17-01-2022 / EN
164/208
5.2 Installation
5.2.1 Start of the installation
Start the installation by executing Recognition Setup.exe
At first, you are asked to select the language for the installation assistant. To do this, click on the desired language in
the selection box and confirm your input with "OK".
After that, the installation assistant for Spider will open. This assistant will guide you through the setup installation in
the selected language. Click on "Next" to start the installation.

Spider Technical Reference - Installation, Configuration, Troubleshooting
17-01-2022 / EN
165/208
5.2.2 License agreement
In the next step, you are asked to read and accept the license agreement before starting the installation. The setup
can only be continued after accepting the license agreement.

Spider Technical Reference - Installation, Configuration, Troubleshooting
17-01-2022 / EN
166/208
5.2.3 License file
Select the matching license file to continue the setup. The setup cannot be continued without the license file
Click on "..." Button:
Select the license and then click "Open".

Spider Technical Reference - Installation, Configuration, Troubleshooting
17-01-2022 / EN
167/208
The selected license will be loaded and its details are shown.
Note If a license is found in the same directory which has been used to start the setup, it will be loaded au-
tomatically into the dialog (if valid).

Spider Technical Reference - Installation, Configuration, Troubleshooting
17-01-2022 / EN
168/208
5.2.4 Installation directory
In the following step, you can select a target directory for the installation. You may change the proposed default
path.

Spider Technical Reference - Installation, Configuration, Troubleshooting
17-01-2022 / EN
169/208
5.2.5 Database server
In the following step, the installation assistant will ask you to specify the name and the instance of a Microsoft SQL
Server, on which the recognition databases are to be installed.
The user, with which the connection is established, can either be the logged-in (Windows) user or an SQL user.

Spider Technical Reference - Installation, Configuration, Troubleshooting
17-01-2022 / EN
170/208
To use an SQL user, you must tick the check box Use SQL user for database connection and fill in the fields User name
and Password with the desired data.
Note The users have to be set up beforehand on the database server with the corresponding rights. De-
pending on the rights of the user, the subsequent dialogs will show different options.
Field
Description
SQL server name
Name of the SQL server, including instance name and port if required
e.g. SQLSERVER\SQLINSTANZ,1234
Using SQL users for database
connection
Select whether to use the logged-in domain user or an SQL user.
User name
Name of SQL user.
Password
Password of the SQL user.

Spider Technical Reference - Installation, Configuration, Troubleshooting
17-01-2022 / EN
171/208
5.2.6 Database & Data Receiver
In this dialog, you can enter the data for the recognition database, the Core database of the Spider installation to be
connected, the data directory, the recognition upload and the customer ID.
Field
Description
Database
Select in the drop-down, whether a new database should be created, or select an existing
(empty!) database
Core DB
Select the name of the Core database of the Spider installation to be linked
Data directory
The work directory in which the received data of the Data Collector(s) are stored and pro-
cessed.
Port
Port used by the Data Receiver to receive the data of the connected Data Collectors (De-
fault port: 1685)
Recognition Center Upload
Check box to determine whether unrecognized software shall be transferred to Flexera for
recognition.
Upload ID
ID (from the license file) used for identification prior to the upload to Flexera.
Customer ID
Customer ID which will be transferred to the Data Collector(s) to ensure the identification
at this installation of the recognition.
5.2.7 SQL login, service user
This user is used for access to the software recognition database.
The Spider services access also the recognition databases by using the Core server user databases!

Spider Technical Reference - Installation, Configuration, Troubleshooting
17-01-2022 / EN
172/208
The default system user «spider» or the user which has been used for the installation of Spider must be entered.
Attention When creating a new user, please make sure to grant the rights for Spider! To make sure that the
Spider services can also access the recognition database, also the user used by the services must have
the corresponding rights for using the recognition database.

Spider Technical Reference - Installation, Configuration, Troubleshooting
17-01-2022 / EN
173/208
5.2.8 Summary
The summary shows that:
• the version of software recognition
• the software recognition definitions
• the Data Receiver components and version
• the upload to the Spider Recognition Center with version

Spider Technical Reference - Installation, Configuration, Troubleshooting
17-01-2022 / EN
174/208
are installed.
5.2.9 Installation
The installation assistant will now install Recognition. This can take some time. Please wait, until the installation is
completed.

Spider Technical Reference - Installation, Configuration, Troubleshooting
17-01-2022 / EN
175/208
The successful completion of the installation will be shown in the progress dialog.
The setup has been completed successfully and can now be closed

Spider Technical Reference - Installation, Configuration, Troubleshooting
17-01-2022 / EN
176/208
After completion of the installation, a log file will be written. For details to the log files, please refer to chapter Log
files (on page 208).
5.3 Advanced configuration
5.3.1 Data Receiver
The Data Receiver is the component which receives the deliveries of the Data Collector(s).
The port and the storage location of the received files can be changed.
The configuration is done in the file <Installation directory>\Recognition\DataReceiver\SpiderDataReceiver.cfg
; OTB Connection Settings:
; ------------------------
; OTBPort - default setting is "80"
[Connection]
OTBPort=1685
; General settings:
; -----------------
; DataDirectory - is the data directory to save files in that should be uploaded - default if not set is the folder where the
EDCSRV.exe is installed (environment variables are resolved)
[General]
DataDirectory=C:\RecognitionData\DataReceiver
Section
Variable
Description
Connection
OTBPort
Port used by the Data Receiver to listen to the connections of the Data Collector(s)
General
DataDirectory
Path used to store the received files.
Attention If variable DataDirectory is adapted, the Service "Spider Data Receiver" must be restarted. Only then,
the change will become active.
In addition, the configuration of the EDC monitor (on page 177) has to be adapted to make sure that it
can find the files to be processed.
SSL Secured Transmission
Communication with the Spider Data Collector can be secured by SSL (RSA 2048Bit).
The superior Data Receiver provides the SSL mechanism for the subordinate Data Collectors.
Upon installation of the Data Receiver the necessary files are generated and placed in: %ProgramData%\Columbus
SSL usage can be enabled by setting the following registry keys.
Key: HKEY_LOCAL_MACHINE\SOFTWARE\<Wow6432Node>\BrainWare\Columbus\7\
"OTBEncryptionUseSSL"="1"

Spider Technical Reference - Installation, Configuration, Troubleshooting
17-01-2022 / EN
177/208
"OTBEncryptionForceUseSSL"="0"
5.3.2 EDC Monitor
The EDC monitor is responsible for the import of the files received by the Data Receiver into the recognition database.
The configuration of the EDC monitor is stored in the file <installation
path>\Recognition\EDCMonitor\EDCMonitor.exe.config.
<?xml version="1.0" encoding="utf-8"?>
<configuration>
<connectionStrings>
<!-- Connection string to the software recognition database -->
<add name="SoftwareRecognitionConnectionString" connectionString="server=server.domain.local; database=Recognition;
uid=Spider; pwd=abcde; application name=SpiderEDCMonitor;Persist Security Info=True" />
</connectionStrings>
<appSettings>
<!-- Working directory of the EDC monitor
Has to be the path where EDCMonitor.exe is located -->
<add key="EDCMonitorWorkingDirectory" value="C:\Program Files\Spider\Recognition\EDCMonitor" />
<!-- Working directory of Data Receiver.
Following files are expected in the directory:
* SpiderDataReceiver.cfg
* SpiderDataReceiverRegister.csv
* SpiderDataReceiverConnection.csv -->
<add key="DataReceiverWorkingDirectory" value="C:\Program Files\Spider\Recognition\DataReceiver" />
<!-- Location, where files are commited to software recognition.
The data directory of the EDC server and this directory should be located on the same HDD. -->
<add key="SoftwareRecognitionImportDirectory" value="C:\RecognitionData\EDC monitor" />
<!-- Delay between monitoring processes (in minutes). -->
<add key="Interval" value="1" />
<!-- Directory where log files will be written
Standard: %ProgramData%\brainwaregroup\EDCMonitor\Logs
-->
<add key="FeedbackDirectory" value="C:\ProgramData\brainwaregroup\EDCMonitor\Logs" />
</appSettings>
</configuration>
Setting
Description
connectionsStrings.
SoftwareRecognitionConnectionString
Data for the connection to the recognition database; if Integrated Security is used,
uid=...;pwd=...; must be replaced by "IntegratedSecurity = True.
appSettings.
EDCMonitorWorkingDirectory
Path used to store the file EDCMonitor.exe.
appSettings.
DataReceiverWorkingDirectory
Path used to store the file SpiderDataReceiver.exe and its configuration file.
appSettings.
SoftwareRecognitionImportDirectory
Path used by the EDC monitor to store its files.
appSettings.
Interval
Interval in which the EDC monitor is activated, detects new files and imports them
if required.
Spider Technical Reference - Installation, Configuration, Troubleshooting
17-01-2022 / EN
178/208
Setting
Description
appSettings.
FeedbackDirectory
Path used to store the log files.
5.3.3 Operation with domain account
Prepare SQL server
The setup is carried out according to the description for setting up Spider Prepare SQL server (on page 43).
In addition, the user must be given new or additional rights for the recognition database.
➢ Entering the Roles memberships for the recognition database by setting the tick on Map and selecting the mem-
bership in the lower part of the dialog.
Database
Database role membership
Recognition
public, sr_user

Spider Technical Reference - Installation, Configuration, Troubleshooting
17-01-2022 / EN
179/208
Folder permissions
In order to enable the access to the stored files, the user can either be given administrative rights on the computer on
which the EDC monitor is installed, or you can give the folder access rights to the EDC monitor directly or via its group
membership.
Folder
Permission
Installation directory of the EDC monitor
C:\Program Files\Spider\Recognition\EDCMonitor
Modify
Installation directory of the data receiver
C:\Program Files\Spider\Recognition\DataReceiver
Modify
Data directory
Database & Data Receiver (on page 171)
Modify data directory and all subfolders

Spider Technical Reference - Installation, Configuration, Troubleshooting
17-01-2022 / EN
180/208
Adapt the service account
The setup is done according to the setup of Spider Adapt the service account (see "" on page 53).
The service to be adapted is the External Data Collector - Monitor
Adapt the connection string
The file ConnectionStrings.config is used for the access of the service.
Storage location of the connection string
Component
Storage location
EDC monitor
C:\Program
Files\Spider\Recognition\EDCMonitor\EDCMonitor.exe.config
The entries uid=... and pwd=... must be replaced by Integrated Security=True.
ConnectionStrings.config
<?xml version="1.0" encoding="utf-8"?>
<configuration>
<connectionStrings>
<!-- Connection string to the software recognition database -->
<add name="SoftwareRecognitionConnectionString" connectionString="server=<SQLServer>;
database=Recognition;
uid=Spider;
pwd=abcde;
application name=SpiderEDCMonitor;
Persist Security Info=True" />
</connectionStrings>
...
</configuration>
<?xml version="1.0" encoding="utf-8"?>
<configuration>
<connectionStrings>
<!-- Connection string to the software recognition database -->

Spider Technical Reference - Installation, Configuration, Troubleshooting
17-01-2022 / EN
181/208
<add name="SoftwareRecognitionConnectionString" connectionString="server=<SQLServer>;
database=Recognition;
Integrated Security=True;
application name=SpiderEDCMonitor;
Persist Security Info=True" />
</connectionStrings>
...
</configuration>
Note After all adaptations have been done, the service must be restarted to activate the changes.
5.4 Update
5.4.1 Start of the update
Start the installation by executing Recognition Setup.exe
At first, you are asked to select the language for the installation assistant. To do this, click on the desired language in
the selection box and confirm your input with "OK".

Spider Technical Reference - Installation, Configuration, Troubleshooting
17-01-2022 / EN
182/208
After that, the installation assistant for Spider will open. This assistant will guide you through the setup installation in
the selected language. Click on "Next" to start the installation.
5.4.2 License agreement
In the next step, you are asked to read and accept the license agreement before starting the installation. The setup
can only be continued after accepting the license agreement.

Spider Technical Reference - Installation, Configuration, Troubleshooting
17-01-2022 / EN
183/208
5.4.3 License file
Select the matching license file to continue the setup. The setup cannot be continued without the license file
Click on "..." Button:
Select the license and then click "Open".

Spider Technical Reference - Installation, Configuration, Troubleshooting
17-01-2022 / EN
184/208
The selected license will be loaded and its details are shown.
Note If a license is found in the same directory which has been used to start the setup, it will be loaded automati-
cally into the dialog (if valid).

Spider Technical Reference - Installation, Configuration, Troubleshooting
17-01-2022 / EN
185/208
5.4.4 Installation directory
During the update, the selection of the installation directory is prevented. An update is only possible in the existing
path.

Spider Technical Reference - Installation, Configuration, Troubleshooting
17-01-2022 / EN
186/208
5.4.5 Database server
During an update, it is not possible to change the previously used SQL server.
The user, with which the connection is established, can either be the logged-in (Windows) user or an SQL user.
To use an SQL user, you must tick the check box Use SQL user for database connection and fill in the fields User name
and Password with the desired data.

Spider Technical Reference - Installation, Configuration, Troubleshooting
17-01-2022 / EN
187/208
Field
Description
SQL server name
Name of the SQL server, not to be changed!
Using SQL users for database connection
Select whether to use the logged-in domain user or an SQL user.
User name
Name of SQL user.
Password
Password of the SQL user.
.
5.4.6 Summary
If the update is carried out for the first time, all product must be selected for update. The dialog is filled in already
and cannot be changed anymore.

Spider Technical Reference - Installation, Configuration, Troubleshooting
17-01-2022 / EN
188/208
If one of the products has been updated earlier, it could happen that not all of the products are offered for updating.
These products can nevertheless be selected for updating.
5.4.7 Installation
The installation assistant will now install Recognition. This can take some time. Please wait, until the installation is
completed.

Spider Technical Reference - Installation, Configuration, Troubleshooting
17-01-2022 / EN
189/208
The successful completion of the installation will be shown in the progress dialog.
The setup has been completed successfully and can now be closed

Spider Technical Reference - Installation, Configuration, Troubleshooting
17-01-2022 / EN
190/208
After completion of the installation, a log file will be written. For details to the log files, please refer to chapter Log
files (on page 208).
6.1 Sizing of the virtual machine
The sizing of the virtual machine depends on many parameters. The following data, which distinguish among four ap-
plication scenarios, could serve as a guideline:
• TEST:
Usage of the Datacenter appliance as a temporary test system
• SMALL:
Usage of the Datacenter appliance in an environment with up to 1,000 systems
• MEDIUM:
Usage of the Datacenter appliance in an environment with 1,000 to 5,000 systems
• LARGE:
Usage of the Datacenter appliance in an environment with 5,000 to 10,000 systems
In case of environments with more than 10,000 systems, it is not possible to give any generalized specifications.
The following specifications are given for each of these scenarios:
• # CPU threads: Number of CPU threads for the appliance
• Memory RAM: Main memory for the appliance
• Disc space: File system size of the appliance
• Network: Number of network interfaces
Sizing
TEST
SMALL
MEDIUM
LARGE
Number of systems
up to 1.000
1.000 to 5.000
5.000 to 10.000
# CPU threads
2
4
12
16
Memory RAM in GB
4
10
20
32
File system size in GB
150
250
500
750
# of gigabit network interfaces
1
2
2
2
6 Data Center Module (nova ratio appliance)

Spider Technical Reference - Installation, Configuration, Troubleshooting
17-01-2022 / EN
191/208
6.2 Launching of the appliance
6.2.1 Import of the VM
The virtual machine is available as an appliance for VMware. Please find below a short description of how to integrate
the virtual machine into an existing VCenter environment by means of the vSphere client. Select "Virtual Machine..."
under File -> New
Then select "User-defined" as configuration.
The following settings are self-explanatory. Please make sure to select the item "Existing virtual hard disc" under "Se-
lect hard disc"
Now you can select the VM, which has previously been stored on the configured Datastore, by clicking on "Next". For
using the import by web client, VMware offers its own KB article with video guide under the following address: :
https://kb.vmware.com/selfservice/microsites/search.do?language=en_US&cmd=displayKC&externalId=2032904

Spider Technical Reference - Installation, Configuration, Troubleshooting
17-01-2022 / EN
192/208
6.2.2 Operating system users
For the operation of the appliance AND the Application, users have been created on the operating system level:
User
Password
erunbook
erunbook
root
nova123
By default, the appliance is provided with the host name "vm-spider-inv". The network settings are configured so that
an IP address is assigned to the server via DHCP. A short illustration on how these settings can be adjusted to custom-
er-specific environments is given below.
6.2.3 Adaptation of the host name
The host name may be changed by using the command "hostname". The call is executed under the root user and works
immediately, however, only until the next restart of the appliance:
root@vm-Spider-inv:~# hostname <new hostname>
In order to make the change of the host name permanent, the file /etc/hostname has to be adapted with a text editor
under the root user. This can be carried out with e.g. the vi editor:
root@vm-spider-inv:~# vi /etc/hostname
<new hostname>
:x
root@vm-spider-inv:~# _
6.2.4 Adaptation of the IP address
By default, the IP address of the appliance is set to use DHCP. To use a static IP address, the following adaptations in
the file /etc/network/interface must be made under the root user:
root@vm-spider-inv:~# vi /etc/network/interface
In the delivery state of the appliance, the section "The primary Network interface" appears as follows:
# The primary network interface
auto eth0
iface eth0 inet dhcp
#iface eth0 inet static
#address 172.19.120.99
#netmask 255.255.255.0
#gateway 172.19.120.1
#dns-nameservers 172.19.120.1
To use a static IP address, the DHCP line has to be commented out. The lines "iface", "address", "netmask", "gateway"
and "dns-nameservers" must be activated and filled with the desired values.
In the following example, the appliance shall use the IP address 172.19.120.99. The routing is done via gateway
172.19.120.1, the subnet mask is set to 255.255.255.0 and the system with IP address 172.19.120.1 will be used as DNS
server:
# The primary network interface
auto eth0
#iface eth0 inet dhcp
iface eth0 inet static
address 172.19.120.99
netmask 255.255.255.0

Spider Technical Reference - Installation, Configuration, Troubleshooting
17-01-2022 / EN
193/208
gateway 172.19.120.1
dns-nameservers 172.19.120.1
After changing these files, the network services of the appliance have to be restarted:
root@vm-spider-inv:~# systemctl restart ifup@eth0
After this command, please use the ifconfig command to make sure that all settings have been applied correctly
root@vm-spider-inv:~# ifconfig
…
6.2.5 Creating a certificate
The tool for creating or updating an eRunbook certificate is already installed on the eRunbook server. On the eRunbook
server, go to the directory /opt/erunbook/product/tools and run the script erunbook_gen_SSL_certificate.sh as user
erunbook.
To create the certificate, some information is requested. Please note that the FQDN of the eRunbook server is expected
in the query of the "common name" (in bold in the illustration).
erunbook@vm-dev-mj:~ > cd /opt/eRunbook/product/tools
erunbook@vm-dev-mj:~/product/tools ./eRunbook_gen_ssl_certificate.sh
writing RSA key
You are about to be asked to enter information that will be incorporated
into your certificate request.
What you are about to enter is what is called a Distinguished Name or a DN.
There are quite a few fields but you can leave some blank
For some fields there will be a default value,
If you enter '.', the field will be left blank.
-----
Country Name (2 letter code) [AU]:DE
State or Province Name (full name) [Some-State]:Germany
Locality Name (eg, city) []:Koblenz
Organization Name (eg, company) [Internet Widgits Pty Ltd]:nova ratio AG
Organizational Unit Name (eg, section) []:eRunbook Dev
Common Name (eg, YOUR name) []:vm-dev-mj.novaratio
Email Address []:.
Please enter the following 'extra' attributes
to be sent with your certificate request
A challenge password []:.
An optional company name []:.
Signature ok
subject=/C=DE/ST=Germany/L=Koblenz/O=nova ratio AG/OU=eRunbook Dev/CN=vm-dev-mj.novaratio
Getting Private key
Please restart Webserver now
erunbook@vm-dev-mj:~/product/tools >
Finally, the web browser has to be restarted. A script is available to start the Apache web server. This script is located in
the directory /opt/erunbook/product/admin/ and will be called with the parameter "restart"::
erunbook@vm-dev-mj:~/product/admin > cd /opt/eRunbook/product/admin/
erunbook@vm-dev-mj:~/product/admin > ./eRunbook_apache restart
erunbook@vm-dev-mj:~/product/admin >
The new erunbook certificate is created with the name "httpd.server.crt" and can be found in the directory
/opt/erunbook/software/additional/etc
The certificate created in this way is a "self-signed SSL certificate". This means that web browsers will usually ask for a
confirmation before granting access to the pages of this web server.

Spider Technical Reference - Installation, Configuration, Troubleshooting
17-01-2022 / EN
194/208

Spider Technical Reference - Installation, Configuration, Troubleshooting
17-01-2022 / EN
195/208
6.3 Setting up the data center module
6.3.1 General information
For the following configuration steps, in some cases, direct actions may be carried out on the data center module via
an API. The creation or deletion of a tenant from spider results in multiple actions in the data module. Depending on
the equipment used and the workload of the data center module, a single task executed in the background may take
several minutes to complete.
Multi-platform inventory management may be carried out via the Columbus Datacenter Inventory. You may select
whether the delivery of the inventory data is carried out to a Spider Data Collector (SDC) end point or a Columbus in-
frastructure server. From here, the inventory management files are delivered to the recognition module as Columbus
Datacenter Container (cdc) file.
After the data center module has been set up, the *.cdc files may be processed with the next data delivery. This is usu-
ally done once per day and may take some time, depending on the size of the covered system landscape.
6.3.2 Registration
In order to enable processing of the inbound raw files in *.cdc format, the access to a data center module (nova ratio
appliance) must be configured. This is done via the technical connection parameters of an API.
For this purpose, a data center module menu item is provided in the main menu of the system section.
Clicking this menu item will provide access to a connection page via which the data center module may be set up.
Technically, only one data center module is set up. In case of multitenancy systems, it may be necessary to set up mul-
tiple data center modules for load distribution reasons.

Spider Technical Reference - Installation, Configuration, Troubleshooting
17-01-2022 / EN
196/208
A data center module may be set up via the "Create" ribbon button. In addition to a name for internal reference, the
URL to the API as well as the access data of the technical user must be entered.
After registration, the data center module details page is displayed. In the left section, configured data center modules
are displayed. The details for the first existing data center module are automatically loaded when accessing the page.
For the currently selected data center module, you may use the "Test" button to immediately test the connectivity.
6.3.3 Tenant assignment
A data center module is able to process the data of multiple tenants. Conversely, a tenant is always assigned to one
data center module.
Therefore, the assignment of a data center module takes place in the context of the affected tenant.

Spider Technical Reference - Installation, Configuration, Troubleshooting
17-01-2022 / EN
197/208
The setup page is accessed via the data center module tab.
Any previously configured access to a data center module will be available via a selection field. The selection must be
confirmed by clicking "Save". This will start the setup of the tenant in the data center module in the background.
This completes the tenant setup. If inventory data related to the tenant is delivered for the data center module, this
data is automatically transferred to the data center module for processing. In Spider, the results will be displayed after
a processing run.
• Systems
• Software from the data center software detection
• Oracle data

Spider Technical Reference - Installation, Configuration, Troubleshooting
17-01-2022 / EN
198/208
7.1 Personal data
The European General Data Protection Regulation, Article 4, No. 1 GDPR provides the following definition:
… "personal data means any information relating to an identified or identifiable natural person ('data subject'); an
identifiable natural person is one who can be identified, directly or indirectly, in particular by reference to an identifier
such as a name, an identification number, location data, an online identifier or to one or more factors specific to the
physical, physiological, genetic, mental, economic, cultural or social identity of that natural person."
With regard to the Spider products, this means that a variety of modules, processes, and reports are affected by the
establishment of a GDPR conformity. However, data to which the GDPR does not apply or which is subject to other le-
gal foundations is not subject to any changes. This, for example, includes data of juristic persons.
7.1.1 Which data categories are processed in Spider products?
Within the spider products, the following data categories are processed by default:
• personal information (e.g. name, surname),
• contact information (e.g. email addresses, phone numbers),
• domain information (e.g. domain login, active directory identities, user logged in last, main user or IP addresses)
• and partial company service information (e.g. date of joining/leaving the company or personnel numbers).
The actually available data fields for personal data must be checked and documented on the customer side in case of
individual adjustments. This is true in particular for possible additional data categories.
7.1.2 Special categories of personal data (Article 9, Section 1 GDPR)
In addition to the abovementioned data, the GDPR (Article 9, Section 1) specifies special categories of personal data
which must not be processed on principle.
By default, Spider products do not contain any such special data categories.
Individual customer expansions must be checked!
In case of customer-specific adjustments there is a possibility that personal data belonging to special categories has
been incorporated into Spider products. This may e.g. be the case in case of additional fields or the integration of
third-party systems with personal data belonging to special categories. In this case, a customer-specific evaluation,
documentation, and definition of necessary measures is required e.g. when processing personal data of minors or ad-
ditional information such as date of birth or religion. This applies in particular to customers who use our products to
collect, store or process specific genetic, biometric, or other health-related data or features.
7 GDPR requirements in Spider

Spider Technical Reference - Installation, Configuration, Troubleshooting
17-01-2022 / EN
199/208
7.1.3 Processing of personal data (Article 4, No. 2 GDPR)
With regard to risk and compliance checks, it may be required to provide information on the processing of personal
data in Spider products. When asked whether a corresponding processing takes place, this must be affirmed. The defi-
nition in Article 4, No. 2 GDPR clearly states:
"Processing means any operation or set of operations which is performed on personal data or on sets of personal data,
whether or not by automated means, such as collection, recording, organization, structuring, storage, adaptation or al-
teration, retrieval, consultation, use, disclosure by transmission, dissemination or otherwise making available, align-
ment or combination, restriction, erasure or destruction.
In Spider products, personal data belonging to defined data categories are being processed. Without processing of such
data, Spider products would be non-functional or their functions would be significantly limited.
7.2 Personal data fields related to selected Spider data objects
The following chapters show the specific fields of the data objects in which personal data is being stored. Since the
Spider data model can be individually supplemented via parameter definition, this will only cover the standard version
which cannot be changed in case of full update editions only. In case of flex editions, inspection and documentation
must always be carried out in a customer-specific manner.
7.2.1 Personal data related to employees
Employee master data is usually imported into Spider from third-party systems. The system most frequently used for
this purpose is Microsoft Active Directory.
The following data categories are stored in the employee data object:
• personal information (e.g. name, surname)
• contact information (e.g. email address, phone number)
• domain information (e.g. domain login, active directory identities, main user)
• partial company service information (e.g. date of joining/leaving the company)
The following fields are used for an employee. The scope has been reduced to the extend absolutely necessary. The
main purpose here is to display the name of an employee as well as their identification in case of an import or the iden-
tification and the connection with the technical inventory of systems by means of domain identifiers. Since data from
Microsoft Active Directory is being linked frequently and the interface as well as the data integration are included in
the standard version of the product, the field names of Microsoft Active Directory are indicated as well. The columns to
be exported can be set via the Active Directory Connector. By default, only the following fields are enabled:
• LastName (Active Directory: GivenName)
• Firstname (Active Directory: Surname)
• DomainLogin (Active Directory: SAMAccountName)
• Fullname
• EmailAddress (Active Directory: EmailAddress)
• EmploymentTypeID – categorization such as internal/external
• UserPrincipalName (Active Directory: UserPrincipalName)
• swrADUserObjectID – internal ID in recognition DB
• ExternalReference – identification in a third-party system

Spider Technical Reference - Installation, Configuration, Troubleshooting
17-01-2022 / EN
200/208
The following fields are no longer part of the standard configuration and will be removed when updating full update
editions to Spider 6.4. The fields remain in the data table. Any permissions as well as visibility have been removed. In
case of a customer-specific use which justifies the processing of such data, the fields can be enabled in the flex edition:
• Title
• StaffNo (Active Directory: StaffNo)
• PhoneNo (Active Directory: PhoneNo)
• MobilePhoneNo (Active Directory: MobilePhoneNo)
• DateOfEntry
• DateOfEmission
• FaxNo
• PrivatePhoneNo
• Department
• Location
• Country
• CountryCode
• State
• StreetAddress
• PostalCode
An index-based search is mapped via OneSearch. Employee data is indexed. OneSearch is available for all Spider users –
it is not possible to restrict permissions to fields or data sets. Thus, only the following fields will be indexed for search
and display via OneSearch in the future:
• LastName (Active Directory: GivenName)
• Firstname (Active Directory: Surname)
• DomainLogin (Active Directory: SAMAccountName)
Furthermore, the following field will be indexed. This is done for cross-module integration.
• EmailAddress (Active Directory: EmailAddress)
7.2.2 Personal data related to assets
Asset data processed in Spider is usually imported from and kept up to date based on inventory systems. Certain fields
may directly contain personal data (e.g. LastLoggedOnUser). Other fields may contain technical identifiers which may
be used to obtain information on the natural person.
The following data categories are stored in the asset data object:
• domain information (e.g. LastLoggedOnUser, host name, IP addresses, UUID)
The following fields are technical identifiers or identification fields which are required for processing and identification.
These are essential and cannot be disabled.
• Hostname
• AssetNo
• International Mobile Station Equipment Identity (IMEI)
• PhoneNo

Spider Technical Reference - Installation, Configuration, Troubleshooting
17-01-2022 / EN
201/208
• UUID
• URN
• ID
The following fields contain personal domain information from user accounts.
• LastLoggedOnUser
• PrimaryUser (detected main user)
LastLoggedOnUser may be used to obtain information on a Microsoft Active user account which is linked to a natural
person. This is resolved in Spider. These fields are required for several reasons. Important in particular are the re-
quirements for mapping of user-based license metrics and the necessity for determination of main users on a device.
These are essential and cannot be disabled in Spider. However, if no LastLoggedOnUser data is provided by a supplying
system, user-based license mapping cannot be carried out.
The following fields contain additional technical information which does not have any specific use in the standard ver-
sion. These fields are no longer part of the standard configuration and will be removed when updating full update edi-
tions to Spider 6.4. The fields remain in the data table. Any permissions as well as visibility have been removed. In case
of a customer-specific use which justifies the processing of such data, the fields can be enabled in the flex edition:
• IPAddressV4
• IPAddressV6
• MacAddress 1-4
An index-based search is mapped via OneSearch. Asset data is indexed. OneSearch is available for all Spider users – it is
not possible to restrict permissions to fields or data sets. The following fields are indexed for search and display via
OneSearch:
• Hostname
• AssetNo
• UUID
7.2.3 Personal data related to Spider users
A Spider user account is required in order to access data in Spider. The user accounts can be granted rights to functions
and data in Spider by means of a permission concept.
The following data categories are stored in the employee data object:
• personal information (e.g. name)
• contact information (e.g. email address)
• domain information (e.g. login)
The following data fields are provided for the user object and required for identification, display, and use in Spider.
• Login
• RealName
Furthermore, it is recommended to register an email address. The email address is absolutely necessary for using the
'password forgotten' function for Spider-internal user accounts.
• EmailAddress

Spider Technical Reference - Installation, Configuration, Troubleshooting
17-01-2022 / EN
202/208
It is possible to either create Spider-internal user accounts or link a Microsoft Active Directory via which user accounts
which belong to AD groups intended for this purpose are transferred automatically. When using user accounts from
Microsoft Active Directory, the SAMAccountName is used as LoginName. In case of Spider-internal user accounts, it is
recommended to use automatically generated login identifiers in order to make it more difficult to obtain information
on a natural person (pseudonym).
In Spider, the login is recorded in the following situations/locations:
• The login is stored for each data object which has been created or changed by a user.
• The login is stored in the change histories of any changes which have been initiated by the user.
Furthermore, an employee master data set can be linked to a Spider user account. In case of an Active Directory ac-
count, the master data set can be linked automatically.
7.2.4 Personal data related to contact persons
In contract management, so-called contact persons can be manually registered in relation to contractors. These contact
persons are natural persons. The data processing of such data is subject to the requirements of the GDPR. Such data
must only be stored with consent of the data subject or on a contractual basis. Compliance with the requirements must
be ensured on the customer side or in the accompanying processes. If this cannot be ensured, this area should be disa-
bled entirely.
The following data categories are stored in relation to a contact person:
• personal information (e.g. name, surname)
• contact information (e.g. email address, phone number)
• organization information (e.g. function)
The intended use is to facilitate contact with the responsible contact partner of a contractor.
Since any desired fields, which may contain personal data, can be added via the Spider meta data model, this docu-
ment will only cover those fields which are included in the standard version. In case of full update systems, where the
entire configuration is updated and no additional fields can be added, the version corresponds to the standard scope.
For all other systems, the specific parameterization must be documented in a customer-specific manner.
The following fields are provided in case of the standard configuration:
• LastName
• FirstName
• Title
• Phone
• Fax
• Email
• MobilePhoneNo
An index-based search is mapped via OneSearch. Data of contact persons is not indexed.

Spider Technical Reference - Installation, Configuration, Troubleshooting
17-01-2022 / EN
203/208
7.3 Principles relating to processing of personal data (Article 5
GDPR)
The Spider products are used for different business processes. Compliance with the requirements of the GDPR depends
on multiple factors. The following, frequently occurring factors shall be mentioned as examples:
• Type and characteristic of the accompanying or underlying business processes
• Scope of the customer-specific expansions or characteristics in the use of the Spider products
• Extent of the inclusion of personal data from external systems and the design of the interfaces
An evaluation which only relates to the product standard is insufficient. A general statement on the compliance with
the different GDPR requirements of the Spider product in a customer environment must always be checked in a cus-
tomer-specific manner due to the options for flexible adjustment. The assessments in this document refer to the basic
standard functions of the Spider products.
The spider products will technically support the different GDPR requirements in accordance with Article 5. In addition
to mere compliance with the requirements, we are also aiming for simplification as well as additional advantages which
are achieved with the implementation of our products. Any requirements and improvements identified based on expe-
riences made with our customers will be taken into account and implemented in future product versions.
7.3.1 Adequacy and relevance of personal data as well as limitation of
their processing to the extend absolutely necessary (Article 5, No. 1,
lit. c GDPR)
In the products, only such personal data which is required for the underlying business processes and functions shall be
processed.
In case of customer-specific adjustments or extensions of the Spider products and when linking Spider products with
third-party systems (e.g. Microsoft Active Directory) which provide personal data, these principles must be checked
and it must be ensured that these are observed individually.
The standard configuration has been reworked with regard to the limitation to the extend absolutely necessary. For the
employee data object in particular, several fields have been removed from the standard version.
7.3.2 Adequate storage of personal data as well as their possible anony-
mization (Article 5, No. 1, lit. e GDPR)
Erasure functions are provided for managed personal data which do not depend on supplying systems and which are
no longer considered necessary for the underlying business process (e.g. an employee leaving the company). Functions
for anonymization, for example, for statistical purposes are not provided. Thus, the data must be physically erased. The
erasure of the data must be ensured in a customer-specific manner.
7.3.3 Rights of the data subject
Right of access by the data subject (Article 15 GDPR)
Data subjects have a general right to obtain confirmation as to whether their personal data is being processed. The
right to obtain information can be complied with on principle using the current product versions.
Information page for employees

Spider Technical Reference - Installation, Configuration, Troubleshooting
17-01-2022 / EN
204/208
The personal data of data subjects (e.g. employment data) can be viewed and printed out via the information page. For
this purpose, a new page (EmployeeEditGDPRInfo) for which access rights can be granted individually has been added
with Spider 6.4. This page shows all fields of the employee object as well as any assets of the employee.
External contact persons
Registered data of a contract person can be viewed via the details form. It must be ensured that the user who compiles
the fields for an information request has the access rights for all fields which contain personal data.
Information page for Spider users
Spider users are able to view their own personal data via the user settings.
Rectification or erasure of personal data (Article 5, No. 1, lit. d GDPR)
In Spider, personal data can be managed, changed, and also erased on principle.
For data which is provided by supplying systems, changes can usually not be carried out in Spider since such data is
overwritten on a regular basis. A change of such data must be carried out in the respective source systems.
In case of Spider products, the erasure of personal data which is provided by external systems cannot be solved in a
uniform manner. One reason for this are possible legal storage periods. Automatic erasure of data must always be de-
termined and set by the customer.
The right to rectification and the right to erasure are covered separately in the following sections.
Right to rectification (Article 16 GDPR)
In Spider products, options for rectification of personal data are provided on principle. These may be reserved to per-
mission groups defined via the permission concept.
When personal data is provided via third-party systems, the permissions must be defined in the third-party system.
Changes to personal data will only apply from their date of entry or application. Thus, change histories will not be af-
fected.
Right to erasure (Article 17 GDPR)
In Spider products, options for erasure of personal data are provided on principle. These may be reserved to permis-
sion groups defined via the permission concept.
The erasure is carried out in two steps: When erasing a data object, the data object is erased from the data table and
moved to a recycle bin. The recycle bin is also available in the databases in the form of a table. While the data set is no
longer present in the data tables, it is still physically stored in the database. The cleansing of the recycle bin – physical
erasure from the database – is carried out by the product. The storage time in days can be set.
When the recycle bin is cleansed, any change histories will be cleansed as well. Data sets with personal data are only
considered physically deleted after the recycle bin has been cleansed.
Backup strategies and storage times for the backups must be taken into account in a customer-specific manner.
Peculiarity of personal data from linked third-party systems
When personal data is provided by third-party systems, the erasure must be carried out in the third-party system. In
case of Spider products, the erasure of personal data which is provided by external systems cannot be solved in a uni-

Spider Technical Reference - Installation, Configuration, Troubleshooting
17-01-2022 / EN
205/208
form manner and can thus not be included in the standard product. For erasure of personal data, factors such as legal
storage periods must be taken into account. Thus, erasure must be realized based on the linked third-party systems
and the business process type.
Right to restriction of processing (Article 18 GDPR)
Since the legitimacy of processing in accordance with Article 6, No. 1 lit. f GDPR, among others, is assumed and, thus,
legitimate reasons may outweigh the right to restriction, no dedicated technical measures need to be taken.
Notification obligation (Article 19 GDPR)
The notification obligation in case of any change of personal data must be taken into account in the accompanying
processing processes (e.g. account management) on the customer side. This is a clear recommendation. It would
probably be irritating for the affected persons (employees) in an organization and ultimately cause disproportional ef-
fort for the organization if any system would automatically inform the persons affected on changes regarding the per-
sonal data, in particular in case of indirect use of these data from a source system.
If automatic notification by the Spider system is desired, this must be realized by means of a customer-specific expan-
sion and a corresponding setup. The product-integrated Alert&Reporting system, which dynamically sends daily emails
based on prepared database views, can be used for this purpose. This way, the email recipients may be set dynamically
depending on the data set. As a data basis for the evaluation of changes, the Spider change histories may be used.
Right to data portability (Article 20 GDPR)
A data portability of personal data is not relevant since Spider products are used for internal company processes and
systems only. IF any data shall be transmitted, the data can be accessed via a REST API.
Right to object (Article 21 GDPR)
Since the legitimacy of processing in accordance with Article 6, No. 1 lit. f GDPR, among others, is assumed and, thus,
legitimate reasons may outweigh the right to object, no technical measures are taken.
Suitable methods for demonstrating compliance with the requirements in accountabil-
ity cases (Article 5, No. 2 GDPR)
Changes to personal data can be viewed via the change histories for which separate permissions may be given.
7.4 Lawfulness of processing (Article 6 GDPR)
The lawfulness of the processing of personal data in Spider products is given by the legal foundations provided in the
following articles:
Article 6, No. 1, lit. c GDPR
"Processing is necessary for compliance with a legal obligation to which the controller is subject."
Article 6, No. 1, lit. f GDPR
"Processing is necessary for the purposes of the legitimate interests pursued by the controller or by a third party, except
where such interests are overridden by the interests or fundamental rights and freedoms of the data subject which re-
quire protection of personal data, in particular where the data subject is a child."
In this case, both passages implicitly mainly refer to the obligations from the German Civil Code (BGB), the German
Commercial Code (HGB), the Law Against Unfair Competition, and the German Copyright Act (UrhG).

Spider Technical Reference - Installation, Configuration, Troubleshooting
17-01-2022 / EN
206/208
7.5 Data protection by design and by default (Article 25 GDPR)
Spider products and infrastructure products used (e.g. Microsoft SQL Server) include different technical functions for
supporting technical and organizational measures. The specific technical and organizational measures must be deter-
mined in a customer-specific manner.
7.5.1 Confidentiality (Art. 32, Section 1, lit. b GDPR)
• Access control: e.g. no unauthorized access to the data processing systems
(to be ensured by the customer)
• Access control: no unauthorized system use by means of passwords
(to be ensured by the customer)
• The data is processed in Microsoft SQL Server databases.
• Certain data is also stored in the index (ESI).
• Access control: no unauthorized reading, copying, changing, or removal within the system
• Access for writing/changing of data is controlled via a role-based Spider permission concept.
• Thus, direct access of users to the SQL server should be prevented by all means since it is not protected by Spider
permission checks.
• Separation control: separate processing of data which has been obtained for different purposes; e.g. multitenancy
• In case of multitenancy systems, a tenant ID is registered for each data set. Segregation of tenants is carried out when
accessing the data via the Spider business logic. Users can only access data from a current session for which they have
access.
• Within a tenant, objects and their data can be assigned to business units. Users can only access the data of objects
from business units for which they have permission.
7.5.2 Integrity (Art. 32, Section 1, lit. b GDPR)
• Transfer control: No unauthorized reading, copying, changing, or removal during electronic transfer or transmis-
sion; e.g. encryption, connection encryption (HTTPS)
(to be ensured by the customer)
• We strongly recommended using https for accessing the Spider Web User Interface (Web UI) and the Web API.
• When sending data exports from the Spider system, the customer must ensure transfer control by means of suitable,
technical, organizational measures.
7.5.3 Availability and resilience (Art. 32, Section 1, lit. b GDPR)
• Availability control: Protection against random or purposeful destruction or loss; e.g. backup strategy, uninter-
ruptible power supply (UPS), virus protection, firewall, reporting channels, and emergency plans
(to be implemented by the customer)
7.6 Conditions for consent (Article 7 GDPR)
If personal data of the data subject is collected directly via software, technical means for giving consent as well as for
recording and explaining this action must be provided. Also, the data subject must be able to withdraw their consent
under the described conditions.

Spider Technical Reference - Installation, Configuration, Troubleshooting
17-01-2022 / EN
207/208
7.6.1 Self-service functions
Self-service functions by means of which a user (data subject in the sense of the GDPR) directly registers their personal
data must comply with the conditions for consent. In the standard Spider product, there is no direct registration of data
by the data subject. Most of personal data is taken from external systems and processed in Spider. If self-service func-
tions are possible due to customer-specific extensions, appropriate measures for fulfilling the requirements must be
taken by the customer.
When processing employment data (e.g. Microsoft Active Directory), consent may be mapped via the accompanying
processing processes or upstream information processes on the customer side.
7.6.2 Consent for personal data from external systems or for collection of
additional data
When personal data from third-party systems (e.g. Microsoft Active Directory) is provided, consent must be obtained
from the responsible authority.
For additional personal data which is entered into and processed in Spider, consent by the data subject is required. This
must be ensured in the accompanying processing processes on the customer side.
7.7 Information obligation (Article 13 and 14 GDPR)
When personal data is collected directly or indirectly, the controller is obliged to inform the data subject about this ac-
tion.
In case of the current product versions, the active information obligation can only be complied with by means of cus-
tomer-specific settings and extensions. Email-based information procedures are often used to inform the data subjects.
On principle, it is questionable whether it makes sense to actively notify the data subjects using Spider since the prod-
ucts are usually used for dedicated subtasks and indirectly use personal data relevant to the task from external sys-
tems.
7.7.1 Processing of employment data
For the quite common processing of employment data (e.g. from Microsoft Active Directory), we recommend ensuring
compliance with the information obligation in the accompanying processing processes or the upstream information
processes on the customer side.
7.7.2 Direct notification of the data subject
Should a direct notification of the data subject from the Spider system still be necessary, the specific information pro-
cesses must be mapped in a customer-specific manner.
7.8 Records of processing activities (Article 30 GDPR)
In order to comply with the documentation obligations in accordance with Article 30 GDPR, it is necessary to, among
other things, maintain a record of all processing tasks which use personal data. The record must be made available to
the supervisory authority upon request (Article 30, Section 4 GDPR and Suitable Recital 82). Companies which are sub-
ject to German regulatory supervision must maintain the processing record in German (§23, Section 1 and 2 of the

Spider Technical Reference - Installation, Configuration, Troubleshooting
17-01-2022 / EN
208/208
German Administrative Procedure Act (VwVfG)). An exception in accordance with Article 30, Section 5 GDPR is to be
excluded even if the quantitative factor of less than 250 employees is given. This is a result of the required IT protocols
which are essential for the proper functioning of the Spider products.
The processing record must be created in a customer-specific manner.
Log files are written for the installation and the update of all setups as well as the services. Please refer to the table
to see where to find these.
Product
Path to the log file
Spider Installation / Update
Recognition Installation / Update
Software catalog
%ProgramData%\brainwaregroup\Logs
Spider Services
%ProgramData%\brainwaregroup\CoreServer_xx\<Service name>
Spider Data Receiver
Spider Data Collector
%Windir%\
EDC monitor
%ProgramData%\brainwaregroup\EDCMonitor\Logs
8.1 Brainware.log
The log file Brainware.log will be rewritten periodically. Older revisions will be renamed with Brainware_0.log,
Brainware_1.log, Brainware_2.log, etc.
This file is a plain text file which may be edited with any text editor.
8.2 Smart-Inspect log files (*.sil)
The *.sil files have the SmartInspect format. These files cannot be read immediately. You will need a (free-of-charge)
tool of the company Gurock Software GmbH.
The SmartInspect redistributable console can be downloaded under SmartInspect Redistributable Console .
8 Log files
