
ConsensusDocs
User Guide
www.ConsensusDocs.org

2
User Guide
Welcome! This User Guide describes how to begin using the new ConsensusDocs online
subscription and contract collaboration technology platform. The guide covers topics such as
registering for an account, signing in, viewing and purchasing contract packages, editing
contracts, collaboration features, and access to other technical resources related to
ConsensusDocs contracts. If you find you prefer more personal support, you can reach a live
person for technical/account support via Support@ConsensusDocs.org or 866-925-DOCS
(3627), Monday through Friday, 8:30 am – 5:00 pm Eastern Time on normal business days.
ConsensusDocs is a secure, cloud-based platform that allows easy access to contracts and
collaboration with project partners, while securing sensitive project information, to expedite the
contract negotiation stage and move your projects forward more quickly to design and
construction.
The basic processes supported by the ConsensusDocs technology platform described in this
manual include:
• Registering as a new user with the site and managing your account information;
• Selecting and purchasing contract subscription packages;
• Signing in and using your personal project “Dashboard” for:
o managing projects
o editing contracts
o collaborating with invited project stakeholders
o finalizing a document (equipped with a ConsensusDocs verification Content
Secure ID).
This User Guide will explain these steps and familiarize you with the information you need to
have continued success with ConsensusDocs on your projects. This is a fluid document so
comments on updating and enhancing the information provided are always welcome.
Let’s get started!

3
Table of Contents
(Ctrl+Click on a section or page number to take you directly to that section)
Capabilities and Process ............................................................................................................ 4
Recommended System Requirements for Best Results ......................................................... 4
Computer Operating System Requirements ........................................................................ 4
Internet Brower Requirements ............................................................................................ 4
Word Processor Requirements ........................................................................................... 4
Adobe Requirements .......................................................................................................... 5
Key Terms .............................................................................................................................. 5
User Access Overview ........................................................................................................... 6
General Guidelines ................................................................................................................. 7
General Process Flow ............................................................................................................ 8
Site Features .......................................................................................................................... 9
Registering a New Account and Signing In ...............................................................................11
Sample Registration Page .....................................................................................................12
My Account Page ..................................................................................................................14
Purchasing and Licensing .........................................................................................................15
Making a Purchase from the Contracts Page.........................................................................15
Making a Purchase from the Home page ...............................................................................16
First Way ...............................................................................................................................16
Next Steps to Begin Using Your Subscription ........................................................................19
My Dashboard Overview ...........................................................................................................20
Project Level..........................................................................................................................20
Negotiation Level ...................................................................................................................21
Contract Version Level ..........................................................................................................21
Creating a New Project .............................................................................................................22
Steps to add a contract to your project ..................................................................................22
Working with Contracts .............................................................................................................25
Editing Contracts ...................................................................................................................25
Collaborating .............................................................................................................................26
Collaborating at the Project Level ..........................................................................................26
Collaborating at the Negotiation Level ...................................................................................26
Collaborating at the Version Level .........................................................................................27
Enabling Accept/Reject Changes ..........................................................................................29
Comparing Two Contract Versions ........................................................................................30
Making a Favorite ..................................................................................................................30
Using a Favorited Document .................................................................................................31
How to Upload Supporting Documents ..................................................................................32
Finalizing a Contract (i.e. removing the “DRAFT” watermark) ................................................33
Un-finalizing A Contract .........................................................................................................34
Document Storage ....................................................................................................................34
Creating Zip Files at the Project Level ...................................................................................34
Creating Zip Files at the Negotiation Level ............................................................................35
Additional Platform Features .....................................................................................................36
Comparing Documents ..........................................................................................................36
Converting Documents ..........................................................................................................37
Additional Useful Tips and Tricks ..............................................................................................38
Removing Unwanted Highlighting ..........................................................................................38
APPENDIX A. Working with Contracts in Microsoft Word ..........................................................39

4
Capabilities and Process
The ConsensusDocs system is a web-based technology accessible by every major web
browser. Documents are downloaded in Microsoft Word® format for editing on your local hard
drive. After changes are made, documents can then be uploaded back to the website for
sharing with Collaborators, comparing document versions, and finalizing your contract.
Recommended System Requirements for Best Results
Computer Operating System Requirements
Systems requirements for computers accessing the ConsensusDocs website or using the
ConsensusDocs contract documents are as follows:
• Microsoft Windows 10 or greater
• Apple Macintosh version 10.5 or greater
Internet Brower Requirements
The ConsensusDocs website can be accessed using any of the following internet browsers:
• Mozilla Firefox version 65 or greater (Recommended)
• Google Chrome version 72 or greater (Recommended)
• Microsoft Edge 10
• Apple Safari version 6 or greater
NOTE: For the best user experience we advise using Google Chrome or Mozilla Firefox.
Word Processor Requirements
ConsensusDocs contract documents are compatible with the following versions of Microsoft
Word for Windows:
• Microsoft Word 2019
• Microsoft Word 2016
• Microsoft Word 2013
• Microsoft Word 2010
ConsensusDocs contract documents are compatible with the following versions of Microsoft
Word for Mac:
• Microsoft Word 2016
• Microsoft Word 2011
NOTE: ConsensusDocs documents are not currently compatible with Apple’s Pages word
processor.
We advise that you save all ConsensusDocs documents as .docx files when working with them
in Microsoft Word format. It is also recommended that Word be up-to-date with all service packs
and patches released by Microsoft.

5
Adobe Requirements
ConsensusDocs contract documents can be viewed in PDF format:
• Adobe Reader version 10 or greater.
o http://get.adobe.com/reader/
Key Terms
• Collaborations – Originators can invite or be invited free of charge, to view and/or
comment on a contract. The contract is posted to a section of the Dashboard called “My
Collaborations” – where those who aren’t the Originator can access, edit and upload to
the Originator’s project Dashboard. Collaborators only see what the Originator has
invited them to see.
• Compare/Comparison –If multiple versions of the contract are posted, any two versions
can be compared within the same contract.
• My Dashboard – Originator’s personal project website where they can: manage
subscriptions, create and manage projects, edit, manage, and finalize contracts, view
collaborations, add contacts to contact list, compare documents, and convert
documents.
• Favorite – An edited contract that can be saved (redline or clean) for use as an
advanced starting point for future projects.
• Finalizing – The site creates a secured final PDF document cleaned (based on
accepted track changes) with watermarks removed. NOTE: pages cannot be added or
subtracted from a finalized document.
• Originator – Purchaser/license holder – assigns sharing rights and coordinates contract
editing.
• Package – Package licensing options are available on an annual subscription basis.
Contracts are not sold individually but are available as part of one or more of the
subscription packages. Single and multi-user licenses are available.
• Sharing – Originator assigns sharing rights to project Collaborators for viewing and
editing access. Sharing allows for invited users to access an entire project or project
contract, download it to their local hard drive, review or make changes, upload back to
the site and view/participate in discussion threads. Shared, edited documents are easily
and quickly compared to the standard and other versions and posted to the online
project negotiation site.
• Subscription – All documents are sold on an annual package subscription basis.
Subscriptions can be purchased as a single license or multiple licenses. Licenses must
then be assigned to a single user. Multiple-user licenses are assigned and managed by
the original purchaser. An active subscription gives you access to all of the tools and
capabilities of the ConsensusDocs system, including all new and updated contracts
released within the subscription packages during the subscription period.
• Supporting Documents – Word files of other supporting documents that are not
ConsensusDocs standard contracts can be uploaded and shared from the project
Dashboard.

6
• Version – An edited contract that has been uploaded to the ConsensusDocs platform. A
version can be compared, made a Favorite, shared, and finalized.
User Access Overview
Below is an overview of the different types of users that will be referenced throughout this User
Guide:
Users will enter the ConsensusDocs website in any of three ways:
• Originator - Purchase contracts and manage project negotiations. Invite Collaborators
to review your contracts – you control editing rights. Full website and related resources
access. (Registration/sign in and purchase required.)
• Invited Collaborator - Review and edit contracts, and participate in project negotiations,
as an invited project Collaborator. Limited website access without purchase.
(Registration/sign in required.)
• Registrant - Browse contracts, preview 3 sample contracts and review select related
resources. (Registration/sign in required to preview sample contracts.)

7
General Guidelines
Below is a list of general guidelines that you should keep in mind when working within the
ConsensusDocs platform.
• Contracts are not edited “online” – they are downloaded in Microsoft Word to your local
computer, edited using Word features, and uploaded back to the ConsensusDocs
website for sharing with the project team, as you deem appropriate (only Collaborators
that you have identified and invited to the site may access your contracts, and you
control editing rights – inviting Collaborators to view PDF formatted contracts or edit
Microsoft versions).
• Tracking changes and versioning control facilitate efficient and coordinated negotiations
while contracts are being edited and reviewed by multiple project stakeholders.
• Once you have finalized a contract, you can “unfinalize” it up to 5 times should you need
to make changes after finalizing (see the section titled Un-finalizing a Contract).
• Once you have edited a contract for a project that you feel you will use, completely or
substantially, for other projects, you can save that version as a “Favorite” before
finalizing it for future use (see the section titled Making a Favorite).
NOTE: You should not finalize a contract that you plan to make a Favorite. All Finalized
contracts are purged from the system after 6 months and therefore cannot be used as a
Favorite.
• Document storage – Documents will be stored as long as you are in negotiations and for
6 months after finalization of your contract, so long as you are a current ConsensusDocs
subscriber. It is recommended that users save at least the final contracts, and earlier
versions if desired, to local hard drives. Favorites will be stored indefinitely (or until the
contract upon which your Favorite was based is updated, replaced or removed from
publication), as long as the user maintains a paid subscription with ConsensusDocs.
• Document security comes primarily through the finalization process when a security
code is inserted into the footer – this will indicate to users and recipients that it is a valid
ConsensusDocs contract.
• The contracts are automatically locked and can be commented on by Collaborators
using Track Changes and Comments, but can only be unlocked for editing (enabling
accept/reject changes) by the Originator (purchaser/license holder) of the contract.

8
General Process Flow
The new ConsensusDocs technology platform is much more than a purchase and download
website. This new technology allows for anywhere/anytime access to contracts, secure online
management of multiple project negotiations, complimentary sharing and collaboration on
document editing with designated project stakeholders, version control, comparisons of edited
contracts, and discussion threading.

9
Site Features
(1) Top Level
• Get Started – Account Registration
• FAQ’s – Frequently Asked Questions
• Support – Training videos and webinars, education and research requests, sample
contracts, communication preferences and contact information
• About – Brief history about ConsensusDocs
• Login – Sign in to your account
• Site Search Field – Search for specific key terms
(2) Banner Level
• Contracts – Contract descriptions
• Pricing – View current subscription packages and purchase selections
• Contact – Related resources – articles, webinars, audio recordings, etc.
• Download Samples – View up to three ConsensusDocs contracts
(1)
(2)

10
(3) Main Section
• Three most popular ConsensusDocs Subscription Packages
• Get Package – Purchase subscriptions
(4) Footer
• About – Why ConsensusDocs?, Testimonials, Case Studies, Coalition Members,
Industry Affiliations, 10
th
Anniversary
• Resources – Guidebook, Samples, Education Application, Comparison Chart, Other
Resources
• For Partners – Workshop In A Box
• News – Articles, Latest News, Press Releases, Newsletter
• Events – Upcoming events and webinars
(3)
(4)

11
Registering a New Account and Signing In
First visit to the site? The web address is www.ConsensusDocs.org. Click “Get Started” – you
only need to do this once, and then use the “Login” button each time you visit after. You will be
welcomed with a link to your personal project “Dashboard” where you will be able to manage
contracts and contact lists and collaborate on one or multiple project negotiations.
• After completing the registration (see sample registration page below), you will be
directed to your “My Account” page where you can update your account information or
purchase a subscription by navigating to the “Purchase History” section and clicking the
green “Add A New Subscription” button.

12
Sample Registration Page

13
• You will only register once. After that you will select “Login” at the top of the page.
• After you have logged in, if you have an unassigned subscription you will be directed to
your “My Subscriptions” page. Otherwise, you will be directed to your “My Projects” page
to begin a project.
NOTE: It is important to remember to “Logout” at the top of the screen when you are finished
with your session – especially when using a public computer.
• Users will be automatically logged out by the system after four (4) hours of no activity. If
you only exit your web browser without signing out, you risk unauthorized access to your
Dashboard and contracts during the 4-hour open period.

14
My Account Page
The “My Account” page is the central storage location of all profile information. From the “My
Account” page you will be able to:
• Keep your contact information updated
• Change your password (6+ characters including at least one number)
• View your orders/purchases
• Assign and manage multiple-license subscriptions (to be covered in Section 3 below)
• View your subscription history
• Check your status for automatic renewal
• Manage/update your credit card on file for automatic renewal and Per Document
Purchases

15
Purchasing and Licensing
There are several ways to purchase contract subscriptions.
Making a Purchase from the Contracts Page
• Once signed in, select “Contracts” in the top banner:
o You can view by “Contract Series”.
o You can also search for contracts by number or keyword in the “search” field
under that specific category.

16
• Click on your selection and you will be taken to a contract description page that will also
link you to the ConsensusDocs Guidebook, provide a Preview of select contracts, and
Related Resources.
• There is a blue “Purchase Options” button next to each contract thumbnail so you
can easily view subscription package pricing and licensing options once you
determine your contract needs.
Making a Purchase from the Home page
First Way
• Make a purchase at the top of the page by clicking on the “Pricing” tab in the top
banner of the Home page – (this option will take you directly to a purchase page with
the package options), OR
Second Way
• Select one of the package options from the Home page.

17
Third Way
• On the Home page, select “Contracts.”
o Select a Contract Series.
o Find the contract that you need.
o Click on “Purchase Options” (located under “More Info.” on the contract
image).
o Select “Get Package” to be taken to a purchase page.
NOTE: Depending on the Contract(s) you selected, you could see one or more package
subscription option(s) that will include the Contract you selected.

18
Sample Purchase Page
To complete the purchase page:
• Enter “Quantity of Licenses”
• Enter Discount Code, if applicable to receive the Member pricing.
o Discount codes can be obtained by contacting your member organization –
links to each of the 40 coalitions partners can be found at:
Consensusdocs.org/coalition-members/
• Click the orange “Apply” button.
• If this is your first purchase, you will be prompted to enter your credit card and billing
information.
• If you have ordered before your previous credit card information with auto-populate
in the Credit Card Number section. (In the case that your credit card information has
changed you will need to input the new information in the Credit Card Number
section before purchasing.)

19
• Review your order (see screen shot below) – NOTE: the savings from full retail price
will be based upon multi-user license purchase and/or discount code (savings will be
combined and shown in the “You Saved” line.
• Click the green “Purchase” button to finalize the purchase. A receipt/confirmation will
also be e-mailed to you.
Next Steps to Begin Using Your Subscription
• The purchased subscription will be listed on the next page under “My Subscriptions.”
• You will need to assign the subscription(s) to an e-mail address before it can be used.
NOTE:
• All licenses will be due for renewal one year from the purchase date, regardless of when
you assign the license.
• If a license needs to be reassigned mid-year, the Originator should contact
ConsensusDocs for assistance.

20
My Dashboard Overview
After making a purchase, the ConsensusDocs system will allow you to manage negotiations
from your “My Projects” page where you will be able to:
• create projects
• download and edit contracts
• manage contract versioning
• generate a clean and finalized, signature-ready contract with supporting documents
• establish and monitor free collaborations with internal and external project members
The “My Projects” page can be found as the third option underneath the “My Dashboard” toolbar
located on the right-hand side of the page.
*See below for an example of what your “My Projects” page will look like.
The ConsensusDocs platform allows you to manage, separate, and organize your work at the
following levels: the project level, the negotiation level, and the contract version level.
Project Level
At the individual Project level you will be able to:
• Rename a project
• Delete a project
• Download all contracts for archiving purposes
• Add contracts from standard templates and favorites
• Manage project level collaborators
NOTE: To access the above functions, you will need to click the “Wheel” icon located to the
right of the project name (see the below image).

21
Negotiation Level
At the negotiation level you will be able to perform the following administrative functions:
• Rename a contract
• Download all versions
• Delete a contract
• Manage contract collaborations
NOTE: To access the above functions, you will need to click the “Wheel” icon located to the
right of the contract name (see the below image).
At the negotiation level you will also be able to perform the following working functions:
• Upload a document
• Compare selected documents
• Manage supporting documents
NOTE: To access the above functions, you will need to click the orange arrow located to the
left of the contract name (see below image).
Contract Version Level
At the contract version level, you will be able to:
• Manage version level collaborators
• Unlock a document by enabling accept/reject
• Delete a version of a contract
• View version level messages
• Finalize a contract
NOTE: To access the above functions, you will need to click the “Wheel” icon located to the
far right of the version level row (see below image).

22
Creating a New Project
To create a new project, you will:
1. Click on the “My Projects” link located in the right hand “My Dashboard” column.
2. On the “My Projects” page type a project name in the text box located underneath “Add
a new project.”
3. Click the green “Create a new project” button.
Steps to add a contract to your project
To add a contract to your project you will:
1. Navigate to the “My Projects” page and select a project.
2. Click the “Wheel” icon located to right of the project name.
3. Select “Add Contracts.”

23
4. From the drop-down menus that appear find the contract that you are looking for in the
respective series.
5. Select the checkbox located to the left of the contract name.
6. Click the green “Add Contracts” button.
7. Find the contract that you added in the list of contract names.
8. Click the orange arrow to the left of the contract name and begin working.
To add a contract from your favorites:

24
1. Navigate to the “My Projects” page and select a project.
2. Click the “Wheel” icon located to right of the project name.
3. Select add contracts from favorites.
4. From the pop-up that appears find the favorited contract that you are looking for.
5. Select the checkbox located to the left of the contract name.
6. Click the “Add Contracts” button.
7. Find the contract that you added in the list of contract names.
8. Click the orange arrow to the left of the contract name and begin working.

25
Working with Contracts
Editing Contracts
NOTE: The contract editing process will be the same for contract Originators (i.e. projects found
under the “My Projects” page) and for contract Collaborators (i.e. projects found on the “My
Collaborations” page).
1. Once you are logged into your account navigate to the “My Projects” page.
2. Create or select a project that you have previously created.
3. Inside of your project select the contract that you want to work on.
4. Click the orange arrow located to the left of the contract name.
5. Find the version that you wish to edit and click the download arrow located to the far
right of the row (see below image).
6. Before you begin editing the downloaded Microsoft Word document, please save the
contract to your local hard drive.
7. Once you have made your edits, you will need to upload the contract back into the
ConsensusDocs platform to either collaborate with others or finalize it.
8. After you are in your project, find the contract that you have been working on.
9. Click the orange arrow located to the left of the contract name column.
10. From the drop-down menu, click the blue “Upload Document” button. Drag and drop or
click Browse to select the edited document that you wish to upload.
11. The uploaded document will now appear as a new version under your contract.

26
Collaborating
The ConsensusDocs platform allows you to collaborate at the following levels with internal and
external parties: the project level, the negotiation level, and the version level.
Collaborating at the Project Level
To begin collaborating at the project level:
1. Navigate to the “My Projects” page and select a project.
2. Click the “Wheel” icon located at the far right of the project name row.
3. Select the blue “Manage Project Collaborators” button.
4. Type the email address(es) of the individual(s) that you wish to collaborate with into the
text box. (NOTE: You can include a message with your collaboration invitation by typing
a note into the personal message box.)
5. Click the green “Invite to Collaborate” button.
6. The collaborator(s) will receive an e-mail from support@consensusdocs.org letting them
know they have been invited to collaborate on a project.
Collaborating at the Negotiation Level
To begin collaborating at the negotiation level:
1. Navigate to the “My Projects” page and select a project.
2. Find the contract that you wish to collaborate on.
3. Click the “Wheel” icon located at the far-right end of the row.

27
4. Select the blue “Manage Contract Collaborators” button.
5. Enter the email address(es) of the individual(s) that you wish to collaborate with.
6. Select whether you wish to share editable word documents or read only PDF
documents.
7. Click the green “Invite to Collaborate” button.
8. The collaborator(s) will receive an e-mail from support@consensusdocs.org letting them
know they have been invited to collaborate on a contract.
Collaborating at the Version Level
To begin collaborating at the version level:
First Method:
1. Navigate to the “My Projects” page and select a project.
2. Find the contract that you wish to collaborate on.
3. Click the orange arrow located to the left of the contract name.
4. Find the version that you wish to collaborate on.
5. Click the “Wheel” icon located at the far-right end of the version level row.
6. Select the orange “Manage Collaborators” button.

28
7. Enter the email address(es) of the individual(s) that you wish to collaborate with.
8. Select whether you wish to share editable Word or read only PDF document.
9. Click the green “Invite to Collaborate” button.
10. The collaborator(s) will receive an e-mail from support@consensusdocs.org letting them
know they have been invited to collaborate on a contract.
Second Method:
1. Navigate to the “My Projects” page and select a project.
2. Find the contract that you wish to collaborate on.
3. Click the orange arrow located to the left of the contract name.
4. Find the version that you wish to collaborate on.
5. Click the share icon located to the right of the timestamp.
6. Enter the email address(es) of the individual(s) that you wish to collaborate with.
7. Select whether you wish to share an editable Word or read only PDF document.
8. Click “Share.’
9. The collaborator(s) will receive an e-mail from support@consensusdocs.org letting them
know they have been invited to collaborate on a contract.
NOTE: Collaborators who are not already subscribed will be prompted to register on the site in
order to access the shared file. No purchase is required to be a collaborator.

29
Enabling Accept/Reject Changes
Enabling accept/reject changes allows the Originator to accept and reject changes in the
redlined Word document.
Originators can Enable accept/reject changes (before downloading the document) by:
• Clicking the “Wheel” icon located to the right of the contract version that they are working
on.
• From the dropdown toolbar that appears click the “Enable Accept/Reject” button.
• A prompt will ask you if you are sure you want to Unlock the document. Click “Yes.”
• The “Enable Accept/Reject” button will turn grey letting you know that the document has
been unlocked.
• Click the download arrow located to the right of the contract version.
• With the document that is downloaded you will be able to accept and reject changes that
have been made to the document.

30
NOTE:
• These accepted/rejected changes will be permanent for the newly uploaded version of
the contract. A prior version would have to be used if any of the edits during
accept/reject changes were not wanted.
• Once the document is re-uploaded to the platform, the newly created version will be
relocked.
• When working with an unlocked document please refrain from modifying the footer. All
footers must remain intact in order to be reuploaded and finalized using the
ConsensusDocs platform.
Comparing Two Contract Versions
Contract versions can be compared by following the below steps:
1. Navigate to your “My Projects” page.
2. Select the project that you are working on.
3. Click the orange arrow located to the left of the contract name.
4. Check the check boxes found to the left of the two contract versions that you would like
to compare. (NOTE: The boxes will turn orange.)
5. Click the blue “Compare Selected Docs” button.
6. The comparison document can be found to the right of the latest version that is being
compare.
7. Click the DOCX or PDF button to download a version of the comparison document.
8. To share a comparison document, click the share icon located to the right of the PDF
button.
Making a Favorite
The Favorite tool allows users to save a Word version of a standard document that has been
negotiated and edited and is in a format that the Originator feels will be useful on future projects.
Follow the below steps to save an edited version of a contract so that you do not have to start
from scratch on your next project.
1. For housekeeping purposes, we advise creating a project and naming it Favorites.

31
2. Once you are in your Favorites project, click the “Wheel” icon located to the right of the
project name.
3. Select the blue “Add Contracts” button to add the applicable contract.
4. After the contract is added, click the orange arrow located to the left of the contract
name column.
5. Click the blue “Upload Document” button. Drag and drop or click Browse to select the
edited document that you wish to upload and make a favorite.
6. Find the row of the document that you just uploaded. Click the star icon located at the
right end of the row.
Using a Favorited Document
You have saved a document as a favorite and now you want to use it. Follow the below steps:
1. Navigate to the “My Projects” page and select a project.
2. Click the “Wheel” icon located to right of the project name.
3. Select “Add Contracts from Favorites.”
4. Find the contract name that you previously made a favorite.
5. Search for the contract that you just added in the list of contracts in your project using
the search bar located at the top of the page.

32
6. Click the orange arrow located to the left of the contract name.
7. The edited contract that your previously made a favorite will be listed as version 1.0.
8. Click the download arrow located at the right end of the row to begin further editing the
contract in Microsoft word.
How to Upload Supporting Documents
Supporting documents can be added to contracts that you work on in the ConsensusDocs
platform. Supporting documents are added at the negotiation level. To add a supporting
document to a contract:
1. Navigate to the “My Projects” page and select a project.
2. Find the contract that you wish to add a supporting document under.
3. Click the orange arrow located to the left of the contract name.
4. Select the blue “Manage Supporting Docs” button.
5. Left click the “Choose File” field.
6. From the file upload pop-up, select and double left click a document from your local hard
drive to upload.
7. Click the green “Upload” button.
NOTE: Supporting documents will be available under all contracts found in the project you are
working on, regardless of which contract they are added under. To add a supporting document
to a finalized contract please see the Finalizing a Contract section.

33
Finalizing a Contract (i.e. removing the “DRAFT” watermark)
1. From the “My Projects” Page select the project that you are currently working on.
2. Find the contract that you are working on.
3. Click the orange arrow located to the left of the contract name.
4. Select the blue “Upload Document” button.
5. Drag and drop or click Browse to select the document that you wish to upload.
6. Click the “Upload” button.
7. Select the “Wheel” icon located at the right end of the row of the contract version that
you just uploaded.
8. Click the green “Finalize Document” button.
a. If you would like to add supporting documents to your finalized contract, select
yes. Then select or upload the supporting documents you wish to attach to the
end of your contract. Click submit.
b. If you do not wish to add supporting documents to your finalized contract, select
no. Click submit.
9. A new contract version will be created for the finalized document.
10. To download the finalized version, click the PDF icon located to the right of the contract
version.
34
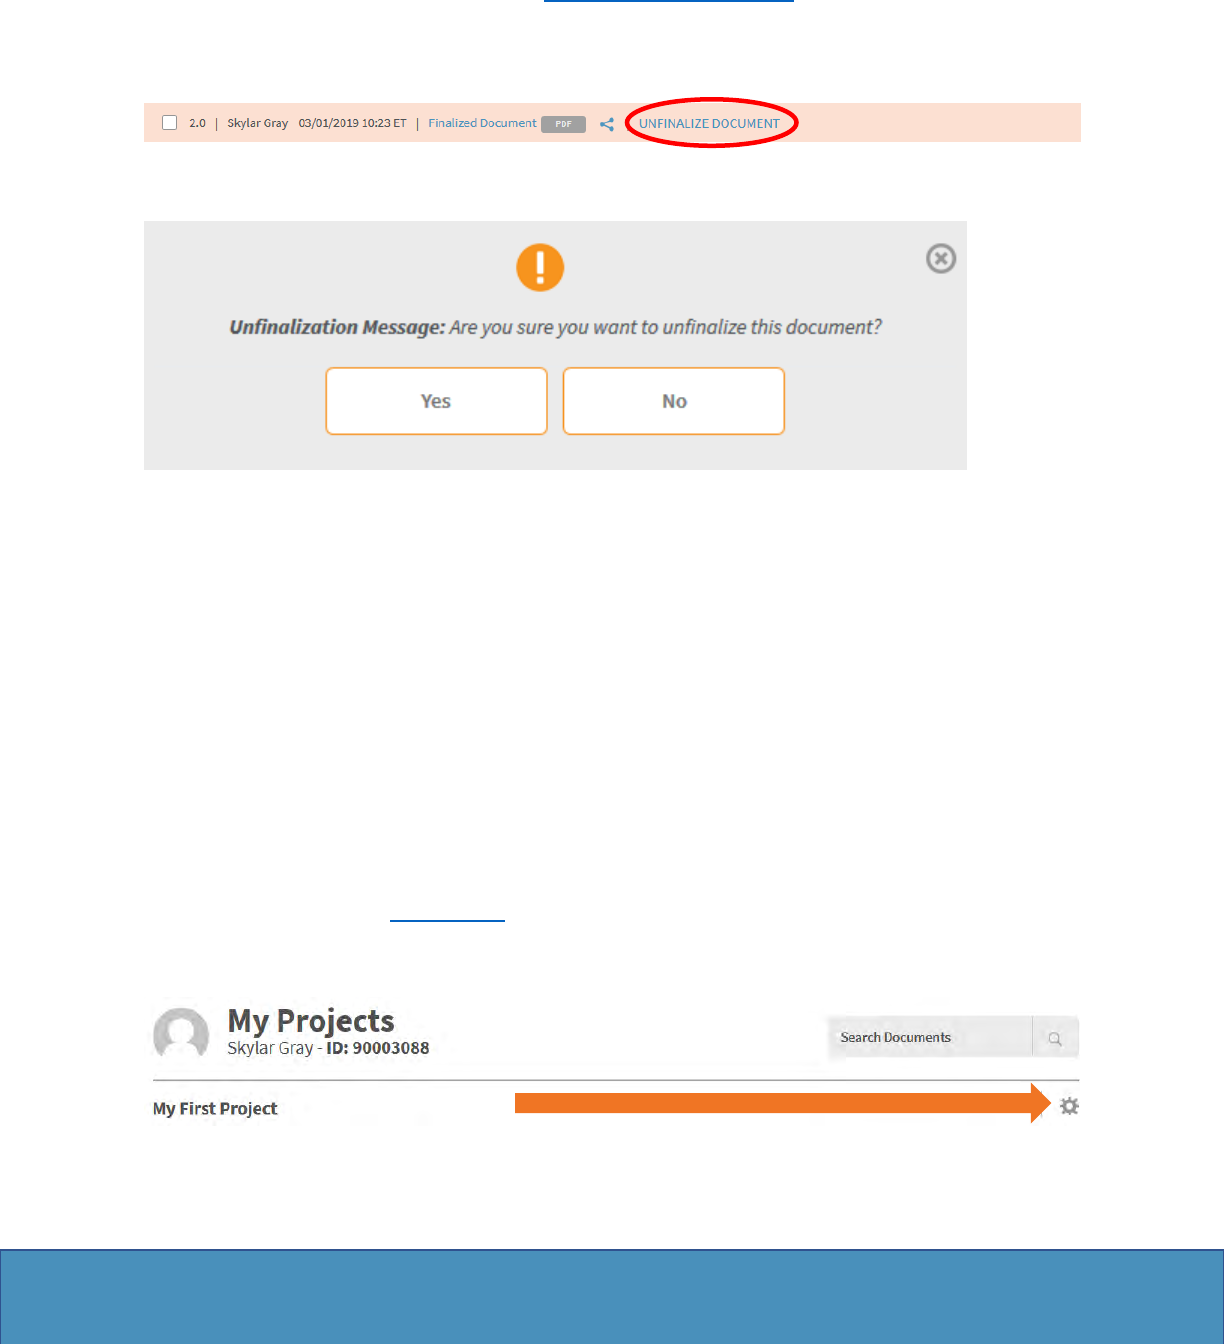
Un-finalizing A Contract
NOTE: You only have 5 times to un-finalize a contract. After 5 attempts you will need to create a
new contract using the steps found in the Editing Contracts section.
1. At the row of the finalized contract version, click the “UNFINALIZE DOCUMENT” text
located to the right of “Finalized Document.”
2. Click “Yes” in the Un-finalization message pop-up window that appears.
3. The document has now been un-finalized. (NOTE: The unfinalized version will become
the version immediately before the previously finalized version (e.g. if the finalized
contract was version 2.0, it will become version 1.0 once un-finalized).)
4. Once you have un-finalized a contract you will be able to download a Word version of
that contract and make edits.
Document Storage
If a negotiation is not finalized, and you maintain an active subscription, files will be saved in
your online account. Finalized negotiations will be saved for up to 12 months after finalization
with an active subscription. To avoid losing your finalized negotiations you will want to download
Zip files. Zip files can be downloaded at the project level or negotiation level.
Creating Zip Files at the Project Level
1. Navigate to your “My Projects” page.
2. Select the project that you wish to create a Zip file from.
3. Click the “Wheel” icon located to the right of the project name.

35
4. Click the “Download all contracts button.” (the third blue button on the first row)
5. Select which items you would like to include in your download (e.g. documents,
messages, and/or supporting documents)
6. Click the “Download Now” button.
7. Save the Zip file to your local hard drive.
Creating Zip Files at the Negotiation Level
To create a Zip file at the Negotiation level:
1. Navigate to your “My Projects” page.
2. Select the project that you wish to create a Zip file from.
3. Within the project, find the contact that you would like to create a Zip file of.
4. Click the “Wheel” icon located to the right of the finalized column.
5. Click the second blue button, “Download all versions.”

36
6. Select which items you would like to include in your download (e.g. documents,
messages, and/or supporting documents)
7. Click the “Download Now” button.
8. Save the Zip file to your local hard drive.
Additional Platform Features
Comparing Documents
ConsensusDocs offers its users the ability to compare both Word and PDF documents using a
standalone comparison tool. Word documents that are uploaded for comparison should be
.docx files. PDF files that are compared cannot be locked or secured. As a result,
ConsensusDocs contracts in PDF format cannot be processed using the comparison tool.
NOTE: All documents created using the Compare feature will be deleted after 30 days by the
system.
To compare two stand documents:
1. Navigate to the “Compare Documents” link located in the right hand “My Dashboard”
column.

37
2. Click “Add File” to upload either a Word document or PDF in the respective sections.
3. After the file is added, click the blue “Start Upload” button.
4. Repeat steps 2 – 3 to upload a second document.
5. Click the green “Run Comparison” button.
6. Click the orange arrow located to the left of the results section.
7. Find the comparison document that you just ran. (Please note, the results file will be the
same name as the second document that you uploaded.)
Converting Documents
ConsensusDocs offers its users the ability to convert documents using a standalone conversion
tool. Word documents that are uploaded for conversion should be .docx files. PDF files
uploaded for conversion cannot be locked or secured. As a result, ConsensusDocs contracts in
PDF format cannot be processed using the conversion tool.
NOTE: All documents created using the Covert feature will be deleted after 30 days by the
system.
To convert two standalone documents:
1. Navigate to the “Convert Documents” link located in the right hand “My Dashboard”
column.

38
2. Click “Add File” to upload either a Word document or PDF in the respective sections.
3. After the file is added, click the blue “Start Upload” button.
4. Click the green “Run Conversion” button.
5. Click the orange arrow located to the left of the results section.
6. Find the converted document. (Please note, the converted document will have the same
name as the document that you uploaded.)
Additional Useful Tips and Tricks
Removing Unwanted Highlighting
When finalized some documents will contain unwanted highlighting. To remove this highlighting
please follow the below steps:
1. Click the “Review” tab located in the Menu toolbar located at the top of the document.
2. Select “Restrict Editing” from the Protect Section.
3. Uncheck the “Highlight the regions I can edit” checkbox.
4. Search the document to find the areas that are highlighted.
5. Select the highlighted area.
6. Navigate to the “Home” tab.
7. Under the Font Section click the “Text Highlight Color” button.
8. From the drop-down, select “No Color.”
9. Repeat steps 4 – 7 for all sections that are highlighted.
After the highlight is removed you will need to upload the updated document to our platform to
finalize.

39
APPENDIX A. Working with Contracts in Microsoft Word
All ConsensusDocs documents can be edited using Microsoft Word. Our documents cannot
currently be edited using other word processing programs.
As a standard form, ConsensusDocs contracts have been designed to establish the relationship
of the parties in the standard situation. Recognizing that every project is unique, modifications
will be required. Text may be edited, excluded or added (except for the locked footer).
When opened for editing in Microsoft Word, there will be a yellow banner at the top of the
document with an “Enable Editing” button that must be selected before changes can be made to
the documents. All editable text will be shaded in yellow. To turn of this yellow shading:
1. Click the “Review” tab located in the Menu toolbar located at the top of the document.
2. Select “Restrict Editing” from the Protect Section.
3. Uncheck the “Highlight the regions I can edit” checkbox.
Embedded Instructions
There are three types of instructions embedded in ConsensusDocs documents to help you
complete the document.
1. Red Boxes: Instructions within red boxes refer to fields that are typically required to be
filled in for a complete contract document.
2. Blue Boxes: Instructions within blue boxes refer to fields that may or may not be
required to be filled in for a complete contract document.
3. Green Boxes: Instructions within green boxes refer to provisions that have General
Instructions or ConsensusDocs Coalition Guidebook Comments. The complimentary
Guidebook is available at www.ConsensusDocs.org.
To display or hide these instructions:
1. Word 2010 and later: File, Options, Display, check the Hidden Text check box – or you
can select “Show all Formatting Marks” which will include hidden text. A shortcut option
is to select the “¶” button under the “Home” tab to show all formatting marks.
2. Word 2007: Office button, Word Options button, Display Hidden Text check box.
3. Word 2003: Tools, Options, View, Formatting Marks, Hidden Text check box.
To print with these instructions:
1. Word 2010: File, Options, Display, Printing Options, “print with hidden text” check box.
2. Word 2007: Office button, Word Options button, Printing Options section, Print Hidden
Text check box.
3. Word 2003: Tools, Options, Print tab, Include with Document, Hidden Text check box.
Navigating Cross References
Cross-referencing can be found throughout ConsensusDocs contracts for your convenience.
Please know that cross-reference links are easily broke. As with any legal document, you
should always double-check all cross-references and not rely solely on MS Word functionality.

40
ConsensusDocs are formatted to automatically renumber when sections of text are added,
deleted, or moved. There are two important steps to ensuring that cross-reference links within
the Standard Contract text are updated to accurately reflect the changes made during editing.
1. Be careful where you insert text to make sure your cross-references update. Cross-
references break if you add a new paragraph to your document by pressing “Enter” at
the beginning of a referenced (usually numbered) heading. To prevent this, you must
add new paragraphs by pressing “Enter” at the end of the previous paragraph (noting the
indentation necessary to accurately reflect the appropriate hierarchical level for the
section of test). For example, if you have a section numbered 5.2.6 and it's already
referenced earlier in your document, DO NOT press “Enter” where the “x” is located in
the following example: --- 5.2.6xHeading Title --- Instead, press “Enter” at the end of
the line before this section. If the section before the one being moved is a lower or
higher level in section hierarchy – you will need to take care to decrease the indentation
to keep the inserted new section at the desired level. (example: when adding Section
5.3 when it will fall just after Subsection 5.2.5 – the inserted “return” will create a new
Subsection 5.2.6 in pattern with the auto-numbering rather than a new Section 5.3).
Editors can correct the list level by selecting the decrease indent arrow in the Paragraph
section on the tool bar or by selecting the new section and hitting “Shift+Tab” to bring the
new section to a higher list level.
2. ConsensusDocs contracts are locked to allow editing only in certain sections, and to limit
the editing capacity of Collaborators. Section changes and deletions will affect cross
reference links in the contracts. Changes will be shown in redline format by pressing
Ctrl + A (to select all) then F9 or by printing the document but will not automatically
updated. Cross references to moved sections will adjust to the new section number.
Cross references for deleted sections will produce an error message prompting the
editor to correct the missing cross reference. Only the Originator can accept/reject
changes – which is required to update the cross-reference links or identifying missing
links. To update cross-references, the Originator will first have to accept or reject
changes, then press Ctrl + A (to select all) then F9. It is important to note that the cross-
references will not be updated until this step is completed.

