
Instructions for
Baking & Decorating
Book Cakes
PLEASE READ THROUGH INSTRUCTIONS BEFORE YOU
BEGIN. IN ADDITION, to decorate cake you will need:
• Wilton Decorating Bag and Coupler or parchment triangles
• Tips 2, 7, 18, 22 and 48
• Wilton Icing Colors in Royal Blue, Golden Yellow, Orange, Pink, Brown,
Christmas Red and Leaf Green
• Cake Board, Fanci-Foil Wrap or serving tray.
• One 2-layer cake mix or make favorite
layer cake recipe.
• Buttercream Icing (recipe included)
• Wilton Decorating Comb (417-156)
or fork (optional).
© 2001 Wilton Industries, Inc.
Woodridge, Il. 60517
www.wilton.com Stock No. 2105-972
Wilton Method Cake Decorating Classes
Call: 800-942-8881
Decorating Your Birthday Book Cake
To make Birthday Book cake in the colors shown, you will need Wilton Icing
Colors in Christmas Red, Pink, and Leaf Green. We suggest that you tint all
icing at one time while cake cools. Refrigerate tinted icings in covered
containers until ready to use.
• Tint 1/2 cup red for message and trims
• Tint 3/4 cup pink for border, message and trims
• Tint 1/4 cup green for message and trims
• Reserve 2 cups white icing for cake top and sides (thin with 2 tablespoons
light corn syrup)
Cake Release
For perfect, crumb-free cakes!
No need to grease and flour your
baking pan – Cake Release coats
in one step. Simply spread Cake
Release lightly on pan bottom and
sides with a pastry brush and fill with
batter. Cakes release perfectly
without crumbs every time, giving
you the ideal surface for decorating.
Now in convenient dispensing
bottle. Certified Kosher. 8 oz..
702-6016
WITH PINK ICING
• Use tip 18 and “To Make Swirl Balloons”
directions to add a balloon to cake top
• Use tip 2 and “To Print” directions to add
“happy birthday” message to cake top
WITH GREEN ICING
• Use tip 18 to add a swirl balloon to cake
top
• Use tip 2 to add “B” and “is for apple” to
cake message and to stem apple
WITH RED ICING
• Use tip 2 to add balloon strings to balloons
• Use tip 18 and “To make Rosettes”
directions to add rosette border to cake
WITH WHITE ICING
• Ice cake top and sides
WITH RED ICING
• With a toothpick, draw an
outline of an apple on cake
top. Use tip 18 and “To Make
Stars” directions to cover
apple with stars
• Use tip 18 and “To Make Swirl
Balloons” directions to add a
balloon to cake top
• Use tip 2 and “To Print”
directions to add “A”and “is
for birthday” to cake message
To Decorate Baby Shower Book Cake
Use Wilton Icing Colors in Orange, Pink and Brown
• Tint 1 cup orange for cake sides, message and trims
• Tint 1/2 cup pink for border and trims
• Tint 2 tablespoons icing brown for eyes or use chocolate chips
• Reserve 1 3/4 cups white icing for cake top (thin with 2 tablespoons light
corn syrup)
Cake top iced
white
Tip 2 orange
message
Tip 2 orange hair
Tip 2 pink faces,
cheeks and mouths
Tip 18
pink
zigzag
border
Cake sides iced orange page mark effect
made with fork, decorating comb or tip 18
Tip 2
brown
eyes
To Decorate Anniversary Book Cake
Use wilton Icing Colors in golden Yellow, Pink and Brown
• Tint 1 3/4 cups light yellow (thin with 2 tablespoons light corn syrup before
adding color)
• Tint 1 1/4 cups golden yellow for cake sides and trim
• Tint 1/4 cup pink for message and trims
• Tint 2 tablespoons brown for eyes or use chocolate chips
Tip 2 red
message
Tip 18
red stars
cover
apple
Tip 2 pink
message
Tip 18 pink
rosette border
Tip 18
red, pink
and
green
swirl
balloons
Tip 2 red
balloon
strings
Tip 2 green
message
Tip 2
green
apple
stem
Cake top and
sides iced white
Tip 2 golden yellow hair,
moustache and curls
Tip 2 golden yellow
and pink messages
Tip 2 brown
eyes
Cake sides
iced golden
yellow,
Tip 7
gold
bead
border
Page mark effect made with fork,
decorating comb or tip 18
Cake
top
iced
yellow
Tip 2 golden yellow and pink
flowers, stems and bow
Tip 18
golden
yellow
shell
border

Baking Instructions
Preheat oven to 350
O
For temperature per recipe directions.
Your cake will unmold easily, without sticking, when you
prepare the pan properly. Grease the inside of pan using a
pastry brush and solid vegetable shortening (do not use
butter, margarine or liquid vegetable oil). Spread the
shortening so that all indentations are covered. Sprinkle about
2 Tablespoons flour inside pan and shake so that flour covers
all greased surfaces. Turn pan upside down and tap lightly to
remove excess flour. If any shiny spots remain, touch up with
more shortening and flour to prevent cake from sticking. (You
can use vegetable oil pan spray or vegetable oil pan spray
with flour, in place of solid shortening and flour, or use N e w
Wilton Cake Release, for perfect, crumb-free cakes!).
Make one 2-layer cake mix according to package or recipe
directions. Pour the cake batter into pan, and if necessary,
spread the batter around with a spatula to fill all areas of the
pan evenly. Be careful not to touch sides or bottom of pan.
Bake cake on middle rack of 350
O
F oven for 30-40 minutes
or until cake tests done according to recipe directions.
Remove cake from oven and cool on cake rack for 10
minutes. While the cake is still in the pan, carefully slice off the raised center
portion of the cake. This allows the cake to sit more level and helps prevent
cracking. To remove cake from pan, place cooling rack against cake and turn
both cake rack and pan over. Lift pan off carefully. Cool cake at least one hour.
Brush loose crumbs off cake.
To transfer cake to serving board, hold a cake board against cake and turn both
cake and rack over. Lift off rack. Hold another board against bottom of cake and
turn cake over. Be sure to hold cake, rack and board close together while
turning to prevent cake from cracking.
Making Buttercream Icing
The thick, but creamy texture of this flavorful icing makes it ideal for
decorating*. For best results, keep icing bowl in refrigerator when not in use. It
can be refrigerated in an airtight container for up to 2 weeks. Rewhip before
using. YIELD: 3 CUPS.
1/2 cup solid vegetable shortening
1/2 cup butter or margarine
4 cups (1 lb.) sifted confectioners’ sugar
2 tablespoons milk
1 tsp. Wilton Clear Vanilla Extract
Cream butter and shortening with electric mixer. Add vanilla. Gradually add
sugar, one cup at a time, beating well on medium speed. Scrape sides and
bottom of bowl often. When all sugar has been mixed in, icing will appear dry.
Add milk and beat at medium speed until light and fluffy.
*To thin for icing cake, add a small amount of light corn syrup.
Coloring Your Icing
Wilton Icing Colors are best for decorating because they are concentrated and
give the deepest, most vivid icing colors. Use a toothpick to swirl icing color into
icing, then mix well. Add color gradually until you get the icing color you desire.
Icing Smooth With A Spatula
With a spatula, place icing on cake. Spread icing over
area to be covered. For a smooth effect, run spatula
lightly over the icing in the same direction, blending it in
for an even look. For a fluffy effect, swirl icing into peaks
using the edge of the spatula.
Let's Practice Decorating
Use decorating bag and coupler as directed in this booklet.
Practice each of the following techniques on the back of a
cookie sheet with white icing. The practice decorations can
be scraped off the cookie sheet back into the mixing bowl
and rewhipped for use again. To hold bag while
decorating, curl fingers around bag with the end twist
locked between your thumb and index finger. This
forces the icing down into the tip each time you squeeze. Apply an even
pressure with all four fingers and icing will come out of the tip until you stop
squeezing. As you decorate, periodically twist the bag down further, forcing the
icing down into the tip. Use fingers of other hand to guide as you decorate.
For more about decorating, refer to the Wilton Yearbook of Cake Decorating.
For more Decorating Techniques &Tips
Visit our website at www.wilton.com -
Learn To Decorate - Basic Decorating Lessons.
Decorating Your Birthday Book Cake
To make Birthday Book cake in the colors shown, you will need Wilton Icing
Colors in Christmas Red, Pink, and Leaf Green. We suggest that you tint all
icing at one time while cake cools. Refrigerate tinted icings in covered
containers until ready to use.
• Tint 1/2 cup red for message and trims
• Tint 3/4 cup pink for border, message and trims
• Tint 1/4 cup green for message and trims
• Reserve 2 cups white icing for cake top and sides (thin with 2 tablespoons
light corn syrup)
Cake sides iced yellow, page mark
effect made with fork or tip 18
Tip 48 yellow belt
Tip 2 orange message
Tip 2 orange jean pockets
and detail work
Tip 18 yellow
shell border
Cake top iced blue
Using Your Decorating
Bag and Coupler
You can make many different designs with just one
decorating bagful of icing by using the Wilton Featherweight
or Disposable Decorating bags and coupler and changing
decorating tips.
Just follow these steps:
1. Screw ring off coupler to expose series of tiny threads
1/2 in. above coupler base.
2. Force coupler base as far down into decorating bag as it
will go.Then mark where bottom thread of coupler shows
through bag; remove coupler and trim bag at pencil mark
with a pair of scissors.
3. Reposition coupler in bag and push end through opening to expose bottom two
threads.
4. Position decorating tip over coupler and screw ring in place to secure. To
change tips, unscrew ring, replace tip and replace ring.
5. To fill, cuff open end of bag over your hand and insert icing with a spatula. Fill
bag no more than half full.
6. To close, unfold cuff and twist top of bag shut. Hold twist between your thumb
and forefinger. Note: You can eliminate any air bubbles that may have have
formed by squeezing bag gently over icing bowl until air is released.
Important: Be sure to wash the Featherweight bag in hot soapy water, then
rinse and dry afterevery use. A degreaser can make clean-up easier.
Using Parchment Bags
Parchment bags made from parchment paper triangles give you more versatility
and the convenience of one-time use. Follow package directions. To “pipe-in”
using a cut parchment bag, cut the point of the bag to desired opening.
Decorating With Wilton Icings
Wilton Frosting Mix: You will need 2-3 packages of Creamy White Icing Mix. To
prepare, follow package directions. Each package makes about 2 cups icing.
Excellent for tinting any shade required. If you're using another type of frosting
mix, you will need three 15.4 oz. packages of the creamy vanilla type that will frost
two 8 in. or 9 in. layers. For each package of frosting mix, use four less teaspoons
water than package directs. Each package makes about 1 3/4 cups icing. Do not
refrigerate icing before decorating. Cake may be refrigerated after it is iced.
Wilton Ready-to-Use Decorator's Icing: You will need approximately 2-3 cans
of our delicious white icing. Each 16.5 oz. can holds about 2 cups. It's ideal for all
of your decorating needs – frosting, decorating and flower making.
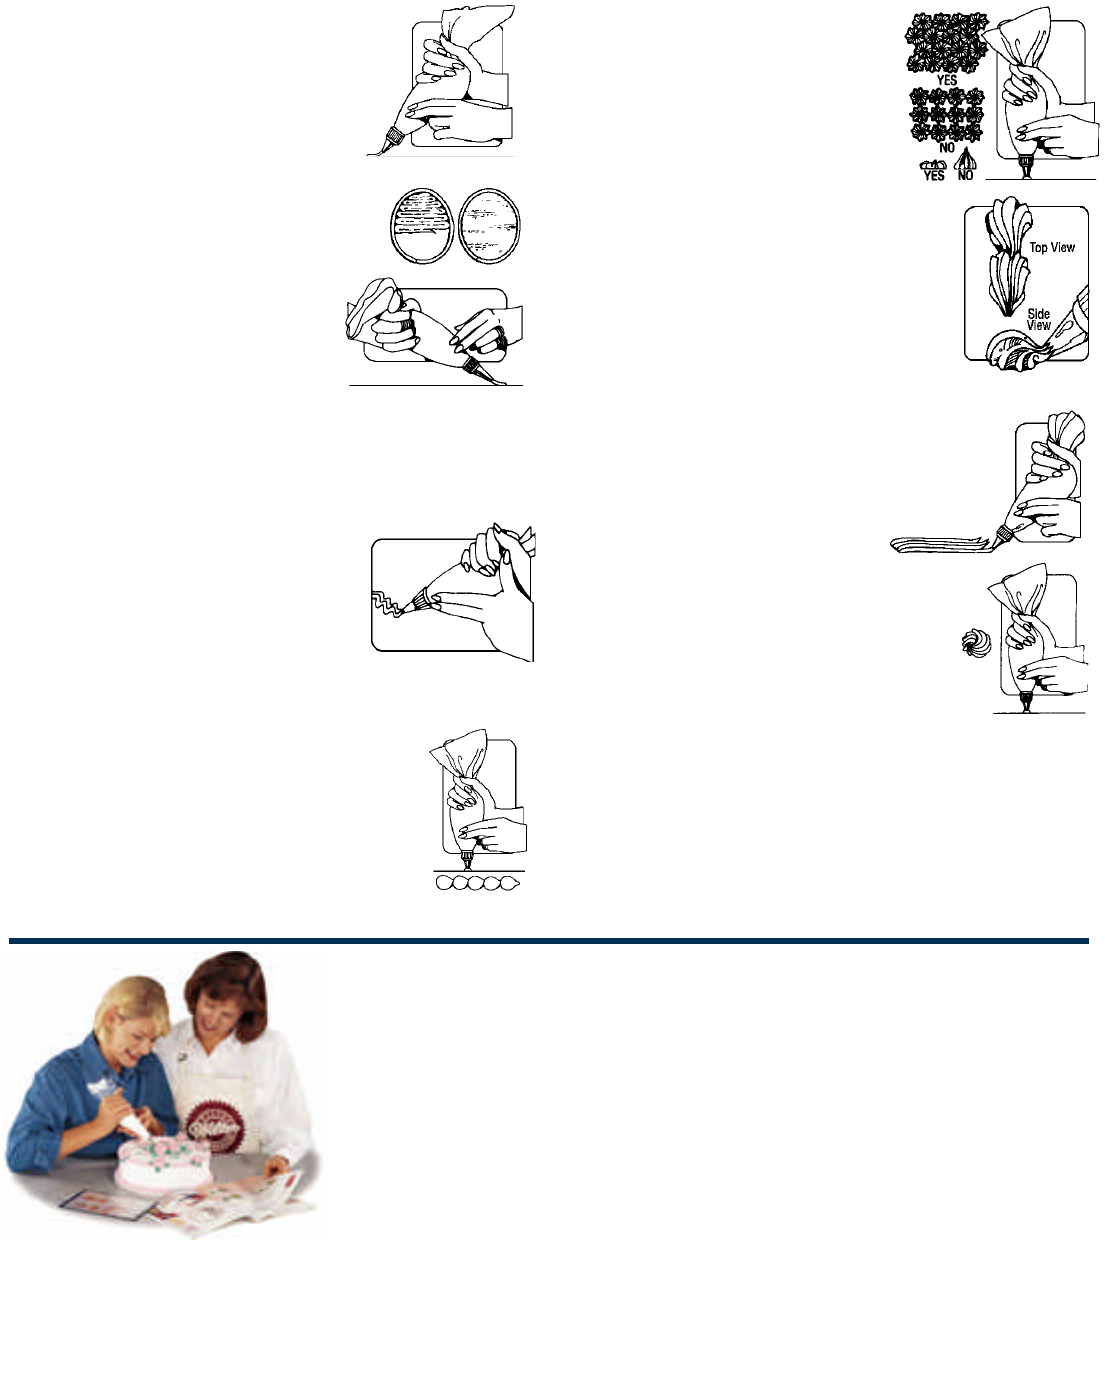
To Make Stars
Use tip 18. Hold bag straight up and down (see
illustration) with tip 1/8 in. above surface.
Squeeze until a star is formed, then stop
pressure and pull tip away. Your stars will be
neatly formed only if you stop squeezing before
you pull the tip away.
To Make Shells
Use tip 18. Hold decorating bag at a 45
O
angle, slightly
above surface with end of bag pointing towards you.
Squeeze until icing builds up and fans out into a base as
you lift tip slightly. Relax pressure as you lower tip until it
touches surface. Stop pressure and pull tip away without
lifting tip off surface to draw shell to a point. Practice this
procedure until you can produce a clean shell shape. To
make a row of shells, rest head of one on tail of preceding
shell. For larger shells, increase pressure; for smaller shells, decrease pressure.
To Make Stripes and Pull Out Stripes
Use tip 48. Hold decorating bag at a 45
O
angle to surface. As you
squeeze out icing with a steady, even pressure, move tip in a
vertical direction, laying out a string of icing. To end a stripe, stop
pressure and pull tip away.
To make pull-out stripes, lift tip as you
squeeze, stop pressure, pull tip away.
To Make Rosettes
Use tip 22. Hold decorating bag straight up with tip 1/8 in.
above surface. Squeeze and hold tip in place
momentarily, then move tip around to the right using a
short circular motion. Stop pressure just before reaching
original starting point and pull tip away.
To Make Swirl Balloons
Use tip 18. hold decorating bag straight up and down with tip lightly touching
practice surface. squeeze steadily and move tip counter-clock wise to make
small circle. Continue squeezing; going round and round to make balloon. To
end balloon, stop pressure and pull tip away.
To Make Curls
Usetip 2 and hold decorating bag at a slight angle with tip touching practice
surface. Squeeze and move hand in circular “O” motion as you continue
downward, overlapping each successive “O” for a curl effect. To end curl. stop
pressure and pull tip away.
To Make Outlines
Use tip 2. Hold bag at a 45
O
angle and touch tip to surface.
Squeeze at starting point so that icing sticks to surface. Now
raise the tip slightly and continue to squeeze. The icing w i l l
flow out of the tip while you direct it along surface. To end an
outline, touch tip back to surface, stop squeezing and pull
away. If icing ripples, you are squeezing bag too hard. If
icing outline breaks, you are moving bag too quickly or icing is too thick.
To Outline & Pipe-In
After outlining, using the same tip, squeeze out rowsof
lines to fill area. Pat icing down with fingertip dipped in
cornstarch or smooth with dampened art brush.
To Write or Print
Use tip 2. Hold bag at a 45
O
angle to surface of
cake with bag toward your right so that fingers face
you (see illustration). As you write or print, always
work from left to right. To write, squeeze out icing
with a steady, even pressure as you glide tip along surface in a smooth
continuous motion. Keep wrist straight; use your arm, not your fingers to form
each line, letter or word. Tip should lightly touch cake at all times. To print, touch
tip to surface and then raise tip slightly as you continue to squeeze. The icing will
flow out of the tip while you direct it along surface. Stop squeezing and touch tip
to surface to end each stroke of printed letter, then lift tip and pull away.
To Make Zigzags
Use tip 18. Hold bag at a 45
O
angle with tip lightly
touching surface. As you squeeze out icing with a
steady, even pressure, move handin a side-to-side
motion for a zigzag effect. To end zigzag, stop pressure
and pull tip away. Loose, overpiped zigzags are made
following the basic zigzag technique. As you move the
tip in the side-to-side motion, vary the width of the zigzags and overpipe areas to
create dimension. Cover the entire area, with no background showing.
To Make Beads
Use tip 7. Hold bag at 90
O
angle to surface, with end of bag
pointing towards you. Lightly touch tip to surface and squeeze
until icing builds up and fans out into a base. Then lift tip slightly
and relax pressure as you pull tip down and towards you to make
a tail. Stop pressure completely and pull tip away for a finished
bead. Practice this procedure until you can produce a clean bead
shape. To make a row of beads, rest head of one on tail of
preceding bead. For larger beads, increase pressure, for smaller
beads, decrease pressure.
TOPVIEW
TOP
VIEW
Response from students has been so amazing that we’ve added new
classes, featuring more ways to decorate great cakes and treats.
Now you can be ready for any occasion, with the perfect, personalized
dessert. Imagine the great things you can make – colorful cakes for kids’
birthdays featuring today’s hottest characters, beautiful floral basket cakes
for Mom, charming gingerbread house centerpieces to make your holiday
festive. We’ll show you how to do it all!
Wilton Method Classes 4 sessions per course
Course I - Cake Decorating
Stars, shells, roses and floral sprays give you the fundamentals to create so
many cakes. Add messages and create fun, figure-piped shapes.
Course II - Flowers and More!
Build on the basics with beautiful blooms like daisies, pansies, violets and
daffodils. Use these flowers and techniques like basketweave and color flow, to
create a fabulous bouquet cake for a sweetheart, mom, sister, or friend.
Course III - Fondant and Tiered Cakes
Ruffled borders, advanced flowers and stringwork expand your decorating
horizons. Lessons in rolled fondant and tiered cake assembly culminate in an
elegant cake suitable for a wedding, formal shower or fancy party.
Project Classes 1 or 2 sessions each
Focus on one fabulous decorating project. We have more to choose from than
ever* – Pre-baked Gingerbread Houses, Fondant Cakes, Star Character Cakes,
Cookie Blossoms, Mini Cakes, Candy and more.
*Not all classes are offered at all store locations. Check with your local retailer for class offerings.
Discover
The Fun of
Cake
Decorating!
Wilton
M e t h o d
Decorating
Classes
Millions have learned how much fun cake decorating can be in Wilton
Method Classes. Our students keep coming back for more, because
each Wilton Class helps anyone get beautiful results – even those who
have never decorated before!
The secret of success? Wilton Method Instructors. Their friendly,
patient way of teaching makes learning a pleasure. Our Instructors
work with you, giving personal attention to help you perfect each
technique. Wilton Method Instructors make learning fun.
Find Classes Near You!
In U.S.A., Call 800-942-8881 Or visit our website at www.wilton.com
In Canada, call (416) 679-0790 x201 Or E-mail: [email protected]
