
Common Uses for Git ........................................................... 1
Expectaons and Assumpons ............................................ 1
Introducon to Version Control ........................................... 2
Installing Git on Windows .................................................... 4
Using the Command Line ..................................................... 6
Registering for GitHub .......................................................... 8
Conguring Git ..................................................................... 8
Creang a Repository ........................................................... 9
Inializing a Workspace ..................................................... 10
Comming Changes .......................................................... 11
Stashing and Reverng Changes ........................................ 12
Using Branches .................................................................. 13
Using Pull Requests ............................................................ 14
Addional Resources ......................................................... 15
If you aren’t a version control expert aer reading this booklet, don’t worry. You have
only been introduced to the laundry list of features provided by Git and GitHub. What
you have learned should be enough to make use of core version control principals but
there is plenty more to explore. Try reading some of the resources below or just trying
new things by yourself with an experimental repository.
To learn more about version control, Git, or GitHub, check out the following websites:
hps://try.github.io/
hp://git-scm.com/book/
hps://help.github.com/
To learn more about command line interfaces in Windows, try these websites:
hp://codeproject.com/Arcles/457305/Basic-Git-Command-Line-Reference-for-
Windows-Users
hp://gitref.org/
hps://dosprompt.info/
Graphical interfaces for using Git are available from the following websites:
hps://windows.github.com/
hp://sourcetreeapp.com/
15

Oen, a new branch is used in the workspace to make a series of changes. Aer these
changes have been commied, reviewed, and pushed to the repository they need to
be merged into the master branch. provide an interface for reviewing
and merging changes from one branch to another.
On the
GitHub repository page, select
the branch you want to
merge and “
” located above
the le list. Alternavely, if
the branch is new GitHub
will show an orange box
with a “Compare & pull
request” buon. GitHub will
provide a simple form to
create the pull request with a tle and descripon. Above the form is a blue box which
you can use to specify which branch to merge into. It should default to master, which
is what we want. Below the form is a list of commits and a “di,” or comparison of
changes between the two branches. Once you know that the changes are correct,
“” .
Aer creang the pull request, you will be brought to the web page for
that request. Normally this would provide an opportunity for other contributors
to inspect your changes and provide feedback. When the pull request has been
reviewed, merge it by “” “
” . A message can be provided if desired.
Aer merging a pull request, the
branch may not be needed any more.
The pull request page will oer a
buon to delete the branch on the
repository. To delete the branch on your workspace, use the command git branch
–D <branch> where <branch> is the name of the branch you wish to delete.
. The master branch on the repository change should now look
the same as the branch which was merged.
When working as a team on a project with many documents, it can be very frustrang
trying to keep things organized. When passing les around, it can be a struggle to
know which version is the most recent. Two team members may want to do work on
the same le at the same me for enrely dierent reasons. If they each work on their
copy of the le, which do you keep
at the end? How do you combine
their changes?
A le server or shared folder can
help keep all of the les in one place, but eding with mulple people is sll
troublesome. For some les, a collaborave editor such as Google Docs may help
migate the issue, but simultaneous eding can be confusing and there are few editors
which are truly designed for it. What we really need is a tool to allow mulple people
to work on the same le
and easily combine their
changes.
Git is a
soware soluon. It is
designed to allow mulple contributors to edit a pool of les located in a .
GitHub is a website which hosts Git repositories. Although other version control
soluons and repository hosng sites exist, Git and GitHub are parcularly popular and
powerful.
Can combine mulple sets of changes to a single text le
Shows which contributor is responsible for each change
Allows changes to be removed or reverted
Makes it easy to nalize and distribute specic versions
This booklet is designed to teach fundamental version control concepts and explain
how to use these concepts with Git and GitHub. Both tools oer a plethora of
addional features, but aer nishing these instrucons you will be able to set them
both up and properly use their primary features on a Windows computer. Since Git is
most oen used via a command line interface, basic instrucons on how to use the Git
Bash soware will also be provided.
Before beginning these instrucons, it is assumed that you are familiar with some
basic funconality of a modern Windows computer. This includes the ability to start
programs, navigate the le system using the Windows Explorer soware, and navigate
to and interact with web pages. If any of these tasks sound unfamiliar, it is
recommended that you learn them before connuing with this booklet.
1
14
Although Git is most oen used for programming
projects, it works well with any projects which use
plain-text les. This includes web development,
LaTeX, markup, or simple text documents.
1
2
were introduced previously as a useful means for contextualizing a series
of commits. They allow for mulple versions of the repository to exist based on the
“master” commit path. To create a new branch, you must specify a commit within an
exisng branch to act as a starng point. Generally, you start a new branch from the
last commit in another branch (usually the “master” branch).
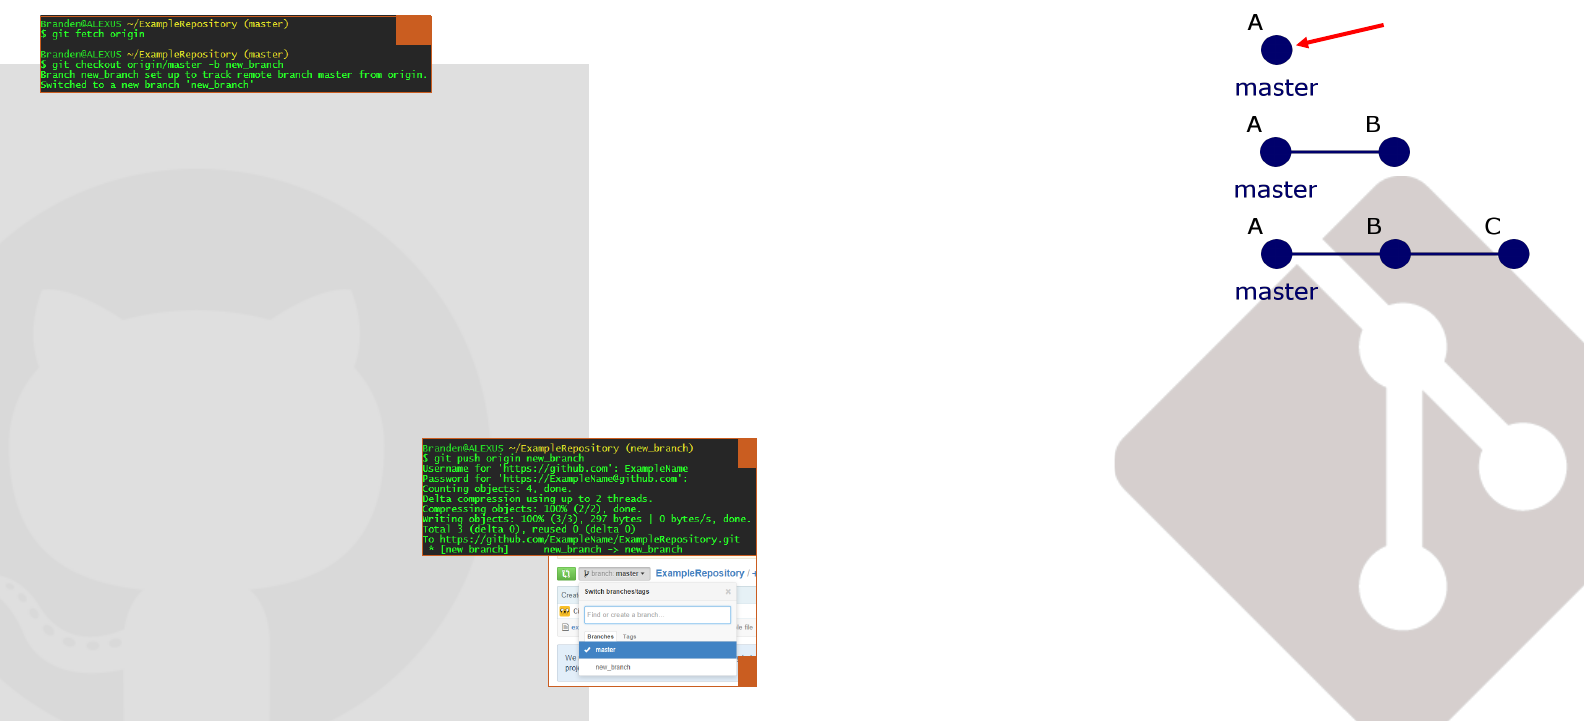
First, we need to make sure that the workspace is completely aware of
any new commits on the repository. Since it does not automacally update
whenever new commits or branches are added to the repository, we must manually
tell the workspace to update. git fetch origin to update
local informaon about the origin remote.
To create a new branch from master,
git checkout origin/master –b new_branch. Again, we see “origin” and
“master” in the command which can
be substuted for any remote or
branch name on the specied remote.
The “-b new_branch” secon tells Git to create a completely new branch based on
origin/master with the name new_branch. Noce the branch name change from
“master” to “new_branch”. To switch back to master or another branch, use the
command git checkout <branch> where <branch> is the name of the desired
branch. Just typing the command git branch will also show you a list of all branches
on your workspace.
Once we have a new branch, we can change something and commit
normally (page 11). Almost all of the steps are the same as when comming to
master. The only dierence is that instead of pushing with git push origin
master, we use the command git push origin new_branch.
.
. When you open
the repository page, you can see any changes
you made on the master branch. If you want
to see changes for new_branch, you must select it from the
branch dropdown list.
. Now the page should show all changes
for the newly created branch.
Instead of saving a whole le, version control soware works by saving sets of changes
made to the les within repository. These groups of changes are called . By
using commits, users are able to work on the same le simultaneously because their
commits will remain separate. Somemes two commits will conict with each other
when both are applied, but in these cases the version control soware can idenfy
which changes are aected so that they can be easily resolved.
When a repository is rst created, it will be empty. To make changes to the repository,
a user will need to set up a local . The workspace is a folder which contains
local copies of the les from the repository. It allows you to down commits from
the repository - updang all of the les in the workspace - and new commits up
to the repository. Aer the workspace is ready, you will be able to push your rst
commit.
In the commit diagram to the right, the rst
commit is represented by the dot labeled “A.”
This commit is the rst set of changes made to
the repository, so it will involve creang one or
more les. Each commit aer A is aached to
the previous commit, creang a chain or series
(see commits “B” and “C” in the diagram).
These commits can involve adding new les,
changing exisng ones, or even deleng les.
As a general rule, the changes within a commit
should be related. This is because commits can be removed if it is later decided that
the changes are not wanted. If many unrelated changes are a part of the same
commit, it is likely that only some of the changes will need to be removed but the
whole commit will have to be removed anyway. The unrelated changes will then have
to be added back to the repository manually with a separate commit. Keeping changes
related also helps a team understand the purpose behind a commit without inspecng
each individual change.
1/2
4
3
13
2

In addion to commits, Git oers features called . A branch is simply a series
of commits, which result in a parcular set of les. By default, the repository is
created with a single branch named “master.” This is usually the branch with “ocial”
les that everyone is working on.
Like a tree, branches split from other branches. In the top diagram a new branch,
appropriately named “new_branch,” is created based on commit C of the master
branch. The les in master will sll only consist of the changes in commits A, B, and C.
However, the les in new_branch will consist of the changes in commits A, B, C, and D.
We can connue adding
addional commits to either
branch and they will remain
separate paths.
Oen mes branches are
used when making a set of
changes on the workspace. A new branch is created on the workspace based on the
latest commit in the master branch. Commits are added to the branch unl all desired
changes have been made, then the branch is pushed up to the repository. In the
repository, a feature called a allows the commits in a branch to be
reviewed by the other contributors and then merged into the master branch. In the
example diagram, a pull request from new_branch into master would append the
commits D and E onto the end of master, immediately aer commit G.
The repository also provides . A fork is basically a copy of a repository for an
individual contributor. A contributor can push to his fork instead to avoid adding
branches to the primary repository. Pull requests can then be made from branches on
a fork to branches in the primary repository.
Somemes you might be in the middle of making
changes for something when a higher priority
change comes up. How do you switch to making a
separate set of changes without comming
unnished work or loosing your progress? Git
provides us with the git stash command for these situaons.
. The git status command should reect this change.
Next, git stash to temporarily revert the le back
to what is on the repository. The changes are placed at the top of a “stack” of
changes. If you do not
immediately noce the
changes, you may need
to re-open the le.
Once again, git
status will conrm the
changes by showing you
that there are no
modied les. Now
your workspace is ready
to work on another task.
Aer the task has been nished and commied, you can
git stash pop. This command “pops”
the changes from the top of the stack of changes which, as long as no other changes
have been stashed, will be the changes you made previously.
Somemes you modify a le and later decide you want to remove those modicaons.
You could try to undo all the work manually, but there is an easier way. The git
checkout command is used to copy content from the repository to your local
workspace. It can be used to copy enre branches or
just single les or folders. In this case, we only want to
checkout the le we modied earlier.
To checkout the le, git checkout <path>
where <path> is the relave path of the designated le. Again, the git status
command should reect the changes by no longer showing the le in the change list.
1
2/3
4
3
12

It’s nally me to create
a commit. First we make a simple change to
the repository by creang a new le.
This can be done a number of ways, but
the simplest is to
.
While in the workspace on Git Bash, try entering the command git status. This
shows us that a le has been created or modied but is not selected to be a part of the
commit.
To select les to be commied,git add
<path> where <path> is the relave path of the designated le or folder. Also,
the command git add –A can be used to add all les in the list. Now if you enter
the git status command again, you can see
that the le had been “staged” for the commit.
A le can be removed from the staging list by
typing git reset <path> where <path> is
the path of the designated le. The git reset
command can also unstage all les in the commit if <path> is omied enrely.
To nalize the commit, git commit –m
“<Message>“ where <Message> is a
brief descripon of what has been changed.
The message part may seem trivial, but it is
important to communicate why a change
was important to others and possibly even
your future self.
Lastly, to add the commit to the repository git push
origin master. “Origin” is the name of the remote which references the
primary repository and “master” is the name of the current branch. You will need to
provide your GitHub name and password to push.
To get the installer, hp://git-scm.com/downloads on
your preferred browser. Once there, “” from the box
under the “Downloads” header. If you are using
another operang system, select the appropriate
link. Although the installer will not be exactly the
same, the installaon steps should be very similar to
those for Windows. Aer clicking the link, the le
should automacally download.
Locate the le and by opening it. If a popup
asks if you want to allow the installer to execute, select “Yes.” The installer
should greet you with a welcome page. “” to skip both the
welcome page and the license agreement. Don’t forget to “read” the license
agreement carefully.
The next three pages ask about where to install the soware,
which components should be included, and where the start menu shortcuts
should be placed. Only modify the values on these pages if you feel comfortable with
them. For most users, the default parameters are appropriate for all three pages.
“” to connue.
*
*Make sure that the
1
2
3
1
2
3
11
4

A folder must be setup locally to read, create, and modify les on
the repository. This folder is commonly referred to as the . From the
command line, we can use the mkdir command to make the workspace folder. On Git
Bash, make sure you are in the folder where you want to create the workspace. For
most, the home folder is a good folder to choose.
mkdir <name> where <name> is the name of the workspace folder (usually the
repository name). Next, cd <name>. Noce that
the path above your command line changed to the path of the workspace.
To designate the current working folder as a git workspace, simply
git init. If the Windows opon to show hidden les and
folders is turned on, you should noce that a new folder named “.git” was created in
the workspace. This folder contains all of the Git informaon in the workspace. If you
ever want to remove the workspace designaon, simply delete the .git folder (try the
command rm –r .git). If you cannot see the .git folder in your workspace, try using
the command ls –A.
You may also noce that “(master)” was added aer the path above the command line
prompt. This tells us that we are on the branch named “master.” We’ll cover more on
how to use branches later.
Lastly, we need to add the GitHub repository to the workspace as a
. A remote is a reference to a repository which can be used in the
workspace. The primary remote for a workspace is usually called “origin,” so we can
git remote add origin <HTTP>
“”, where <HTTP> is the HTTP address of the repository we recently
created. In this instance we are calling this remote “origin” because it is the standard,
but any name can be used in the command when adding a new remote. SSH addresses
can also be used in place of HTTP addresses, but they require some addional setup.
The
next page in the Git installer
provides you with three opons.
The rst opon, “Use Git from
Git Bash only” is the default
selecon. However, it is
generally safe to select “Use Git
from Windows Command
Prompt.” This selecon extends
compability for Git commands
to the Windows Command Prompt. We will not be using this feature for the sake of
these instrucons, but it is useful for users who prefer using the built-in Windows
command line interface. Go ahead and
“” .
Three more
opons are presented on
the second page. This me, the
opons aect how line breaks
are treated in text les.
Windows treats line breaks
dierently from other operang
systems, so some editors such as
Notepad will have trouble
reading line breaks in les from
other operang systems. Git
provides a feature which can
automacally convert other line breaks into Windows-style line breaks when les are
retrieved from a repository. It will also convert them back before comming changes
to the repository. There are very few instances where this feature is not desirable, so
it is safe to
“” .
“” on
the nal page and “” .
Git and its primary components should now be
fully installed and ready to run.
4
5
6
1/2/3
5
10

We need to create a
repository to work with on GitHub. If you are
logged in on hps://github.com/ you’ll see a series
of tutorials on the front page. These can be very
useful for beginners, but for now just “
” .
The following page requests a name and descripon
for your repository. These elds are fairly straighorward and they can be almost
anything you’d like as long as the name is not taken by another user.
Next it asks whether or not the repository is public or private.
Private repositories will only be
visible to invited users and require
either a payed plan or for you to
register your account as an educaonal
one using a valid university email
address. The remaining elds can be
ignored.
“”
.
When you click the buon, GitHub will bring you to your
empty repository page, which provides many suggesons for geng started. The
most important part of the page for now is the blue box which provides the HTTP and
SSH addresses of the repository. These addresses will allow us to connect to the
repository using Git locally. For these instrucons we will be using HTTP addresses,
which require a name and password any me a connecon is made between Git and
GitHub. For informaon on how to setup a repository with SSH links instead, visit
hps://help.github.com/arcles/generang-ssh-keys/.
The is a simple interface for execung tasks on a computer. Instead of
interacng with pictures and buons, a user simply types a command and presses the
“Enter” key. Of course, it is impraccal to do everything in a command line as it
requires memorizaon of commands and can somemes be much slower than its
counterpart, the Graphical User Interface (GUI).
Unfortunately, while GUI soware for using Git is available, some opons are daunng
for beginning users while the others simply do not oer more than the most basic
features. This booklet will focus on using the command line interface for Git since it
allows for all of Git’s features to be used without presenng too much informaon for
basic users to be comfortable with.
If a GUI is sll preferable, the most popular opons are GitHub for Windows by GitHub
(available at hps://windows.github.com/) and SourceTree by Atlassian (available at
hp://sourcetreeapp.com/).
When Git was installed, a command line soware called was installed with it.
Git Bash emulates the popular “Bash” command line interface used on many other
operang systems. Although Git is usable in the Windows Command Prompt, Git Bash
is typically the preferred interface. The Git-specic commands are almost idencal
between the two interfaces, but the more basic system commands can be very
dierent. For more informaon on how to use the Windows Command Prompt, check
out hp://dosprompt.info/.
Try opening Git Bash to see the basic command line interface. Aer the introducon
text, you should see a line which shows the Windows username of whatever account is
logged in, an “@” symbol, and the name of the computer. In the example image, the
username is Branden and the computer’s name is Alexus. Following is a “~” or a lde
character. It represents the folder which is currently open. More specically, it
represents the “home” folder.
1
2
3
9
6

Before using Git, you must congure Git to use your name and email
address for GitHub. You can do this by opening Git Bash and entering the com-
mands git config --global user.name “<Username>“ and git config
--global user.email “<Email>“ where <Username> and <Email> are the
username and email address used to register with GitHub. Be sure to note that there
are two dashes before each “global.”
To use GitHub, you must have a
registered account.
hps://github.com/ in your preferred browser and
“
” .
The next page will ask you to
select an account payment plan. The free
plan allows for unlimited public repositories and
some private repositories for students and
educators with valid email addresses. For most
users, the free plan is enough. Make sure that
“Help me set up an organizaon next” is not
checked and “” .
(somemes called
directories) organize a
computer’s le by grouping
them and nesng within other
folders. Root folders in
Windows are represented by
drives. On most systems, the
root folder or drive will simply
be labeled “/c.” The Windows
Explorer labels this as “C:\”
are addresses used to show where a le or folder is located. They list every
folder between the root and the specied le or folder separated by a slash. For
instance, the absolute path for J.txt in the diagram would be “/c/H/I/J.txt.” If a path
begins with a slash, it is called an and always starts at the root directory.
Without a starng slash, it is a and depends upon the current folder.
From H, the relave path for J.txt
would be “I/J.txt.”
One folder will also be set as the
, represented by the
“~” character. For Windows, the
home folder defaults to “/c/Users/<Username>“ where <Username> is the account
name of the user who is currently logged in.
Interacng with les and folders in the command line is very similar to using the
Windows Explorer program. To see the contents of the folder you’re in, type the
command ls (remember to press enter to submit a command). To change folders,
type cd <path> where <path> is either the relave or absolute path of the folder
you want to go to. Addionally, you can type cd ~ to go to the home folder or cd ..
to go up to the parent folder. Other system commands are given by the table below.
pwd
Display the path of the current working folder
ls
List all les and folders in the current working folder
cd <path>
Change the current working folder
mv <path> <path>
Move a le or folder to another path
cp <path> <path>
Copy a le or folder to another path
rm <path>
Remove a le or folder (must provide –r for folders)
mkdir <path>
Make a new folder
exit
Close the command line interface
1
2
1
7
8
Quotes are not normally necessary to denote a
path, but if any le or folder has spaces in it, a
path must be wrapped with quotaons. This can
be avoided by using underscores (or “_”) instead
of spaces when naming les and folders.
