
Kofax Communication Server
KCS Portal Administrator's Guide
Version: 10.3.0
Date: 2019-12-13
©
2019 Kofax. All rights reserved.
Kofax is a trademark of Kofax, Inc., registered in the U.S. and/or other countries. All other trademarks
are the property of their respective owners. No part of this publication may be reproduced, stored, or
transmitted in any form without the prior written permission of Kofax.

Table of Contents
Preface...........................................................................................................................................................6
Related Documentation................................................................................................................................. 7
Chapter 1: Architecture.............................................................................................................................. 8
Chapter 2: Installation.............................................................................................................................. 10
Prerequisites..................................................................................................................................... 10
Client...................................................................................................................................... 10
Server.....................................................................................................................................10
IIS configuration..................................................................................................................... 11
Installation......................................................................................................................................... 19
Post installation procedures............................................................................................................. 27
Remote Application Server credentials................................................................................. 27
Authentication mode (IIS settings)........................................................................................ 28
Authentication mode (KCS settings)..................................................................................... 30
Create groups........................................................................................................................ 30
Log in as administrator.....................................................................................................................32
Chapter 3: Configuration..........................................................................................................................33
Session timeout................................................................................................................................ 33
Customize navigation tree................................................................................................................34
Date and time formats......................................................................................................................36
Configuration files............................................................................................................................. 37
KCSPortalConfig.xml..............................................................................................................38
ServerConfig.Xml................................................................................................................... 40
Registry............................................................................................................................................. 41
KCS Portal authentication................................................................................................................ 42
Single Sign-On mode............................................................................................................ 42
Manual mode......................................................................................................................... 44
KCS server authentication.....................................................................................................45
Additional information....................................................................................................................... 47
Access and refresh tokens....................................................................................................47
Security considerations..........................................................................................................48
Cookies, browser local storage and request header attributes.............................................49
Utilization of Http verbs GET, POST, PUT and DELETE...................................................... 50
Chapter 4: Fault tolerant operation.........................................................................................................51
Chapter 5: Getting started....................................................................................................................... 52
3

Kofax Communication Server KCS Portal Administrator's Guide
Basic UI organization and available tools........................................................................................52
Filtering/Sorting................................................................................................................................. 53
Filter or search...................................................................................................................... 54
Sort grid data......................................................................................................................... 55
Show/Hide columns............................................................................................................... 56
Scrolling..................................................................................................................................56
Chapter 6: Settings................................................................................................................................... 57
Add groups....................................................................................................................................... 57
Edit a group........................................................................................................................... 60
Remove a group.................................................................................................................... 60
Add Application Servers................................................................................................................... 60
Add an Application Server.....................................................................................................60
Edit an Application Server.....................................................................................................61
Delete an Application Server.................................................................................................62
Add Message Servers...................................................................................................................... 62
Add a Message Server..........................................................................................................62
Edit a Message Server..........................................................................................................64
Delete a Message Server......................................................................................................64
Chapter 7: Monitor.................................................................................................................................... 65
Status and actions............................................................................................................................65
General status colors....................................................................................................................... 66
Application Server items and icons..................................................................................................66
Message Server items and icons.....................................................................................................67
Chapter 8: Message Tracking.................................................................................................................. 70
Chapter 9: KCS Administration............................................................................................................... 71
Licenses............................................................................................................................................ 71
Add a license......................................................................................................................... 71
Remove a licenses................................................................................................................ 72
Activate Test mode................................................................................................................ 72
Services............................................................................................................................................ 72
Add a service.........................................................................................................................73
Modify a service.....................................................................................................................74
Remove a service..................................................................................................................74
Users.................................................................................................................................................74
Add a user............................................................................................................................. 75
Edit a user............................................................................................................................. 93
Remove a user...................................................................................................................... 93
Backup users......................................................................................................................... 93
4

Kofax Communication Server KCS Portal Administrator's Guide
Restore users.........................................................................................................................94
User Addresses................................................................................................................................ 94
Events............................................................................................................................................... 94
Modify an event..................................................................................................................... 95
Remove events...................................................................................................................... 95
Archive.............................................................................................................................................. 95
Actions on volumes............................................................................................................... 96
Update volumes in Archive Server........................................................................................98
Chapter 10: Troubleshooting................................................................................................................. 100
Possible errors................................................................................................................................100
Error on initial login............................................................................................................. 100
Error on Login......................................................................................................................100
Error on login during normal operation............................................................................... 100
Authorization error on login................................................................................................. 101
KCS Portal not accessible after installation........................................................................ 101
Monitor view does not show any information......................................................................101
HTTP error 405....................................................................................................................101
HTTP error 403....................................................................................................................101
Server error when starting default login page.....................................................................102
Blank screen displayed when starting KCS Portal..............................................................103
Troubleshooting WMI services with Windows PowerShell.............................................................103
5

Preface
KCS Portal is a web-based application supporting Kofax Communication Server (KCS) administration and
monitoring.
This application is intended to replace the legacy KCS administration and monitoring tools.
KCS Portal currently offers the following tools:
• Monitor to replace the KCS Monitor application
• Line statistics function of the TCfW client
• License to replace the KCS License maintenance tool
• Services to replace TCfW client services management
• Message tracking
Additional legacy functionality will be transitioned in future versions of Kofax Communication Server.
6

Related Documentation
This document refers to the following documentation:
• TCOSS Configuration Manual
• MFP Connection Monitoring Integration Manual
• Voice Platform Technical Manual
• TC/Web Installation and Configuration Manual
• TCfW Communication Server Client User Manual
• Message Broadcasting Server Processes Technical Manual
• Client Applications Administrator's Manual
• TC/Archive Technical Manual
The full documentation set for Kofax Communication Server is available at the following location:
https://docshield.kofax.com/Portal/Products/en_US/KCS/10.3.0-SihMvq5oti/KCS.htm
7

Chapter 1
Architecture
KCS Portal architecture is based on principles of the “Single Page Application” (SPA) design pattern.
With SPA, the entire main browser page is loaded after the initial request is responded by the server, but
all subsequent requests/interactions with the server take place through asynchronous Ajax requests. As a
result, the browser can update any changes to the page without reloading the entire page.
The architecture of KCS Portal is shown in the following diagram.
8

Kofax Communication Server KCS Portal Administrator's Guide
KCS Portal consists of three main functional blocks:
1. Kofax WMI Provider for KCS Portal – Applications
Runs as a Windows service and collects information regularly about all KCS Application Servers
(these are all computers on the network where TCSRV service is running).
2. Kofax WMI Provider for KCS Portal – KCS
Runs as a Windows service and collects information regularly about all KCS Message Servers
(these are all KCS Code/TCOSS instances in the network).
3. The KCS Portal back end, which is implemented by the means of Microsoft Web APIs 2.2, is hosted
on Internet Information Server (IIS) and is responsible to deliver the data in the JavaScript Object
Notation (JSON) format for the front end.
The front end is JavaScript based. It is hosted by the client’s browser, and is responsible to consume and
present the data provided by the back end.
9

Chapter 2
Installation
This chapter provides detailed information about the pre-installation, installation and post installation of
KCS Portal.
Once the KCS Portal is set up, you must select the proper authentication method. See Authentication
Mode for more information.
To grant access for the authenticated Windows user to the defined set of KCS Portal tools, role-based
authorization is required, using Windows group membership of the logged-in user. For more information
on how to create the first (mandatory) Windows group for KCS Portal root administrators, see Create
groups.
Prerequisites
This section lists the important prerequisites related to the client, server, and the IIS configuration.
Client
The KCS Portal client supports the following browser versions.
• Internet Explorer 10 or later
• Chrome 52.0 or later
• Firefox 47.0 or later
Note For the best user experience, we recommend the minimum screen resolution of 1280x1024 pixels.
Server
Prerequisites for the KCS Portal server include:
• Windows Server 2019, Windows Server 2016, Windows Server 2012 or Windows Server 2008 R2
• Microsoft .NET Framework 4.0.30319 or later
• Internet Information Server (IIS) 7.5 and later
• Following Http verbs must be enabled on IIS:
GET, POST, PUT and DELETE
If you cannot enable these due to reasons such as internal security policy, see Utilization of Http verbs
GET, POST, PUT and DELETE
• User installing KCS Portal must have administrator rights on the Windows computer
10

Kofax Communication Server KCS Portal Administrator's Guide
Note The IIS installation requires activation of the relevant server role and role services on the Windows
server. For details, see your IIS documentation.
IIS configuration
Configure IIS for the following:
• Windows Server 2008 R2
• Windows Server 2012
Windows Server 2008 R2
1. Start the Server Manager from the Windows Start menu. The Server Manager screen appears.
11

Kofax Communication Server KCS Portal Administrator's Guide
2. To add the WebServer role, click Roles, and click Add Roles. The Add Roles Wizard starts.
12

Kofax Communication Server KCS Portal Administrator's Guide
3. Click Server Roles, select the required roles to install on this server, and click Next.
Note Do not activate WebDAV Publishing.
13

Kofax Communication Server KCS Portal Administrator's Guide
4. Use IIS Manager to verify that the required .NET Framework version is available.
14

Kofax Communication Server KCS Portal Administrator's Guide
Windows Server 2012
1. Start the Server Manager from the Windows Start menu. The Server Manager screen appears.
When the following screen appears, locate the required server role and role services.
Note WebDAV Publishing must not be activated.
15

Kofax Communication Server KCS Portal Administrator's Guide
2. Click Server Roles, select the required role to install on this server, and click Next.
16

Kofax Communication Server KCS Portal Administrator's Guide
3. Select the features and click Next.
17

Kofax Communication Server KCS Portal Administrator's Guide
4. Use IIS Manager to verify that the required .NET Framework version is available.
18

Kofax Communication Server KCS Portal Administrator's Guide
Installation
This section describes the process of installing KCS Portal.
1. Right-click KCS setup.exe and select Install as Administrator. Accept the license agreement and
click Next. The Kofax Communication Server Setup opens.
19

Kofax Communication Server KCS Portal Administrator's Guide
2. Click Select.
20

Kofax Communication Server KCS Portal Administrator's Guide
3. On the Applications list, select KCSPortal and click OK.
21

Kofax Communication Server KCS Portal Administrator's Guide
4. Click Install. The installation wizard is started.
5. Click Next.
22

Kofax Communication Server KCS Portal Administrator's Guide
6. Accept the license agreement and click Next.
7. Specify the IIS Application Pool Settings:
• To use an existing application pool, select Select and Existing Application Pool and then on the
Application Pools list, select the applicable application pool.
• To create a new application pool, clear Select and Existing Application Pool and specify the
application Pool name and Idle Timeout.
23

Kofax Communication Server KCS Portal Administrator's Guide
8. Click Next.
9. To specify IIS Web Settings, do one of the following:
• To create KCS Portal under the default website, select Select an Existing Website and then
select an existing website from the list. Under Web App Settings, specify the Application Name,
24

Kofax Communication Server KCS Portal Administrator's Guide
such as KCSPortal. If you want the user to access KCS Portal using Windows authentication,
select Windows Authentication.
• To create a new web site, clear Select an Existing Website and specify the Website name and
Port Number. Specify the Application Name, such as KCSPortal. If you want to access KCS
Portal using Windows authentication, select Windows Authentication.
10. Click Next.
25

Kofax Communication Server KCS Portal Administrator's Guide
11. Specify a Windws Group name. This group is assigned to the root role and its information is added
to ServerConfig.Xml file. Once the installation is complete, you can log in to KCS Portal and
assign users to this group.
Note If you are upgrading KCS Portal and any group with root role already exists, you cannot add
new groups using the above screen.
12. Click Next.
26

Kofax Communication Server KCS Portal Administrator's Guide
13. Select KCSPortal and click Next.
14. Click Install to start the installation.
15. Follow the onscreen prompts, and click Finish when the process is finished.
By default, KCS Portal is installed in the c:\TCOSS\KCSPortal directory.
16. Continue to the next section to complete the post-installation procedures.
Post installation procedures
After installing KCS Portal, configure the following settings:
• Remote Application Server credentials
• Authentication mode
• Create groups
Remote Application Server credentials
To use KCS Portal to start, stop and restart the remote application servers, you must have necessary
Windows user credentials with Administrator privileges on the remote application server. No user actions
are required to perform these actions if the local application server is running on the same computer as
KCS Portal. In this situation, the credentials for the local application server are not used.
See Adding Application Servers for more details on where to add user credentials.
27

Kofax Communication Server KCS Portal Administrator's Guide
Authentication mode (IIS settings)
KCS Portal may use Windows User Management for Single Sign-On (SSO) authentication. If the KCS
Portal computer is a member of the customer’s domain, domain users can be used to log in to the KCS
Portal. If the computer is not member of a domain, local Windows users must be created with the local
computer’s user management.
By default, KCS Portal is pre-configured for the manual authentication mode. For Single Sign-On,
Windows Authentication must be manually activated for the KCS Portal web application on the IIS server.
For SSO mode, update the following settings on the IIS Manager for KCS Portal.
1. In IIS Manager, select Authentication. Set Windows Authentication to Enabled and Anonymous
Authentication to Disabled.
2. In IIS Manager, select Configuration Editor.
28

Kofax Communication Server KCS Portal Administrator's Guide
3. From the Section drop-down, select system.web/authentication. Set the attribute Mode to
Windows.
4. For Manual Authentication mode, in IIS Manager, select Authentication. Set Windows
Authentication to Disabled and Anonymous Authentication to Enabled.
5. In IIS Manager, select Configuration Editor.
29

Kofax Communication Server KCS Portal Administrator's Guide
6. From the Section drop-down, select system.web/authentication. Set the attribute Mode to None.
Note If the preceding settings are not correct, the system prevents you from logging in to the KCS
Portal. You must return to IIS Manager to update the settings before attempting to log in again.
Authentication mode (KCS settings)
If the KCS Portal and managed KCS servers are all in the user's domain (Active Directory), Single Sign-
On (SSO) can be used.
The administrator is logged in automatically not only to the KCS Portal, but also to each managed KCS
server using domain credentials, without having to enter any password manually.
Note SSO is the most secure authentication method as no passwords are transferred over the network.
To use SSO, the KCS user must meet the following requirements:
1. For the applicable KCS servers, the KCS Administrator user must have a user ID with the principal
user name in the format of [email protected] KCS user must have the LAN login rights enabled.
2. For details, see KCS Portal authentication.
Create groups
Create the Windows group for the KCS Portal root administrators and grant full access rights to the
members of this group for using all KCS Portal functions.
To create a group, do one the following:
• If the computer is connected to the domain, create the group for administrators with the root access and
specify a name, such as KCSRootAdmin.
• If the computer is not connected to the domain, create this group on the local computer using
Computer Management > Local Users and Groups > Groups, and add the selected local
administrator to the new group.
30

Kofax Communication Server KCS Portal Administrator's Guide
If no groups are configured for KCS Portal (in case of an initial setup), then all users who are local
administrators are provided the rights to add the group name for root administrators to the KCS Portal.
If any users who are not local administrators try to access the KCS Portal, a message appears that they
are not authorized to use this application.
31

Kofax Communication Server KCS Portal Administrator's Guide
If any users who are not local administrators try to access the KCS Portal, a message appears that they
are not authorized to use this application.
If the issue persists, add the name of the group manually into the ServerConfig.Xml. Open the file in a
text editor, add the name of the group into the <groups> element, and assign it the “root” role. Ignore
subsequent steps that describe adding the first group via the user interface and start the browser again.
Now any user who is member of the group will be able to log in to the KCS Portal as the root user.
Log in as administrator
To connect to KCS Portal, in the browser (locally, or on any other computer on the local network) type in:
http://<hostname>/kcsportal.
Once the user is authenticated and logged in, KCS Portal detects all Active Directory and/or local
Windows user groups to which the logged-in user belongs.
32

Chapter 3
Configuration
This chapter includes general administrative configuration for the KCS Portal.
Session timeout
Although no “real” session exists for the KCS Portal user on the server, it is possible to change lifecycles
of the access and bearer tokens to control the session-like behavior. See Access and Refresh Tokens.
By default, the access token lifecycle is set to five minutes and a refresh token is set to one hour.
• If the user logs into KCS Portal and leaves the browser windows unused for more than one hour
(more than the lifecycle of the refresh token), on the next click, the “Your session is expired” message
appears.
• If the user logs in and views the monitor tree in auto-polling mode (default), then the refresh token gets
actualized permanently and the user’s access time is unlimited.
33

Kofax Communication Server KCS Portal Administrator's Guide
• In the manual authentication mode, the user has to enter credentials into the KCS Portal login screen.
However, if the user closes the browser without using the logout button, the access token remains
active. In this case, if the user starts KCS Portal again sooner than the access token lifecycle (by
default five minutes), the login occurs automatically without prompting for credentials.
In case, if the user logs in after the access token has already expired, he will be prompted to enter his
credentials again.
Customize navigation tree
You can customize the navigation tree in KCSPortalConfig.xml, in the xml node Navigation, separately for
desktop and touch device browsers.
To add custom menu items for executing other websites (third party or TC/Web), use the following section
(which is commented in the standard configuration), and remove the comments. The system adds a tree
node “Mail” with one sub-node “TC/Web” to load the http://localhost/tcweb URL in a new window.
<!-- Node for customizable menu items such as for TC/Web integration
<NavTreeNode>
<Text>Mail</Text>
<IconCls>x-fa fa-send</IconCls>
<Expanded>false</Expanded>
<Leaf>false</Leaf>
<Children>
<NavTreeNode>
<Text>TC/Web</Text>
<IconCls>x-fa fa-send</IconCls>
<ViewType>windows-xtype</ViewType>
<Expanded>false</Expanded>
<Leaf>true</Leaf>
<Url>http://localhost/tcweb</Url>
<Target>_blank</Target>
</NavTreeNode>
</Children>
</NavTreeNode>
End Node for customizable menu items such as for TC/Web integration -->
To add another instance of TC/Web, such as the test system version, into the TC/Web node, add another
element <NavTreeNode> below the existing TC/Web node as shown below.
<NavTreeNode>
<Text>TC/Web</Text>
<IconCls>x-fa fa-send</IconCls>
<Expanded>false</Expanded>
<Leaf>false</Leaf>
<Children>
<NavTreeNode>
<Text>Production</Text>
<IconCls>x-fa fa-send</IconCls>
<ViewType>windows-xtype</ViewType>
<Expanded>false</Expanded>
<Leaf>true</Leaf>
<Url>http://localhost/tcweb</Url>
<Target>_blank</Target>
</NavTreeNode>
<NavTreeNode>
<Text>Test System</Text>
<IconCls>x-fa fa-send</IconCls>
34

Kofax Communication Server KCS Portal Administrator's Guide
<ViewType>windows-xtype</ViewType>
<Expanded>false</Expanded>
<Leaf>true</Leaf>
<Url>http://testsystem/tcweb</Url>
<Target>_blank</Target>
</NavTreeNode>
</Children>
</NavTreeNode>
Execute IIS reset (command line iisreset), and log in to TC/Web. The following screen appears.
To restrict the added nodes for a particular role, add the required role by using the <Roles> element into
the appropriate <NavTreeNode> element. For example, show the Test System sub-node only for users
with the root role assigned.
<NavTreeNode>
<Text>TC/Web</Text>
<IconCls>x-fa fa-send</IconCls>
<Expanded>false</Expanded>
<Leaf>false</Leaf>
<Children>
<NavTreeNode>
<Text>Production</Text>
<IconCls>x-fa fa-send</IconCls>
<ViewType>windows-xtype</ViewType>
<Expanded>false</Expanded>
<Leaf>true</Leaf>
<Url>http://localhost/tcweb</Url>
<Target>_blank</Target>
</NavTreeNode>
<NavTreeNode>
<Roles>
<Role>root</Role>
</Roles>
<Text>Test System</Text>
<IconCls>x-fa fa-send</IconCls>
<ViewType>windows-xtype</ViewType>
<Expanded>false</Expanded>
<Leaf>true</Leaf>
<Url>http://testsystem/tcweb</Url>
<Target>_blank</Target>
35

Kofax Communication Server KCS Portal Administrator's Guide
</NavTreeNode>
</Children>
</NavTreeNode>
To use different icons for added nodes, visit the Font Awesome website. You can select more appropriate
icons and replace the default “fa-send” icon (which is an alias for the fa-paper-plane) in the appropriate
<iconCls> node by the new one, such as fa-desktop, fa-cloud, and so forth.
Date and time formats
KCS Portal provides the option to manage and modify the date and time format for viewing different user
interfaces, such as message, which display the date and time. By default, KCS Portal derives the value
of the date and time format from the Region and Time Windows settings where the TCOSS server is
running.
You can configure the Date and Time formats in KCSPortalConfig.xml using the DateFormat,
ShortTimeFormat and LongTimeFormat elements.
The date and time formats are available at the following locations.
• On KCS Portal’s server, select Start > Control Panel > Region and Language.
36

Kofax Communication Server KCS Portal Administrator's Guide
• By default, the value of the, the following elements in KCSPortalConfig.xml is derived from the Windows
settings where the KCS Portal server is running:
• DateFormat: Displays date values in formats, such as M/d/yyyy, M/d/yy and others.
• ShortTimeFormat: Displays time values in hours and minutes, such as h:mm tt, H:mm and others.
• LongTimeFormat: Displays time values in hours, minutes, and seconds followed by AM or PM, such
as h:mm:ss tt, hh:mm:ss tt, H:mm:ss and others.
If you set the value of these elements in the XML file, KCS Portal will display the date and time formats as
configured in the XML file, and override the Windows configuration.
The following table describes each date and time elements in KCSPortalConfig.xml for an example date-
time string 4 December 2018, 19:23:41.
Note The element values defined in the table may vary, depending on the country where you are using
KCS Portal.
Type Element in
KCSPortalConfig.xml
Element value Displayed value Description
dd.MM.yyyy 04.12.2018
dd-MMM-yy 04-Dec-18
yyyy-MM-dd 2018-12-04
M/d/yy 12/4/18
Short date DateFormat
MM/dd/yyyy 12/04/2018
Where,
d = day;
M= month;
y = year
HH:mm 19:23
H:mm 19:23
Short time
format (without
seconds)
ShortTimeFormat
h:mm tt 7:23 PM
Where,
h = hour;
m = minute;
tt = A.M. or P.M.;
h/H = 12/24 hour
HH:mm:ss 19:23:41
hh:mm:ss tt 07:23:41 PM
Long time format
(with seconds)
LongTimeFormat
h:mm:ss tt 7:23:41 PM
Where,
h = hour;
m = minute;
tt = A.M. or P.M.;
h/H = 12/24 hour
Configuration files
KCS Portal uses several configuration files, which are described in the following table.
File name Default Location Purpose
KCSPortalConfig.xml C:\TCOSS\KCSPORTAL\Web Main KCS Portal configuration file to configure
the application behavior, such as default
language, polling cycles and so forth.
Web.config C:\TCOSS\KCSPORTAL\Web Standard Asp.Net Web.config file
37

Kofax Communication Server KCS Portal Administrator's Guide
File name Default Location Purpose
ServerConfig.xml C:\TCOSS\KCSPORTAL
\SharedConfig
System-wide servers configuration:
• Message servers
• Application servers
• Group and Roles Assignment
• oAuth2 JWT Token generation parameters
including 256-bit secret key for token
signing.
<userPrincipalName>.xml> C:\TCOSS\KCSPORTAL
\SharedConfig\UserData
User-related configuration:
• View state of UI components
• Refresh Tokens generated for the user
• For internal purpose only
KCSPortalConfig.xml
Following is an example of the ServerConfig.xml file:
<?xml version="1.0" encoding="utf-8" ?>
<KCSPortal xmlns:xsi="http://www.w3.org/2001/XMLSchema-instance"
xmlns:xsd="http://www.w3.org/2001/XMLSchema" Version="1.0">
<Version>1.0</Version>
<LanguageId>1</LanguageId>
<ValidateGroupName>true</ValidateGroupName>
<DateFormat>Server</DateFormat>
<ShortTimeFormat>Server</ShortTimeFormat>
<LongTimeFormat>Server</LongTimeFormat>
<Security>
<AccessTokenLifeTime>60</AccessTokenLifeTime>
<RefreshTokenLifeTime>3600</RefreshTokenLifeTime>
<CookieUseForTokens>true</CookieUseForTokens>
<CookieHttpOnlyFlagEnable>true</CookieHttpOnlyFlagEnable>
<CookieSecureFlagEnable>false</CookieSecureFlagEnable>
<CookieDomainName></CookieDomainName>
<CookiePath>/</CookiePath>
<ClientAllowedOrigin>*</ClientAllowedOrigin>
</Security>
<Customization>
<CompanyName>Lexmark</CompanyName>
<ApplicationName>KCS Portal</ApplicationName>
<CompanyLogoUrl>image/company-logo.jpg</CompanyLogoUrl>
</Customization>
<ConfigFilePath>C:\TCOSS\KCSPORTAL\SharedConfig</ConfigFilePath>
<Client>
<AjaxRequestTimeout>300000</AjaxRequestTimeout>
</Client>
<Monitoring>
<PollCycle>2000</PollCycle>
<ActionTimeout>20000</ActionTimeout>
</Monitoring>
<Navigation>
<Desktop>
<!-- navigation for desktop browser -->
<Text>.</Text>
<Expanded>true</Expanded>
<Leaf>false</Leaf>
<Children> <!-- all navigation tree nodes visible in the navigation
38

Kofax Communication Server KCS Portal Administrator's Guide
tree -->
<!-- Node for customizable menu items such as for TC/Web
integration
<NavTreeNode>
<Text>Mail</Text>
<IconCls>x-fa fa-send</IconCls>
<Expanded>false</Expanded>
<Leaf>false</Leaf>
<Children>
<NavTreeNode>
<Text>Locahost</Text>
<IconCls>x-fa fa-send</IconCls>
<ViewType>windows-xtype</ViewType>
<Expanded>false</Expanded>
<Leaf>true</Leaf>
<Url>http://localhost/tcweb</Url>
<Target>_blank</Target>
</NavTreeNode>
</Children>
</NavTreeNode>
End Node for customizable menu items such as for TC/Web
integration -->
</Children>
</Desktop>
<Touch>
<!-- navigation for touch/mobile device browser -->
</Touch>
</Navigation>
</KCSPortal>
Configuration Element Def. Value [unit] Description
LanguageId 1 Default system-wide language ID:
1: English
2: German
3: French
4: Spanish
5: Italian
6: Chinese
7: Japanese
KcsAuthenticationMode auto Possible values:
• Auto:
• If KCS Portal is running in SSO mode, at first try to use
SSO while logging into KCS Server.
• If KCS SSO login fails, use preconfigured administration
“Super-User”.
• Native: Use preconfigured administration “Super-User”.
DateFormat Server Displays date in format, such as M/d/yyyy.
ShortTimeFormat Server Displays time values in hours and minutes in format, such as
h:mm tt.
LongTimeFormat Server Displays time values in hours, minutes, and seconds followed by
AM or PM, such as h:mm:ss tt.
AccessTokenLifeTime 300 seconds Access token lifecycle.
39

Kofax Communication Server KCS Portal Administrator's Guide
Configuration Element Def. Value [unit] Description
RefreshTokenLifeTime 3600 seconds Refresh token lifecycle.
CookieHttpOnlyFlagEnable true Use cookies with http-only flag for security purposes.
CookieSecureFlagEnable false Use cookies with secure flag for security purposes.
CookieDomainName Cookies domain
CookiePath / Cookies path
CompanyName Lexmark Not being used
ApplicationName KCS Portal Application name to be displayed in the top header.
CompanyName Lexmark Not being used.
CompanyLogoUrl image/company-
logo.jpg
Company logo used in the top header.
AjaxRequestTimeout 300000 ms Timeout for Ajax requests.
PollCycle 2000 ms Monitor poll cycle
ActionTimeout 20000 ms Action timeout
CompanyLogoUrl image/company-
logo.jpg
Company logo used in the top header.
Navigation
ServerConfig.Xml
Following is an example of the ServerConfig.xml file. It may not be necessary to modify any parameters of
this file manually.
<?xml version="1.0"?>
<Kofax.KCS.Portal.DataLib.Xml xmlns:xsi="http://www.w3.org/2001/XMLSchema-instance"
xmlns:xsd="http://www.w3.org/2001/XMLSchema">
<ApplicationServers>
<ApplicationServer Name="local">
<HostName>localhost</HostName>
<Password>0/skR2Vc9KO0BofVDJFCUp9PnhzgHRJhDcEg1I1jgtOU=</Password>
<RemotePassword>0T/kINsFgBf2RjiGYzFqp2A==</RemotePassword>
</ApplicationServer>
<ApplicationServer Name="VM-BR-TCWEB">
<HostName>vm-br-tcweb.emea.kofax.com</HostName>
<Password>0SWbTrsgtUh/IUmJzdnu3MA==</Password>
<RemoteUser>vm-br-tcweb.emea.kofax.com\Administrator</RemoteUser>
<RemotePassword>0plJ8FpXxDDr8ksikb89m0cz59ID5EbipwL9O6ABCz4M=</RemotePassword>
</ApplicationServer>
</ApplicationServers>
<MessageServers>
<MessageServer Name="local">
<UserId>TCTECH</UserId>
<Password>0WWn/HQTJej4CnvUcuFPVm0sJJjvhSBMe2lIl3F64AFw=</Password>
<Path>local,</Path>
</MessageServer>
</MessageServers>
<Groups>
<Group Name="KCSRootAdmin">
<Role>root</Role>
</Group>
40

Kofax Communication Server KCS Portal Administrator's Guide
</Groups>
<Settings>
<Token>
<Type>jwt</Type>
<JWS>
<Alg>HS256</Alg>
<Secret />
<Secretbase64URL>J2FntPMCmrLsc1fl20tei8ZwCQ2K3i1skco5_ags_HM</Secretbase64URL>
</JWS>
</Token>
</Settings>
</Kofax.KCS.Portal.DataLib.Xml>
Registry
Three registry keys in HKLM\Software\TOPCALL (referred to as <Base> in the tables below) are being
used by the KCS Portal itself, by the Kofax WMI Providers for KCS Portal – Applications and Kofax WMI
Providers for KCS Portal – KCS.
Registry
<Base>\KCSPortal
Default value [unit] Description
ConfigFolder C:\TCOSS\KCSPORTAL
\SharedConfig
Shared configuration folder path
KCSPortal\TraceLevel 1 Tracelevel *
Registry
<Base>\KCSPortalWMIApp
Default value [unit] Description
PollCycle 2000 ms Poll cycle for polling KCS Servers
KCSPortal\TraceLevel 1 Tracelevel *
Registry
<Base>\KCSPortalWMIKCS
Default value [unit] Description
PollCycle 2000 ms Poll cycle for polling KCS Servers
KCSPortal\TraceLevel 1 Tracelevel *
* The following trace level values are used:
1 Errors
10 Warnings
100 Debug
It is necessary to restart corresponding application to reflect the modified trace level.
41

Kofax Communication Server KCS Portal Administrator's Guide
KCS Portal authentication
KCS Portal requires two authentication levels:
• For KCS Portal: To log in to the KCS Portal, Windows User Management is used.
• If the KCS Portal computer is a member of the customer’s domain, domain users can be used to log
in to KCS Portal.
• If the computer is not a member of a domain, local Windows users must be created in the local
computer’s user management.
• For administering KCS servers: Once authenticated in the KCS Portal, there are three ways to
authenticate into the monitored or administered KCS Server: Single Sign-On, native KCS logon, or pre-
configured KCS Super User. For details, see KCS Servers Authentication.
Single Sign-On mode
With Single Sign-On (SSO), the user logs in only once to the Windows workstation but afterwards uses
KCS Portal without the necessity to log in again.
This mode – also known as Windows authentication – is supported officially by Internet Explorer only, but
works (and has been tested) with other popular browsers, such as Chrome, Opera and Firefox.
In this case, the browser uses the Microsoft proprietary challenge/response protocol to propagate the
user’s security token to the KCS Portal server, without transferring the password across the network.
This approach is considered to be the most highly recommended and secure authentication mode.
42

Kofax Communication Server KCS Portal Administrator's Guide
The following conditions must be met for Internet Explorer to automatically authenticate the user:
1. Internet Explorer is configured for “Automatic logon only in Intranet zone” (Internet Explorer default
setting).
2. Both the user’s workstation and the KCS Portal server must be in the same domain or in domains
with a trusted relationship.
43

Kofax Communication Server KCS Portal Administrator's Guide
3. Browser must consider the KCS Portal’s URL to be on the intranet, if the URL doesn’t contain any
periods (for example, http://10.0.0.1/kcsportal would be considered on the Internet).
However, the URL with periods can be included in the browser’s Intranet Zone to enforce automatic
authentication.
If the user’s workstation and KCS Portal server are not in the domain but are in the workgroup,
Windows authentication works, but not automatically. In this case, Internet Explorer prompts for user
credentials.
When the credentials are entered, the password is not sent.
Log in with different credentials in case of automatic SSO
1. Log in to KCS Portal automatically with the current credentials, and then select "Log in as different
user".
You are prompted for credentials.
2. Enter the credentials.
You are logged in to KCS Portal.
Log off in SSO mode
1. Choose logout.
2. Confirm closing the browser’s window.
Manual mode
Use Windows credentials to log in to the KCS Portal.
44

Kofax Communication Server KCS Portal Administrator's Guide
Your user name and password are transferred across the network to the KCS Portal, which executes the
Windows login procedure with the provided credentials on your behalf.
To log off, click Logout. The browser will display again its own login screen (where any user can log in
again).
KCS server authentication
To monitor configured KCS servers, always use the preconfigured “Monitor” KCS user (see Adding
Message Servers).
To administer configured KCS Servers, use one of the following authentication methods:
1. Single Sign-On (SSO) based on Windows authentication. This works only if KCS Portal is running in
SSO mode and all involved KCS Servers are connected to the customer’s domain (Active Directory).
In this case it is necessary to create user IDs in all managed KCS Servers using the user’s principal
user name, which must always be in the form userId@domain.
This type of login in the KCS Server corresponds with the “improved active directory LAN
login” (authentication type 0x20 as described along with registry value DeniedAuthentications in the
TCOSS Configuration Manual).
The advantage of the SSO authentication method is that the administrator doesn’t have to enter
credentials while logging into KCS Portal, or while administering any of the managed KCS Servers.
Furthermore, this is the most secure authentication method as no passwords are transferred over the
network.
2. Native KCS logon utilizing KCS user credentials.
User is prompted to enter KCS credentials while switching to a particular KCS Server.
3. “Super-User” KCS Logon Mode, which uses pre-configured administration KCS user credentials for
each managed KCS Server (see Adding Message Servers).
45

Kofax Communication Server KCS Portal Administrator's Guide
The way KCS server authentication works is configurable by the configuration parameter
KcsAuthenticationMode (see KCSPortalConfig.xml).
With the default value (KcsAuthenticationMode=auto), it works like this:
1. If KCS Portal uses SSO (based on Windows authentication,) attempt the same Windows user
credentials for KCS Server login. If the login fails, proceed automatically with Step 2.
If KCS Portal uses manual login, proceed with Step 2.
2. Use the “Super-User” for KCS Login if configured in the Add Message Server dialog box.
If the SuperUser is not configured for a particular KCS server, the user has to enter native KCS
Server credentials prior to accessing one of the administered KCS Servers.
With the configuration value KcsAuthenticationMode=native, KCS Portal does not attempt to use SSO for
KCS login, and instead, automatically proceed with the Step 2 above.
Example 1
Assume KCS Portal is working with SSO, using default KcsAuthenticationMode=auto, user
<name>@kofax.com configured in the KCS server with LAN login enabled, and Super User “TCTECH”
configured for administering the KCS Server LOCAL.
If user <name>@kofax.com logs into the KCS Portal, the same user would be used for administering KCS
server LOCAL.
Example 2
Assume the same prerequisites as with Example 1, but without the LAN login right for user
<name>@kofax.com in the KCS server LOCAL.
As a result, for the KCS Server login, the pre-configured user TCTECH is used.
Example 3
46

Kofax Communication Server KCS Portal Administrator's Guide
Assume the same prerequisites as with Example 2, but without a preconfigured Super User for the KCS
Server LOCAL.
As a consequence, KCS Portal cannot log on to the selected KCS Server or attempt to use any of the
administrative functions.
In this case, the prompt is displayed to log on as a different KCS user.
Additional information
This section provides additional information about the following items:
• Access and refresh tokens
• Security considerations
• Cookies, browser local storage and request header attributes
Access and refresh tokens
To transfer the information on the user role in a secure way among the KCS Portal front end (browser)
and the back end (server-side) with each request, an access token according to oAuth2 resource owner
password credentials grant uses the embedded authorization server based on Microsoft OWIN/Katana
middleware.
1. The user logs into the KCS Portal with Windows credentials.
2. The login request is sent from the front end to the back end including following parameters using the
application/x-www-form-urlencoded” format with UTF-8 encoding in the body:
• grant_type set to “password”
• username (empty, if using SSO)
• password (empty, if using SSO)
47

Kofax Communication Server KCS Portal Administrator's Guide
3. The (embedded) authorization server authenticates the client using Windows authentication, verifies
the role (by checking Windows group membership) and generates a JWT access token with the
information on the assigned role.
The expiration of the access token is configurable and by default set to only 10 minutes.
4. Along with the access token, a refresh token is generated, which contains the same information, but
it is kept only on the back end in the user’s XML data store. The refresh token is a long-term token,
with the default expiration of 24 hours.
5. The back end writes the access token and the reference to the refresh token (stored in the XML file)
into the cookies Kcs-AccessToken and Kcs-RefreshToken.
Both cookies have the httpOnly parameter enabled, which prevents any potential abuse that occurs
as the result of malicious scripts sent by an attacker.
6. During all subsequent requests, these cookies are propagated towards the back end and
according to the role in the token, KCS Portal back end can determine the user’s role and grant the
corresponding functionality.
7. As soon as the access token expires, the first request from the front end to the back end is rejected
and the front end asks the back end to regenerate the access token using the refresh token, by
sending the login request with the following parameter using the application/x-www-form-urlencoded”
format with UTF-8 encoding in the body:
• - grant_type set to “refresh_token”
8. As soon as the refresh token hasn’t expired, the back end re-generates both access and refresh
tokens and the front end executes that previous reject request once more, with the new access
token.
9. If the refresh token expires (which can only happen after a very long time of inactivity, by default 24
hours), the attempt to regenerate the access token fails, and the user is informed that the session
has expired.
For more information, refer to the OAuth 2.0 Authorization Framework documentation.
Security considerations
Handling of the access token is crucial for the security. In a cyberattack, someone who locates the access
token could send requests to the KCS Portal back end on behalf of the victim, but without the victim's
knowledge.
The access token uses the format of JSON Web Token (JWT), industry-standard (RFC7519) method for
representing user roles between frond end and the back end.
Example of the access token
{
"typ": "JWT",
"alg": "HS256"
}
{
"unique_name": "[email protected]",
"sub": " [email protected] ",
"role": "root",
"langId": "1",
"uniqueId": "497823313641340928",
"clientId": "kcsportal",
"clientType": "desktop",
"iss": "jwt",
48

Kofax Communication Server KCS Portal Administrator's Guide
"aud": "kcsportal",
"exp": 1470301236,
"nbf": 1470301176
}
For security reasons, the following measures are in place:
1. The access token includes no sensitive information, such as a password. The content of the JWT
token is serialized and transferred as encoded Base64Url.
2. The Base64Url representation of the token gets signed using a 256-bit secret key with the HMAC
SHA-256 algorithm (RFC7515). After the initial KCS Portal installation, the secret key is generated
randomly and stored in the Server configuration xml store (ServerConfig.xml).
3. On receipt of each request with the access token, its signature is verified and if the verification fails,
the request is rejected.
Note It is not possible that a potential attacker would tamper the content of the token and perform any
attack with it.
Cookies, browser local storage and request header attributes
The following table summarizes the usage of all cookies, header attributes and browser local storage
values.
Cookie Attributes Description
Kcs-AccessToken httpOnly Base64URL encoded value of the JWT token (including digital
signature according to the HMAC SHA-256 algorithm).
Kcs-RefreshToken httpOnly Reference to the refresh token is saved in the XML store on the back
end.
Note The refresh token itself is not transmitted over the network.
Kcs-LogonAsOtherUser This is a helper-counter value to be used only with the Login As Other
User function.
Request header Description
Kcs-ConnectionHandle Unique connection identifier which maintains its value for the entire user session
duration (even while values of access/refresh tokens would be changing)
Kcs-RefreshToken Reference to the refresh token is saved in the XML store on the back end.
Note Refresh token itself is not transmitted over the network.
Other user
49

Kofax Communication Server KCS Portal Administrator's Guide
Browser Local Storage Description
Kcs-cred Values collection of a few non-sensitive helper attributes, among which the most
relevant are:
• userName (of the logged in user)
• languageId (selected language on this browser and workstation
Kcs-errorCount Reference to the refresh token is saved in the XML store on the back end.
Note The refresh token itself is not transmitted over the network.
Utilization of Http verbs GET, POST, PUT and DELETE
KCS Portal uses unique Web API URLs to represent resources on the server along with four Http verbs
GET, POST, PUT and DELETE to execute four types of CRUD operations (Create, Read, Update and
Delete) with the same Web API URL.
In some scenarios, the usage of PUT and DELETE verbs is strictly prohibited for some reasons, such as
internal security policies. For example, Microsoft’s UrlScan is used or some http verbs are not allowed on
a web site hosted on the IIS server.
In this case, set following elements in the KCSPortalWebConfig.xml configuration file:
• <ReplaceHttpDeleteByHttpPostEnable>true</ReplaceHttpDeleteByHttpPostEnable>
•
<ReplaceHttpPutByHttpPostEnable>true</ReplaceHttpPutByHttpPostEnable>
The PUT and DELETE http verbs are replaced by POST and the additional information on the requested
verb (which is necessary to determine the type of operation on the server) is sent in the
X-HTTP-Method-Override request header to the server.
50

Chapter 4
Fault tolerant operation
To eliminate the single point of failure, it is possible to install KCS Portal on two separate IIS Servers and
use the load balancer to distribute the client requests across both servers.
To replicate KCS Portal configuration across both instances, its SharedConfig folder (by default, located
at C:\TCOSS\KCSPORTAL\SharedConfig) must by synchronized by the means of the Distributed File
System (DFS). For example, if an administrator adds some servers to monitor for one instance of KCS
Portal, these changes are reflected in both instances KCS Portal.
Note See the Microsoft documentation for setting up Distributed File System (DFS).
The following diagram depicts the principle of DFS.
When configuring criteria to distribute the client requests across IIS servers in the load balancer, take
the request header attribute “Kcs-ConnectionHandle” and route all requests with a particular value to the
same IIS server instance.
51

Chapter 5
Getting started
This section describes the main elements of KCS Portal interface and commonly used features.
Basic UI organization and available tools
The KCS Portal user interface consists of the main header, navigation tree and the main content areas.
Following table illustrates the main elements of KCS Portal interface.
Function/Description
1 Controls the width of the navigation tree. Use to show or hide the navigation tree.
52
Kofax Communication Server KCS Portal Administrator's Guide
Function/Description
2 Displays KCS Portal version information.
3 Lists the languages you can select for use with KCS Portal.
With the first logon from a particular workstation, the user interface is displayed in the default language
(English). You can select the language from the list to display the user interface in another language.
With Windows authentication, the user is automatically logged in to the KCS Portal using the new language.
With manual authentication, the user is prompted to log in again if the language selection is changed.
The information on the selected language is saved in the browser’s local storage and is used for any
subsequent login to KCS Portal from the same browser and workstation, even for a different user.
If the user deletes internal data for the browser, the language information is cleared and the default language
is restored for use with KCS Portal.
4 Preserves the current settings, such as tree nodes expand/collapse, grid columns show/hide, column width
for the currently logged in user.
5 Lists the currently logged-in user, and gives options to log in as a different user or to log out.
6 Displays the menu for only those functions that are available for the logged in user’s role.
Note The screenshot above shows the full navigation tree as available for the users with the root role.
Additionally, for customizing this view, see Customize navigation tree.
7 Displays the output for each tool including:
• Title (reflecting the current tool’s name)
• Status message area (green for positive acknowledgments and red for errors)
• Toolbar with context-sensitive action buttons.
• Content
The example above shows the output from the monitor tool.
Filtering/Sorting
KCS Portal provides a variety of filters to enhance the user experience.
• Filter/Search
• Sorting
• Show/Hide columns
53

Kofax Communication Server KCS Portal Administrator's Guide
Filter or search
A user can reduce the number of items in a list by applying a filter on one or more columns. All items that
fulfill the filter criteria are listed. This is an effective way to search for specific items.
If any filters are active, a small filter symbol is added in front of the corresponding column headers.
The Filter Option button at the top of the tool displays a form with a control for all important columns in the
respective tool. To show the available filter options for a tool:
1. Click Filter options.
All the available fields for filtering for the respective tool are displayed.
2. To use one or more fields for filtering the view, select the corresponding check boxes for the needed
fields.
3. Specify the filter criteria.
54

Kofax Communication Server KCS Portal Administrator's Guide
4. Click Apply Filter.
The following filtering options are available.
Field Search Description Example
The filter is not case sensitive.
The * can be used as wildcard at the beginning,
end, or beginning and end.
For Sender and Recipient columns, if the text
string is not having * at its end, the * is internally
added at the end of the string.
“greetings”, “GreEtinGs”,
“GREETINGS” will all return
“greetings”
“greet*”, “*tings”,”*etin*” will all
return “greetings”
Text
Without wildcards, only items with an exact
match are returned for all columns.
Note This is not applicable for Sender and
Recipient columns.
“tings” will not return “greetings”
“greet” will not return “greetings”
“greetings” will return “greetings”
Date/time Filter with date/time values have popup calendar
control, so the date and time can be entered
from this control. All the messages which have
been created during this interval are shown.
Check box Select or clear the check box for the filter option
and apply filter. The results are displayed based
on the check box being selected or clear.
If the check box for Account
locked is clear, all the users
whose account are not locked are
displayed.
If the check box for Account locked
is selected, all the users whose
account are locked are displayed.
Sort grid data
Most of the KCS Portal data is displayed in grid format. If the list in the grid has more number of items, you
can sort the column on the grid to display the desired data.
Sort the data in either of the following ways:
• Click the required column. The data in the grid is sorted in ascending or descending order.
• Hover the mouse over the required column, click , and then select Sort Ascending or Sort
Descending as needed.
55

Kofax Communication Server KCS Portal Administrator's Guide
Show/Hide columns
You can customize the columns displayed in any KCS Portal grid, that is, hide or show some specific
columns.
Note You cannot hide some specific columns in certain grids.
To show or hide specific columns, do the following:
1. Hover the mouse over the required column, click .
2. Select Columns. By default, all the columns are selected.
3. To hide a column, clear the check box for that column.
Scrolling
By default, 100 items are displayed on a KCS Portal page, such as Users and Events. Use the mouse
scroll or vertical scroll bar to fetch and display additional items. As soon as, the scroll bar reaches the
bottom of page, next 100 records are fetched from the server. This is applicable until all records are
fetched from the server.
Item count: displays the number of currently fetched items. A "+" sign appended to the item count value
suggests that there are more items on the server that can be fetched. For example, Item count: 200+.
Once all items are fetched from the server, the "+" sign is removed. For example, Item count: 667.
You can also use the Fetch all items button to fetch all items from the server. Depending on the number
of items on server, it can take few seconds to few minutes. You can cancel the fetching process using the
Cancel button.
Selected count: displays the number of items selected on the current page.
Note From Kofax Communication Server version 10.3.0 onwards, navigation through item list pages
using forward and next buttons is discontinued.
56

Chapter 6
Settings
Use this tool to perform basic configuration for KCS Portal.
1. Add groups and assign roles to selected Windows user groups who can access the KCS Portal
functions in KCS Portal.
2. Add application servers to monitor and control KCS applications running on specific application
servers.
3. Add message servers to monitor and control the KCS Core properties, and to use other KCS Portal
functions, such as message tracking and KCS Administration.
Add groups
KCS Portal relies on the Active Directory (AD) user and group management (if all related KCS servers
are added to the domain controller on the customer site), using the logged-in (Windows) user’s group
membership to determine KCS client role.
Note If the KCS Portal computer is not added to the domain, the same functionality is achieved by using
local Windows groups.
You can add groups to the KCS Portal and assign roles to them.
57

Kofax Communication Server KCS Portal Administrator's Guide
To add a group:
1. Click Add Group.
2. Enter the name of the group.
Note KCS Portal validates the group name and then displays the group listed along with its type
(local or Active Directory) and assigned roles.
If the group name cannot be found in the Active Directory or on the local computer, the following error
may occur.
3. By default, the Root role is associated with the first group. To add additional roles, such as Admin,
Monitor, to the group select the role. Three authorization levels (or roles) are available to access KCS
Portal functions.
Role name Authorized to
Root Manage roles (add, delete, assign roles to the Windows groups)
Manage and monitor KCS Servers
Admin Manage and monitor KCS Servers
58

Kofax Communication Server KCS Portal Administrator's Guide
Role name Authorized to
Monitor Monitor KCS Servers
4. Click Commit.
Any user who is a member of the added group can start and configure KCS Portal. The following
screen appears when the browser is used to access http://<hostname>/kcsportal.
5. Similarly, add more groups, and assign roles to them. For example, to authorize all members of a
group to monitor KCS processes without the right to perform any actions on them, first add group
“KCSMonitorOnly” and then associate Monitor role to the group.
Any user who is a member of the group “KCSMonitorOnly” and who logs in to the KCS Portal will
only access the Monitor and Message Tracking features.
Note the following:
• At least one group must be assigned to the root role. KCS Portal rejects the deletion attempt for the last
group with the root role.
• Even if a particular group is added to the Roles Assignment tool and is in use, you can still add
Windows users to this group (in the Active Directory or into the local group). Once added, these users
can access the functionality according to the assigned role.
• If any user is a member of more than one group added to the KCS Portal, that user is granted the
highest role assigned to those groups.
• If a user who does not belong to any group added to the KCS Portal attempts to log in, an error
appears.
59

Kofax Communication Server KCS Portal Administrator's Guide
Edit a group
1. Select the group and click Edit Group.
2. Make changes as need and click Commit.
Remove a group
1. Click for the group to remove.
2. Click Yes to confirm removal.
Add Application Servers
The “Application Server” is a server on the network where the TCSRV service is running. Application
servers are KCS servers such as the KCS core server and link servers.
To monitor and control KCS applications running on a particular application server, it must first be added
to the KCS Portal configuration.
Add an Application Server
1. Log in to the KCS Portal as the root administrator, go to Settings > Servers, and click Add
Application Server.
2. Specify the required values as specified in the table and click Save.
Parameter Description
Server Name Any appropriate name can be selected for a particular server, such as
MyLocalApplicationServer. This name must be unique server-wide as it is also
used as a unique reference for the server's configuration data.
Server Host Name Valid server hostname or IP address (localhost or 172.20.148.240)
60

Kofax Communication Server KCS Portal Administrator's Guide
Parameter Description
Password Application server password that is set in the application server's registry value
in HKLM\Software\TOPCALL\Boot\Default. If this registry value is empty, the
Password field should also be empty. Note that, this is the same server password
used by the KCS Monitor.
This password is used to control applications running under the TCSRV service
(start/stop/restart application).
Administrator Administrator Windows user account on the (remote) application server.
This account is used for start/stop/restart of the remote application server (TCSRV
service). It is not required for controlling the local application server.
The account must be in the format:
domain\username (for domain user), or <computer>\username (for local users on
the remote application server), where <computer> is the computer host name or IP
address.
For example, add the application server 172.20.148.240 with administrator account
being Administrator and then add 172.20.148.240\Administrator.
Admin password Remote administrator password
3. The application server is added to the list of Application Servers.
Until the server is added successfully, the status of the newly added server appears as "Initializing".
Click Refresh to update the status. If the server is added, it is listed in the Application Servers.
Edit an Application Server
1. Select the check box of the Application Server to edit and click Edit Application Server or double-
click the Application Server.
The Edit Application Server screen is displayed.
2. Modify the settings.
Note You cannot modify the Server Name field.
3. Click Save.
61

Kofax Communication Server KCS Portal Administrator's Guide
Delete an Application Server
To delete an Application Server, select the check box of the Application Server to delete and click Delete
Application Server. Confirm the prompt to delete.
Add Message Servers
The Message Server, which presents an advanced view of the KCS Core (or “TCOSS“) application
running on one or more application servers, displays information related to the KCS Core nodes, channels
and disks.
To monitor and control these KCS Core properties, and to use other KCS Portal functions, such as
message tracking and KCS Administration, the Message server for each KCS Core instance of interest
must be added to the KCS Portal configuration.
Add a Message Server
1. Log in to KCS Portal as the root administrator, navigate to Settings > Servers, and click Add
Message Server.
2. Specify the required values.
Parameter Description
KCS Server Name Any appropriate name can be selected for a particular server, such as
MyLocalMsgServer. This must be unique server-wide as it is also used
as a unique reference for the message server’s configuration data.
62

Kofax Communication Server KCS Portal Administrator's Guide
Parameter Description
KCS Server Path Valid KCS Server path in one of the following the format:
tcp/ip,<ipaddress>
tcp/ip,<ipaddress>
local, (in the case of local message server)
Note In the case of Tandem Server, this would be the KCS
alternative path.
Monitor User Name KCS Server user for the monitor function (KCS User), such as
TCMONITOR.
Monitor User Password KCS password
Administration User Name KCS Server user for the administration function (KCS User), such as
TCTECH.
Administration User Password KCS password
The KCS monitor user must be granted the following minimum rights on each KCS Server for the
KCS Portal tools:
Tool KCS rights assigned
Monitor Server
The KCS administration user must be granted the following minimum rights on each KCS Server for
the KCS Portal tools:
Tool KCS rights assigned
Message Tracking List Inbox and Outbox for All Users
Licenses List Licenses: No additional rights necessary.
Add License: Registration/License
Services List Services: No additional rights necessary.
Add/Edit Service: Services
Users/Addresses List Group/All Users: Read Group/System User Profiles.
Add/Edit Group/All Users: Write Group/System User Profiles.
63

Kofax Communication Server KCS Portal Administrator's Guide
3. Click Save. The message server is added to the list of Message Servers.
Until the server is added successfully, the status of the newly added server appears as "Initializing".
Click Refresh to update the status. If the server is added, it is listed in the Message Servers.
Edit a Message Server
1. Select the check box of the Message Server to edit and click Edit Message Server or double-click
the Message Server.
The Edit Message Server screen is displayed.
2. Modify the settings.
Note You cannot modify the KCS Server Name field.
3. Click Save.
Delete a Message Server
To delete a Message Server, select the check box of the Message Server to delete and click Delete
Message Server. Confirm the prompt to delete.
64

Chapter 7
Monitor
The Monitor tool shows the status of all configured Application and Message servers configured through
Settings > Servers.
Status and actions
All Application/Message servers are shown in the respective Application Servers/Message Servers
containers, which are marked in green (application servers) and blue (message servers).
The Monitor tool supports context-sensitive actions. Each item in the monitor tree, where any action can
be executed, is marked with a check box. There are two ways to execute an action:
• Select a particular item (or through multi-select more items of the same type and status) by selecting
the check box, notice context sensitive buttons to appear in the toolbar.
Execute the required action:
65

Kofax Communication Server KCS Portal Administrator's Guide
• Right-click a particular item, and then execute the action.
All actions are context-sensitive, which means that only actions that apply to a particular item’s state
are available. For example, an application in a stopped state cannot be stopped again.
Note The user must be assigned to an admin role, and users assigned to the monitor role are not
allowed to execute any action.
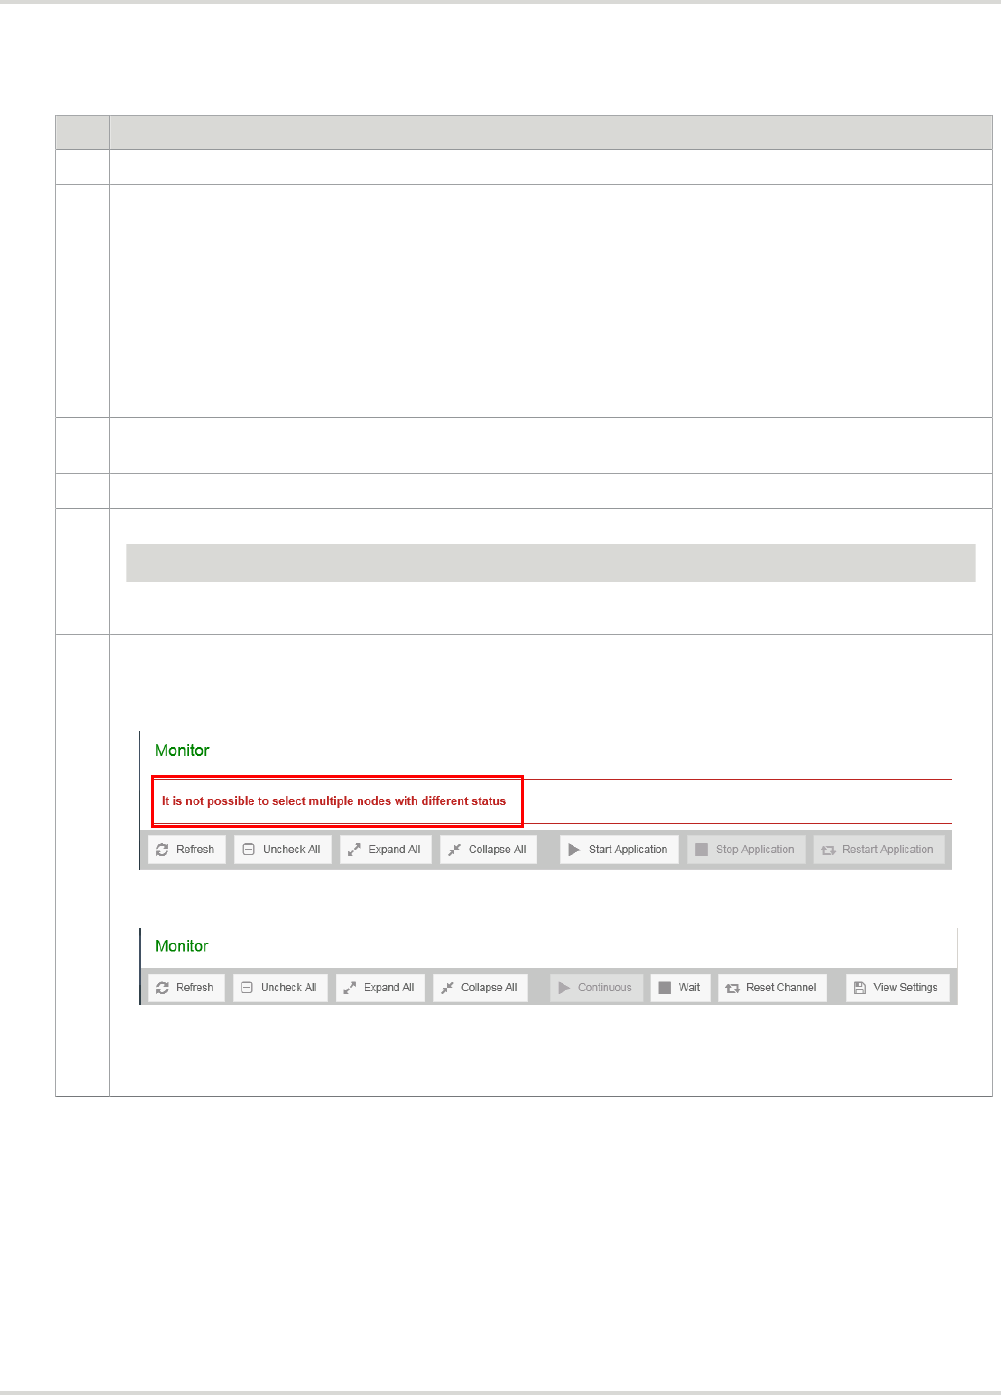
Summary of actions supported by the Monitor tool
Application Servers
Item Action
Application Server Start, Stop, Restart
Application Start, Stop, Restart
Message Servers
Item Action
Node Restart
Channel Continuous, Wait, Reset
General status colors
In the Monitor tool, four colors are used to indicate the current status.
Status color Description Example
Green Item is working properly as expected. Application is running .
Yellow Item is in a temporary condition. Application is starting .
Red Item is not operational. Application is stopped .
Gray Item with additional information. Application information line .
Application Server items and icons
An Application server comprises one or more applications that are KCS applications running on a
particular application server, such as, TC/LINK-SM, TCOSS.
66

Kofax Communication Server KCS Portal Administrator's Guide
Refer to the table below for description of Application server icon states.
Application Servers
Item Icon Description
Application server is running.
This indicates an active supervisor service (TCSRV.EXE) on the application
server computer.
The status text contains “server active” in this case.
Problem connecting to the application server.
The status text contains the problem explanation.
Application
Server
This indicates not running supervisor service (TCSRV.EXE) on the application
server computer.
The status text contains the error description.
Application is running.
The status text contains the name of the process plus any text and status code
(in parentheses) generated by the process.
Application is stopping or starting.
The status text contains the name of the process plus the description of the
intermediate status. The Status can be “starting”, “stopping”, “waiting for ...” and
more.
Application
Application is stopped.
The status text contains the name of the process plus the word “stopped.”
Application
Information
One line of additional application specific information.
Message Server items and icons
Each Message server contains two collections: Nodes and Channels.
KCS is a distributed system that consists of multiple nodes distributed on several computers across the
network. Most types of nodes can have sub-nodes.
Node 1 and node 2 represent the primary and secondary master of a KCS Tandem Server. These two
nodes additionally have a hard disk connected.
The tree of nodes always starts with node 1 (root node).
The status text for any node is the node number including a colon, followed by the type of node and
optionally, by an additional description of the current node’s status.
Disks are always sub-items of nodes number 1 and 2. With non-tandem systems there is no node 2 and,
therefore, only one disk at the root node 1.
The status text is the disk number including a colon and additional strings describing the status of the disk.
67

Kofax Communication Server KCS Portal Administrator's Guide
Channels do not display their status as text. The status can be seen by the specific icon for a channel.
The text displayed for a channel is the channel number and the description configured for that channel
within TCOSS.
Following tables describe the icons for Message Server and its nodes, disks and channels.
Message Server
Icon Description
Message server is connected and running.
Temporary condition of the message server, which could occur while initializing the connection to this
message server.
Message server not connected.
The status text contains the error description.
Nodes
Icon Description
Represents the root or any active sub node in the tree. The node is booted entirely and running
properly in this state. All channels are started.
The root node always has the number 1 and is the top one in the node’s hierarchy.
Represents a node manually reset by the KCS Portal or the corresponding dot-dot-command. In this
state, the system is waiting for all channels at the specific node to finish the current task before the
hardware is reset and the code stops executing.
The status text contains “waiting.”
In this state, the node is not booted. This happens after any kind of hardware reset until the node’s
operating system is loaded and started.
The status text contains “not booted.”
The node is stopped because of locally detected errors. Any kind of problem occurred after the node
started its operating system and before it finished starting the channels. The node enters this state
after some retries. It can be caused by a hardware problem.
The status text contains “stopped.”
Disks
Icon Description
Active not mirrored hard disk. The disk is actively used by TCOSS but has no backup by a second
disk. This is always the case for the single disk system.
For a tandem system, this means the second hard disk is not available or its data is not up to date.
In addition to this status string, the date and time is displayed when the mirror is broken.
Active mirrored hard disk. The disk is actively used by TCOSS and backed up by a second disk.
68

Kofax Communication Server KCS Portal Administrator's Guide
Icon Description
Active disk update in progress. The disk data is outdated and is being resynchronized.
This happens automatically after booting the system or rebooting one master of a tandem system. If
both hard disks are “Not Mirrored” (desynchronized), the system cannot determine the hard disk with
the most recent data automatically. In this case “Updating” can be forced manually for one disk using
the corresponding KCS Portal action.
Defective disk. The disk is defective because of a hardware problem or temporarily set to defective by
TCOSS.
Channels
Icon Description
Active Channel. Set to continuous operation.
The channel is idle.
Active Channel. Set to continuous operation.
The channel is sending (without back-reception).
Active Channel. Set to continuous operation.
The channel is sending and back-receiving.
Active Channel. Set to continuous operation.
The channel is receiving.
Active Channel.
Line error occurred (can be caused by disconnecting the FAX line).
Active Channel. Set to query operation.
The image does not change for sent or received messages.
Active Channel. Set to wait.
Sending is disabled but receiving is possible.
The image does not change on received messages.
Active Client/Server Channel.
The image does not change.
Reloading Channel Configuration.
This status appears when the channel is forced to reload its configuration. This can be done using the
corresponding menu or button from TCMON, or using the corresponding dot-dot-command with the
console.
Inactive Channel.
The channel is not started. This happens to channels located on nodes that are not booted.
69

Chapter 8
Message Tracking
The Message Tracking tool helps to analyze the history and details of messages on a particular KCS
Server. All the properties for a message are specified in columns.
To search specific messages for analysis, you can use the Filter Options.
70

Chapter 9
KCS Administration
This tool provides the administration of the following Kofax Communication Server features:
• Licenses
• Services
• Users
• User Addresses
• Events
• Archive
Licenses
The Licenses tool provides the licensing information for each KCS server configured as Message Server.
Use the Licenses tool to add and remove licenses, and manage the licenses in test mode for each
Message server.
You can generate additional licenses for a specific computer using the CPU Number of the computer. To
copy the CPU Number, double-click the respective CPU Number on the Licenses grid and use the Ctrl +
C command. Use this CPU Number on the Kofax Communication Server License generation tool.
Add a license
1. Select KCS Administration > Licenses, and select the required Message Server.
2. Click Add License.
71

Kofax Communication Server KCS Portal Administrator's Guide
3. The Add License dialog box appears.
4. Click Browse and navigate to the license file provided by Kofax.
All the license keys available in the license file are displayed.
5. Click Add.
Remove a licenses
1. Select the license and click Remove License.
2. Click Yes to confirm deletion.
Activate Test mode
Test mode allows operation of a KCS system without appropriate license keys for a limited period of time.
During the test phase, all license checks are disabled.
The test mode is followed by a phase of 30 days with regular license checking. During this phase, it is not
possible to switch KCS server into test mode again.
To activate the test mode, on the Licenses page, click Switch to Test Mode. The information on the test
phase duration is displayed.
To deactivate the test phase, click Deactivate Test Mode.
Services
Use the Services tool to add, edit, and remove services for each KCS server configured as Message
server.
72

Kofax Communication Server KCS Portal Administrator's Guide
Add a service
1. Select KCS Administration > Services, and then select the required Message Server.
2. Click Add Service.
A new row is added to add the new service.
3. Configure the following fields for each service entry.
Field Description
Name Service name
Description Briefly identifies the service
Address Type Supported address types:
• Fax
• Telex
• Teletex
• X.400
• TOPCALL
• Postal
• Free Format
Prefix KCS channel and the mask for final delivery.
Refer to the TCOSS Configuration Manual for more information about masks.
Document Class Type of content the service can handle:
• Image
• Text
• Restricted text
• Binary Doc
• XML Detection
• Digital Signature
4. Click Commit.
73
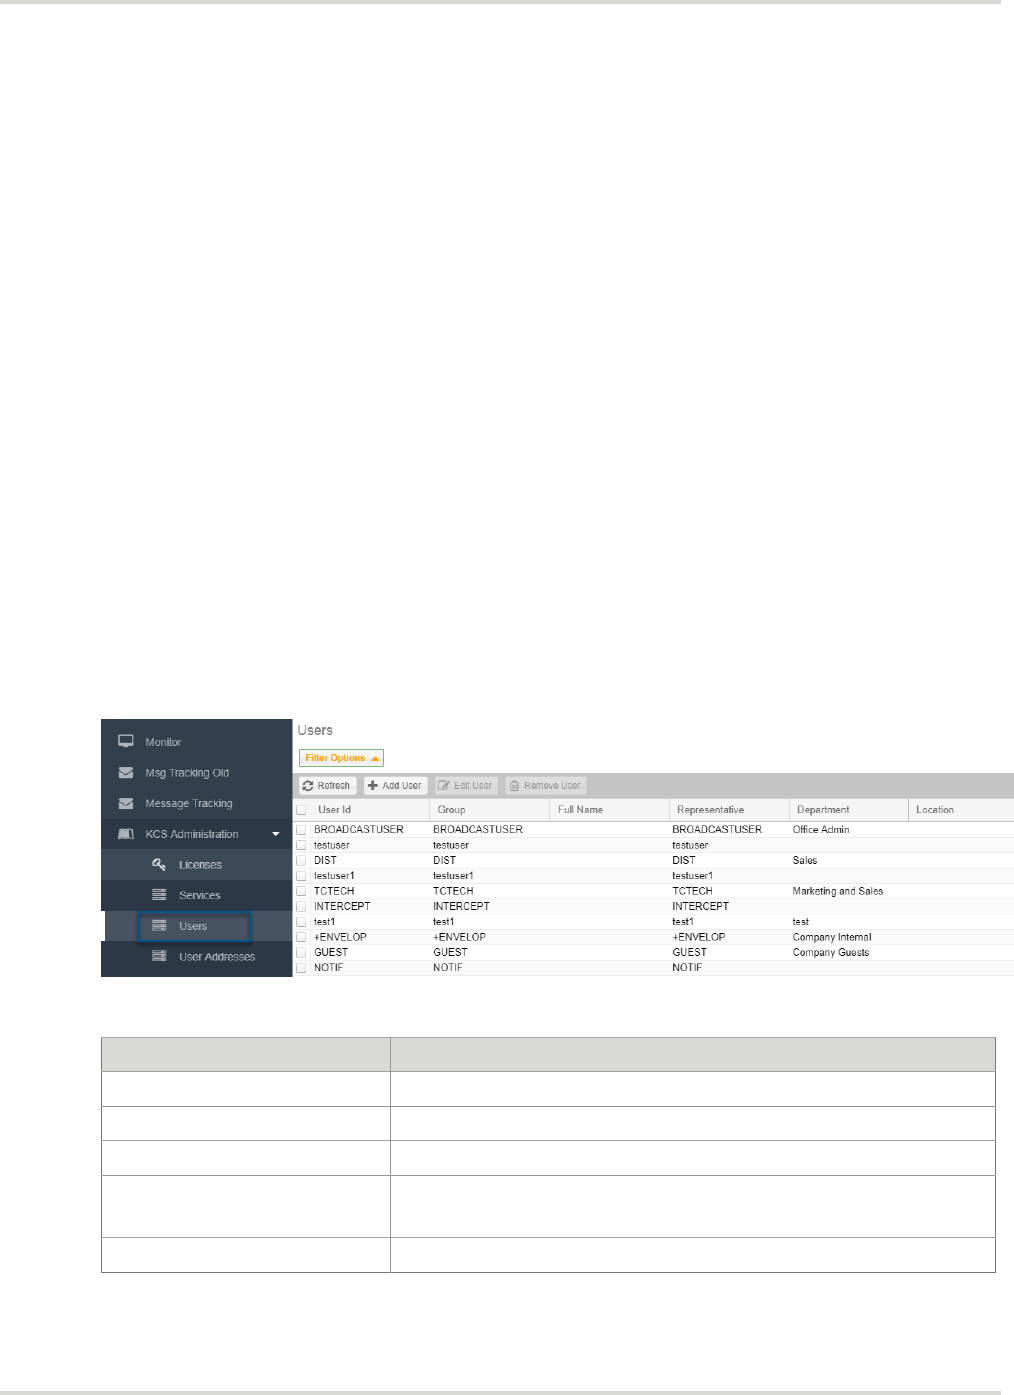
Kofax Communication Server KCS Portal Administrator's Guide
Modify a service
1. Select the service to modify and click Edit Service.
2. Modify as required and click Commit.
Remove a service
1. Select the service to remove and click Remove Service.
2. Click Yes to confirm deletion.
Users
Each Kofax Communication Server system has a set of user profiles that have direct access to the server.
Use the Users tool to add, edit, and remove users.
You can also back up the user data and restore it. See Backup users and Restore users.
To access Users, do the following:
1. Select KCS Administration > Users.
2. On the Message Servers list, select the required message server.
All the users for the selected Message Server are displayed in the Users grid.
Each user entry contains the following fields.
Field Description
User Id User ID assigned to the user.
Group Group to which the user belongs.
Full Name Full name of the user.
Representative A representative for this user.
If authorized, a representative can read and/or write the user folders.
Messages Total number of messages in the Inbox and Outbox for a user.
74

Kofax Communication Server KCS Portal Administrator's Guide
Field Description
Unread Messages Total number of unread messages for a user.
By default, ten users are displayed on each page. You can modify the Page Size to set the number
of users to display on each page.
Use the Next page or Previous page buttons to browse all the users.
Add a user
1. On the Users screen, click Add User.
2. Configure the basic properties of the user under the following tabs:
• General
• Address
• Event
• Rights
3. Click More to configure the advanced properties for a user. Selecting an advanced property displays
the property in a new tab along with the basic tabs. The advanced properties of a user belong to the
following tabs:
• TC/Web Navigation
• TC/Web User Administration
• Authorize/Sign
• Manual Fax
• Services
• Distributor
• Queue Length Alerting
• Queue Age Alerting
• Queue Pages Alerting
• Queue Logging
4. Click Save.
General
Use this tab to add or modify general information for a user.
Field Description
User ID User ID assigned to the user.
Group Group to which the user belongs.
Location The location of the user.
The location is used for location-based routing, where the recipient depends on the
location of the message originator. Maximum length of the location can be eight
characters.
Representative A representative for this user.
If authorized, a representative can read and/or write the user folders.
75

Kofax Communication Server KCS Portal Administrator's Guide
Field Description
Company The name of the user’s company.
Text line used in cover sheets.
Department The name of the user’s department.
Text line used in cover sheets.
Full Name Full name of the user to insert in the cover sheets.
Salutation Salutation of the user, such as Mr., Mrs. to insert in the cover sheets.
Free Text Description in cover sheets.
Default Template Specify the template file name along with the folder name. For example, FIS/Template.
The KCS Portal does not verify whether this template exists.
Language The language to use by a user. The KCS Portal supports the following languages:
• German
• French
• Spanish
• Italian
• Simplified Chinese
• Japanese
• Portuguese (Brazilian)
• Russian
User Belongs to Specify the email server type or application for which the DirSync process is done.
Available email server types and business applications are:
• Topcall: This uses the KCS user and does not support DirSync.
• MS Mail
• cc:Mail
• Lotus Notes
• HP Open Mail
• Host
• TCFI
• MS Exchange
• GroupWise
• IBM MQSeries
• SAP/R3 via TC/LINK-SC
• SAP/R3 via TC/LINK-AC
• Internet
• SMS
• X.400
• MFPConnect
VRS Profile Specify the VRS (VirtualReScan) profile name to use for document conversion.
Note You can modify the VRS profile only when the user belongs to MFPConnect.
Refer to the MFPConnect Administration Guide.
76

Kofax Communication Server KCS Portal Administrator's Guide
Field Description
Visible in outbox Select this option for a gateway user.
MediaType and Application Name fields appears.
MediaType Select the media type that matches the connected mail system or medium.
If Visible in outbox is set for a user, select the Invalid media type. This media type
ensures that the user profile information is imported to the OmniAnalyser database.
Note The “Invalid” media type is only used internally. It does not appear in reports.
Application Name A descriptive name for the application.
You can use the same application name for all queues polled by an instance. If there
are several parallel instances, such as, for a link, all instances can share the same
application name.
The maximum length for an application name is 256 characters.
Password and Retype
password
A password for this user.
The maximum length for a password is 80 alphanumeric characters.
Retype the password.
Note
• For a new user, the password field can be left blank.
• The minimum password length is set in the “+MAIL5V/App99” file. The
minimum password check applies when changing the passwords.
Change password at next
login
Allows the newly created user to change its password when logging in to the
application for the next time.
Lock Account Locks the account of this user.
When an account is locked for a user, the “Account is locked” information is displayed
in the Lock Account field. But no system error message or event log entry is
generated.
The account is also locked when a user consecutively tries to log in with a wrong
password for a configured number of times.
Note
• The number of incorrect login attempts is set in the “+MAIL5V/App99” file.
• The number of attempts to login using a wrong password does not expire with
session timeout.
• Account locking is reported by a system error message (with error level
2 = warning) and an event log entry. The “account locked” flag is stored
permanently in the user profile.
Once an account is locked, administrator can unlock the account by clearing the Lock
Account field or by changing the password for the user.
Cost Center The department or entity that pays for a user’s outgoing faxes and other transmission
fees.
Note If authorized, user can modify their cost center.
77

Kofax Communication Server KCS Portal Administrator's Guide
Field Description
Dirsync allowed TC/LINK automatically modifies the User ID as per the changes in the mail client’s user
profile.
Reject all messages All incoming messages are rejected. The handling of messages is the same as with
negative termination, non-delivery notifications and archive entries are generated as
requested.
Logging of all send
attempts
TCOSS logs all message sent attempts in the short-term archive. For example, for a
fax line, all the scenarios where a distant subscriber was busy or not reachable are
logged in the short term archive.
Number Locking Restricts concurrent access to identical telephone numbers for the VoiceLink2 users.
This feature is similar to the basic number locking feature of fax channels.
If activated for a VoiceLink2 queue user, the locking covers all send orders within that
queue and does not interfere with send orders in other queues.
Refer to the Voice Platform Technical Manual.
Comments Specify some general information about the user. You can also use this field to log all
the changes performed on a user profile, such as information about the modified fields
and reason for modification. This field can have a maximum of 30000 characters.
By default, this field is not editable. To add/edit information, click the button. Click
button to lock the field.
Note After saving the updated user profile, you cannot undo the changes.
Following fields are displayed only for the users that are created using Kofax Communication Server version 10.3.0
and higher.
Time Created Date and time of the TCOSS server when the user was created. This information is
displayed in the format as configured in the TCOSS server.
This value is displayed according to the current Windows time-zone.
Created by user Name of the user which has created this user.
Created by application Name of the Kofax Communication Server application used for creating this user:
TCfW, TC/Web, KCS Portal or Dirsync.
Following fields are displayed only for the users that are created or modified using Kofax Communication Server
version 10.3.0 and higher.
Time modified Date and time of the TCOSS server when the user information was last modified. This
information is displayed in the format as configured in the TCOSS server.
Note In TCfW, while saving a new user, if user clicks Save and then click OK,
the time of clicking Save is displayed as Time Created and time of clicking OK is
displayed as Time Modified.
Modified by user Name of the user which has modified the information of this user.
Modified by application Name of the Kofax Communication Server application used for modifying this user:
TCfW, TC/Web, KCS Portal or Dirsync.
Addresses
Use this tab to add new addresses for a user, modify the existing addresses, and remove addresses.
78

Kofax Communication Server KCS Portal Administrator's Guide
A list of all the addresses defined for the selected user along with the service used by each address is
available. Using these addresses, user can receive messages from internal and external senders.
Note By default, KCS uses the first active address in the grid to send a message. You can set the
required sequence by dragging and dropping addresses at the desired position.
Add an address
1. On the Addresses tab, click Add Address. A new editable row appears.
2. Configure the following fields for an address.
Field Description
Service List of available services for which an address can be defined. For example, FAX, MX7,
SCAN.
Address Name of the address.
Answerback Specify an answer back for the selected service, such as, for a FAX service, specify the
answer back number. If a service does not support answer back functionality, any value
specified here is ignored.
Active Select this checkbox for an active address. If an address is inactive, it is not used for
communication. If an address is not required temporarily, you can clear the Active
checkbox for the corresponding address.
3. Click Commit to save the changes.
Edit an address
1. On the Addresses tab, select the address to edit, and click Edit Address or double-click the
address. Selected address is displayed in editable mode.
2. Make changes as needed.
3. Click Commit.
Remove an address
• To delete a single address, select the check box for the address to remove and click Remove
Addresses. Click Yes to confirm deletion.
• To delete multiple addresses, select the check box for the addresses to remove and click Remove
Addresses. Click Yes to confirm deletion.
• To delete all addresses, select the Service check box on the grid header and click Remove
Addresses. Click Yes to confirm deletion.
Events
Use this tab to define events for a user. Events are activated by any incoming or outgoing message. To
execute an event, you need to define services. For example, for an incoming fax, you can print the fax,
trigger a LAN break message, or can trigger the fax beeper to beep.
You can define up to 150 events for a user.
Add an event
1. On the Events tab, click Add Event.
79

Kofax Communication Server KCS Portal Administrator's Guide
2. Configure the following fields for an event.
Field Description
Event Following events are available and the description of when these are generated.
Event type Event description
In Generated when a message arrives in the user's inbox.
Usually, this event is used to create send orders for LAN
printers (Service PRINT) and/or for LAN Break messages
(Service BRK). Additionally, this event can also be configured
to automatically forward messages to a remote fax machine.
MsgWait On Generated when the status of a user's inbox is "No unread
messages" and a new message arrives.
MsgWait Off Generated when the status of the user's inbox changes from
"Unread messages" to "No unread messages". This event is
used to turn off the message waiting signal (Service MSGON)
on the user's telephone set (depending on the options installed
and the PABX in use).
DelNotif Generated when a delivery notification for a sent message
exists. Usually, this event is used to generate a LAN Break
message (Service BRK) to inform the user that one of the
outgoing messages is delivered successfully.
Non-delNotif Generated when a non-delivery notification to a sent message
exists. Usually, this event is used to generate a LAN Break
message to inform the user that one of the outgoing messages
is not delivered successfully.
Sending Copy Generated when a sending copy of the sent message is
created. A sending copy message is a copy of the message
that KCS generates during sending. This event can be used to
print the sending copy on a LAN printer or a fax machine.
Job Start Generated when a job is successfully posted.
Job End Generated as soon as all send orders of the job are (positively
or negatively) terminated.
Inbound Release Generated for new inbound send orders.
Outbound Release Generated if outbound send orders are terminated.
Service Select the service to use for this event. According to the service selected, additional
fields are displayed. Specify the details of service in respective fields. For example, if
you select FAX service, specify the fax Number and Answerback for this fax.
80

Kofax Communication Server KCS Portal Administrator's Guide
Field Description
Rec Error Filter Specify message reception filter for an event. For example, message reception error
code for an inbound message can be used to configure the event. This can be different
for a message received without any errors.
Following filtering options are available:
• All: No filter is applied.
• With reception error: Filter the messages with reception error.
• Without reception error: Filter the messages with no reception error.
• With specific reception error: Filter the messages with specific reception error.
Note
• You can only specify one filter for a service.
• Filters do not support wildcards.
Doc Error Code For filtering errors messages with specific error, specify the error code in Doc Error
Code.
Archive Entry Select the required option to store the send orders generated by events to short-term
archive. Send orders are usually the mail entry and the linked document. Following
options are available:
• No: The send order is never stored into the short-term archive.
If a send order terminates positively, it is deleted. If a send order terminates
negatively, it remains in outbox of the originator with status as Inactive-Problems.
• Positive: If a send order terminates positively, it is deleted and an entry is logged in to
the short-term archive.
• Negative: The send order is deleted, whether it terminates positively or negatively.
Whenever a send order is terminated negatively, an entry with the status "Cancelled"
is logged in to the short-term archive.
• Always: The send order is deleted, whether it terminates positively or negatively.
When a send order terminates positively, an entry with the status "sent ok" is logged
to the short-term archive.
When a send order terminates negatively, an entry with status "Cancelled" is logged
to the short-term archive.
Active Select this option to activate an event. Only active events execute. You can clear this
option for an event that is not required temporarily.
Auto Termination The messages that trigger the configured events are displayed in the user’s inbox with
status Terminated.
Registered Select this option to register the messages. A registered message remains open in
outbox of a user until the recipient opens the message.
Sender Service This is the service of a sender that is used to send a notification or sending a copy
event.
Recipient Number Restricts the actions triggered by in-mail, notifications and sending copies to the
recipients.
• All: Allows printing sending copies for all recipients plus an extra sending copy for
only the first recipient.
• First: Allows printing sending copies for only the first recipient of an envelope’s
recipient list.
81

Kofax Communication Server KCS Portal Administrator's Guide
Field Description
Delivery Type Filters the sender service-dependent events in the list. Delivery types include To, cc, bcc
and Auth.
This filter does not work with the MsgWait On and MsgWait Off events.
For example, an in-event configured to trigger a print can be specified to print only
incoming messages sent with the delivery type as To.
Edit an event
1. On the Events tab, select the event to modify.
2. Make changes as needed.
Remove an event
• To delete a single event, select the check box for the event to remove and click Remove Event. Click
Yes to confirm deletion.
• To delete multiple event, select the check box for the events to remove and click Remove Event. Click
Yes to confirm deletion.
• To delete all events, select the check box on the grid header and click Remove Event. Click Yes to
confirm deletion.
Rights
Use this tab to assign rights to the user. As per the user type, you can assign a right to the user to allow or
restrict a functionality.
1. Select the Rights tab. All the available rights for a Kofax Communication Server user are displayed.
2. Select the check box for the right to assign to the user.
Following is the list of rights and their significance.
Right Description
FIS Folder Defines the access permissions for the Fax Information System (FIS) folder.
Users with Write permissions of FIS folder can store new documents to, or change
existing documents in the FIS folder.
FIS Prefix Defines the permanent search criteria for the FIS folder's Message Name field.
Usually, it is not required to modify this field.
Message Folder Defines the access permissions for the Message Folder on the Kofax
Communication Server (KCS).
System Folder Defines the access permissions for the System Folder on KCS. Only users with
the TECH USER check box selected can see all the files on KCS.
System Address Book Defines the access permissions for the System address book. For Administrator
and Distributer type users, set both Read and Write permissions. For other users,
you can set only the Read access.
User Address Book Defines the access permissions for the address book of the user. Set both Read
and Write permissions.
All Private Address Book Defines the access permissions for the private address books of all the users.
Assign the Read and Write access to an administrator user that needs to maintain
address book of all users. For other users, no access must be assigned.
82

Kofax Communication Server KCS Portal Administrator's Guide
Right Description
Group Address Book Defines the access permissions for the group address book to which user
belongs. Select both read and write permissions.
Group User Profiles Defines the access permissions for a group user profile. Users with this
permission, can create and modify other users.
System User Profiles Defines the access permissions for a system user profile. Users with this
permission, can create and modify other users.
TECH User Defines permissions for highest level of system access. Users with this permission
can do the following:
• View all the fields in Inbox and Outbox lists.
• Access system files on Kofax Communication Server.
• Read and edit configuration and system files.
Server Defines permissions to maintain the Kofax Communication Server, and access
statistics. Server access includes Lines/Statistics, Disk Usage, Number Series,
Date/Time, Backup/Restore, and Registration.
Services Defines access to the Services.
Registration/License Defines access to the Registration.
Change sender Defines the permissions to send messages with any sender.
Reporting Defines the permissions to request a report. TC/Report application verifies this
access permission when a user request for a report.
May mark complete Defines the permissions to a user to terminate incoming messages manually.
Change own password Defines the permissions to a user to change the password.
Metamail Defines the permission to replace attachments with an URL when Metamail is
installed.
The Metamail feature saves storage capacity on the linked mail systems (Novell
GroupWise, Lotus Notes, and MS Exchange).
LAN login Allows the user to login to the Kofax Communication Server using the LAN login
credentials. When using the LAN login credentials, user’s password is not verified
by the Kofax Communication Server.
Terminate Incoming Defines permissions for automatically terminating incoming messages for a user
when the messages are opened from the inbox.
Change cost center Defines whether a user can change its cost center or not.
Extender folder view Defines permissions for most of the entry fields in the user’s inbox, outbox and
message folder to be displayed.
Note
• Set this authorization for specific users, such as the Distributor or the
TECH user.
• Allow only the TECH user to view all fields.
83
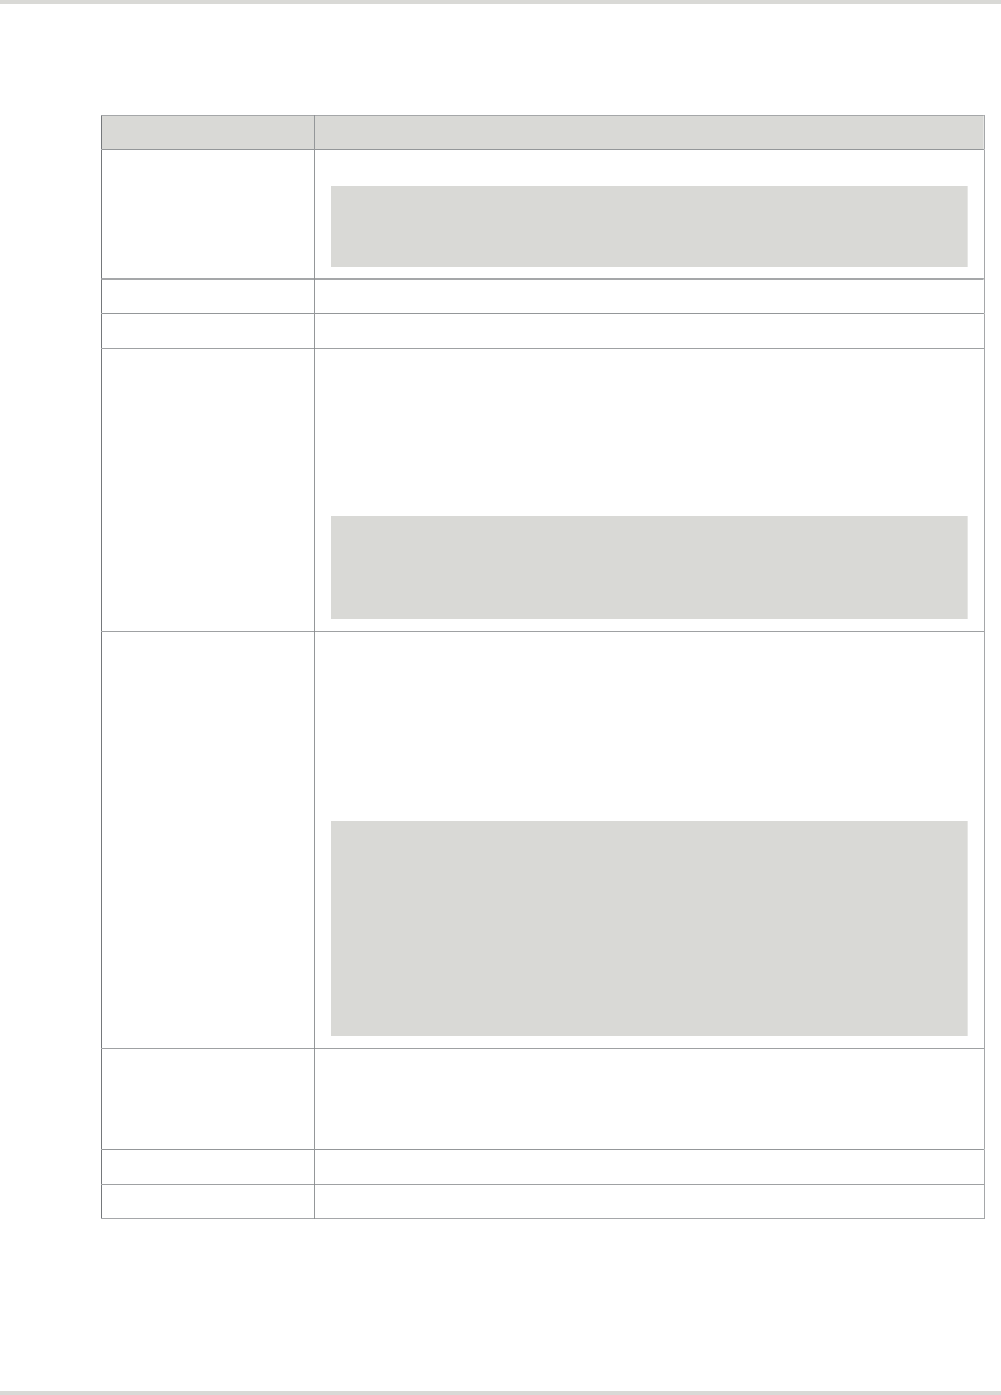
Kofax Communication Server KCS Portal Administrator's Guide
Right Description
Preferences Allows the user to access the TCfW Common Preferences.
Note By default, this permission is assigned to all users. If the backup
for a user is restored, all users will have the right to make changes in the
preferences.
Save as Cover Sheet User can modify and save coversheets.
Password never expires The password for a user will never expire.
Inbox, Outbox and
Message Folder for
Group Members
Permissions assigned to a user’s group members:
• List: The user can select any user of the group and view the list of messages,
but cannot open the messages.
• Correct: The user can correct recipient information of messages in the Outbox,
but cannot change the message content.
• Open: The user can view and open messages of any user in the group.
Note A user registered as representative of another user can always open
its messages. The representative has full access to the Inbox, Outbox and
Message Folder of the user it is representing. But, it cannot transfer any
additional rights to the represented user.
Inbox, Outbox and
Message Folder for All
Users
Permissions assigned to a user’s group members:
• List: The user can select any user (or clear the search criteria field) and see
the list of messages, but cannot open other user’s messages.
• Correct: The user can correct recipient information of messages in the Outbox,
but it cannot change the message content.
• Open: The user can select any user (or clear the search criteria field) and have
full access to the list of messages.
Note
• A user registered as representative of another user can always open its
messages. The representative has full access to the Inbox, Outbox and
Message Folder of the user it is representing. But, it cannot transfer any
additional rights to the represented user.
• A group administrator with permissions of a certain group, such as,
“group1” may also have access to groups which start with the same name
string. For example, “group10”, “group11”.
Enter Number Directly Always: The user can enter a number directly and send messages to recipients
that are not stored in any of the address books.
Correct: The user can change the recipient number only, when a message is
opened for correction.
Archive delete Allows the user to delete messages from archive server.
Archive volume update Allows the user to update the volume.
84

Kofax Communication Server KCS Portal Administrator's Guide
TC/Web Navigation
Use this tab to define the features that should be visible to the user when the user logs in to the TC/Web
application.
The following options are available.
Field Description
Registry For each feature in TC/Web, a corresponding registry key is available. Use the
Registry option to allow the feature to be visible or hidden depending on the value
set in the registry setting.
Hide Use this option to hide the feature from the user in TC/Web.
Show Use this option to make the feature visible to the user in TC/Web.
For more information about these features, refer to the TC/Web documentation.
TC/Web User Administration
Use this tab to view and edit information of other users in the TC/Web application. This option is called
User Switching. This feature is useful for helpdesk administrators and customer administrator roles.
KCS Portal provides the option to update information about this feature for a user.
Field Description
Administer Users By default, a user cannot administer other users (None.) Select either option to the
user to administer other users.
Group Users: The user can only administer other users in its group.
All Users: The user can administer all users in the respective TCOSS instance.
The Show User List, Show User Switching and Show Set New Password fields
are displayed.
Show User List Displays the User List option to the user in TC/Web.
Show User Switching Displays the User Switching option to the user in TC/Web.
Show Set New
Password
Displays the Set New Password option to the user in TC/Web.
Using this option, a user can change the password of any user without knowing the
existing password.
Note This field is only enabled if Show User Switching option is selected.
Set these user rights
automatically
Provides the default TC/web user rights to assign to a user based on the option
selected in the Administer Users.
If required, you can modify these rights.
If you wish to assign the user rights manually, clear this option.
Set TC/WEB identity
rights automatically
Automatically assigns the default TC/Web identity rights to a user based on the
option selected in Administer Users.
If required, you can modify these rights.
If you wish to assign the TC/Web identity rights manually, clear this option.
85

Kofax Communication Server KCS Portal Administrator's Guide
Authorize/Sign
Some users cannot send messages directly to the recipients. For such users, all sent messages must be
authorized by a user that have the permission to authorize such messages. The authorized user can send
or reject messages from such users, and also send the messages for further authorization.
Use the Authorize/Sign tab to enable a user to authorize messages.
Permission Description
May Authorize Allows user to authorize messages for sending.
Change Options and reference Allows user to change the send options and reference fields.
Change message content Allows user to change the content of the message received for authorization.
Authorize without signing Does not include the signature of the authorized user in the message received for
authorization.
Change recipients Allows user to modify the recipients of a message received for authorization.
Enter/edit test key Allows user to enter or edit a test key in the received message.
For more information about the test key, refer to the TCfW user manual.
Authorize own messages Allows user to authorize its own sent message. This option is only enabled if May
Authorize is selected for the user.
Insert a signature
You can insert a signature for an authorized user.
1. Create an image (JPG or PNG format) file of the authorized user’s signature.
2. Click Upload.
Open screen appears.
3. Browse to the signature and click Open.
4. The selected image is displayed in the Signature box.
Clear, + and - buttons appear.
5. Use the + and – buttons to zoom in and zoom out the image.
6. To display the desired part of image, click the image and while keeping the mouse cursor pressed,
move the image in box.
Note Only the visible part of the image is stored as a signature.
7. You can use Clear to clear the currently selected image.
8. Click Save.
The currently visible image is saved as the signature of the user.
Job Notifications
Kofax Communication Server sends notifications for every TC/Broadcast job: Job start notifications, job
error notifications and job end notifications.
For more information about jobs, refer to the Message Broadcasting Server Processes Technical Manual.
86

Kofax Communication Server KCS Portal Administrator's Guide
Use the Job Notifications tab to add or remove job notifications for a user. Once you add a new
notification, it is added to the Job Notification grid.
Configure the job notification fields.
Field Description
Active Sets the notification to be active.
Only one notification can be active at a time.
Type Type of job notification:
• Start: Informs the user that the job information is successfully resolved and
send orders are created for every recipient in the distribution lists.
• Error: Informs the user that the job request could not be processed.
• End: Informs the user that all job are finished, positively or negatively.
Service The service used by the job originator.
Number The number of service used by the job originator. For example, for FAX service,
provide the fax number.
Full Name The full name of the job originator.
Broadcast Settings
Use this tab to set up the TC/Broadcast error handling and error reports.
For more information about broadcasting, refer to the Message Broadcasting Server Processes Technical
Manual.
Configure the broadcast fields.
Field Description
User can send job Allows the user to send jobs.
Intercept on error Forwards the failed job requests to an operator.
Send error report If job request is not resolved, creates an error report and sends it to the user.
Resend failed
messages
Creates a new job for the all the failed addresses and sends them to the operator.
The operator decides whether the job can be started.
Include details for
successful transmission
Includes the details of the successful transmission in the job end report.
Include details
for unsuccessful
transmission
Includes the details of the unsuccessful transmission in the job end report.
PIN Specify the Broadcast PIN.
Manual Fax
Kofax Communication Server provides fax server functions to users who do not have access to TCfW.
With appropriate authorization, user can access the FIS (Fax Information System) folder from any fax
machine.
87

Kofax Communication Server KCS Portal Administrator's Guide
Use the Manual Fax tab to configure the fields to access documents from the FIS folder using phone and
fax.
Field Description
Access number Identifies the user and should be kept secret.
This number along with the number 8 and the second access number enables fax
machines to use as scanners. For example, send fax to 661338-8024.
Access password Password to scan documents or retrieve FIS documents from remote location.
FIS Prefix Sets the prefix value for the FIS folder select criteria. This is essential, as only
numbers can be entered by phone.
Default fax number User receives all messages and notifications at this number.
Access number Number to access Kofax Communication Server.
Services
Use this tab to restrict some services and allow some services for this user. Configure the following fields.
Field Description
Restricted use of
services
Restricts the access of services for this user.
• Authorization Required: A message sent using this service must be
authorized by an authorized user.
• No Restriction: A message sent using this service has no restrictions.
Restrict services editing
for the user
Select the services that a user can view or edit.
• Invisible: The user to see this service.
• Read Only: The user to view and use the service, but cannot modify the service
properties.
• Writable: The user can view and use the service. The user can also edit the
service properties.
Distributor
A distributor user distributes or routes incoming messages addressed centrally to the company, to
the intended recipients. It can also specify the desired recipient in the recipient field and add update
information in the subject and from fields. But, it cannot change the message content.
For more information about the Distributor user, refer to the Client Applications Administrator's Manual.
Use the Distributor tab to configure the following fields.
Field Description
Distributor mode Enables the distributor mode.
View first page only Allows the distributor user to see only the first page of the message.
Print enabled Enables the message for printing.
Save as enabled Enables the message for saving to a folder.
88

Kofax Communication Server KCS Portal Administrator's Guide
Field Description
Distributor queue Specify the Kofax Communication Server queue to search for messages to distribute. If
this field is empty, the DIST queue is used.
Terminate enabled Terminates an incoming message.
Split messages Splits an incoming message to multiple new messages. All messages in a distribution
mode open in text view.
Change message content Allows the distributor user to modify the content of a message.
Key system fields Allows the distributor user to view or modify key system fields.
Note If View is selected, the user can fill the header fields with the function keys,
but cannot change the fields directly.
Queue Length Alerting/Queue Page Alerting/ Queue Age Alerting
Use these tabs to configure alerts in KCS Portal. By default, when you add an alert, one alert level is
added. You can create multiple levels for each alert.
The message that needs to be sent when an alert is triggered is configured separately. For more
information about configuring alert messages, refer to the Client Applications Administrator's Manual.
Create an alert
1. On the Queue Length Alerting/Queue Page Alerting/Queue Age Alerting tab, click Add Alert.
An alert is added to the list of existing alerts.
2. Select the alert from the list.
3. Configure the following parameters for the alert.
Field Description
Alert Name Name of the alert.
Watch Select message folder to watch: Inbox or Outbox.
From • If you are watching an inbox folder, select the User or Group and specify the user ID or
group ID respectively.
• If you are watching an outbox folder, select the User or Group and specify the user
outbox or group outbox respectively.
Note If the From field is left blank for outbox, it is set to outbox of the current user.
To If you are watching an inbox folder, select the User or Group and specify the user inbox or
group inbox respectively.
Note In case of inbox, if To field is left blank, it is set to outbox of the current user.
If you are watching an outbox folder, select the User or Group and specify the user ID or
group ID respectively.
89

Kofax Communication Server KCS Portal Administrator's Guide
Field Description
State Only the messages with the selected states are considered for alerts. Following are the
possible states:
• A_deferred: Waiting for the intended time of sending.
• B_wait for document conversion: Waiting to be picked up by the TCOSS document
converter.
• C_active: Being sent out or waiting for a send retry.
• D_at next node: Already transferred but waiting for a confirmation.
• E_terminated: Sending failed, no further send retries.
Priority Select a range of message priority. Messages with priority in range of selected priority are
included.
Create levels for an alert
For each alert, one level is created by default with predefined settings. You can add multiple levels for
each alert.
1. Select the alert from the grid, and click Add Level. A new level is added to the selected alert in the
grid.
2. Configure the properties of the new alert level.
Field Description
Alert Level Name Name of the level.
Sub-Alert Ignores the configuration set in this level if another level exists with a higher
Trigger Threshold.
Active Sets this level as active. Only the active levels are used for generating alert
messages.
Periodic Repetition In case an alert is triggered and the alert condition persists, sends alert messages
repeatedly after the specified time here. The minimum value is 10:00 minutes. A
value less than 10 minutes signifies that alert messages must be sent only once.
Trigger Threshold If the number of entries of the configured parameter in a message queue is more
than the configured value, alert message is triggered. This value must be more
than Re-activation threshold. Set this parameter for the type of alert needed:
• Queue Length Alerting: Number of messages in a message queue.
• Queue Page Alerting: Number of pages in a message queue.
• Queue Age Alerting: Age of message queue in seconds
Example: Trigger Threshold = 1000, Re-activation Threshold = 500.
The alert warning message is sent if the queue length is more than 1000. If the
queue length oscillates between 1000 and 500, no further alert messages are sent.
When the queue length falls below 500, alert gets cleared and any further alert
message is only sent if queue length is more than 1000.
90

Kofax Communication Server KCS Portal Administrator's Guide
Field Description
Re-activation threshold If the number of entries of the configured parameter in a message queue becomes
less than the reactivation threshold, a message is sent specifying that alert is now
cleared.
Example: Trigger Threshold = 1000, Re-activation Threshold = 500.
The alert warning message is sent if the queue length is more than 1000. If the
queue length oscillates between 1000 and 500, no further alert messages are
sent. When the queue length falls below 500, alert gets cleared and a respective
message is sent.
Folder name The folder where the alert message is saved.
For more information about configuring alert messages, refer to the Client
Applications Administrator's Manual.
File Name The file name of the alert message.
Template Text Variable The variables to use for alert message. When alert messages are sent, these
variables are replaced with the configured values.
Queue Logging
Use this tab to configure performance counters (NT performance counter) to view the live status of Kofax
Communication Server queues. Once you add a new performance counter, it is added to the Queue
Logging grid. A log agent logs entries at regular intervals to the short term archive. These entries are
processed by TC/Report.
The log agent and the performance counters are set using a log agent entry in the queue user profile. For
example, to monitor the fax sending queue for the "F" user.
Note
• Queue length/age/pages logging must be enabled on sending queues, such as FAX, Telex.
• The sending queues must exist as user on Kofax Communication Server. Enable the Visible in
outbox option for the user.
• Performance counters are generated on the TCOSS server.
Add a Queue Log
1. On the Queue Logging tab, click Add Queue Log.
2. Configure the following fields for an event.
Field Description
Active Sets the queue logging to active or inactive. Only the active queue are used for
queue logging.
Queue Log Type Set the type of queue logging needed:
• Queue Length: Number of messages in a message queue.
• Queue Page: Number of pages in a message queue.
• Queue Age: Age of message queue in seconds
91
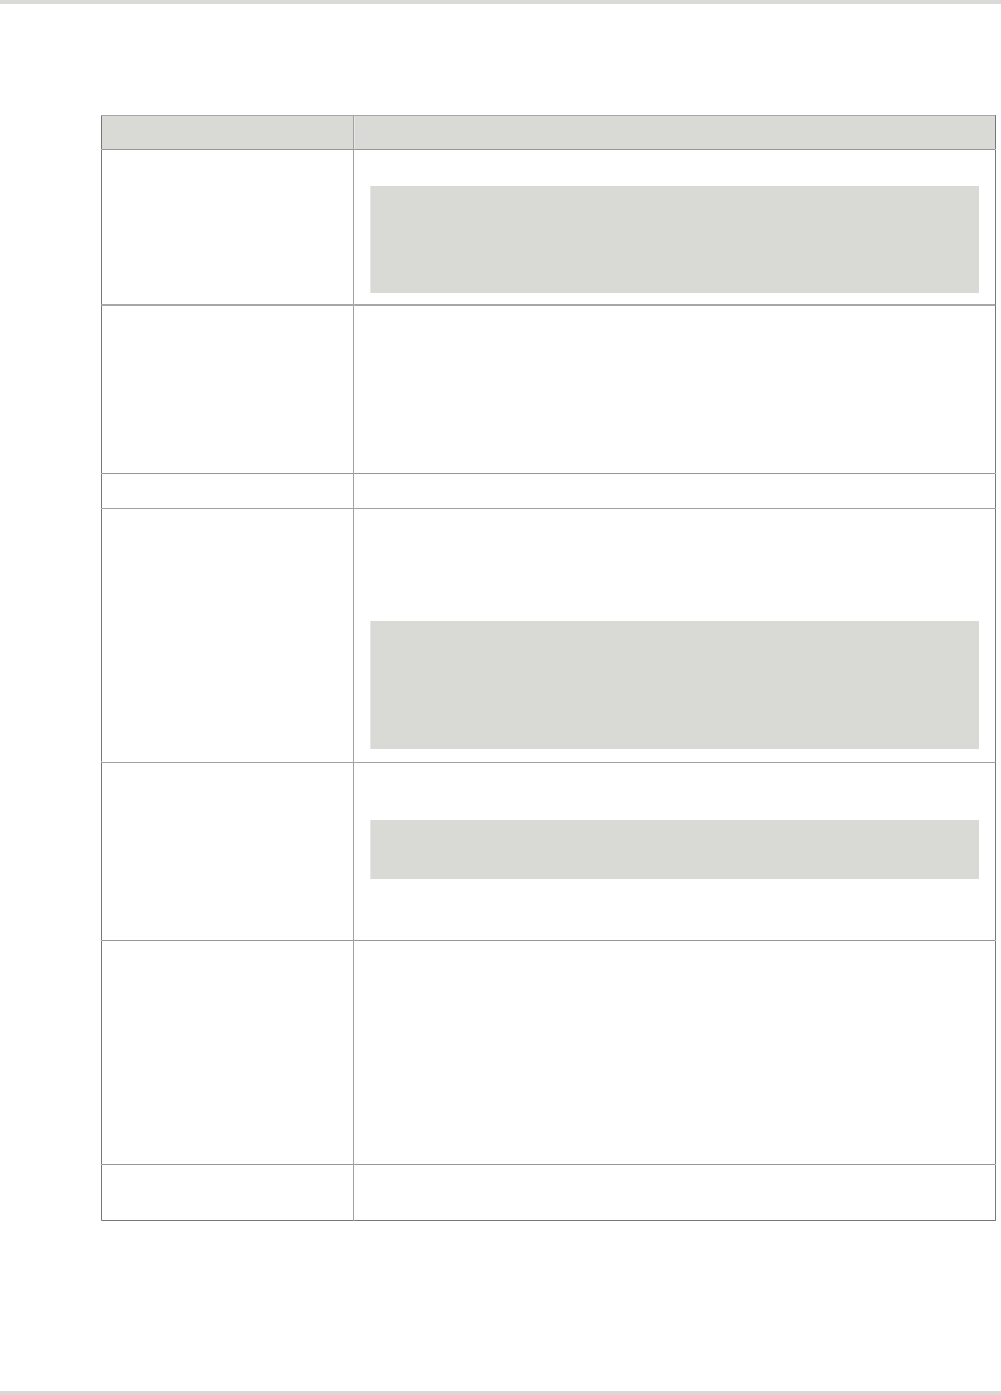
Kofax Communication Server KCS Portal Administrator's Guide
Field Description
Performance Counter Specify the name for the queue logging.
Note
• Different users cannot create the same performance counter.
• Special characters and umlaut characters are not supported.
Log Interval Specify the log interval in seconds.
• If set to zero, activates the NT performance counter.
• If set to a non-zero value, activates the queue length log agent plus an NT
performance counter.
The actual log interval is set to multiples of the alert check interval configured
in the system configuration.
Watch Select message folder to watch: Inbox or Outbox.
From • If you are watching an inbox folder, select the User or Group and specify the
user ID or group ID respectively.
• If you are watching an outbox folder, select the User or Group and specify
the user outbox or group outbox respectively.
Note
• In case of outbox, the From field is set to the current user profile and
you cannot change this.
• Leave the From field empty to include messages sent from any user.
To If you are watching an inbox folder, select the User or Group and specify the
user inbox or group inbox respectively.
Note In case of inbox, the To field is set to the current user profile and you
cannot change this.
If you are watching an outbox folder, select the User or Group and specify the
user ID or group ID respectively.
State Only the messages with the selected states are considered for queue logging.
Following are the possible states:
• A_deferred: Waiting for the intended time of sending.
• B_wait for document conversion: Waiting to be picked up by the TCOSS
document converter.
• C_active: Being sent out or waiting for a send retry.
• D_at next node: Already transferred but waiting for a confirmation.
• E_terminated: Sending failed, no further send retries.
Priority Select a range of message priority. Messages with priority in range of selected
priority are included.
Edit a Queue Log
1. On the Queue Log tab, select the queue log to modify.
2. Make changes as needed.
92

Kofax Communication Server KCS Portal Administrator's Guide
Remove a Queue Log
• To delete a single queue log, select the check box for the queue log to remove and click Remove
Queue Log. Click Yes to confirm deletion.
• To delete multiple queue logs, select the check box for the queue log to remove and click Remove
Queue Log. Click Yes to confirm deletion.
• To delete all queue logs, select the check box on the grid header and click Remove Queue Log. Click
Yes to confirm deletion.
FAXPlus
Use this tab to specify a range of fax extensions assigned to a customer.
Configure the following fields.
Field Description
Enable administration
of FaxPlus group
members
Allows you to define one administrator user for FAXPlus user group. All other
users of a customer belong to the same group. The group name is the name of the
administrator user.
FAXPlus administrators can change the addresses (fax, email) of users using TC/
WEB-MF.
Service Select a fax service.
Range of valid fax
extensions
The range of fax extensions that the FAXPlus administrator can define for the
group members.
Edit a user
1. On the Users page, select the user to edit, and click Edit User.
2. Make changes as needed.
See Add user for more information.
Remove a user
• To delete a single user, select the check box for the user to remove and click Remove User. Click Yes
to confirm deletion.
• To delete multiple users, select the check box for the users to remove and click Remove User. Click
Yes to confirm deletion.
• To delete all users, select the check box on the grid header and click Remove User. Click Yes to
confirm deletion.
Backup users
You can back up the user data in KCS Portal. When you backup a user, the corresponding address data
is also stored. Backing up a user helps in saving user data, for example, in case of any accidental data
deletion.
93

Kofax Communication Server KCS Portal Administrator's Guide
By default, KCS Portal backs up all the users for a selected Message Server. To backup specific users, do
the following:
1. In the Users grid, select the check box for each required user. You can also set the desired filters in
Filter Options from the Users grid to get a list of all specific users.
2. Select More > Backup. The user data is backed up and stored usually in the default download folder
that is set in browser’s settings of the browser you are using. For example, for the Chrome browser,
this location is:
c:\user\Downloads
The backup data is stored as a ZIP file. The default name format for this ZIP file is “KCSUserBackup-
DD_MM_YYYY-hh_mm_ss PM”. You can save this file with a different name.
The ZIP file contains two text files:
• user.txt: This file contains information of all the selected users.
• address.txt: This file contains information of all the linked addresses for the selected users.
Restore users
You can restore or import the user and address data stored in a backup file. If the information of a user
exists both in KCS Portal and in backup file, KCS Portal data is overwritten by the data in the restored file.
To import the data, do the following:
1. In the Users grid, select More > Restore.
Choose File to Upload screen appears.
2. Browse and select the backup file.
3. Click Open.
The data from the backup is imported.
4. Click Refresh.
User Addresses
This page displays all the addresses, including the active and inactive addresses, for all the users.
You can edit the address of a user directly from this page.
1. Select an address from the User Addresses grid and click Edit User. Alternatively, double-click the
address.
The user administration interface is displayed of the user to which the address belongs.
2. Make changes as needed, and click Save.
3. Click Refresh to view the changes in the User Addresses grid.
Events
This page displays all the events, including the active and inactive events, for all the users.
94

Kofax Communication Server KCS Portal Administrator's Guide
Modify an event
1. Select an event from the User Events grid and click Edit Event. Alternatively, double-click the event.
The user administration interface is displayed of the user to which the event belongs.
2. Make changes as needed, and click Save.
3. Click Refresh to view the changes in the User Events grid.
Remove events
1. You can remove a single event, multiple events or all events.
• To delete a single event, select the check box for the event to remove and click Remove Events.
• To delete multiple events, select the check box for the events to remove and click Remove
Events.
• To delete all events, select the check box on the grid header and click Remove Events.
2. Click Yes to confirm deletion.
Archive
This page displays the status of TC/Archive along with the list of all the volumes in the selected Message
Server. Based on the current status of a volume, you can perform various actions on it.
Clicking TC/Archive Status displays the current status of Archive Server such as, number of volumes,
last updated, number of online entries and so on. The actions that are currently active are displayed with a
selected check box. You can clear the check box for any actions and update the status of TC/Archive.
Column name Description
Number Volume number
Status Current status of a volume
A volumes can have one of the following status:
• Online, Open: Volume that is currently used for archiving. Only one volume can have
this state.
• Offline, Only Index Online: Only the index part of this volume is still online. The
messages have already been saved to DVD/CD and are part of an offline volume.
• Index Online on Index Volume nn: The index part of this volume is kept on-line on
volume nn, where nn indicates the volume number.
• Access Error: Read or write error occurred on this volume.
• Online: Complete volume is online.
• Offline: Complete volume is offline.
• Index for Volumes xx – yy: Volume that contains the index parts for volumes xx to yy,
where xx indicates the first volume and yy the last volume number.
Oldest Entry Oldest entry/message in the volume.
Newest Entry Newest entry/message in the volume.
Entries Number of entries in a volume.
95

Kofax Communication Server KCS Portal Administrator's Guide
Column name Description
Messages Number of messages in a volume.
Entries Deleted Number of entries deleted from the volume.
Messages Deleted Number of messages deleted from the volume.
Pending Updates Number of messages deleted from the volume since last volume update operation.
Last Last action performed on the volume.
Result Result of the last action performed.
Actions on volumes
Depending on the status of a volume, different sets of actions can be performed on a volume.
Volume is offline
• Cancel Operation
• Restore Index and Entries only
• Restore Volume from DVD/CD
• Set Path for Offline Volume
• Set Volume Online
• Set Index of Volume Online
• Rebuild Index Volume - Only for Index Volumes
• Update
Volume is online and TC/ARCHIVE does not support immediate DVD/CD writing
• Cancel Operation
• Prepare File for DVD/CD Creation
• Make DVD/CD
• Verify DVD/CD only
• Verify DVD/CD and Increment DVD/CD Count
• Remove File for DVD/CD Creation
• Set Volume Off-Line
• Set Index of Volume On-Line
• Set File Error
• Update
96

Kofax Communication Server KCS Portal Administrator's Guide
Only Index is Online
• Cancel Operation
• Prepare File for DVD/CD Creation
• Make DVD/CD
• Verify DVD/CD only
• Verify DVD/CD and Increment DVD/CD Count
• Remove File for DVD/CD Creation
• Set Volume Offline
• Set Volume Online
• Set File Error
• Update
Volume is online and TC/ARCHIVE supports immediate CD writing
• Cancel Operation
• Write DVD/CD Scheduled
• Write DVD/CD Immediately
• Verify DVD/CD only
• Set Volume Offline
• Set File Error
• Set Index of Volume Online
• Update
Following table lists the description of each action. For more details on actions, refer to the TC/Archive
Technical Manual.
Action Description
Prepare File For DVD/CD
Creation
Prepares a temporary file for a ‘Online’ volume to create a DVD/CD. If the status
of a volume is ‘Online, Open’, this action is deferred until the status of the volume
changes to ‘Online’.
A path in the form \\pcname\sharename can be specified for the temporary file.
If no path is specified, the file is created on the Archive server.
Make DVD/CD Once the temporary file of a volume is ready this actions starts the DVD/CD writer
software specified in the path field, such as, c:\apps\winoncd\winoncd.exe.
Verify DVD/CD Only If the DVD/CD is ready, this action verifies the DVD/CD. If the action is successful,
the Result column displays OK. This verification is different from verifying a DVD/
CD only with the DVD/CD writer software used to create the DVD/CD, because
this action checks the DVD/CD against the original data and not against the
temporary file.
The Path field must contain the path to the DVD/CD in the \\pcname
\sharename format.
Verify And Increment DVD/CD
Count
Performs the same action as "Verify DVD/CD Only" and increments the ‘DVD/CDs
written’ count for one.
97

Kofax Communication Server KCS Portal Administrator's Guide
Action Description
Remove File For DVD/CD
Creation
Deletes the temporary file created for DVD/CD creation. If a path in the \\pcname
\sharename form is specified, the Archive server tries to find the temporary file in
this directory and deletes it.
If the temporary files are created on the Archive server, this action is important to
free up disk space on the Archive server.
Cancel Allows canceling a selected operation as long as the server did not start with the
operation. If canceling is successful Last Action is blank and the Result column
displays ‘None’.
Restore index only If an Archive has to be rebuilt from DVDs/CDs, the online index is restored by
restoring index volumes from DVD/CD, using the normal “Restore volume from
DVD/CD”.
If some of the most recent volumes are not yet included in an index volume, and
cannot be restored fully because of a limited online disk space, use this function to
restore those volumes partially.
Write DVD/CD scheduled Starts writing the selected volume on DVD/CD at the time specified on the TC/
ARCHIVE server.
You can specify the schedule using the following registry key:
HKEY_LOCAL_MACHINE\SOFTWARE\TOPCALL\TCARCH\NetworkStorage
\Schedule
Write DVD/CD immediately Starts writing the selected volume on DVD/CD immediately.
Set volume offline Sets the volume offline.
Set volume online Sets the volume online.
Set index of volume online Sets the index and the entries on-line.
Set file error When restoring an Archive from DVDs/CDs, if a single DVD/CD is missing from
the intended online range, this volume may be set “on-line” (although the data
base files of this volume are not on disk). File error flag is set for this volume. This
volume is skipped during any search, and the search through the complete online
range does not stop at the missing volume.
Rebuild index volume Is used to rebuild an index volume, such as, in case when an Archive has to be
restored from DVDs/CDs and the DVDs/CD of the index volume was lost.
Update Updates the volume and reset the Pending Updates column. See Update volumes
in Archive Server.
Update volumes in Archive Server
You can use this feature to update volumes in Archive Server. Update volume feature is only available in
user interface if following conditions are true:
• The volume update function must be enabled using the TC/Archive registry key UpdateLog\
EnableVolumeUpdate. The value of this key must be greater than zero when the last time TC/Archive
was started and greater than 1 when the delete request occurs.
• User must have Archive volume update right assigned in KCS Portal.
98

Kofax Communication Server KCS Portal Administrator's Guide
Note For each delete operation in archive, the value of "Pending update" increases depending on
the number of deleted message. The maximum number of pending updates is defined using the "TC/
Archive" registry key UpdateLog\MaxPendingUpdates. The default value of this key is 100000.
Therefore, it is not necessary to perform the" Volume update" operation for each delete operation.
1. From the list of available volumes, select the required volumes to update.
2. In the Next action field, select Update.
3. Click Execute Action.
The volumes are updated and the value in the Pending update column reset for the selected
volumes.
99

Chapter 10
Troubleshooting
Possible errors
This section lists solutions to issues that may occur while you are working with KCS Portal.
Error on initial login
Problem: After the initial login to KCS Portal, the following error is displayed:
“The following exception occurred:
Access to the path ‘C\TCOSS\KCSPORTAL\SharedConfig\ServerConfix.Xml’ is denied.
KCSPortal is not operational.
Please contact your system administrator.”
Cause: Permissions for KCS Portal identity were not correctly set.
Resolution: Verify the permissions in Internet Information Services.
Error on Login
Problem: User getting following error on login:
“Login failed. Retry?”
Cause: There is probably a mismatch with the authentication mode.
Resolution: Verify the authentication mode. See Authentication Mode.
Error on login during normal operation
Problem: User suddenly gets following error during normal operation of KCS Portal:
“Login failed. Retry?”
Cause: Permissions for KCS Portal identity may have changed since the first KCS Portal startup (after
iisreset). There is probably a mismatch with the authentication mode.
Resolution: Verify the permissions for KCS Portal Identity in Internet Information Services.
Verify the authentication mode. See Authentication Mode.
100

Kofax Communication Server KCS Portal Administrator's Guide
Authorization error on login
Problem: User logs in but sees following error:
“You are not authorized to use this application. Please contact your system administrator.”
Cause: The user has valid Windows credentials, but is not a member of any KCS Portal groups.
Resolution: Verify that user is a member of a KCS Portal group. See Add groups.
KCS Portal not accessible after installation
Problem: Sometimes KCS Portal is not accessible after installation and the following error occurs:
“Service Unavailable
HTTP Error 503. The service is unavailable.”
Cause: Iisreset command may be needed.
Resolution: The iisreset command is needed to access KCS Portal.
Monitor view does not show any information
Problem: Monitor view does not show any information (Application Servers and Message Servers
containers are not available).
Cause: WMI services may not have restarted.
Resolution: Try restarting both Kofax WMI providers for KCS Portal services.
HTTP error 405
Problem: Following error is displayed:
“Http error occurred (‘Method Not Allowed’) error code(‘405’)”
Cause: This error may occur on any attempt to change any data on the server (for example, edit, delete
server). This means that one or some of the Http verbs PUT, DELETE, POST or GET are rejected by IIS.
Resolution: Verify that WebDAVPublishing is NOT installed. See IIS Configuration.
HTTP error 403
Problem: Following error is displayed:
“Http error occurred (‘Forbidden’) error code(‘403’)”
Cause: This error may occur suddenly during a working session, if at the same time administrator
removes the current user’s group and role from the configuration.
101

Kofax Communication Server KCS Portal Administrator's Guide
For example, if the user was logged in as the root administrator, but someone removes this role, the next
Ajax request from that user’s browser may be rejected.
Resolution: Verify if the user’s group is available in KCS Portal.
Server error when starting default login page
Problem: Following screen is displayed.
Cause: Server error may occur at the time of running KCS Portal.
One reason for this error can be that on the server where KCS Portal is installed, TC/Web is also installed
and in IIS (Internet Information Services) Manager, TC/Web is set as the Default Web Site and KCS Portal
is set up as an application in the Default Web Site.
To verify this error, on the server where KCS Portal is installed, browse KCS Portal. The following error
message should be displayed:
Description: An error occurred during processing of a configuration file required to service this request.
Please review the specific error details below and modify your configuration file appropriately.
Parser Error Message: Could not load type ‘MySessionIdManager’.
Resolution: Follow the instructions to resolve the above error:
1. On the server where KCS Portal is installed, open the web.config file of TC/Web (default location is
c:\tcoss\tcweb).
2. Verify that the <configuration> element in the web.config file includes the <location> element as
shown below:
<Configuration>
<location path="" inheritInChildApplications="false">
...
...
</location>
</Configuration>
3. If <location> element is not available, please add this element and execute iisreset.
102

Kofax Communication Server KCS Portal Administrator's Guide
Blank screen displayed when starting KCS Portal
Problem: Blank screen displayed when starting KCS Portal
Cause: This error may occur if you are configuring a new KCS Portal system by copying the
ServerConfig.xml file from an existing KCS Portal system.
Resolution: To resolve this error, execute the iisreset command (command line iisreset).
Troubleshooting WMI services with Windows PowerShell
Verify whether the WMI objects/class are installed correctly. Open the Windows PowerShell ISE
application.
WMI classes for KCS Portal use the namespace (ns) root\kofax\kcsportal.
PowerShell Purpose/Command/Excerpt of command’s output
Lists all KCS Portal WMI classes
gwmi -ns root\kofax\kcsportal –list
Lists all methods of KCS Portal WMI class “applicationserver”
gwmi -ns root/kofax/kcsportal –class server | get-member –membertype method
Lists all properties of KCS Portal WMI class “server”
gwmi –ns root/kofax/kcsportal –class server | get-member –membertype property
103

Kofax Communication Server KCS Portal Administrator's Guide
PowerShell Purpose/Command/Excerpt of command’s output
Lists all KCS Portal WMI classes
gwmi -ns root\kofax\kcsportal –list
Lists all methods of KCS Portal WMI class “applicationserver”
gwmi -ns root/kofax/kcsportal –class server | get-member –membertype method
Lists all properties of KCS Portal WMI class “server”
gwmi –ns root/kofax/kcsportal –class server | get-member –membertype property
104
