Replay Media Catcher 2024 User Guide
Table of Contents
Quick Start ................................................................................................................................................. 2
Tutorials ..................................................................................................................................................... 3
Overview and the Home Tab ..................................................................................................................... 4
Replay Media Catcher Main Toolbar ......................................................................................................... 6
Replay Media Catcher tabs ....................................................................................................................... 7
Replay Media Catcher Home Tab Central Content .................................................................................... 8
Capture Method - Stream Downloader .................................................................................................. 10
Capture Method - Audio Recorder .......................................................................................................... 13
Capture Method - Digital Video Recorder ............................................................................................... 17
Guides: Exploring the Media Guides ....................................................................................................... 19
Schedule Recording ................................................................................................................................. 20
Monitor Webcams and Live Streams ...................................................................................................... 23
Sengs Tab: Customizing Replay Media Catcher ................................................................................... 26
Get Support Tab ...................................................................................................................................... 38
Converng Media Formats...................................................................................................................... 40
Advanced Internet Downloading Sengs ............................................................................................... 44
Keyboard Shortcuts ................................................................................................................................. 70
Disabling Secure Boot on Windows 8.1 Systems .................................................................................... 71

Quick Start
Watch these videos to get up and running quickly with Replay Media Catcher:
• How to Auto-Download from YouTube and Other Streaming Media Sites
• How to Use the Copy/Paste Method in Replay Media Catcher to Download Videos
• How to Record from Pandora and other Music Services
In most cases, capturing online media is as easy as toggling the AUTO switch to the On
position.
If this is the first time you are using Replay Media Catcher, you may get a notice about our SSL
Scanner. This helps facilitate capturing streaming media over HTTPS connections.
Replay Media Catcher will automatically recognize streaming media as you browse the Internet.
When streaming media is recognized, it will be saved to your computer. For more information,
please read Capture Method - Stream Downloader.
If you don't want Replay Media Catcher to constantly monitor for streaming media, toggle the
AUTO switch to the Off position:
To save media on demand, add the URL of the page from which you want to download media
into the URL Download field:
Replay Media Catcher will then find the media on the page and save it for you. For more info,
please see Saving Online Media with the URL Bar and DVR Online Videos with the URL Bar.
If the media playing in your browser (or via the Drag & Drop or Copy & Paste method) cannot
be saved, the media is likely protected from download. In these cases, you can still save the
media using Replay Media Catcher's Audio Recorder or Digital Video Recorder features.

Tutorials
When you first launch Replay Media Catcher, you will be presented with an overview of the
software and an opportunity to do a guided walk-through. We strongly recommend you watch
the tutorial, as it highlights commonly used features and teaches you how to use them.
You can reopen the tutorial screen any time via the Main menu icon at the top right and
selecting Tutorial.
We also recommend that you watch our video tutorials: Video Tutorials
Overview and the Home Tab
Overview
Replay Media Catcher is an easy-to-use, yet powerful app to capture video and audio files from
thousands of websites while you play them in your Web browser. You can then use the saved
files in any way you like, including transferring them to your phone or tablet, compiling albums
and playlists on your PC, and more.
Here are the key features of Replay Media Catcher:
1. Automatically capture streaming media
2. Save online videos in original quality
3. Record audio from any source as it plays on your PC
4. Automatically convert recorded files to a format of your choice
5. Schedule recordings from any playable URL
6. Use embedded video, music and radio guides to help you find interesting content to save
7. Automatically identifies and tags recorded MP3 files thanks to the Music Fingerprinting
technology
The Home Tab
When you start Replay Media Catcher for the first time, the default view is the Home tab
for Stream Recording.


Replay Media Catcher Main Toolbar
At the top of Replay Media Catcher is a toolbar, which adjusts depending on the chosen Capture
Method.
When the Stream Downloader Capture Method is chosen, the AUTO button will appear, as seen
on the above screenshot. Please read Capture Method - Stream Downloader to learn more about
this method and how to use it.
At the top right, you will find the main toolbar icons for accessing the most common recording
features:
• Registration: If you are still in trial mode, you can register Replay Media Catcher
using this button. If you are already registered, the button will not appear.
• Stream Downloader Mode: Use this mode to download from popular sites like
YouTube.
• Audio Capture Mode: Great for recording audio from any streaming music site.
• Digital Video Recorder: A powerful DVR recording method for use with
premium sites like Netflix and Hulu.
• Small interface mode: Clicking this button will shrink Replay Media Catcher into
a much smaller, streamlined interface.
• Output folder location: Use the Output Folder button to change where to save
captured media. This action is also available in Settings.
• Main menu: The Main Menu button provides access to all program settings and
options.

Replay Media Catcher tabs
On the left-hand side of the user interface you will find tabs for:
• Most of your time will be spent on the Home tab, from which you can view
all of your saved media.
• The Guides provide a convenient way to find new media to download.
• Use Schedule to have Replay Media Catcher record shows at designated
times.
• Use Settings to customize Replay Media Catcher’s behavior.
• The Get Support tab provides more product information and ways to contact
us.

Replay Media Catcher Home Tab Central Content
The contents of the central area will change depending on the chosen tab. When on
the Home tab, all your saved media will be shown in the central file listing section.
1. At the top left is the global conversion pull-down menu. Please refer to the Converting
Media Formats section for more information.
2. At the top right is a Search field where you can search though your saved media.
3. At the bottom, you can see a generated thumbnail for the media and information about
it.There are icons for getting more information, playing the media, and
revealing the Windows folder where the media was saved.
4. In the middle is the saved media listing itself. The name of the media as well as file
characteristics are listed. Clicking on column headers will change the sorting order.

Right-clicking on a saved file will bring up a context menu for additional actions:
5. Stop: Stop the active download or recording
6. Delete: Delete the selected file(s)
7. Rename: Rename the selected file
8. Remove: Remove the selected file(s) from the listing but do not delete them from the
computer
9. Play: Launch the appropriate media player for the media type
10. Convert: Convert the selected file(s) to the media format chosen in the global conversion
pull-down
11. Save to MP3: Quickly convert the selected file(s) to MP3 without having to select a
global conversion setting

12. Combine: Merge the selected files into one continuous file - see Split and Combine for
more information
13. Fix FLV: Adjust the duration or time stamp for selected file(s) - sometimes necessary for
FLV files that have audio/visual synchronization problems
14. Restart: Attempt to restart the download/recording - not always possible depending on
the media source
15. Import into iTunes: Send the selected file(s) to iTunes
16. Import into WMP: Send the selected file(s) to the Windows Media Player library
17. Show in folder: Show the saved media in its Windows
18. Artwork: Open the file Properties window to show the downloaded artwork or generated
thumbnail
19. Lyrics: Open the file Properties window to show any lyrics that might have been
obtained
20. Lookup Tags: Attempt to find artist and album information (a.k.a. ID3 tags)
21. Properties: Open the Properties window to see more information about the saved media
Capture Method - Stream Downloader

Replay Media Catcher will detect and download video and music from thousands of sites that are
streamed via many different protocols and in many different formats. Click here for the full list
of supported protocols.
Browser Independence
It does not matter what browser or other application you use to watch streaming videos or listen
to music online. This is because Replay Media Catcher monitors the network stream for media,
and once streaming media is detected, it will download or record the stream.
What Is the Difference Between Recording and Downloading Internet Streams?
When Replay Media Catcher detects a compatible stream, it will try to create another connection
to download it. When Replay Media Catcher is downloading, there is no need to continue to play
the video or music in your browser.
Sometimes it is not possible for Replay Media Catcher to create a separate connection and
download the media. In that case, Replay Media Catcher will record the stream as it plays in
your browser. When Replay Media Catcher is recording in this manner, you must continue to
play the video or music in your browser. If you stop playback, Replay Media Catcher will also
stop recording.
Replay Media Catcher displays Downloading or Recording in the Status column of the Home tab
for the respective capture methods. If a stream is protected and cannot be downloaded or
recorded directly, you can use the Audio Recorder (for audio content) or the Digital Video
Recorder (for video content) to save the media.
Monitoring For Internet Streams with AUTO
You must start monitoring for available Internet streams BEFORE you watch or listen to media
that you want to capture. First, make sure that the capture method in the top right is set to Stream
Downloader, as seen above. Toggle the AUTO switch on before browsing to the media you want
to capture. .
Saving Online Media with the URL Bar
You can perform manual downloads using the URL bar, which can be found directly beneath the
AUTO switch. As the hint text suggests, you can manually type in a URL, copy & paste a URL,
or drag & drop a URL into the text field. If you already have a URL copied to the Windows
clipboard, you can use the clipboard button at the end of the URL field. Then press the Enter
key or click the download arrow button. Replay Media Catcher will visit the URL and

attempt to grab streaming media from it. The DVR button in the bar will launch the Digital
Video Recorder to record the media as it plays in your browser (refer to Capture Method -
Digital Video Recorder for more information).
Media Extractor - Choosing Media Quality
Often, online media will be streamed in multiple formats and qualities. For compatible streams,
Replay Media Catcher will detect the available media formats and let you choose which formats
you want to save.
Expand the formats list and double-click on the one you want to download. The line will turn
green, indicating that the video is queued for download. If you are interested in only saving a
particular format or quality all the time, you can configure those preferences with the Preferred
Download Quality and Preferred Download Format drop-down menus at the bottom of the
window.
If you change your mind about preferred formats, you can reset the preference in Settings ->
Internet Downloads.
File Naming

Please refer to Settings -> Naming Rules and Advanced Settings
Capture Method - Audio Recorder
Audio recording is a great way to capture music when downloading the file fails. Saving audio
using this method will work regardless of the format, protocol, or web site where the media is
posted.
First, switch to the Audio Recorder by changing the Capture Method in the top right toolbar. The
green bull's-eye RECORD button will appear at the top left. Once clicked, the
RECORD button will turn to a red square STOP button .
Replay Media Catcher will start actively monitoring for audio media. When Replay Media
Catcher is actively recording audio, the VU meter will animate at the lower left of the interface,
and the recording will be seen on the Home tab.

Splitting and Combining Recordings
While recording, you may wish to begin the creation of a new file, ending the first, without
stopping the recording process. This is easily achieved using the Split Now scissors icon in the
toolbar .
Sometimes, based on the automatic silence detection settings (see Settings -> Audio
Recording and DVR), a recording might be accidentally split into two or more files.
If that happens, you may want to join multiple files together to make a long recording.
In the Home tab, simply select the files you wish to combine, right-click and choose Combine.

The Combine window will appear. Reorder the recorded clips as you wish by dragging and
dropping them, with the top-most item being the first. Give a name for the combined recording,
and press the Combine button.
The Combine option can also be accessed from the Main Menu icon or by pressing the +
key on your keyboard's number pad.

Small Interface
If you are capturing a lot of media from the Internet (a playlist of songs, for instance) then you
may wish to use the Small Interface by clicking in the toolbar.
The progress of active recordings will appear in a movable box at the lower right of the screen.
You can turn off this option in Settings -> Personalization -> "Display progress alerts when
minimized". The Small interface can be dragged to different locations on your screen and you
can return to the Main Interface by clicking .
Setting the Output Folder
You can change the default output folder to which files are saved in by clicking in the
toolbar. You can also change the location via Settings -> Output Folder.
Audio Settings and Naming (a.k.a. Tagging) Rules
Please view the Settings sections on Audio Recording and Naming Rules.

Capture Method - Digital Video Recorder
Videos from some streaming websites cannot be directly downloaded or recorded using
the Stream Capture method. For these cases, Replay Media Catcher has a powerful Digital
Video Recorder feature. In this mode, only one recording can be done at a time.
Currently, DVR supports a wide variety of popular sites including Netflix, Amazon Prime,
Disney, and more.
To select Digital Video Recorder, click on the camera icon in the top right toolbar. The Digital
Video Recorder feature is available on computers running Windows 8, 10 or 11.
DVR Online Videos with the URL Bar
As with the Stream Downloader capture mode, website URLs can be dragged & dropped (or
copied and pasted) into the URL bar at the top of the Replay Media Catcher interface. The

clipboard icon can also be used to paste a URL that you have copied from the browser. Then
press the DVR button to the right in the URL bar. Replay Media Catcher will go to the site
and attempt to make a recording of the video there. If the recording fails, you may need to use
our DVR Browser to specifically start the recording, especially if login credentials are necessary.
DVR Online Videos with the DVR Browser
Replay Media Catcher includes a convenient web browser for making digital video recordings of
online media easier. To open the DVR Browser, click the globe icon in the toolbar . The
DVR Browser window will open and you'll get a list of popular video streaming websites.
You can click on a service thumbnail to go to the site, or you can enter any URL in the URL
field. Reopening the DVR Browser will take you back to the last site you visited, and
the Home button will return you to this main list.
Once you found a video you want to capture and it's playing in the DVR Browser, click
the REC button. The browser window will close and the video will be recorded in the
background. You can check the mini live preview of the recording in the lower left corner of the

Replay Media Catcher interface.
Note: Replay Media Catcher uses audio redirection by default, so there will be no audio.
DVR recordings are meant to be done in the background, so there will be no audio playing in the
DVR Browser or during an active recording. If you do hear audio from the video, then our audio
redirection is not locked into the media or you have turned off the setting. Close and reopen the
DV Browser. If you want to hear the audio while a recording is taking place, turn Off the Audio
Redirection option in Settings -> DVR.
Additional options:
1. Recording Duration: If you want to record for a specific amount of time, enter the
number in the Recording Duration box at the top right of the DVR Browser
window. Recordings will then ignore the silence detection routines (see Settings ->
DVR). Be sure to include enough time for any commercial breaks.
2. Settings: Some websites open embedded windows to play their videos. When that
happens, you need to turn on the Adjust embedded player for DVR setting via
the DVR Browser Settings gear icon.
DVR Automatic Silence Detection
Automatic silence detection is controlled via Settings -> DVR where you can enable or disable
the Split on silence feature.
Replay Media Catcher's DVR includes methods to detect if there is silence during a recording.
This typically indicates that a video has completed or that a commercial break has been
encountered. By default, Replay Media Catcher will "split" a recording when silence is detected
and create separate recordings. This conveniently allows you to subsequently delete
advertisements and only watch the content you are interested in. Video recordings can then be
recombined into a single video as previously described for audio recordings.
If a longer period of silence is detected, Replay Media Catcher will completely stop the
recording under the assumption that the video has completed. This "timeout" feature can be
adjusted in Stop if no sound (sec) in Settings -> DVR. Please refer to the Settings section of this
User Guide for more information.
Guides: Exploring the Media Guides
Various Guides are available to help you find Videos, Music, Radio, and Podcasts to download
and record.
Some guides let you download and schedule downloads directly from within the guide itself.
Others require Internet monitoring or audio recording to be switched on to capture media as it
plays in the guide.

Guides that allow direct downloads let you schedule content for download or recording. Using
the guide as a reference for scheduling recordings ensures that correct information will be
entered into the Scheduler.
Schedule Recording
Replay Media Catcher contains a sophisticated scheduler that allows you to schedule regular and
unattended downloads and/or recordings. The scheduler takes into consideration the time zone of
the source and takes daylight saving into account, automatically adjusting the time difference.
This is particularly important for regular radio recordings.
Replay Media Catcher does not need to be running when a download or recording is scheduled.
It will automatically start using the Windows Task Scheduler.

1. New Schedule icon: Click the New Schedule icon to create a new schedule from
scratch, or use the Guides to get initial schedule information.
2. Save Schedule icon: The Save Schedule icon will become active when there are
unsaved changes to a schedule.
3. Delete Schedule icon: Deletes the selected schedule.
4. Run Now Schedule icon: Clicking Run Now will run the recording immediately.
The recording will last until the end time set in the Schedule options.
5. Import icon: The Import icon allows you to import previously exported
schedules.
6. Export icon: The Export icon allows you to save a schedule file to your computer
for later use.

You can configure a scheduled download or recording as follows:
• General tab
o Schedule Name: This is the name of the scheduled recording/download. You can
also use the following curly bracketed parameters to add start time information to
the file name: {D} - day, {M} - Month, {Y} - year, {H} - Hour, {MI} - minute,
{S} - second.
o Capture Method:
▪ Audio Record (Application): Audio recording will be switched on and
the URL will be opened in the default browser. Whatever is streamed will
be captured.
▪ Audio Record (Device): Audio recording will be switched on for content
from an external device such as Line In or Microphone. View Settings-
>Audio Recording for information on how to select the device.
▪ Audio Record (What You Hear): Audio recording will be switched on
and all detected audio on your system will be recorded.
▪ Auto Detect Download: The Stream Downloader capture method will be
activated and a browser window will open the desired URL. Whatever is
streamed will be captured.
▪ Digital Video Record: The Digital Video Recorder capture method will
be activated and Replay Media Catcher will start recording from the
desired URL.
▪ Direct download by URL: The URL will be downloaded directly. This is
particularly useful for audio sites that provide a perpetual stream address.
o At Complete: Choose what you want Replay Media Catcher to do when the
scheduled item has completed recording:
▪ None: Take no additional action.
▪ Quit application: Replay Media Catcher will be closed.
▪ Stop Capture: The current recording method will be stopped.
o The remaining, second row of options in the General tab depend on the selected
Capture Method: Audio Record (Application), Audio Record (What You
Hear), and Auto Detect Download
▪ Launch URL In:
▪ External Player: An external program (your default Windows
player) will be launched.
▪ Web Browser: The website URL will be opened using your
default web browser.
▪ Windows Media Player: Windows Media Player will be launched
for handling playback of the stream.
▪ URL: The web URL to be opened containing streaming media
o Audio Record (Device)
▪ Device: A list of available audio recording devices from your system will
be shown.
o Digital Video Record
▪ URL: The web URL to be opened containing streaming video.
o Direct download by URL
▪ Download Method:
▪ Normal URL: A URL with no specific formatting
▪ Playlist URL: A URL formatted as a playlist
▪ Radiotime URL: A URL formatted for Radiotime / TuneIn programming
▪ RSS Feed: A URL to a RSS feed
▪ Torrent Magnet Link: A URL pointing to a torrent magnet link
▪ YouTube Channel ID: A YouTube Channel ID
▪ Normal URL: The direct URL to the streaming media source.
• Schedule tab
o Choose the days of the week on which the scheduled recording will run.
o Timezone: The time zone of the start time. This will be used to schedule the
download at the correct time on your machine. Each time a scheduled download
occurs, the start time is updated according to the time zone to take into account
daylight savings changes or your machine and this time zone.
o Start Time: The start time in the given time zone.
o Start Date: Items with published dates after this date will be downloaded. Each
time the schedule runs, this date will be updated ensuring only newly published
items are downloaded.
o Duration: The duration of the recording. The recording will be stopped once the
specified duration is reached. -1 means unlimited duration.
• Settings tab
o Import into iTunes: When On, recording will be imported into iTunes (if in
MP3, M4A, M4B, or MP4 format).
o Mute Volume: Mute the computer during recording time.
o Specify output folder: This option gives you the ability to save recordings to a
specific location other than the overall media Output folder.
o Convert to this format and quality once complete: Select a preset file
conversion setting once the download is complete.
• Split tab: Recordings can be spit into smaller files
o Don't Split: Leave recording as one file.
o Split Every X Minutes: Create a new fileat the requested interval.
o Split At: Recordings can be split at specific time points during the hour. Use 0 to
split at the top of the hour. Leave -1 in the field to not use this setting.
• Override Tags tab: use these values instead of the data obtained via ROVI database for
formats such as MP3 that support tagging.
o A bracketed shorthand can be used to add time and date information to the file.
{D} - day, {M} - Month, {Y} - year, {H} - Hour, {MI} - minute, {S} - second
o ID3 Title Tag: Leave recording as one file.
o ID3 Album Tag: At the requested interval, create a new file.
o ID3 Artist Tag: Recordings can be split at specific time points during the hour.
Use 0 to split at the top of the hour. Leave -1 in the field to not use it.
Monitor Webcams and Live Streams
Replay Media Catcher contains a sophisticated monitor, which allows you to monitor webcam
and live stream pages so that you never miss a broadcast.

• Start Monitors button: Start all enabled monitors.
• New Monitor button: Create a new monitor.
• Save Monitor button: The Save Monitor button will only become active when
there are unsaved changes to a monitor.
• Delete button: Deletes the selected monitor.
• Import button: The Import button will allow you to import previously exported
monitors.
• Export button: The Export button will allow you to save a file to your computer
containing all the details of your monitors.
You can configure the web page containing the webcam or live stream to monitor as
follows:
• General tab
o Monitor Name: This is the name of the monitor. You can also use the following
curly bracketed parameters to add start time information to the file name: {D} -
day, {M} - Month, {Y} - year, {H} - Hour, {MI} - minute, {S} - second.
o Check Interval: Enter the interval (in seconds) that the page will be checked at
for a live broadcast.
o URL: This is the URL of the page hosting the live stream. The live stream at this
URL must be suitable for capturing using the Page Extraction Method.
o Enable: This switch enables or disables the monitor.
• Settings tab
o Import into iTunes: When on, the recording will be imported into iTunes (if in
MP3, M4A, M4B, or MP4 format).
o Specify output folder: This option gives you the ability to save recordings to a
specific location other than the general media Output folder.
o Convert to this format and quality once complete: Select a preset conversion
setting for the finished download.
• Split tab
This tab provides settings that let you automatically split recordings into smaller files.
o Don't Split: Leave the recording as one file.
o Split Every X Minutes: At the requested interval, create a new file.
o Split At: Recordings can be split at 8 specific time points during the hour. Use 0
to split at the top of the hour. Leave -1 in the field to not use it.
• Override Tags tab
For formats such as MP3 that support tagging, use these values instead of ones obtained
via ROVI database lookup.
o A bracketed shorthand can be used to add time and date information to the file.
{D} - day, {M} - Month, {Y} - year, {H} - Hour, {MI} - minute, {S} - second
o ID3 Title Tag
o ID3 Album Tag
o ID3 Artist Tag

Settings Tab: Customizing Replay Media Catcher
The Settings tab allows you to customize the behavior of the software. All settings have tooltips
that provide information about them when you hover your mouse over them. If you want to
return to the default settings, press the Reset button located on the right, under the main
toolbar.
Personalization
• Delete to Recycle Bin: If ON, deleted files will be sent to the Recycle Bin. If OFF,
deleted files will be immediately removed from computer.
• Enable sound effects: If ON, sound effects will be active, and you will get an audible
tone when recordings complete.
• Prompt on quit: If ON, you will be prompted by Replay Media Catcher when you close
the program, giving you a chance to check if there are any running downloads.

• Clear list on exit: If ON, the recording listing will be cleared when you close Replay
Media Catcher. Files will not be deleted. If OFF, Replay Media Catcher will keep a
complete list of recordings even after multiple sessions.
• Always on top: If ON, Replay Media Catcher will attempt to stay above all other
windows on your screen.
• Use IE Proxy settings: If ON, Replay Media Catcher will use Internet Explorer's proxy
settings as determined in Control Panel\Network and Internet\Internet Properties. This
setting is recommended for recording over HTTPS connections.
• Start with small interface: If ON, Replay Media Catcher will start in the Small
Interface mode.
• Import into iTunes: If ON, all recordings/downloads that are in iTunes compatible
formats will be sent to the iTunes Library. If this button is not present, iTunes was not
detected on your system. iTunes-compatible formats include MP3, WAV, AAC, and
MP4/M4V.
• Auto resize columns: If ON, the columns on the Home tab will automatically resize
based on the length of each recording's name and details.
• Choose player based on file association: If ON, playing a file from within Replay
Media Catcher will launch an appropriate player based on Windows default settings. If
OFF, the Applian FLV and Media Player will be launched.
• Display progress alerts when minimized: If ON and Replay Media Catcher is
minimized or in the Small Interface mode, a movable progress window will appear on
your screen, letting you know the status of the download/recording.
• Minimize to Windows System Tray: If ON, Replay Media Catcher will minimize to the
System Tray instead of the Windows toolbar.
• Prevent sleep/hibernation: If ON, your computer's sleep & hibernation settings will be
disabled.
• Scheduler can wake: If ON, scheduled recordings will wake your computer so that the
recording is not missed if your computer is in sleep mode.
Output Folder

By default, your recordings will be placed into an Applian\Replay Media Catcher folder inside
your Documents folder. You can easily change to a number of different common folders. If you
have a "cloud" service installed, Replay Media Catcher will recognize it and provide that as a
save location option as well. Links for three common cloud services are supplied if you wish to
install them.
If you want a custom location for saving the downloaded and recorded media, select
the Custom and specify a custom output folder in the Output Folder field at the bottom of the
screen.
Internet Downloads

When you turn on the Auto mode for Stream Downloading, Replay Media Catcher will watch
network traffic for data that looks like media. Replay Media Catcher does this using either
the WinPcap Monitor or Applian Network Monitor driver. If you are not seeing any media
being downloaded when Auto is ON, then you may need to switch to the other
driver. WinPcap is the preferred driver due to fewer conflicts with other software, and Network
Monitor is specifically recommended for downloading media over VPN connections.
• Network interface WinPcap will monitor: Some computers will have multiple network
interfaces. WinPcap will typically choose the correct one, but this pull-down can be used
to try other interfaces.
• Monitor HTTP/SSL: If you want to download media over HTTPS connections, this
setting needs to be ON. Replay Media Catcher will then use its proxy + certificate system
to make it possible to download from HTTPS websites.
• Dial Up/VPN Connection: Some computers may have multiple network connections, as
determined in Control Panel\Network and Internet\Internet Options. If Replay Media
Catcher is unable to download media when Auto is ON, you may need to use this pull-
down to see if data is passing through a different connection.
• Concurrent Downloads: The number of simultaneous downloads before additional
requests are queued. In general, only increase this for broadband connections > 20 Mbps.

• Minimum duration in seconds: Downloaded media smaller than this duration are
considered to be ads and are automatically deleted. Set to -1 to disable this feature.
• Preferred Download Quality: For sites that offer multiple streaming qualities, you can
have Replay Media Catcher prompt you each time asking which you would like to
download, or you can have Replay Media Catcher automatically download the preferred
quality (High, Medium, Low).
• Preferred Download Format: For sites that offer multiple streaming file formats, you
can have Replay Media Catcher prompt you each time for the preferred download format,
or you can have Replay Media Catcher automatically download the preferred format
(Any, flv, mp4, 3gp, webm, mkv).
• Advanced Settings: Settings that will not normally need to be edited can be accessed via
the Advanced button. Please see Advanced Settings for more details.
• Block the download of adverts: If ON, Replay Media Catcher will automatically ignore
streaming media from known advertisers. The list of advertiser URLs can be found
in Advanced Settings, where you can add or delete sites.
• Start automatic detection on start: If ON, the Auto mode will be turned on
immediately when Replay Media Catcher starts.
Audio Recording

• Audio recording method:
o Application: In the Application recording method, audio is directly pulled out of
running applications. The applications from which Replay Media Catcher can
grab audio are set via the Application configuration Apps button.

o Device: When Device is selected, you will be able to choose a hardware device
connected to your computer, such as Line In, from which to record audio.
o Stereo Mix (What you hear): When Stereo Mix is chosen, all audio from your
computer will be recorded. A Buffer value will be presented, and larger buffer

values will reduce CPU load during recording.
• Output format: Choose the audio format you would like to record in.
• Bit Rate: Compressed, constant bit rate Output formats will allow you to choose the bit
rate that you would like for recording. Variable Bit Rate (VBR) and uncompressed
formats (such as WAV) do not have this option.
• Minimum duration in seconds: Recordings less that this duration will be discarded.
• Amplification Factor (Gain): Values less than 1 will decrease the volume of the saved
recording. Similarly, the saved audio can be boosted in volume by increasing the Gain
above 1.
• Peak Normalization: If ON, the recording will be processed to increase the overall
volume such that the loudest part is at 0 dBFS.
• Start audio recording on start: If ON, Replay Media Catcher will activate audio
recording when first launched.
• Prompt when a configuration issue is detected: The Application recording method
requires certain Windows Registry settings to be accurate. Sometimes, other software
such as "Cleaners" or antivirus programs will delete the necessary Replay Media Catcher
settings. If ON, Replay Media Catcher will warn you that the Registry is not configured
correctly.

• Record silence: If ON, sound that is considered silent based on the Silence Level setting
will be recorded. This is usually necessary for audio recordings that include large breaks
or gaps in the stream.
• Split on silence: If ON, when silence is detected based on the Silence Time and Silence
Level settings, Replay Media Catcher will split the current recording and start a new file
to continue recording.
• Silence Time (ms): Time, in milliseconds, for which silence needs to be detected
for Split on silence to be activated.
• Silence Level: Numbers below this level will be considered silent for the purposes
of Record silence and Split on silence.
DVR
• Audio Redirection: If ON, audio will not play during a DVR recording session. If OFF,
you will hear the audio as the recording takes place, and you will need to choose an audio
source in order for the video to have embedded audio.
• Hardware Acceleration: If ON, enables your PC’s hardware acceleration. In some
cases, DVR flash streams will not be recorded properly and may turn out black. Toggle
the switch OFF to fix the problem.
• Zoom in on Player: If ON, the video will be zoomed in for recording. This can result in
a larger recording, but it will also require more CPU power.
• Audio Codec: You can choose a specific audio codec if desired.
• Audio Format: You can choose from a wide range of audio qualities. Lower bitrates will
give smaller files and use less CPU power.
• Video Codec: You can choose a specific video codec if desired.
• Frames Per Second: Common video frame rates are available. 29.97 is the NTSC
standard. Consider reducing the Frames Per Second on older computers, to reduce CPU
load, or to reduce file size.
• Stop on Silence: If ON, the DVR will stop recording if silence is detected for Silence
Time
• Split on silence: If ON, when silence is detected based on the Silence Time and Silence
Level settings, Replay Media Catcher will split the current recording and start a new file
to continue recording.
• Prompt when a configuration issue is detected: If ON, you will be warned if your
system might have difficulty recording with the DVR. Typically this means that
Windows Desktop Composition needs to be enabled by choosing an "Aero" desktop
theme.
• Silence Check (ms): The interval, in milliseconds, to check to see if there is silence.
• Silence Time (ms): Time, in milliseconds, for which silence needs to be detected
for Split on silence to be activated. If Stop on Silence is ON, it is recommended to
increase this number to 5000 or greater so that the loading of advertisements does not
stop a recording.
• Silence Level: Numbers below this level will be considered silent for the purposes
of Stop on Silence and Split on Silence.
• Stop if no sound (sec): The DVR recording will stop if silence is detected for a period of
time larger than this value. If you are recording from a site that offers one show after
another, you may want to increase this from the default 30 to account for delays between
loading of videos.
Naming Rules

• Duplicate naming rule: If Replay Media Catcher 7 encounters another file in your
media folder with the same name, apply this rule to prevent overwriting.
• ID3v2 Version: Windows operating systems don't always recognize the latest ID3
tagging scheme, although iTunes can. If you want to view song tag information in
Windows File Explorer, reduce this number.
• Enable ID3 Naming Rule: When ON, recordings will be renamed based on the ID3 tag
information.
• Lookup and tag music: When ON, audio recordings will be checked against an online
music database for determining artist, album, song title, and other information.
• Lookup artwork: When ON, Replay Media Catcher will attempt to find appropriate
album artwork, based on the lookup rule below.
• Lookup lyrics: When ON, Replay Media Catcher will attempt to find song lyrics, based
on the lookup rule below.
Replay Media Catcher uses a curly-bracketed (aka braces) shorthand for naming files. This
shorthand allows for easy naming of recordings based on a series of rules.
Track: {title} {album} {artist} {genre} {trackno} {year}
Date of the recording: {D} - day, {M} - month, {Y} - year, {H} - hour, {MI} - minute, {S} -
second

{id} - Uid, the order in which the file was downloaded in the file listing. Clear the listing and
restart to reset the Uid.
Folder Separator for creating subfolders: \
• When files are tagged, apply the following naming rule: Using the listed, bracketed
shorthand, files will be renamed based on the shorthand.
• Use application title as initial title: If ON, Replay Media Catcher will attempt to get the
title of the recording from the window of the audio source. If OFF, you can choose an
initial title.
• Artwork lookup rule: Album artwork will be searched for based on the given shorthand.
• Lyrics lookup rule: Song lyrics will be looked up based on the given shorthand.
So, if you want a tagged file to be named by album, artist, and then title with underscores
between, you should use {album}_{artist}_{title}.
If you want to put the tagged file into subfolders, artist first and then album, and include the track
number, you could use {artist}\{album}\{trackno}-{title}.
If a recording is not automatically tagged, you might need to manually tag it for the file naming
rules to apply. Right-click on the recording and choose Properties.
For media obtained via the Stream Downloader method, additional naming rules apply after the
initial title is determined. Please refer to Advanced Settings for these site-naming rules.

Get Support Tab
On the Get Support tab, you can learn more about Replay Media Catcher as well as gather useful
information to technical support if there is a problem.
• User Guide: Opens up the user guide
• Support Page: Opens your web browser to the main Applian Replay Media
Catcher support website.
• EULA: Opens the End User License Agreement.
• Acknowledgements: Opens the About website for Applian, detailing company
information.
• New Version: Checks to see if a new version of the software is available

• Reset Registration: Clears the current registration information so that you can
enter a new or different license code. (Won't appear if you are in trial mode).
• Send Logs: This button will generate a Zip file containing diagnostic information.
It's particularly useful when debug mode has been turned on prior to an even requiring
support.
• If requested by support, please switch on the Debug Mode: In debug mode, more
details will be saved to the recording logs. If you are having trouble, turn on this setting,
reproduce the problem, and then generate support logs using the Send Logs button. This
setting gets turned off when Replay Media Catcher is restarted, so it is only valid for your
current session.
• Send Anonymous Analytics: To help improve Replay Media Catcher, you can have
anonymous information sent to our server. Collected data includes the functions of
Replay Media Catcher you use the most as well as sites visited. No customer or license
information is included.
• Check for new version on start: If On, Replay Media Catcher will check to see if you
are using the most current version of the software. This helps you stay up-to-date with the
latest streaming formats and bug fixes.
• License: If you are registered, your license code will appear here. If you are not
registered, you can click the ellipsis (...) at the end of the field to open the registration
window.

Converting Media Formats
On the Home tab, beneath the main toolbar, you will find the conversion preset pull-down.
Selecting a preset from this drop down means that any download, recording or conversion started
after the preset is changed will be converted to that format. If you don't want to convert the file,
select Don't Convert, and you will see No Conversion Setting selected.
Conversions of media can either be done automatically, as mentioned above, or on-demand.
To perform on-demand conversion, choose a conversion setting, then right-click on the media in
the Home tab and select Convert. Alternatively, if the media is already selected, you can
choose Convert from the Main Menu . If you are scheduling a recording, you can set it up
to perform conversion automatically (see Schedule for more information).
Quick Conversion to MP3
If you have a media file or files that you want to convert to MP3, you don't need to set a global
conversion setting. Simply select the files to be converted in the Home tab. Next, either right-
click on the file or use the Main menu to choose Save to MP3. Your selected file will be
converted to a high quality MP3.
Importing Media For Conversion
You may have media from other sources that you would like to convert to a different format.
First, import the media into Replay Media Catcher. This can be done either by dragging &
dropping the file from Windows onto the Replay Media Catcher file listing, or via the Main
Menu's Import option (press Alt+i on the keyboard).
Note: Media imported into Replay Media Catcher will stay in its original location. Conversions
of the media will be saved to the same location. The imported media will not be moved to the
Replay Media Catcher Output Folder.
Then, select a conversion setting from the pull-down and choose Convert from the right-click or
Main menu.
Changing and Adding New Conversion Settings
You have full control over the preset conversion settings and can create, delete and modify them.
However as new devices and formats are released, preset conversion settings will be updated,
and these are automatically downloaded when you start the application.

To create, delete or edit existing preset conversion settings, select the Configure menu item from
the drop-down. The Conversion Presets dialog will appear.
Select the preset conversion setting you wish to modify from the drop-down list at the top.

Copy button: Will prompt you for a new preset name and create that preset. Your
new conversion setting will be saved in the same pull-down location.
Save button: Will save your changes.
Delete button: Will delete the selected preset.
Reset button: Will reset all presets to their default settings.
To add a new format without deleting the default one, simply click the Copy button first, give
your new format a name, and then edit as you wish.
All conversion settings follow FFMPEG conventions.

Advanced Internet Downloading Settings
In general, you won't need to adjust the Advanced settings. These settings are accessed via
the Advanced button on the Settings -> Internet Downloads page. Before you adjust these
settings, you'll need to turn Off and back On the AUTO setting for any changes to take effect.
• Ad Blocker
Downloading ads can be annoying. Enable Ad blocking, and video ads from the list of
domains in the Ad Blocker will not be downloaded.

Type in the name of an ad-serving domain and press the Add button. To no longer block
a domain, select it from the list and press the Delete button.

• DASH
Lets you configure DASH Protocol settings.

• Extractor
Lets you turn the extraction engine on and off, add URLs that will be passed to the
extraction engine, and add certain media URLs to the Ignore List.
Some videos are available in multiple resolutions and qualities. The Video Page Extractor
can search for the multiple video options and allow you to choose which you want to
download. If you encounter a website that offers multiple resolutions (as determined by
observing multiple versions being download in Auto mode), you can add the URL here.
Some videos are sent to your browser in multiple parts, requiring you to watch (nearly)
the entire video for the whole video to be saved. In these cases, add the URL to the
Supported URL listing - Replay Media Catcher will attempt to grab all the parts at once
and combine them into a single file.
• Extractor Logins

Use this screen to add your login credentials for popular services.
• Extractor Subtitles

When ON, the video extractor will extract subtitles. You can select the desired language,
choose to automatically create an SRT file, or just keep the original.

• HDS
Adobe HTTP Dynamic Streaming (HDS) is an adaptive streaming protocol, which means
that the quality of the media changes based on your Internet connection. If many HDS
streams fail to download, you may want to set Replay Media Catcher to record them all.
• HLS

Here you can configure settings for Apple HLS Protocol, such as HLS downloader, the
number of concurrent segments, timeout, segment timeout, the number of segment
attempts, segment live edge, and adjust muxing settings.
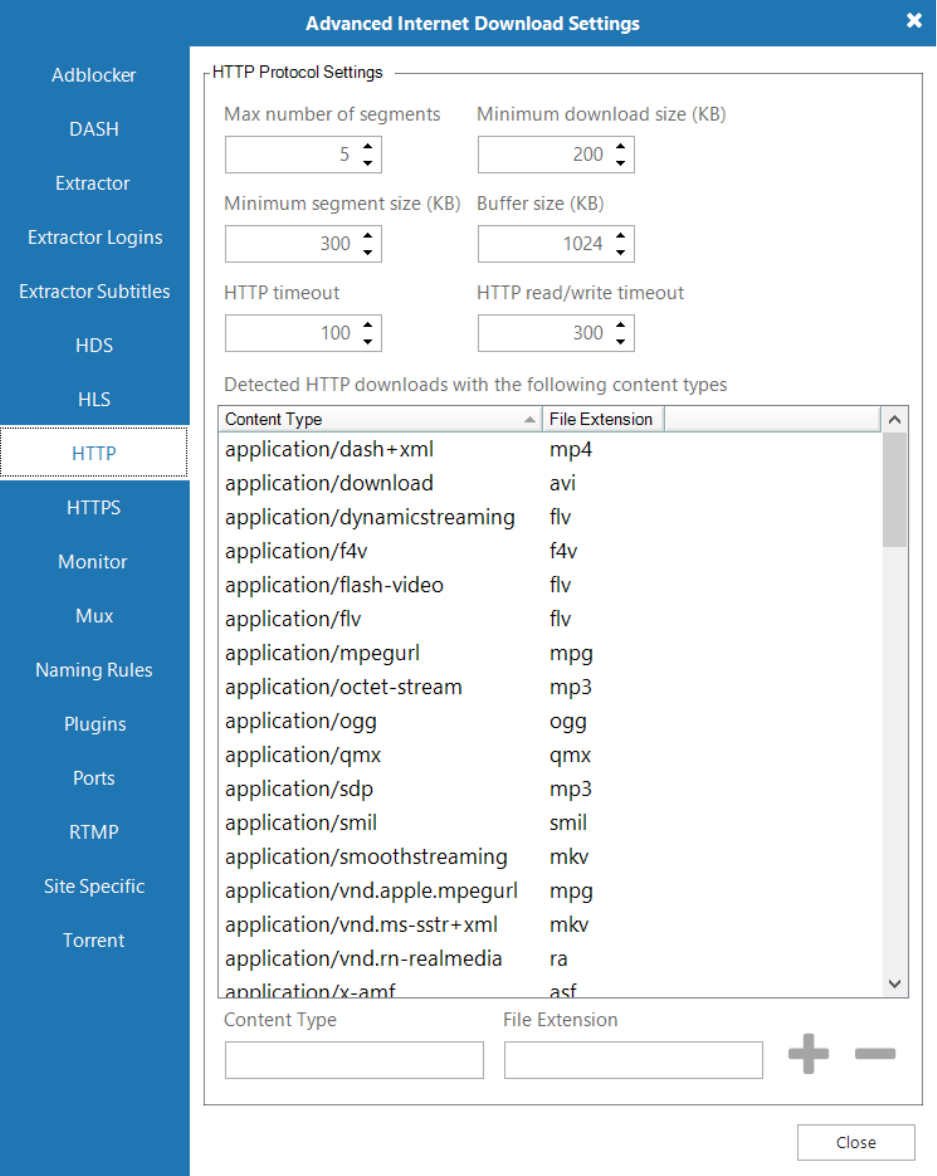
• HTTP
o To increase the speed of HTTP downloads, Replay Media Catcher can use a
method called segmented downloading. This is where a single download is broken
to several smaller downloads (segments) and each is downloaded at the same
time.
o The speed boost obtained is dependent on your network connection, your
computer and the server streaming the video or audio.
o Here you can configure the Max number of segments for each download, and
the Minimum segment size for each segment.
o If a download is failing and you see in the Progress log that segments are failing,
change the Max number of segments to 1.
Audio and video streamed over the HTTP protocol is identified by content type. You can
add and remove Content Types and the associated File Extensions.
• HTTPS

Reinstall Firefox HTTPS Scanner: Firefox updates sometimes delete our certificate for
downloading over HTTPS. Click Reinstall to add the certificate again.

• Monitor
Configure the number of concurrent checks for the Live Stream Monitor.

• Mux
Enable or disable MP4 Fast Start.

• Naming Rules

o Enable the Playlist Naming Rule: Video and music players sometimes use
"playlist files" to obtain the stream(s) to play, and these can contain title
information. Replay Media Catcher will match stream URLs against any detected
playlists to see if a title can be found. This is common for music sites (e.g.
Pandora)
o Enable the Referrer Naming Rule: HTTP requests can contain what is termed a
referrer, which identifies the URL of the page which made the request. If the
detected streams request contains a referrer then the title of this page will be used
as the name.
o Enable the Last Web Page Title Naming Rule: The application keeps track of
all visited HTML pages. The domain name of a stream's URL will be used to look
up the last page visited on that domain and that page title will be used. Extended
HTTP Title lookup will occur once the download is complete.
o Enable the URL Parameter Naming Rule: The stream's URL is searched for
parameters such as title= or name=. If one is found, it will be used as the name.
Extended HTTP title lookup will occur once the download is complete.
o Enable the URL Path Naming Rule: The file part of the stream's URL will be
used. For example https://www.applian.com/some/path/file.mp3 the name would
be file.mp3. Extended HTTP title lookup will occur once the download is
complete.
YouTube has an additional naming rule, which can be found in Site Specific advanced
options.
• Plugins

Replay Media Catcher supports third party plug-ins like rtmpdump to handle the
downloading of streams. If Replay Media Catcher cannot download or record a file,
installing a plug-in can give it extended power.
o Protocol: Select the protocol you would like to pass to the plug-in.
o URL Match: Enter part of the URL to match.
o Executable: Enter the plug-in's executable name and place the executable in the
Replay Media Catcher installation folder.
o Parameter Wildcards: Enter the executable's parameters. Use the pattern's URL
and file as indicated on the dialog. Other parameters should be hard coded.
Once you're done configuring the settings, click on the Add button to save the changes.
• Ports


• RTMP
Live FLV streams such as webcams sometimes send incorrect timestamps. This means
the file created for the download plays back incorrectly. The following settings allow you
to control and fix these settings.
o Automatically fix live streams and those without a duration: Enable this and
such streams will be fixed.
o Rebase timestamps to zero: Enable this and all timestamps will be rebased so
the file starts at 0 time
Some sites that stream RTMP try to secure it with a technology called SWF Verification.
It is illegal for our products to respond to SWF Verification requests so we ignore them.
This will cause the server connection to drop after a period of time. The following
settings allow you to control how these secure streams are handled.
o Automatically resume when a secure RTMP connection is dropped: Enable
this and the download will automatically restart each time the connection is
dropped.
o Automatically record when a secure RTMP stream is detected: Enable this
and the application will automatically record the stream, instead of attempting to
download it
o Always record RTMP streams (instead of downloading): Enable this and the
application will always record RTMP streams.
The RTMP protocol allows us to request the amount of data the server should send in
each chunk. Requesting a large chunk means that in many instances the download will
happen much faster than the playback speed. The following settings allow you to control
how this Super Download feature works.
o Initial client buffer size (seconds): The number of seconds of data the server
should send.
o Enable Super Download: Check to enable this feature.
o Disable RTMP Super Download for live streams: Check this to disable this
feature for live streams.
o RTMP Super Download buffer in seconds: The number of seconds of data the
server should send when attempting a Super Download.
• Site Specific

o YouTube Naming Rule: Use a special rule to accurately name YouTube
downloads
o Some sites do not allow multiple connections to them or use URL s that are valid
only the first time they are used (by your browser). Some sites use protection
technologies (including SWF Verification and other site specific technologies)
that mean it is only possible to record. We refer to them as secure sites. Media
Recorder can automatically record instead of downloading secure sites. Add the
URLs for secure sites here. During a recording, the entire media must completely
play in your browser for it to be saved by Replay Media Catcher.
• Torrent

Replay Media Catcher can download torrents by clicking appropriate links on websites.
Replay Media Catcher's torrent and magnet link downloader (based upon Aria2) is
controlled via the following settings.
o Aria2 Port: The port that aria2 will listen on.
o Seed Time: The number of minutes after a download is complete that it will seed
for.
o Allow Overwrite: If checked then any existing file will be overridden
o Enable DHT: Check to enable distributed hash table lookups
o DHT Entry Point: Sets the host and port as an entry point to IPv4 DHT network.
o DHT Listen Port: Sets the UDP listening port used by DHT(IPv4, IPv6) and
UDP tracker. Multiple ports can be specified by using comas, for example:
6881,6885. You can also use hyphens to specify a range - for example: 6881-
6999. Commas and hyphens can be used together.
Keyboard Shortcuts
• Alt + X = Start or Stop Auto mode Stream Downloading
• Alt + R = Start or Stop audio recording
• Alt + S = Split audio recording
• Escape = Cancel selected download
• Del = Delete selected recording(s) from computer
• F2 = Rename selected download/recording.
• Ctrl + R = Remove selected file(s) from the file listing, but don't delete from computer
• Enter = Play selected download/recording
• Ctrl + C = Converted selected files to format specified in global conversion settings
• Ctrl + M = Converted selected files to MP3
• Add = Combine multiple selected files
• Ctrl + F = Fix FLV
• F5 = Restart download (only possible for some download streams)
• Ctrl + I = Import selected recording(s) into iTunes library
• Ctrl + W = Import selected recording(s) into Windows Media Player library
• Ctrl + O = Show selected file in Windows File Explorer
• Alt + A = Show the album artwork in the Properties Window
• Alt + L = Show the song lyrics in the Properties Window
• Alt + T = Lookup ID3 tags (artist, song, album, etc.) for selected song(s)
• Alt + Enter = Open the download/recording properties window
• Alt + I = Open file browser to Import songs into Replay Music
• F1 = Open web browser to the Replay Media Catcher support page
• Alt + F4 = Quit
• Ctrl + L = Place cursor in the URL bar
• Ctrl + S = Open Settings tab
• Ctrl + tab = Next tab
• Ctrl + shift + tab = Previous tab
• Ctrl + V = With the file listing selected, the paste command can be used to import media
files from the clipboard. Additionally, if you have copied multiple URLs from a text file,
those can be queued for downloading.
Disabling Secure Boot on Windows 8.1 Systems
The Applicationrecording mode requires Secure Boot to be disabled on Windows 8 systems.
The benefit of the Applicationrecording mode is that each audio source can be isolated,
providing a clean recording. You can still recording in Stereo Mix mode without disabling
Secure Boot, but then the recordings might overlap with other audio playing on your computer,
such as system sounds. You will need to be careful to turn off system sounds and not have any
other audio play during a recording.
You might want to print out these instructions or have them open on a mobile/secondary device
since disabling Secure Boot involves restarting your computer. You might also want to
bookmark this page to return to after disabling Secure Boot.
1. Press the Windows key + C, or (if you have a touchscreen) swipe in from the right edge
of the screen to open your Charms.
2. Click Settings.
3. Click Change PC Settings.
4. In PC Settings, select Update and Recovery.
5. In the Update and Recovery screen, click Recovery at the left.
6. Under Advanced Startup, click Restart now. The system will restart and show the
Windows 8 boot menu.
7. In the boot menu, select Troubleshoot.
8. In the Troubleshoot menu, select Advanced options.
9. In the Advanced options menu, select UEFI Firmware Settings.
10. Click Restart button to boot into UEFI BIOS Setup screen.
11. Each manufacturer lays out the BIOS differently. Look through the BIOS settings and
disable Secure Boot. Save settings and exit.
Once Secure Boot is turned off, you will be able to use the Applicationsrecording method to get
clean recordings.
