
ADVANCED PDF/HTML TEMPLATES
May 2021
NetSuite Implementation, Consulting, and Support
Oracle NetSuite North America Solution Provider
2020 Partner of the Year

PRESENTER
Gillian L. Pearson
NetSuite Manager, Consultant
gpearson@eidebailly.com
208.383.4769

INTRODUCTION TO ADVANCED PDF/HTML TEMPLATES
Out of the box NetSuite uses the Basic
PDF layouts. Today we will discuss how
to make the move to using Advanced
PDF Templates. We will customize the
templates using the WYSIWYG Editor
and the source code mode. We will
also see some more advanced
functionality of Advanced PDFs. The
goal today is to get you to a point
where you aren’t afraid to give it a try.
• SAID = SuiteAnswers article ID
• Go to SuiteAnswers and search for
the ID number.
• I recommend you follow along in
your NetSuite account if you can.

Advanced PDF
Templates
WYSIWYG Editor
Source Code
Advanced Uses

ADVANCED PDF
TEMPLATES

BASIC PDF TEMPLATES
• Designed to be easier to modify and do
not require any HTML knowledge.
• More restrictive in the types of
customizations that they support.
• User interface is visual, with a drag-
and-drop style.
• Select from a pre-defined list of fonts
and apply styling like bolded, italicized,
or underlined text.
• Adjust the application of borders to the
fields and define the color(s) of the
body text, labels, borders, and fills.
• Element Size and Element Position
sections to apply precise sizing to each
element and position it on the page.

BASIC PDF
LAYOUT

ADVANCED PDF/HTML TEMPLATES – SAID 48703
Advanced PDFs:
• More customization capabilities than transaction form layouts, also known as basic layouts.
• Associate with custom transaction forms, to format printed and email versions of
transactions.
• Support all transaction and print types supported by basic layouts.
• Standard templates are provided for each supported print type and includes the company
logo.
• Template Editor supports current industry standards for HTML-based editing, including rich
text editing and HTML markup source editing.
• Preview as you make changes; detailed error messages are shown if it cannot be saved.
• Use SuiteScript to take advantage of customization capabilities.
• Can be included in bundles.
Important:
New enhancements are added exclusively to advanced printing. Transaction Form PDF/HTML
Layouts will be deprecated in a future release. You are encouraged to use advanced
templates and associate them with custom forms.

BASIC VS. ADVANCED PDFS
Basic PDFs allow for fast distribution of changes because
a single template can be used across many transaction
types.
Advanced PDFs require a separate template for each
transaction type. Due to this, it is best practice to start
with a single template and work through the branding and
formatting before moving on to additional templates.

WHICH SHOULD I USE?
Basic PDF Template:
• You are not comfortable working with
code.
• You want to make simple changes (bold
or add a field).
• You want multiple transactions to use the
exact same template.
Advanced PDF Template:
• You are comfortable working with code.
• You need to use conditional logic.
• You need to add additional information
to the template.
• You have very specific formatting
requirements.
• You are unable to access the fields you
need in the Basic PDF Template.

SETUP STEPS
• Enable Features – Navigate to Setup > Company > Enable
Features. On the SuiteCloud tab enable “ADVANCED PDF/HTML
TEMPLATES”.
This does not have to be provisioned, it is standard NetSuite and
usually enabled during configuration.
• Versions of third-party products used with Advanced PDF
Templates.

SETUP STEPS
Custom Form:
When creating a new custom transaction form or editing an existing one, you can
define whether you prefer to use a Basic or Advanced PDF template.
The option that you select dictates which PDF templates are available for selection
in the “PDF Layout” section. Selecting “Basic” limits the PDF Layout options to only
PDFs listed under Customization > Forms > Transaction Form PDF Layouts, while
selecting “Advanced” shows only those PDFs listed under Customization > Forms >
Advanced PDF/HTML Templates.
Transaction Forms:
• Used for all transaction record types.
• Sales Orders, Item Fulfillments, Invoices, Bills, Journal Entries etc . . .
(directly plagarized from Cory Anderson’s Customizing NetSuite presentation)

SETUP STEPS
• Navigate to Customization > Forms > Transaction Forms
• If you already have a custom form you are using, you can edit that form, or
you can customize a standard form.
• The printing type is the area we will focus on.

SETTING THE STAGE
Prior to updating any template, I like to see my starting
point/baseline and understand what I am going to be modifying.
Hopefully, you have a mockup of the desired result, or notes on the
changes to be made, as well as a test transaction to use.
• Print the transaction with the standard template.
• Open the test transaction and ensure that it is using the appropriate custom form.
• Save and print the transaction.
• If you have to update the form, when you save you will be notified that no
changes have been made, save anyway.

SETTING THE STAGE
To be
updated
Standard PDF
Template
Note: After the test
transaction is opened, keep
it open, this will make
viewing changes easier.

DEMONSTRATION
TIME

CREATING A TEMPLATE
No matter how you plan to update the template, you first have to create
it. You will be selecting an existing template to customize to your needs.
Navigate to Customization > Forms > Advanced PDF/HTML Templates
Find the transaction type of the template and click Customize if using a
standard template and Edit if using an existing template.

CREATING A TEMPLATE
Click Template Setup. Enter a name for the template.
Use a naming convention to keep consistency.
You can also enter a description or update the margins if needed.
Click Save, then Save again.

CREATING A TEMPLATE
This is a good time to go back to your Custom Form and update your
Print Template to your new Custom Template.
• Navigate to Customization > Forms > Transaction Forms

WYSIWYG EDITOR
(WIZZY-WIG)

WYSIWYG EDITOR
There are two main ways to edit Advanced PDFs in
NetSuite.
WYSIWYG Editor:
• Literally stands for “What
You See Is What You Get.
• Visual way to make changes
in your template.
• Not as flexible or intuitive
as the Basic PDF Template.

WYSIWYG EDITOR
Toolbar
Field
Text
Image
Table
Page
Number
Total
Pages
End of
Page
Horizontal
Line
Header
Footer

DEMONSTRATION
TIME

SOURCE CODE
SOURCE CODE
The second way to edit Advanced PDFs in NetSuite.
Source Code:
• FreeMarker Code
• More flexibility around formatting.
• Conditional logic.
• If you are comfortable with HTML or cutting and pasting from Google.

SOURCE CODE EDITING TO CUSTOMIZE ADVANCED TEMPLATES – SAID:
48809
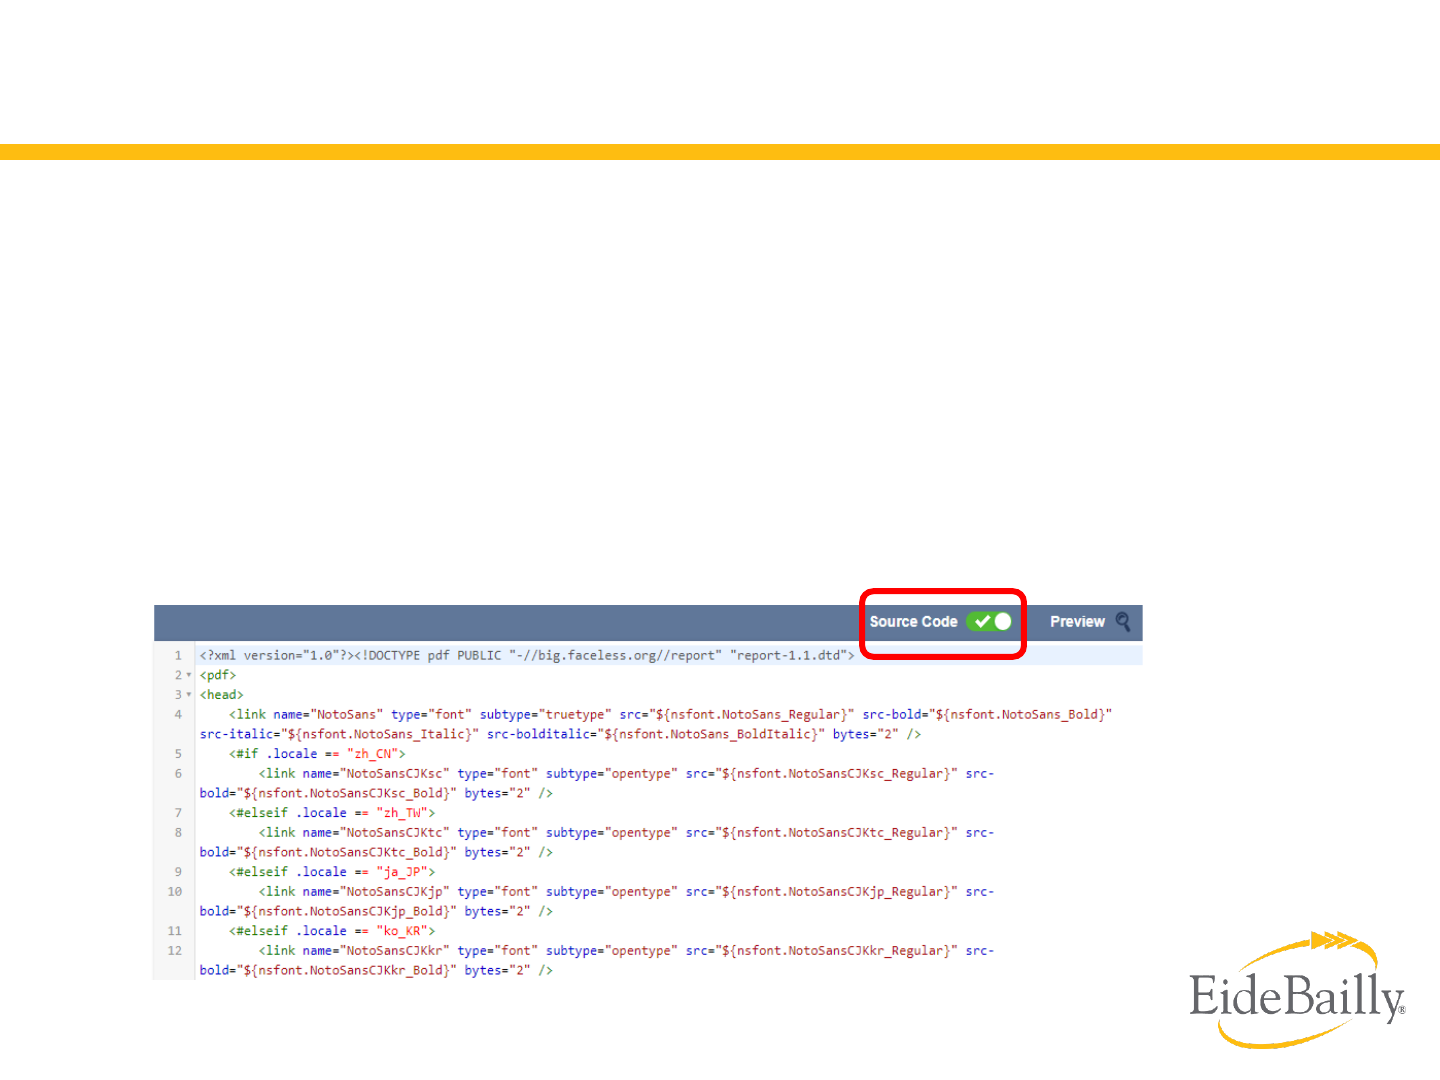
Line 1 - XML version
Line 2 - DOCTYPE
Line 3 - BFO wrapping element – This is NOT an HTML declaration
Line 4-8 – standard HTML head and body
Line 9 – elements must always be closed in XML
Important:
When using advanced templates, you must follow the syntax and usage guidelines
included in the documentation for BFO, FreeMarker, and CKEditor. For more
information, see the
BFO website, FreeMarker website, and the
CKEditor website.

SOURCE CODE EDITING TO CUSTOMIZE ADVANCED TEMPLATES – SAID:
48809
BFO Elements (Big Faceless Organization):
Page Numbers <pagenumber /> <totalpages />
Headers, Footers, and Background Maros <macrolist>
Bar Codes <barcode codetype=“qrcode” value=${item.name} />
FreeMarker:
Reference Fields
field - ${record.field}
label -
${record.field@label}
example - ${record.entity@label}: ${record.entity}
Customer: The Treasure Chest
Sublists and Other Lists
${record.item[1].itemName}
<#list record.item as item></#list>
Additional Information
${customer.email}

SETTING THE STAGE
To be
updated
Standard PDF
Template
Note: After the test
transaction is opened, keep
it open, this will make
viewing changes easier.

CODE UPDATES
<td rowspan="3" style="padding: 0;"><#if companyInformation.logoUrl?length
!= 0><img src="${companyInformation.logoUrl}" style="float: left; margin:
7px" /> </#if> ${companyInformation.companyName}<br
/>${companyInformation.addressText}</td>
Sized the logo so that it was slightly smaller
<td rowspan="3" style="padding: 0;">
<#if companyInformation.logoUrl?length != 0><img
src="${companyInformation.logoUrl}" style="float: left; margin: 7px; height:
75%; width: 75%;" />
</#if>
</td>
Separated the address into its own cell, then removed the duplicated companyName, and
the words “United States” if it is included in the address
<td rowspan="3">${companyInformation.addressText?replace("United
States","")}</td>

CODE UPDATES
<td colspan="3" style="padding: 0;">${record.billaddress}</td>
<td colspan="3" style="padding: 0;">${record.shipaddress}</td>
Removed the “United States from the shipaddress, but not the billaddress
<td colspan="3">${record.billaddress}</td>
<td colspan="3">${record.shipaddress?replace("United States","")}</td>

CODE UPDATES
<tr>
<td colspan="3" style="font-size: 8pt; padding: 6px 0 2px; font-weight: bold; color:
#333333;">${record.billaddress@label}</td>
<td colspan="3" style="font-size: 8pt; padding: 6px 0 2px; font-weight: bold; color:
#333333;">${record.shipaddress@label}</td>
<td colspan="5" style="font-size: 12pt; background-color: #e3e3e3; font-weight:
bold;">${record.total@label?upper_case}</td>
</tr>
<tr>
<td colspan="3" style="padding: 0;">${record.billaddress}</td>
<td colspan="3" style="padding: 0;">${record.shipaddress}</td>
<td align="right" colspan="5" style="font-size: 28pt; padding-top: 20px; background-color:
#e3e3e3;">${record.total}</td>
</tr>
Removed the Total Box
<tr>
<td colspan="3" style="font-size: 8pt; padding: 6px 0 2px; font-weight:
bold; color: #333333;">${record.billaddress@label}</td>
<td colspan="3" style="font-size: 8pt; padding: 6px 0 2px; font-weight:
bold; color: #333333;">${record.shipaddress@label}</td>
</tr>
<tr>
<td colspan="3" style="padding: 0;">${record.billaddress}</td>
<td colspan="3" style="padding: 0;">${record.shipaddress?replace("United
States","")}</td>
</tr>

FINAL PRODUCT
CUSTOMIZED
PDF TEMPLATE

DEMONSTRATION
TIME

TIPS AND TRICKS
Advanced PDFs now have the ability to use “Save & Edit”,
so that you no longer get sent back to the list of templates
and have to reopen it.
By keeping your printed transaction tab open, you can
refresh the tab each time you save an update to the
template without having to reprint each time.
When you have a template that is working and you need
to make modifications, save a backup before making
major changes.

TIPS AND TRICKS
The advanced templates have always
“versioned”, but now you can use that
version to “undo” changes you have
made.
Find the version at the very bottom
and determine which version you want
to go back to. Go to the URL and add
“&version=5” at the end of the
existing URL.

DEMONSTRATION
TIME

ADVANCED USES

ADVANCED USES
• Call a template based on
the value of a field.
• Assign values for variables
within a template.
• Call another PDF to attach
terms and conditions.
• Create terms and
conditions within the
template on added pages.

SAVED SEARCH PDF
• Client required details on a
customer statement.
• Created a saved search with
the necessary fields.
• Created a PDF Template for
the saved search.

CONDITIONAL STATEMENT
Remit To based on
combination of:
• Customer’s preferred
language
• Country of the
customer
• Currency of the
invoice

This template uses:
• Conditional
formatting for the
aging
• Creation of variables
• Calculations for the
totals
CALCULATIONS

• Count sheet with bar
codes
• Additional lines for
each of the lots
• Handle many
subsidiaries and
counts, so that needed
to be displayed.
BAR CODES

• Used tags to format
the terms and
conditions
TERMS & CONDITIONS

• Created by a
developer to display
in a matrix format
• Beyond my abilities
MATRIX DISPLAY

This presentation is presented with the understanding that the information contained does not constitute legal, accounting or other professional advice.
It is not intended to be responsive to any individual situation or concerns, as the contents of this presentation are intended for general information
purposes only. Viewers are urged not to act upon the information contained in this presentation without first consulting competent legal, accounting or
other professional advice regarding implications of a particular factual situation. Questions and additional information can be submitted to your Eide
Bailly representative, or to the presenter of this session.
QUESTIONS?

eidebailly.com
THANK YOU
Gillian L. Pearson
NetSuite Manager, Consultant
gpearson@eidebailly.com
208.383.4769

eidebailly.com
Find us online:
