January 2023 Origami Risk - Client Release Notes 1 of 84
January 2023
Client Release Notes

January 2023 Origami Risk - Client Release Notes 2 of 84
Disclaimer
These release notes cover the whole gamut of offerings from Origami Risk. You may or may not have these options
in your system. Also, depending on your User Rights, you may not be able to access some of these features. Lastly,
your System Administrator may have changed the way these items are named in your system.

Table of Contents
New Solution 6
New STP RegHub integration 6
New ICD Codes Solution 7
What's new? 8
System-wide 8
Expand long tooltips in a new popup 8
View main menu items, right-panel, and column header rows when scrolling 9
View side panel on mobile devices and web browsers 9
View all private tasks 10
Expand or collapse all panels at once 10
Log in without auto complete of user names 13
Filter images added to printable abstracts 13
Associate a contact with another contact 14
Administration 14
Access Management 14
Add custom titles, headers, and footers to all Anonymous Collection screens in
a collection category 14
Add custom icons for collection category items 17
Create a user from a contact record 18
Create a user from an employee record 19
Audits 22
Create Audit Definition and Audit Response access groups with view, edit, or
delete access 22
Use Save as Draft option to save green checkmarks on Audit Responses 23
Exclude a question from scoring in audits 24
Display audit categories without scrolling when importing audit definitions 25
Claims 25
Add the BuildingFacilityID field to Claim and Incident Forms 25
1099-MISC Extracts updated to match 1099 Pro’s new standard import layout
changes 26
Data Entry Events (DEE) 26
Track refired Data Entry Events 26
Create a data entry event based on audit user assignment 28
Grant external users access to related records 29
Document Management 29
January 2023 Origami Risk - Client Release Notes 3 of 84

Create an Audit Definition Template for Document Control Attestation 29
Use an Audit Definition Template for Document Control Attestation 30
Stack teams assigned review access in Document Controls 31
Stack teams assigned file access in Document Controls 32
Change the sequence of assigned users in Document Controls 33
Use Visio files in Document Controls 34
Search the content of published policies in Document Controls 35
Use advanced search when adding multiple assignees in Document Controls 36
Track views and downloads of published Document Controls 37
Manually change the status of a Document Control 38
Document Templates 39
Track views and downloads of published Document Templates 39
Limit editable parts of a Document Template Element 40
Environment, Health, and Safety (EHS) 41
Select country of audit when importing audits from STP AuditHub 41
Map audit category groups to STP rulebooks instead of topics 42
Import Audit Definitions from STP AuditHub to include the highest possible
score 43
Customize the selection screen for a safety meeting type 43
Governance, Risk, and Compliance (GRC) 44
Select the position of an attestation question 44
Batch import files into Document Controls 45
Policy and Billing 46
Add a security deposit for various payment options with pre- and post-bind
payment support 46
Create rules to write off negative amounts 47
Automatically approve certain Underwriting Rules based on a User’s Role 48
Add Relationship Validation to an Underwriting Rule 49
Root Cause Analysis (RCA) 50
Add new RCA Types 50
Give a root cause domain a custom name throughout Origami Risk 50
Use custom employee fields in the RCA Domain 51
Create a root cause with a DEE for incidents or claims 52
Add Days Open tracking to the RootCauses and RCACorrectiveActions
domains 53
Assign a root cause analysis to a team 53
Reporting and Analytics 54
Add expiration date for downloading scheduled reports 54
Reporting and Analytics 54
Schedule Dashboard PDF exports to include interactive options 54
January 2023 Origami Risk - Client Release Notes 4 of 84

Claims 55
Select a Risk Unit on the Loss Event form 55
Display all electronic data interchange rejection errors in a report 56
Environment, Health, and Safety (EHS) 57
Chemicals 57
Import chemical concentrations in the Data Import Center 57
Export chemicals to CSV or PDF 57
Enter partial inventory values 58
Governance, Risk, and Compliance (GRC) 58
Policy and Procedure Management (PPM) 58
Create a policy from a template or a blank document 59
Change the order sequence of team members 59
Get a notification when publishing an unreviewed policy 60
Give a named user direct access to a policy 61
Give an external user direct access to a policy 62
View repository links within a box 63
Healthcare 63
Calculate risk priority scores for HFMEA processes 63
Give an HFMEA domain a custom name throughout Origami Risk 64
Policy and Billing 64
Rollback and re-run bind data updaters 64
Bulk bind proposals 65
Re-run ‘Forms Auto Generation’ after a proposal post-bind failure 65
View the ‘Net of Commission’ on agency-billed policies 66
Use net of commission for agency billing on invoiced and written premiums 67
Handle Commission for existing invoices after Policy Billing has been switched
to ‘Net Of Commission’ 69
Remove proposal coverages from proposal view 72
Close invoices on an Agency Statement for flat-cancelled policies 74
Override billed premium at the Policy and Coverage level 76
Allocate a payment to a policy when the outstanding amount is 0 USD 78
Increase the number of Policy Changes shown on the Proposal screen 81
Edit Files associated with a Cancelled Policy 81
Down Payment Due field calculations corrected for down payment invoices 82
View all matches when running an Office of Foreign Assets Control check 82
January 2023 Origami Risk - Client Release Notes 5 of 84

January 2023 Origami Risk - Client Release Notes 6 of 84
New Solution
New STP RegHub integration
Why
STPRegHub is a service providing access to a continuously updated library of regulatory
documents containing information related to environmental, health, safety and transportation
laws and regulations.
Importing data from STPregulations records is crucial to understand and ensure compliance
with laws and regulations that specific jurisdictions enforce on the locations Origami Risk
customers operate in.
The STPRegHub platform underwent updates, where certain fields are differently named or
new fields are now added, and the current Origami Risk RegHub integration now supports
these changes.
Previously
You could not import data from the STP RegHub platform.
New solution
You can import data from the STP RegHub platform so that you have the latest regulatory
information relevant to you.
If you want to use this feature, see your Origami Service Administrator to update
your system settings.
How and where
1. From the main menu, select Risk Governances > Regulations.
2. Select More > Edit Import Schedule.
3. On the Edit Risk Governances Import Schedule screen, provide the relevant data.
4. Select Save Schedule.

New ICD Codes Solution
Why
CMS updates ICD Diagnosis and ICD Procedure Codes two times per year. Maintaining updated
codes ensures the most accurate claims tracking and reporting.
Previously
There was a standard ICD Diagnosis Codes table where ICD Diagnosis codes had to be manually
updated. Also, Custom Defined Entities (CDEs) had to be created to store and manually update
ICD Procedure Codes.
New solution
A new standard table has been created to store ICD Procedure Codes and a new process has
been developed that will systematically update ICD Diagnosis Codes and ICD Procedure Codes
two times per year.
January 2023 Origami Risk - Client Release Notes 7 of 84
What's new?
If you don’t see the new or changed features, ask your System Administrator to
update your permissions.
System-wide
Expand long tooltips in a new popup
Previously
Tooltips are displayed in their entirety, regardless of how long they are. This can still be true.
Now
When this option is activated, only the first few lines of tooltips are displayed. You can then
select Click to expand on a truncated tooltip to see the entire tooltip in a popup screen.
This is especially helpful, for example, when you have lengthy tooltips that contain important
regulatory information.
If you want to use this feature, see your Origami Service Administrator to update
your system settings.
January 2023 Origami Risk - Client Release Notes 8 of 84

View main menu items, right-panel, and column header
rows when scrolling
Previously
When you scrolled down a page, the main menu items, the items in the panel on the right, and
the header row for columns in a table did not remain visible.
Now
When this option is activated, and you scroll down a page:
l
An additional scrollbar is available.
l
The following remain visible:
l
The main menu items
l
The right-side panel items
l
Header rows inside tables
If you want to use this feature, see your Origami Service Administrator to update
your system settings.
View side panel on mobile devices and web browsers
Previously
It was difficult to determine how to open the side panel when using the system on your Mobile
devices or on a web browser that was zoomed in.
January 2023 Origami Risk - Client Release Notes 9 of 84

Now
The Open Side Panel button has been enlarged.
How and where
When on a page that has the right-side panel, use the Open Side Panel Button to view the right
side panel.
View all private tasks
Previously
When a task was private, only the user who created the task and the task owner (primary and
backup) could view it.
Now
Private tasks can also be viewed by users with the View Private Tasks role permission enabled.
New role permissions
View Private Tasks Allows you to view any task that was marked as private.
Expand or collapse all panels at once
Previously
For custom forms, you had to expand or collapse every panel individually.
January 2023 Origami Risk - Client Release Notes 10 of 84

Now
You can expand or collapse all panels at once with a single Expand All / Collapse All option.
New fields
Expand All Expands all panels on the screen.
When selected, changes to Collapse All.
Collapse All Collapses all panels on the screen.
When selected, changes to Expand All.
January 2023 Origami Risk - Client Release Notes 11 of 84

How and where
l
When creating or editing a custom form, at the form level, add the
enableExpandCollapseAll attribute.
This functionality works only when two or more panels have the
enableExpandCollapseAll value set to true.
To create a custom form:
1. From the main menu, select Admin.
2. In the Fields, Labels and Forms section, select Custom Forms.
3. From the list, select your forms set.
4. For the form you want to modify, in the View Mode or the Edit Mode column, select
Edit Form or New Form.
You can create custom forms for both modes.
5. Edit the XML as needed.
You can find the descriptions of all parameters on the Help on Forms XML screen
({YourCurrentURL}Origami/forms/help).
6. Save the changes.
Your custom form is ready, and you can find it in Admin > Custom Forms.
January 2023 Origami Risk - Client Release Notes 12 of 84

Log in without auto complete of user names
Previously
If you were not using single sign-on (SSO), you were able to select a username from the list of
previously-entered usernames.
Now
You have to enter your username unless you are using SSO. The system no longer gives you a
list of previously-entered usernames.
You can still use a password manager to store your system username and password
details.
Filter images added to printable abstracts
Previously
When creating a Printable Abstract, all attached images for a record would also be added to
the abstract. There was no way to filter out only specific images to include in the Abstract.
Now
You can now use a filter to determine which images attached to a record should also be added
to the Printable Abstract. This is similar to how you filter which PDFs attached to a record
would also be included in the Printable Abstract.
How and where
When generating a printable abstract from:
l
The More button on a record. Select Printable Abstract.
l
The More button > Bulk Actions> Printable Abstract
l
The New Abstract Data Entry Event.
January 2023 Origami Risk - Client Release Notes 13 of 84

Associate a contact with another contact
Previously
This functionality was not available.
Now
You can now associate one Contact with another.
How and where
1. Open a Contact.
2. Associate this Contact with another Contact using:
l
The Contacts Side Panel. Click All Contacts or Here. Then, search for the contact in
the Attach Contact side panel. Once you find the contact, click Submit to attach
the Contact.
l
The More menu > Associated > Contacts
Administration
Access Management
Add custom titles, headers, and footers to all Anonymous
Collection screens in a collection category
Previously
This functionality was not available.
January 2023 Origami Risk - Client Release Notes 14 of 84

Now
You can now customize the look and feel of all Anonymous Collection screens in a Collection
Category.
New fields
On the Collection Categories screen, in the new Welcome Page section.
You will be responsible for all content and links added to these fields.
Welcome
Page Title
Page
Header Text
The header is displayed below the Welcome Page Title.
Page
Footer Text
Custom
Styling
Options
Only use this if you are proficient in HTML/CSS.
Use this field to apply valid custom CSS styling to the elements on the
Collection Category page.
For example, the default Collection Category items are defined by the CSS
selector #anonymousWelcome a.createButton on the anchor tags
that could be overridden to present the links in a different way.
Custom
Welcome
Page HTML
Only use this if you are proficient in HTML/CSS.
Use this field to design a custom Web Page using HTML.
See tips below.
Tips for creating a custom welcome page using HTML
l
The Custom HTML will be wrapped in the section tag <div> with id
anonymousWelcome.
January 2023 Origami Risk - Client Release Notes 15 of 84

l
The following tags can be used within the HTML to auto-generate content:
l
{WelcomePageText}: Content will use the Page Header Text content defined
above.
l
{WelcomePageFooterText}: Content will use the Page Footer Text content
defined above.
l
{CollectionCategoryItemAnchorTag-[CategoryItemID]}: This
will produce an HTML anchor tag (i.e. <a>) for the Collection Category Item ID
noted in the tag. If the Collection Category Item allows Incident drafts, the anchor
will be wrapped in a span along with a link to access the drafts. If the Collection
Category Item is not part of the Collection it will not resolve the tag. To identify
the Collection Category Item ID, copy the hyperlink of the Link Item you're
interested in from the Anonymous Collection Category view page. The link will
contain the CollectionCategoryItemID for that item. Note you will
replace the [CategoryItemID] with the numeric ID value.
l
{CollectionCategoryItemURL-[CategoryItemID]}: This will
produce just the URL string for the Collection Category Item ID noted in the tag.
You can use this tag if you'd like to create a custom anchor tag or button. If the
Collection Category Item is not part of the Collection it will not resolve the tag. To
identify the Collection Category Item ID, copy the hyperlink of the Item you're
interested in from the Anonymous Collection Category view page. The link will
contain the CollectionCategoryItemID for that item. Note you will
replace the [CategoryItemID] with the numeric ID value.
l
{AssetURL:[filename]}: This will produce a URL for files attached to the
Incident Collection. This is useful if you have static assets like images or logos that
you want to refer to in your html.
l
You can also generate HTML to be used with each item.
Everything between {CollectionLinkItems} and {/CollectionLinkItems}
will be generated for each item in this collection category.
l
{Item.ImageIconURL}: Gives the URL to the item's icon, if it exists.
l
{Item.ButtonText}: Gives the item's button text, if it exists.
l
{Item.HelpText}: Gives the item's button hover text, if it exists.
l
{Item.ActionURL}: Gives the link to the item's collection page.
l
{Item.DomainName}: Gives the item's domain name.
l
{Item.Sequence}: Gives the item's sequence.
January 2023 Origami Risk - Client Release Notes 16 of 84

How and where
Admin > Anonymous Collection Groups
Add custom icons for collection category items
Previously
You could not add custom icons for collection category items.
Now
For each collection category item, you can upload an image and create a custom icon.
January 2023 Origami Risk - Client Release Notes 17 of 84

How and where
1. From the main menu, select Admin.
2. In the Account section, select Anonymous Collection Groups.
3. Select a collection category.
4. Select New Collection Category Item.
5. In Image Icon File, select Choose File and upload an image.
Create a user from a contact record
Previously
It was not possible to automatically create a user account based on a contact record.
Now
On a contact record, you can now create a user account for the contact using a new field called
Create User, and a Data Entry Event. When a user account is created, an email containing a
login and a password is sent to the user.
New fields
Create user Allows you to create a user account from a contact record.
January 2023 Origami Risk - Client Release Notes 18 of 84

How and where
To set up a data entry event:
1. From the main menu, select Admin.
2. In the Fields, Labels and Forms section, select Data Entry Events.
3. Select New Data Entry Event.
4. Select Contacts.
5. In the Condition section, do the following:
l
Set First Name to is not empty.
l
Set Last Name to is not empty.
l
Set Create User to is true.
l
Set Email1 to is not empty.
6. Select Save Changes.
7. On the Data Entry Event Details screen, in the Actions Triggered by Event section, from
the Create a new action... drop-down, select New User.
8. On the New Action Screen, provide the relevant data.
9. Select Save Changes.
To create a user from a contact record:
To create a user account, the <field name="CreateUser"/> must be added
to the Edit Contact custom form located in Admin > Custom Forms.
1. From the main menu, select Contacts.
2. Do one of the following:
l
Select an existing contact from the list.
l
Select New Contact, and provide the relevant data.
3. From the Create User drop-down, select Yes.
4. Select Save Changes.
Create a user from an employee record
Previously
It was not possible to automatically create a user account based on an employee record.
January 2023 Origami Risk - Client Release Notes 19 of 84

Now
On an employee record, you can now create a user account for that employee using a new
field called Create User, and a Data Entry Event. When a user account is created, an email
containing a login and a password is sent to the user.
New fields
Create user Allows you to create a user account from a employee record.
January 2023 Origami Risk - Client Release Notes 20 of 84

How and where
To create a data entry event:
1. From the main menu, select Admin.
2. In the Fields, Labels and Forms section, select Data Entry Events.
3. Select New Data Entry Event.
4. Select Employees.
5. In the Condition section, do the following:
l
Set First Name to is not empty.
l
Set Last Name to is not empty.
l
Set Create User to is true.
l
Set Email1 to is not empty.
6. Select Save Changes.
7. On the Data Entry Event Details screen, in the Actions Triggered by Event section, from
the Create a new action... drop-down, select New User.
8. On the New Action Screen, provide the relevant data.
9. Select Save Changes.
To create a user from an employee record:
To create an employee account, the <field name="CreateUser"/> must be
added to the Edit Employee custom form located in Admin > Custom Forms.
1. From the main menu, select Contacts.
2. Do one of the following:
l
Select an existing employee from the list.
l
Select New Employee, and provide the relevant data.
3. From the Create User drop-down, select Yes.
4. Select Save Changes.
January 2023 Origami Risk - Client Release Notes 21 of 84

Audits
Create Audit Definition and Audit Response access groups
with view, edit, or delete access
Previously
For audit definitions and audit responses, you could create access groups with only two levels
of access:
l
Full access
l
No access
January 2023 Origami Risk - Client Release Notes 22 of 84

Now
For audit definitions and audit responses, you can create access groups with five levels of
access:
l
Full access
l
Viewing (applies to definitions and responses)
l
Editing (applies to responses)
l
Deleting (applies to responses)
l
No access
For example, a single user can have full access to one group of audit definitions, and view-only
access to another group of audit definitions.
Users still need to have the required role permissions for audit definitions and audit
responses.
How and where
l
To manage access groups, go to the Audit Definition Access Groups screen (Admin >
Audit Definition Access Groups).
Access groups define which audit definitions users can see, and which audit responses
users can create.
l
To manage audit definitions, go to the Audit Definitions screen (Admin > Audit
Definitions).
l
To manage audit responses, go to the Audit Responses screen
({YourCurrentURL}/Origami/AuditResponses).
Use Save as Draft option to save green checkmarks on
Audit Responses
Previously
When an Audit “owner” makes edits and saves the Audit as a Draft, the system removes 1.)
any green checkmarks added during the current draft changes and 2.) all green checkmarks
next to categories that were completed and validated through external access links. (This can
still be true.)
January 2023 Origami Risk - Client Release Notes 23 of 84

Now
When this option is activated, the system will ONLY remove any green checkmarks that were
added during the current Save as Draft made by an Audit “owner”. The green checkmarks will
be preserved for all previous completions through External Access links.
If you want to use this feature, see your Origami Service Administrator to update
your system settings.
How and where
l
Audits > Audit Responses
Exclude a question from scoring in audits
Previously
You had to create an exclude script for the audit question (audit definition) to exclude the
question from scoring.
Now
On the New Audit Code and Edit Audit Code screens, you can select a check box to exclude the
question from scoring by default.
If you also define an exclude script or a scoring formula for a question, the scripts
and formulas override the Exclude setting for the audit codes.
New fields
Exclude
Excludes a question from scoring. When the audit code is used for the Coded,
Attestation, and Multi-Select question types, the following applies:
l
Coded and Attestation: If a code is set to Exclude, the question is ignored.
l
Multi-Select: If all codes selected for the question are set to Exclude, the
question is ignored.
How and where
1. From the main menu, select Admin > Audit Code Sets.
2. Select an audit code set to exclude a question for.
3. In the Codes section, select a code.
4. In the Audit Code Details section, select Exclude.
January 2023 Origami Risk - Client Release Notes 24 of 84

Display audit categories without scrolling when importing
audit definitions
Previously
When importing audit definitions, it was difficult to navigate through audits because you had
to scroll through both Audit Category Groups and Audit Categories columns of the audit
definition.
Now
Only Audit Categories columns are displayed when importing audit definitions. The new Jump
To search field in the menu allows you to jump to a location in the list of results.
New fields
Jump to Allows you to jump to a location in the list of results
How and where
1. From the main menu, select Admin > Audit Definitions.
2. On the All Audit Definitions screen, select More > Import AuditHub Template.
Claims
Add the BuildingFacilityID field to Claim and Incident
Forms
Previously
This field was unavailable in these forms.
Now
You can now add the new BuildingFacilityID field to Claims and Incidents forms.
New fields
BuildingFacilityID Allows you to add a field for building facilities in claims and
incidents forms.
January 2023 Origami Risk - Client Release Notes 25 of 84

How and where
1. From the main menu, select Admin> Custom Forms.
2. Select the correct formset.
3. Select a View/Edit Claims form or the View/Edit Incidents form.
4. Add the BuildingFacilityID field to the form.
1099-MISC Extracts updated to match 1099 Pro’s new
standard import layout changes
Previously
Before the update this year, users could not edit Box 17 in the Form 1099 Extract module in
Origami. Previously, boxes 13-17 represented other fields.
Now
1099 Pro has published updates to their standard import layouts to accommodate IRS
regulations for tax year 2022. The following changes were incorporated into the standard 1099
Pro Export in preparation for the year end:
l
1099-MISC: In the Form 1099 Extract module, box 13 is assigned Foreign Account Tax
Compliance Act (FATCA) filing requirement checkbox. Old box numbers 13-17 are
renumbered to 14-18 respectively.
l
When an extract is generated for 1099-MISC, the column mapped for box 13 now reads
Box 13 - FATCA CheckBox.
How and where
To generate a MISC extract, do the following:
1. From the main menu, select Admin > Form 1099 Extracts.
2. Select the extract record.
3. From the extract record's screen, select More > Generate MISC Extract.
Data Entry Events (DEE)
Track refired Data Entry Events
Previously
On the Data Entry Events screen, you could not see which failed events were refired.
January 2023 Origami Risk - Client Release Notes 26 of 84

Now
On the Data Entry Events screen, in the event logs table, in the Refire Status column, you can
see that an event was refired. You can also see the link to the original event.
On the log screen for the original event (parent), you can see the chain of all the related refired
events (children).
New fields
Refire Status Indicates if an event was refired, and shows the link to the original
event.
The field is displayed on the Recent Events Log screen and the Event
Log screen.
Most Recent
Refire
Shows the previous refire event.
The field is displayed on the Event Log screen.
Original Event
Log
If an event is refired, links to the previous event log.
The field is displayed on the Event Log screen.
Refire Children Shows the chain of all the refired events related to the original event.
The field is displayed on the Event Log screen.
How and where
1. From the main menu, select Admin > Data Entry Events.
2. Select a data entry event.
3. In the Recent Events Log section, for a refired event, you can do the following:
l
From the Event Date column, select an entry for which you want to view the
refired event log.
l
From the Refire Status column, select an Original Event Log entry to view the
previous event log, before the refire.
The Event Log screen is displayed.
January 2023 Origami Risk - Client Release Notes 27 of 84

Create a data entry event based on audit user assignment
Previously
This functionality was not available.
Now
Using the new … is Assigned Data Event, you can now create assignment workflow DEEs to fire
immediately upon assigning the individual Questions, Categories, or Category Groups.
For an audit response to be assigned separately, you must have Can Assign
Separately (which allows you to assign Audit Groups, Categories, and Questions to
separate Users) set to true on the Audit Definition.
New fields
... is Assigned in
the On Events
list
This option is available in the Audit Answer, Response Category, and
Response Category Group Domains.
l
Select … is Assigned to create a Data Entry Event that fires when an
Audit Answer, Response Category, or Response Category Group is
assigned.
How and where
1. Admin > Data Entry Events.
2. Select one of these Areas: Audit Answer, Audit Response Category, or Audit Response
Category Group.
January 2023 Origami Risk - Client Release Notes 28 of 84

Grant external users access to related records
Previously
In Data Entry Events (DEE), you could only grant an external user access to the record
triggering an event.
Now
In Data Entry Events (DEE), you can also grant an external user access to the domain related to
the record triggering an event.
How and where
1. From the main menu, select Admin.
2. In the Fields, Labels and Forms section, select Data Entry Events.
3. Select the DEE you want to give the external user access to.
4. In the Actions Triggered by Event section, from the Create a new action... drop-down,
select Grant External Access.
5. In the Body field, do the following:
l
Specify the name of the related domain you want the external user to have access
to.
l
Specify the external access type you want to assign to the external user.
Below the email fields, you can find instructions on how to grant access
to related domains and with specific external access type. You can also
find examples of tags and filters to enter in the Body field.
6. Provide the relevant data.
7. Select Save Changes.
Document Management
Create an Audit Definition Template for Document Control
Attestation
Previously
This functionality was not available.
January 2023 Origami Risk - Client Release Notes 29 of 84

Now
You can mark an Audit Definition to be used as an Audit Definition Template for Attestation of
a Document Control. Once a Document Control is ready for Attestation, the Document Owner
or Co-Owner can then select the correct Audit Definition Template that will be used for
Attestation of the Document Control.
New fields
Use as Document Attestation
Template on the New/View
Audit Definition screen
When checked, this Audit Definition can be used as a
Document Control Attestation Template, if there is at
least one Attestation Question Type set up.
How and where
1. Edit an Audit Definition
2. Select the Use as Document Attestation Template check box.
3. Add an Audit Category and at least one Attestation Question Type.
4. Save and close.
This Audit Definition is now available to use as a Template for a Document Control.
Use an Audit Definition Template for Document Control
Attestation
Previously
You could only create an Attestation from Audit screens.
Now
Once a Document Control is ready for Attestation, the Document Owner or Co-Owner can now
select the Audit Definition Template that will be used to generate the Attestation for the
Document Control.
New sections
Attestations on the
View/Edit
Document Control
screen
l
Use the Create Attestation link to select the Audit Definition
Template that will be used to create a new Attestation for this
Document Control.
l
You will only be able to select Audit Definition Templates that
have the Use as Document Attestation Template field checked
and include at least one Attestation Question Type.
January 2023 Origami Risk - Client Release Notes 30 of 84

How and where
When your Document Control has been approved, you can generate a new Audit Definition for
Attestation of this Document Control based off an existing Audit Definition Template.
1. Open a Document Control that you are an Owner/Co-Owner of.
2. Select More > Create Attestation.
OR
In the Attestation section, click Create Attestation.
3. Select the Audit Definition Template you want to use for the Attestation of this
Document Control.
Once selected, a new Audit Definition is generated, using the selected template, for the
Attestation of this Document Control
If there are no Audit Definition Templates, see Create an Audit Definition
Template for Document Control Attestation to create one.
4. You can now use the Audit Schedule, if desired, to send out the Attestation to the
related Domain.
Stack teams assigned review access in Document Controls
Previously
When you assigned multiple teams review access, you could not stack the teams in a
sequence.
Now
When you assign multiple teams review access, you can stack the teams so that the first team
in the sequence must review the policy before the policy is sent to the next team in the
sequence, and so on.
January 2023 Origami Risk - Client Release Notes 31 of 84

How and where
For example, to use this function in the Policy and Procedure Management (PPM) module, do
the following:
1. From the main menu, select Policies and Procedures > Document Controls.
2. On the Document Controls screen, select the policy you want to be reviewed.
3. In Review Access, select Assign Team.
You must be a document control owner to assign review access.
4. In Team, select the team you want to add to the review process, and provide the
relevant data.
5. If you need to assign sequential review access, in Next in Sequence To, select the team
that must review the policy before the policy can be assigned to the team you entered in
Team.
6. Select Assign.
Stack teams assigned file access in Document Controls
Previously
When you assigned multiple teams file access, you could not stack the teams in a sequence.
Now
When you assign multiple teams file access, the teams can be stacked so that the first team in
the sequence must access the policy before the policy is sent to the next team in the
sequence, and so on.
January 2023 Origami Risk - Client Release Notes 32 of 84

How and where
For example, to use this function in the Policy and Procedure Management (PPM) module, do
the following:
1. From the main menu, select Policies and Procedures > Document Controls.
2. On the Document Controls screen, select the policy you want to give access to.
3. In File Access, select Assign Team.
You must be a policy owner to assign file access.
4. In Team, select the team you want to assign policy access to, and provide the relevant
data.
5. If you need to assign sequential file access, in Next in Sequence To, select the team that
must access the policy before the policy can be accessed by the team you entered in
Team
6. Select Assign.
Change the sequence of assigned users in Document
Controls
Previously
When you assigned a policy to a sequence of users within a team, you could not change to the
order of the users in the sequence.
Now
When you assign a policy to a sequence of users within a team, you can change the order of
the users in the sequence.
January 2023 Origami Risk - Client Release Notes 33 of 84

How and where
For example, to use this function in the Policy and Procedure Management (PPM) module, do
the following:
1. From the main menu, select Policies and Procedures > Document Controls.
2. On the Document Controls screen, select the policy for which you want to change the
sequence of assigned users.
3. In Team Assignments, for the user you want to reorder, in the Reorder column, select
the arrows icon.
The Assignment Mode of a team must be set to Sequential .
4. On the User Assignment Order screen, in the Assignee column, find the name of the
user you want to reorder.
5. Next to the name of the selected user, left-click on the three dots and drag the row into
the position you want the user to be in the sequence.
6. Select Save.
Use Visio files in Document Controls
Previously
In Document Controls, you could upload, view, and edit, the following files Word, Excel and
PDF files.
Now
In Document Controls, you can now also upload, view, and edit, Visio files.
January 2023 Origami Risk - Client Release Notes 34 of 84
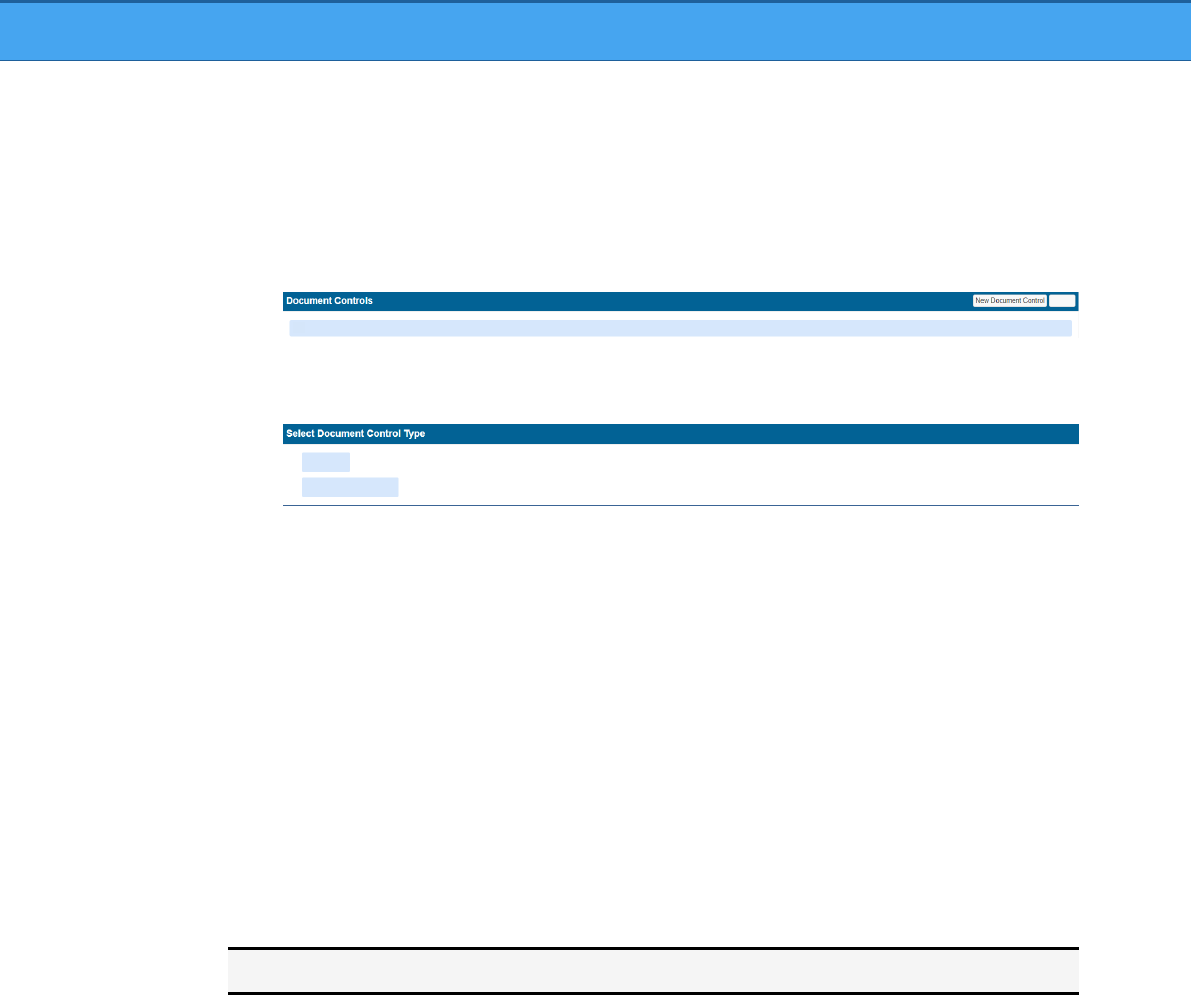
How and where
For example, to use this function in the Policy and Procedure Management (PPM) module, do
the following:
1. From the main menu, select Policies and Procedures > Document Controls.
2. On the Document Controls screen, select New Document Control.
3. If your organization has document types set up, on the Select Document Control Type
screen, select the document type.
4. On the New Document Control screen, select Blank.
5. From the Document Type drop-down, select Visio, and provide the relevant data.
6. Select Save Changes.
Search the content of published policies in Document
Controls
Previously
You could not search within the content of your published policies to find specific information.
Now
You can search within the content of your published policies to find specific information.
New fields
File Contents Allows you to search within the content of your published files
January 2023 Origami Risk - Client Release Notes 35 of 84

If you want to use this feature, see your Origami Service Administrator to update
your system settings.
How and where
For example, to use this function in the Policy and Procedure Management (PPM) module, do
the following:
1. From the main menu, select Policies and Procedures > Document Repository.
The Document Control Published Files screen displays a list of your published policies.
2. In the Filter By section, in File Contents, enter the content you want to search for.
3. Select Search.
Use advanced search when adding multiple assignees in
Document Controls
Previously
When you added multiple assignees to File Access, Review Access or Repository Access, you
could not use the advanced search function.
Now
When you add multiple assignees to File Access, Review Access or Repository Access, you can
use the advanced search function for users, contacts and employees.
January 2023 Origami Risk - Client Release Notes 36 of 84

How and where
For example, to use this function in the Policy and Procedure Management (PPM) module, do
the following:
1. From the main menu, select Policies and Procedures > Document Controls.
2. Select the policy you want to add multiple assignees to.
3. For the access type you want to add multiple assignees to, select Assign Multiple.
4. Select User, Contact or Employee, and select Next.
5. Select Advanced Search, and add the filters you want to use.
6. Select Apply Filter.
7. From the filtered list, select the assignees you want to add, and select Next.
8. Provide the relevant data and select Submit.
Track views and downloads of published Document
Controls
Previously
This functionality was not available.
Now
If you are the Document Controls Owner (or Co-owner), you can now see how many times the
Document Control was downloaded and previewed by others.
The Previews and Downloads statistics do not include the Owner and Co-owner’s
downloads and previews.
January 2023 Origami Risk - Client Release Notes 37 of 84

How and where
1. Open a Published Document Control.
2. In the Published Files section, click Views/Downloads.
Manually change the status of a Document Control
Previously
This functionality was not available.
Now
The Owner or Co-Owner of the Document Control can now manually change the status of a
Document Control.
At this time, the system only automatically changes the status of a Document Control to
Published when you publish a Document Control. You can create DEEs to automatically change
the Document Control to other statuses.
New fields
Status on the
Edit Document
Controls screen
Choices Include:
l
Editing in Progress
l
Approval in Progress
l
Expired
l
Archived
l
Approved
l
Published
l
Created
The option: Published is only displayed in this list after the
Document Control has been Published.
January 2023 Origami Risk - Client Release Notes 38 of 84

How and where
1. Open a Document Control that you are an Owner/Co-Owner of.
2. From More > Change Status.
3. Select the new status in the Change Status To drop down list.
Document Templates
Track views and downloads of published Document
Templates
Previously
This functionality was not available.
Now
If you are the Document Template Owner (or Co-owner), you can now see how many times
the Document Template was downloaded and previewed by others.
The Previews and Downloads statistics do not include the Owner and Co-owner’s
downloads and previews.
January 2023 Origami Risk - Client Release Notes 39 of 84

How and where
1. Open a Published Document Template.
2. In the Published Files section, click Views/Downloads.
Limit editable parts of a Document Template Element
Previously
When you sent elements of a Document Template to assignees for review, all the content
could be edited.
Now
When you send elements of a Document Template to assignees, you can now decide which
portions can be edited by the assignees by locking the other parts within a given element.
January 2023 Origami Risk - Client Release Notes 40 of 84

How and where
1. Document Template > select a Template in which you are an owner.
2. In the Elements section, open an Element.
3. Click inside one of the sections in the Element and select the items that you don’t want
people to edit.
4. With the items selected, click the Lock button in the toolbar.
Each line that was selected will now show a gray lock icon at the beginning. These items
are now un-editable for assigned recipients.
Environment, Health, and Safety (EHS)
Select country of audit when importing audits from STP
AuditHub
Previously
When importing audits from STP AuditHub, you couldn't select the country of the audit. You
also had to select a state.
Now
You can use the Country field in audit definitions and on the audit import screen.
If you select US in the Country field on the audit import screen, an additional State field
becomes available.
New fields
Country Allows you to select a country for the audit import screen.
State Allows you to select a state for the audit import screen.
January 2023 Origami Risk - Client Release Notes 41 of 84

How and where
1. From the main menu, select Admin > Audit Definitions.
2. On the All Audit Definitions screen, select More > Import AuditHub Template.
3. On the Import AuditHub Template screen, in the Country field, select a value.
4. If you selected US in the Country field, select an additional value in the State field.
Map audit category groups to STP rulebooks instead of
topics
Previously
When you imported audit data from STPAuditHub:
l
Category groups were mapped to topics.
l
STP rulebooks were ignored.
This lead to disorganized audits with few category groups, where each STP topic was imported
as a single Origami Risk category. The created groups were very large and difficult to find
relevant questions in.
Now
When you import audit data from STPAuditHub, STPrulebook mapping is used.
A topic name precedes a category group name only when topics belong to multiple
category groups.
Audit category groups are now mapped to STPrulebooks, instead of STPtopics, following STP
three-level hierarchy:
l
Audit category group
l
Audit category
l
Question
l
Question
l
Audit category
l
Question
l
Question
As a result, the large groups based on topics are divided into smaller groups based on
rulebooks, so the information is more organized and identifiable.
January 2023 Origami Risk - Client Release Notes 42 of 84

How and where
1. From the main menu, select Admin.
2. In the Fields, Labels and Forms section, select Audit Definitions.
3. On the All Audit Definitions screen, select an audit to review or add a new category
group for.
4. In the Audit Category Groups section, select Add Audit Category Group.
Import Audit Definitions from STP AuditHub to include the
highest possible score
Previously
When you imported Audit Definitions from STP AuditHub, you had to update the Audit and set
the Possible Score for all Questions. Otherwise, the Possible Score would be 0.
Now
When you import Audit Definitions from STP AuditHub, all non-instruction questions are
automatically set to the highest score available (determined in Admin > Audit Code Set).
How and where
1. From the main menu, select Admin > Audit Definitions.
2. On the All Audit Definitions screen, select More > Import AuditHub Template.
Customize the selection screen for a safety meeting type
Previously
When creating new safety meetings (also called "safety huddles"), the selection screen for a
safety meeting type could not be customized.
Now
On the Custom Forms screen, you can use XML to customize the default selection screen for a
safety meeting type.
How and where
1. From the main menu, select Admin.
2. In the Fields, Labels and Forms section, select Custom Forms.
3. To create a custom selection screen for safety meeting types, in Safety Meetings, select
Edit/New Form.
4. On the Edit/New Form screen, edit the XML as needed.
5. Select Save Changes.
January 2023 Origami Risk - Client Release Notes 43 of 84

Governance, Risk, and Compliance (GRC)
Select the position of an attestation question
Previously
When creating a new attestation question, you could not select the position of the question
text.
Now
When creating a new attestation question, you can select the position of the question text as
follows:
l
Below
l
Hidden
l
Above
New fields
Question Text
Placement
l
Above: Places the question at the top of the document.
l
Below: Places the question at the bottom of the document.
l
Hidden: Hides the question, allowing the user to make an
attestation by selecting Save.
January 2023 Origami Risk - Client Release Notes 44 of 84

How and where
1. From the main menu, select Administration > Audit Definitions.
2. From the list of documents, select the document you want to add an attestation
question to.
3. In the document form, in the Attestation Questions section, select Add New Question.
4. In Question Type, from the list, select Attestation.
5. In Audit Code Set, from the list, select an audit code set for your document.
6. In Question Text, add the attestation question you want the user to see.
7. In Question Text Status, select one of the following:
l
Above: Places the question at the top of the document.
l
Below: Places the question at the bottom of the document.
l
Hidden: Hides the question, allowing the user to make an attestation by selecting
Save.
8. Provide the remaining data.
9. Select Save Changes.
Batch import files into Document Controls
Previously
You could not import a batch of files into Document Controls.
Now
You can use a wizard to import a batch of files into Document Controls. The import includes all
versions of each file in the batch.
January 2023 Origami Risk - Client Release Notes 45 of 84

How and where
1. From the main menu, select Administration > Batch Processes.
2. On the Batch Processes screen, select More > Origami Document Control Import By
Title.
3. On each screen of the Origami Document Control Import By Title wizard, provide the
relevant data.
4. Select Save Changes.
5. Select Run Now.
Policy and Billing
Add a security deposit for various payment options with
pre- and post-bind payment support
Previously
This functionality was not available.
Now
In Billing Profiles, you can choose to add a security deposit for the monthly pay-as-you-go
payment option.
A security deposit can be invoiced outside the application interview process. For a security
deposit, a special security deposit invoice is created. You can pay for the security deposit
invoice in many ways, like credit card, online payment, or check.
The security deposit is created at the member level and is linked to the policy it originated
from.
January 2023 Origami Risk - Client Release Notes 46 of 84

How and where
1. From the main menu, select Admin.
2. In the Policies and Underwriting section, select Billing Profiles.
3. Select a billing profile where you want to configure a security deposit.
4. Select a monthly frequency payment option, for example Monthly Pay As You Go.
5. Define the following fields:
l
Security Deposit Percentage: How much percent of the entire policy is taken for a
security deposit.
l
Security Deposit Threshold: The minimum policy value for which a security deposit is
taken.
6. Select Save Changes.
Create rules to write off negative amounts
Previously
You could create rules to write off only positive amounts from policies.
Now
You can now also create rules to write off negative amounts from policies.
January 2023 Origami Risk - Client Release Notes 47 of 84

How and where
1. From the main menu, select Admin.
2. In the Policies and Underwriting section, select Write-Off Rules.
3. Select New Write-Off Rule.
4. In the Maximum Write-Off Threshold field, enter the maximum negative amount of
money you want to write off from a policy.
For example, if you enter -10.00, our system searches for all policies with an
outstanding negative balance of 10 USD or less (up to 0), and writes off that amount
from each policy.
5. Provide the remaining details, and save the rule.
Automatically approve certain Underwriting Rules based
on a User’s Role
Previously
When you bound a proposal or manually initiated the underwriting rules, you were also
required to approve every underwriting rule to bind the policy.
Now
Each Underwriting rule now has the option to be automatically approved based on a user’s
role. This allows users with specific roles to continue to bind without having to manually
approve certain rules.
Example: You have a junior approver whose approval limit is 2 million dollars, whereas the
senior approver’s limit is set to 4 million dollars. Previously, every time a senior approver
bound a proposal, they also needed to approve the Underwriting Rules for the junior
approvers. Now, you can auto-approve all junior approver rules for every user with the senior
approver role.
New fields
On the New/Edit Underwriting Rule screen, in the new Override Rules section.
Roles that can
override
Select all User Roles that will have this Underwriting Rule automatically
selected and approved.
Auto Approve
for Override
Roles
Yes: The Underwriting Rule is pre-checked and approved for the selected
Roles in the Roles that can override field. All users will still see the rule.
No: The underwriting rule will need to be manually checked by all Users
before they can bind the proposal.
January 2023 Origami Risk - Client Release Notes 48 of 84

How and where
l
Admin > Underwriting Rules > New Underwriting Rule
Add Relationship Validation to an Underwriting Rule
Previously
Underwriting rules could not validate if a Schedule had the required amount of a particular
child record before it was bound.
A child record is, for example, the work location for an additional insured.
Now
You can now add a Relationship Validation to an Underwriting rule that scans all child records
under a specific Parent Record of the Schedule. If the Parent Record does not have an amount
between the minimum and maximum range of a specific child record, the proposal will not
bind and an underwriting exception will be thrown.
For example, the Underwriting Rule requires an additional insured to have at least one work
location. If there are no work locations added to an additional insured, the Proposal will not
bind.
New sections
Relationship
Validation
On the Edit Underwriting screen. (This section is not displayed when you
first create the Underwriting Rule.)
How and where
1. From the main menu, select Admin > Underwriting Rules.
2. Open an existing Underwriting Rule.
3. In the new Relationship Validation section, select the New Relationship Validation
button.
The New Relationship Validation screen is displayed.
4. Select the Parent domain and the child domain combination that needs to be validated.
5. Add the minimum and maximum range amount needed to allow the proposal to bind.
6. Select Save Changes.
January 2023 Origami Risk - Client Release Notes 49 of 84

Root Cause Analysis (RCA)
Add new RCA Types
Previously
This functionality was not available.
Now
You can now add RCA types directly to the Code Table or add a new RCA Type when creating
an RCA Record. The system will automatically create a new custom form for each new RCA
Type.
How and where
To add RCA Codes:
l
Admin > Code Tables > Root Cause Types
l
When you create a new Root Cause Type, the system automatically creates a new
custom form named the same as the new Root Cause Type.
l
The new form will be identical to the New RCA screen until you modify it to suit
your needs.
To edit an RCA custom form:
l
Admin > Custom Forms > search for the RCAs section
To create a new RCA record using an RCA Code Type:
l
From the RCA section, select New RCA.
l
If there are RCA Types setup in your system: the Select New Root Cause Type
screen will be displayed. You can now select the Root Cause Type.
l
There are no RCA Types setup in your system: You will go directly to the New RCA
screen.
Give a root cause domain a custom name throughout
Origami Risk
Previously
You could not rename any of the RCA Domains.
January 2023 Origami Risk - Client Release Notes 50 of 84

Now
You can now use Domain Name Overrides to rename the following RCA Domains, so they
display as different names throughout the system:
l
RootCauses
l
RootCauseCodes
l
RCATimelines
l
RCAContributingFactors
l
RCAContributingFactorTypes
l
RCAPatientTypes
l
RCAStatusCodes
l
RCASeverityCodes
l
RCAServicesCodes
l
RCAFollowUpActionCodes
l
RCAInvolvedFactorsCodes
How and where
1. Admin > Domain Name Overrides > select New Domain Name Override.
2. From the Domain drop-down field, select the domain you want to rename in the system.
3. In the Display Name Singular field, enter the new singular version of the Display name.
4. In the Display Name Plural field, enter the new plural version of the Display name.
5. Click Save Changes.
Use custom employee fields in the RCA Domain
Previously
This functionality was not available.
Now
15 custom Employee fields are now available in the RCA Domain.
These fields are named: Employee1, Employee2, Employee3, … , Employee14, Employee15.
How and where
For RCA Domains, add fields to your Forms:
l
Admin > Custom Forms
January 2023 Origami Risk - Client Release Notes 51 of 84

Create a root cause with a DEE for incidents or claims
Previously
This functionality was not available.
Now
You can now create a new Root Cause using a DEE for Incidents or Claims.
How and where
1. Admin > Data Entry Events > New Data Entry Event.
2. Select Incident or Claim as the Event Area.
3. On the New Data Entry Event screen, fill out the information, then click Save Changes.
4. On the Data Entry Event Details screen, in the Action Triggered by Event section, from
the Create a new Action drop list, select New Root Cause.
5. On the New Action screen, select the Auto Fill Mapping Set, if available.
l
If you have Auto Fill Mapping Sets created for RCA and Incidents/Claims, you can
use these mapping sets to auto-fill specific fields on the new Root Cause record
from the source domain record.
l
If you do NOT have any Auto Fill Mapping sets created for RCA and
Incidents/Claims, a blank Root Cause Record will be created and linked to the
Incident/Claim with no other data from the Incident/Claim.
Send Email Notification
l
To use the Email Notification option, you will need to have a Root Cause
Email Template (Attached to the Root Cause domain). Once you select this
option, you will be prompted to select an Email Template.
l
If you do NOT have any Root Cause Email Templates created, select New
Email Template to create one.
Create External Access (available when you select Send Email Notification)
l
When selected, an External Access Key is created for the newly created Root
Cause Record.
l
You can select when you want this Access Key revoked.
l
This will also replace any links to the record in the Email template with
external access URLs.
Create External Access only shows if you have at least one
External Access Type configured for the RCA domain.
January 2023 Origami Risk - Client Release Notes 52 of 84

Add Days Open tracking to the RootCauses and
RCACorrectiveActions domains
Previously
Users couldn't track the progress of ongoing root cause analyses (RCAs) and corrective actions
(CAs).
Now
You can track open RCAs and CAs. You can select RCAs and RCA Corrective Actions from the
list of domains in the Days Open Rules section in the Administration module. When custom
digits-only number fields are defined for the domains, you can create up to two Days Open
rules for the root causes and corrective actions domains.
Tracking open RCAs and CAs can be useful, for example, if you want to do the following:
l
Check how quickly open RCAs or CAs are resolved
l
Identify bottlenecks in your departments
How and where
1. From the main menu, select Admin
2. In the Fields, Labels and Forms section, select Days Open Rules.
3. Select New Days Open Rule.
Assign a root cause analysis to a team
Previously
You could not assign a root cause analysis (RCA) to a team.
Now
You can assign a root cause analysis (RCA) to a team to allow more than one person to
participate in an analysis.
How and where
1. From the main menu, select Root Causes.
2. On the RCAs screen, select the RCA for which you want to add a team.
3. In the Team Assignments section, select New Team Assignment.
4. On the Team Assignment for RCA screen, provide the relevant data.
5. Select Assign.
January 2023 Origami Risk - Client Release Notes 53 of 84

Reporting and Analytics
Add expiration date for downloading scheduled reports
Previously
For scheduled reports sent by email, the download link expires automatically after seven days.
(This can still be true.)
Now
When this option is activated, you can specify the number of days after which the download
link expires.
Apart from the download link, the email also contains a sentence informing about the date on
which the download link expires.
If you want to use this feature, see your Origami Service Administrator to update
your system settings.
Reporting and Analytics
Schedule Dashboard PDF exports to include interactive
options
Previously
Interactive options were not included in scheduled PDF exports of a dashboard.
Now
You can include interactive options when scheduling a PDF export of a dashboard.
January 2023 Origami Risk - Client Release Notes 54 of 84

How and where
When creating a new schedule:
l
In the Filter Options section, select Apply Interactive Filter to Schedule.
Next to Filter to Apply, you can see which interactive option is included in the scheduled
PDF export.
If you want to include a different interactive option, you need to apply it on
the dashboard first.
To create a new schedule:
1. From the main menu, select Dashboards > More > More Dashboards.
2. From the list, select the dashboard you want to share.
3. Select More > AddSchedule.
4. Provide the relevant data, for example, the frequency of sending, the recipient, and the
body of the email.
5. Save the changes.
Your email is ready, and you can find it in Dashboards > More > View Schedule.
Claims
Select a Risk Unit on the Loss Event form
Previously
When a Policy Snapshot was imported, you had to add a risk unit on the first notice of loss,
when sometimes you didn't have this information at that time.
Now
You can now select the risk unit on the loss event form.
New fields
Risk Unit Shows information on the selected risk unit. The following buttons are
available:
l
Add Risk Unit: Allows you to add a risk unit on the loss event form.
l
Change: Allows you to change a risk unit on the loss event form.
l
Remove: Allows you to remove a risk unit from the loss event form.
January 2023 Origami Risk - Client Release Notes 55 of 84

How and where
To add a risk unit:
1. From the main menu, select Claims and Incidents > All Loss Events.
2. From the list, select the loss event you want to add a risk unit to.
3. Select Edit Event.
4. From the Risk Unit field, select Add Risk Unit.
5. Select the required risk unit.
The information on the risk unit is added to the loss event form.
To choose another risk unit:
l
If you want to select another risk unit from the loss event form, from the Risk Unit field,
select ChangeRisk Unit.
To remove a risk unit:
l
If you want to remove the risk unit from the loss event form, from the Risk Unit field,
select Remove Risk Unit.
Display all electronic data interchange rejection errors in a
report
Previously
To view electronic data interchange (EDI) rejection errors for a claim, you had to select View
Acknowledgment in the claim record, and manually extract the rejection error details from the
XML.
Now
l
You can see all the claims that have EDI rejection errors displayed in one report.
l
From the report, you can select a claim to see all the EDI rejection errors for that claim.
How and where
1. From the main menu, select Claims & Incidents > EDI Reports.
2. On the EDI Reports screen, select Rejected EDI Reports.
3. Select a claim to see all the EDI rejection errors for that claim.
January 2023 Origami Risk - Client Release Notes 56 of 84

Environment, Health, and Safety (EHS)
Chemicals
Import chemical concentrations in the Data Import Center
Previously
This functionality was not available.
Now
You can now import Chemical Concentrations using the Chemical Concentrations template.
How and where
Admin > Data Import Center
The new Chemical Concentrations template has been added to the Additional Templates
menu.
Export chemicals to CSV or PDF
Previously
You could only export chemicals to a CSV file.
Now
You can now export chemicals also to an Excel or a PDF file.
January 2023 Origami Risk - Client Release Notes 57 of 84

How and where
To export a list of chemicals:
1. From the main menu, select Chemicals.
2. Select More, and then select one of the following:
l
Export to CSV
l
Export to Excel
l
Export to PDF
Enter partial inventory values
Previously
For the inventory items and transaction values, you could only enter quantities in whole
numbers.
Now
You can now enter quantities with up to two decimal places.
How and where
You can enter a partial inventory value:
l
In the Quantity field on the Inventory Items screen.
l
In the Change field on the Inventory Transactions screen.
Open an inventory item and scroll down to the Inventory Transaction section.
Governance, Risk, and Compliance (GRC)
Policy and Procedure Management (PPM)
PPM uses Document Controls functionality.
January 2023 Origami Risk - Client Release Notes 58 of 84

Create a policy from a template or a blank document
Previously
The only way to create a new policy was to upload a file from your computer.
Now
When you create a new policy, you can select a pre-loaded template file or a blank document.
New fields
Template Allows you to select a pre-loaded template.
Blank Allows you to select a blank document.
How and where
1. From the main menu, select Policies and Procedures > Document Controls.
2. On the Document Controls screen, select New Document Control.
3. If your organization has document types set up, on the Select Document Control Type
screen, select the document type.
4. On the New Document Control screen, select one of the following:
l
Template: Creates a policy from a template.
l
Blank: Creates a policy from a blank document.
5. Depending on your answer in the previous step, do one of the following:
l
If you selected Template, select a document from the list of uploaded templates,
and provide the relevant data.
l
If you selected Blank, select the document type, and provide the relevant data.
6. Select Save Changes.
Change the order sequence of team members
Previously
The only way to re-sequence Team Members was to open each Team Member’s record and
assign a sequence manually.
January 2023 Origami Risk - Client Release Notes 59 of 84

Now
When a Team Member is added to a Team (regardless of the Maintenance Mode), the system
automatically gives the member the next number in the sequence (starting with 1). You can
also re-sequence members through drag and drop.
How and where
1. Teams > Open a Team.
2. In the Team Members list, hover your mouse cursor over the 3-dot icon.
The cursor will change to 4 arrows.
3. Drag and drop the member to the new position in the list.
The system automatically updates the sequence order for all Team Members.
Get a notification when publishing an unreviewed policy
Previously
When you selected Publish, you were not warned if a policy was unapproved, or contained
tracked changes.
Now
When you select Publish, if a policy is unapproved, or contains tracked changes, our system
warns you and asks if you want to publish anyway.
January 2023 Origami Risk - Client Release Notes 60 of 84

How and where
To publish a policy, you must be the policy owner.
1. From the main menu, select Policies and Procedures > Document Controls.
2. On the Document Controls screen, select the title of the policy you want to publish.
3. Select Publish.
A warning displays if the policy contains pending changes, or comments that are
not yet approved.
Give a named user direct access to a policy
Previously
In the Document Controls module, a published policy could only be accessed from an Origami
Risk repository.
January 2023 Origami Risk - Client Release Notes 61 of 84

Now
In the Document Controls module, you can give a named user direct access to download the
most recent version of a published policy.
How and where
You need to configure a data entry event to send an email with the download link
to the named user. Such a link is also useful to link back to the policy from other
areas in Origami.
1. From the main menu, select Policies and Procedures > Document Controls.
2. Select the policy for which you want to give access to a named user.
3. In Download Access, select New User Assignment.
4. In Assignee Type, select Named User.
5. In User, enter the name of the user you want to give access to the policy.
6. In PDF File, select one of the following:
l
Yes: Gives access to a PDF version of the policy document.
l
No:Gives access to the original format of the document, for example, a Word
document.
Most modern browsers open PDF documents in a new tab instead of
downloading them directly.
7. Select Assign.
Give an external user direct access to a policy
Previously
In the Document Controls module, a published policy could only be accessed from an Origami
Risk repository.
January 2023 Origami Risk - Client Release Notes 62 of 84

Now
In the Document Controls module, you can give an external user a link to the most recent
version of a published policy so the policy can be directly accessed from an external web page
or intranet site.
How and where
You need to configure a data entry event to send an email with the download link
to the named user.
1. From the main menu, select Policies and Procedures > Document Controls.
2. Select the policy for which you want to give access to an external user.
3. In Download Access, select New User Assignment.
4. In Assignee Type, select External Assignee.
5. In User Email , enter the email address of the external assignee.
6. In PDF File, select one of the following:
l
Yes: Gives access to a PDF version of the policy document in a browser.
l
No:Gives access to the original format of the document, for example, a Word
document.
7. Select Assign.
View repository links within a box
Previously
When you viewed an open access document in Document Templates, long URL links to a
repository crossed into the right panel of the screen.
Now
When you view an open access document in Document Templates, the URL links are contained
within a box.
Healthcare
Calculate risk priority scores for HFMEA processes
Previously
For HFMEA (Healthcare Failure Mode and Effect Analysis) hazard analysis, our system used the
VA (Veterans Affairs) methodology.
January 2023 Origami Risk - Client Release Notes 63 of 84

Now
For HFMEA hazard analysis, our system uses both the VA (Veterans Affairs) methodology and
the IHI (Institute for Healthcare Improvement) methodology.
In the IHI process, with severity, occurrence, and detection scores, you can now provide values
from 1 to 10. The risk priority score is calculated automatically.
Give an HFMEA domain a custom name throughout
Origami Risk
Previously
You could not rename any of the HFMEA Domains.
Now
You can now use Domain Name Overrides to rename the following HFMEA Domains, so they
display as different names throughout the system:
l
HFMEAEffects
l
HFMEAProcesses
l
HFMEAStatusCodes
l
HFMEAActions
l
HFMEAFailureModes
l
HFMEARecords
How and where
1. Select Admin > Domain Name Overrides > New Domain Name Override.
2. From the Domain drop-down field, select the domain you want to rename in the system.
3. In the Display Name Singular field, enter the new singular version of the Display name.
4. In the Display Name Plural field, enter the new plural version of the Display name.
5. Select Save Changes.
Policy and Billing
Rollback and re-run bind data updaters
Previously
This functionality was not available.
January 2023 Origami Risk - Client Release Notes 64 of 84

Now
When a Proposal is successfully bound, but there is an error in the post-bind Data Updaters:
1. You will see an error on both the Proposal and Policy Record. (This is still the same.)
2. Now, all the previously run Data Updaters are rolled back.
3. You can now re-run the Data Updaters from the Policy’s More > Rerun Data Updaters
(after the reason for the failure has been corrected.)
This option is only available when an error has aborted the post bind execution. Once
the rerun is executed without any errors, the option will no longer be available.
Bulk bind proposals
Previously
When you use the db.api method: BindProposal ctx.Util.BindProposal
(proposal proposal), you can only bind one proposal at a time. (This is still true)
Now
A new db.api method BulkBindProposal allows you to bulk bind a group of proposals
from within a Rating Program.
“Help on Script Actions” (…/Origami/Actions/ScriptActionHelp) has
been updated to include this Method/Function.
New methods and functions
void ctx.Util.BulkBindProposal
(int policySetID, int[]
proposalIDs)
This will queue a list of proposalIDs to
be bound on the app server.
Only accepted proposals can be bound
with this method.
Parameters:
l
policySetID: The selected Rating
Program for the bulk operation
l
proposalIDs: The list of proposal
IDs to bind (must be in the specified
Rating Program)
Re-run ‘Forms Auto Generation’ after a proposal post-bind
failure
Previously
This functionality was not available.
January 2023 Origami Risk - Client Release Notes 65 of 84

Now
When a Proposal is successfully bound, but the Forms Auto Generation fails:
l
You will now see an error on both the Proposal and Policy screens with details of the
failure.
l
You can then re-run the Forms Generation from the Policy’s More > Rerun Forms
Generation. (After all errors have been corrected.)
This option is only available when the Auto Forms Generation during Bind failed. Once
the re-run is executed without any errors, the option will no longer be available.
View the ‘Net of Commission’ on agency-billed policies
Previously
This functionality was not available.
Now
You can now see the Net of Commission in the Premium Invoices section of an Agency-Billed
Policy. This column is only available for Agency Billed policies.
How Net of Commission is calculated and updated:
l
Net of Commission = Gross Amount - Commission Payable to Broker 1 (Broker 2
commission, if available is still included in the Net of Commission)
l
For Invoiced Premium commission basis, the Net of Commission is calculated for each
policy invoice.
l
For Written Premium commission basis, the Net of Commission is updated on the first
invoice.
For any Endorsement or cancellation which changes the original commission,
the changed commission amount is reflected on the next pending invoice or
in the new invoice created by this endorsement or cancellation transaction.
How and where
1. Open an Agency-Billed Policy.
2. Scroll down to the Premium Invoices section.
January 2023 Origami Risk - Client Release Notes 66 of 84

Use net of commission for agency billing on invoiced and
written premiums
Previously
Agency billing included the commission portion in the agency statement. As a result, the
commission portion had to be manually accounted for when a payment was allocated to the
statement.
Now
When this option is activated, Agency billing will use ‘Net of Commission'.
Agency statements will now generate as ‘Net of Commission.’ This means that the commission
of the primary agency/broker is subtracted from the statement. The commission for the
second agency or broker (if available) is included in the net of commission.
When entering a payment on an Agency Bill, you only need to enter the net payment. The
system will no longer use Commission Retained when allocating payment to the invoice(s).
New fields
Net of Commission on the Agency Invoice
screen, Allocate Payments screen, and Policy
Billing.
l
The Net of Commission shows the
premium amount minus the
commission.
Updated fields
Paid Amount on the New Agency Transaction
screen.
l
The field is now the Net of
Commission.
l
Enter the Net Paid amount in this
field.
Removed fields
Commission Retained on the New
Agency Transaction screen.
l
Commission retained is no longer being used
when calculating Agency Billing.
January 2023 Origami Risk - Client Release Notes 67 of 84

How and where
When this option is activated, the agency statements will start excluding the commission
portion.
1. When a policy is bound, it creates a payment schedule (based on the existing setup) on
the Policy Billing screen.
2. The policy invoice is added to the Agency Invoice screen and the Agency Statement.
l
The new field: Net of Commission is now displayed on the Agency Invoice screen
(in the Invoice Policy Summary and Invoice Transactions sections) and also on the
Policy statement. This new field shows the premium amount minus the
commission.
3. Once the statement is generated, the system assumes the commission has been paid. A
new commission payment record is now added on the Policy Billing screen so that policy
outstanding is in sync with agency outstanding.
January 2023 Origami Risk - Client Release Notes 68 of 84
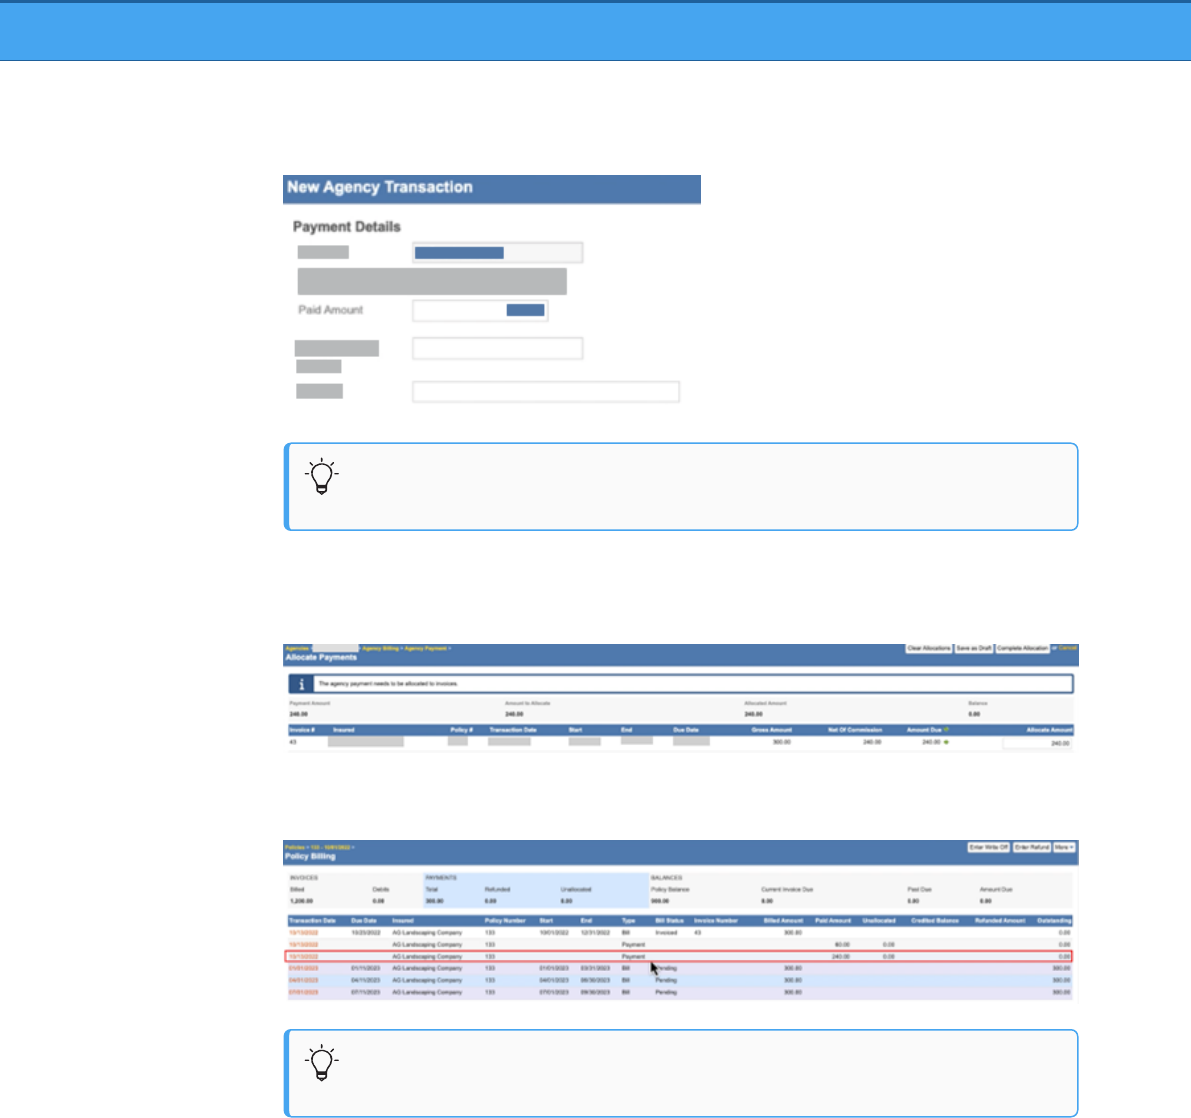
4. When it’s time to add the agency payment on the New Agency Transaction screen, the
‘Paid Amount’ is now the ‘net of commission’. Enter the Net Paid amount in this field.
The Commission Retained field has been removed, since it is no longer
needed when allocating payment.
5. On the Allocate Payments screen, you will now see the new Net of Commission field. In
order to complete the allocation, the paid amount must be fully allocated to one or
more line items.
6. After the payment is allocated, the system adds a new payment record to the Policy
Billing screen that shows the allocated payment amount.
If you want to use this feature, see your Origami Service Administrator to
update your system settings.
Handle Commission for existing invoices after Policy
Billing has been switched to ‘Net Of Commission’
Previously
This functionality was not available.
January 2023 Origami Risk - Client Release Notes 69 of 84

Now
If your system’s Policy Billing is ‘Net of Commission” you only need to enter the net payment
on the New Agency Transaction screen. (See the section: Agency Statement and Agency
Payment can now be ‘Net of Commission’ on invoiced and written premium) since
Commission Retained is no longer needed, this temporary process allows you to handle the
outstanding Agency Statements that still have commission retained.
This feature allows existing pending statements to be paid using the previous workflow while
new statements will use the new net of commission (NOC) workflow.
Field changes
“Commission Retained” on the New Agency Transaction screen and Allocate Payments screen
On the New Agency Transaction screen
l
This field will only be displayed when you have existing unpaid agency statement
transactions.
l
This field will be hidden for all newly created agency statement transactions.
On the Allocate Payments screen
l
This field will be displayed in the header only when allocating to existing agency
statement.
l
For new agency statements or when allocating to mix of existing and new statements,
this field will no longer be displayed.
January 2023 Origami Risk - Client Release Notes 70 of 84

How and where
The following temporary process only applies when your system’s Agency Billing is ‘Net of
Commission’(NOC) and you have existing unpaid agency statement transactions that have
Commission Retained.
1. When paying an existing agency statement (after switching to NOC) you can enter the
commission retained on the New Agency Transaction screen.
You will not see the Commission Retained field when adding a payment on
new agency statements generated after switching to NOC.
2. The Allocate Payments screen will work the same for the existing agency statements as
prior to switching to NOC.
When there are no transactions with commission retained left, you will no
longer see the Commission Retained field..
To view the process for new Agency Statements after NOC has been enabled, see the section:
Agency Statement and Agency Payment can now be ‘Net of Commission’ on invoiced and
written premium.
When a Payment is initiated at the Agency level, then there are transactions with and without
Commission Retained.
On the Allocation Payments screen:
l
If an amount is entered in the Commission Retained field, the system will only show the
existing, unpaid Agency Statements that included Commission Retained.
January 2023 Origami Risk - Client Release Notes 71 of 84

l
If the Commission Retained field is left blank, the system will show all statements (with
and without Commission Retained). When allocating a payment to existing invoices, the
system will:
l
First, allocate the commission portion of the invoice.
l
Then, allocate the remaining amount to the premium outstanding.
Remove proposal coverages from proposal view
Previously
On the Add/Edit Proposal Coverages screen, you could not remove individual coverages from
a proposal. The check boxes for added coverages were grayed-out.
Now
On the Add/Edit Proposal Coverages screen, you can now remove a coverage from a proposal.
January 2023 Origami Risk - Client Release Notes 72 of 84

How and where
l
To remove a coverage from a proposal, on the Add/Edit Proposal Coverages screen,
clear a relevant check box.
When you remove a coverage, you get a warning message saying that any existing child
records and associated schedules will also be deleted.
January 2023 Origami Risk - Client Release Notes 73 of 84

Close invoices on an Agency Statement for flat-cancelled
policies
Previously
If you bound a policy and then received a flat-cancel endorsement after the Agency Statement
was created, there was no way to close out the corresponding invoice on the Agency
statement.
January 2023 Origami Risk - Client Release Notes 74 of 84

Now
You can now close the flat-cancelled policy by entering a 0 USD amount in the
AllocateAgencyPaymentToPolicy method, to reconcile negative and positive
transactions and close out the flat-cancelled invoice.
“Help on Script Actions” (…/Origami/Actions/ScriptActionHelp) has
been updated to include this Method/Function.
Updated methods and functions
AllocateAgencyPaymentToPoli
cy
Allocates a payment to a policy. The allocation
is done in a sequence starting from the invoice
with the earliest due date.
If a policy has 0 USD outstanding, the payment
amount is held at the policy level and is
identified as an unallocated payment. This
payment can be used to pay off another agency
invoice.
When a 0 USD payment is passed, the system
attempts to close out two or more invoices
which have the total value of 0 USD. For
example, the system would close an invoice of -
100 USD and an invoice of 100 USD.
Parameters:
l
agencyPayment: The agency payment to
be allocated.
l
policyID: The identifier of the policy to
which the agency payment must be
allocated.
l
consumePolicyOverPayments: When
set to true, policy payments with
unallocated balance are refunded and
added to the agency payment amount.
This method is used after
AllocateAgencyPaymentToPolicyExa
ct.
January 2023 Origami Risk - Client Release Notes 75 of 84

How and where
For the system to automatically pick up invoices to be closed, you need to provide the
following:
l
The 0 USD amount to be allocated.
l
The policy ID.
Override billed premium at the Policy and Coverage level
Previously
This functionality was not available.
Now
You can now override billed premium at the Policy and Coverage levels. When a proposal has
been rated (and still "unbound"), a new option More > Premium Override will be available.
New screens
Premium Override Accessible from the View Proposal screen.
New fields
Allow Premium Override on the
Add/Edit Rating Program screen
Use this field to enable Premium Override
functionality for this Rating Program.
January 2023 Origami Risk - Client Release Notes 76 of 84

How and where
For New Business
1. Create a new Proposal.
2. Run the rating to calculate the premium. (You can manually do this from the More
menu.)
3. Select More > Premium Override.
l
The Premium Override screen is displayed. This screen lists all the rated premium
line items of the proposal with the rated premium amount.
l
Edit the Premium Adjustment amounts, as needed, with positive or negative
numbers for each line item.
In the screenshot above, they entered -50 for AL Premium to reduce the rated
Premium from 300 to 250.
l
Premium Adjustment will not be prorated since it is not an interim update.
l
If Apply to Renewal is not selected, then all the adjustments for the line
item will carry forward.
l
When finished, click Save.
4. After saving, the system will run the rating to account for the new adjustment amount.
5. When finished, click Bind Proposal.
For Endorsements
1. Open the Policy.
2. Select More > Create Endorsement.
3. After the endorsement details and rating are complete, select More > Premium Override
and update the coverage amount.
When you close the Premium Override, the rating will run automatically to account for
the new adjustment amount.
January 2023 Origami Risk - Client Release Notes 77 of 84

4. To see if there are any existing Premium Overrides, select More > Premium Override.
l
When you first enter this screen, you may see overrides in the Premium
Adjustments fields that were made previously at the Endorsement level.
l
You can make changes to these Premium Overrides, as needed, to adjust the
Endorsement Premium. For example, you can enter -50 for AL Premium to
reduce the rated Premium from 370 to 320.
l
Save
5. After saving, the system will run the rating to account for the adjustment amount.
6. When finished, click Bind Proposal.
7. After you bind the Proposal, the Bind Amount at the Policy level will reflect that change.
Allocate a payment to a policy when the outstanding
amount is 0 USD
Previously
You could not allocate a payment to a policy when the outstanding amount was 0 USD. The
payment was not processed by the system.
January 2023 Origami Risk - Client Release Notes 78 of 84

Now
With the AllocateAgencyPaymentToPolicy and
AllocateAgencyPaymentToPolicyExact methods, you can now allocate a payment
to a policy when the outstanding amount is 0 USD.
“Help on Script Actions” (…/Origami/Actions/ScriptActionHelp) has
been updated to include this Method/Function.
Updated methods and functions
AllocateAgencyPaymentToPoli
cy
Allocates a payment to a policy. The allocation
is done in a sequence starting from the invoice
with the earliest due date.
If a policy has 0 USD outstanding, the payment
amount is held at the policy level and is
identified as an unallocated payment. This
payment can be used to pay off another agency
invoice.
When a 0 USD payment is passed, the system
attempts to close out two or more invoices
which have the total value of 0 USD. For
example, the system would close an invoice of -
100 USD and an invoice of 100 USD.
Parameters:
l
agencyPayment: The agency payment to
be allocated.
l
policyID: The identifier of the policy to
which the agency payment must be
allocated.
l
consumePolicyOverPayments: When
set to true, policy payments with
unallocated balance are refunded and
added to the agency payment amount.
This method is used after
AllocateAgencyPaymentToPolicyExa
ct.
January 2023 Origami Risk - Client Release Notes 79 of 84

New methods and functions
AllocateAgencyPaymentToPolicyExa
ct
Allocates a payment to a policy if the
following conditions are met:
1. The system checks, if the payment
to be allocated matches the total
outstanding value of the policy.
If the values match, the payment
is allocated to the outstanding
invoices.
2. If the total outstanding value of
the policy doesn't match the
payment amount, the system tries
to find an invoice in the policy that
exactly matches the payment
amount.
The payment is allocated to the
specific invoice.
3. If there are no outstanding
invoices, a policy payment is
created and left unallocated.
If a policy has 0 USD outstanding, the
payment amount is held at the policy
level and is identified as an unallocated
payment. This payment can be used in
future to pay off another agency invoice.
When a 0 USD payment is passed, the
system attempts to close out two or
more invoices which have the total value
of 0 USD. For example, the system would
close an invoice of -100 USD and an
invoice of 100 USD.
Parameters:
l
agencyPayment: The agency
payment to be allocated.
l
policyID: The identifier of the
policy to which the agency payment
must be allocated.
This method is used before
AllocateAgencyPaymentToPoli
cy.
January 2023 Origami Risk - Client Release Notes 80 of 84

Increase the number of Policy Changes shown on the
Proposal screen
Previously
The Policy Changes section only shows the ten most recent policy changes for the proposal.
(This can still be true.)
Now
When this option is activated, you can decide how many policy change records to show,
including all records.
If you want to use this feature, see your Origami Service Administrator to update
your system settings.
How and where
On the Edit Proposal screen, in the Policy Change section.
Edit Files associated with a Cancelled Policy
Previously
This functionality was not available.
Now
When this option is activated, you can edit files attached to a cancelled policy using the pencil
icon.
If you want to use this feature, see your Origami Service Administrator to update
your system settings.
January 2023 Origami Risk - Client Release Notes 81 of 84

How and where
1. Open a cancelled policy.
2. In the Files section, on the right, select All Files.
3. In the Files list, use the pencil icon to edit a specific file.
Down Payment Due field calculations corrected for down
payment invoices
Previously
When creating a Down Payment Invoice, the system ignored any values in the Down Payment
Due field.
Now
When creating a Down Payment Invoice, the Down Payment Due field now overrides the Days
Notice field and Due Date field settings when creating the Down Payment Invoice.
l
The Down Payment Due date can only be entered as the current date or later.
l
When the Down Payment Due field is left blank, the regular invoicing template is
applied to the down payment invoice.
Example: If there is a down payment setup on a payment plan, and the Down Payment Due
field is set to X days after the effective date, the Down Payment Due field will override any
other setting.
How and where
l
Admin > Billing Profiles > Edit a Billing Profile
View all matches when running an Office of Foreign Assets
Control check
Previously
When running an OFAC (Office of Foreign Assets Control) check on many records or tables
before binding a new application, only one OFAC match was shown even if there were more.
Users could clear all OFAC matches, but didn't know that the check returned more matches.
January 2023 Origami Risk - Client Release Notes 82 of 84

Now
If the OFAC check returns some matches, an OFAC Clear panel is shown with a message
indicating that more OFAC matches were found.
January 2023 Origami Risk - Client Release Notes 83 of 84

How and where
To run an OFAC check:
l
On the Proposal View page, select More > Search OFAC.
When binding a new application, and running an OFAC check that returns matches, the system
prevents the application bind. If any OFAC matches are found, an OFAC Clear panel is shown
with a warning message about potential matches against the OFAC database.
You can do the following:
l
Select the See match details link.
A popup window with details on found OFAC matches is shown.
l
Select Clear all matches to clear all OFAC matches, for example, when the insured has
the same name as an individual in the OFAC database.
The found OFAC matches are cleared, and you can continue binding the policy.
January 2023 Origami Risk - Client Release Notes 84 of 84
