
CUSTOMER
SAP BusinessObjects Business Intelligence platform
Document Version: 4.2 Support Package 4 – 2017-10-19
SAP BusinessObjects BI Developer’s Guide for Web
Intelligence and the BI Semantic Layer

Content
1 Document Version History........................................................4
2 About This Guide...............................................................7
3 Audience.....................................................................8
4 Conventions in This Guide........................................................9
5 Setting Up Web Intelligence as an Embedded Applet...................................10
5.1 Prerequisites..................................................................10
5.2 Where to Find the Embedded Applet..................................................11
5.3 Package Content............................................................... 11
The Embedded Applet Utility.................................................... 11
The Embedded Applet Properties File..............................................11
The webiApplet Folder Content...................................................12
The JSP and Image Sample Files................................................. 12
5.4 Managing the Locale.............................................................13
5.5 Managing the Session............................................................14
5.6 Deploying the Embedded Applet Sample.............................................. 14
To Create the Deployment Root Directory........................................... 14
To Deploy the Embedded Applet..................................................15
To Test the Deployment........................................................16
6 Customizing Web Intelligence User Interfaces........................................17
6.1 Customizing Web Intelligence interface elements by user group and folders......................17
Customization Interface........................................................17
User Interface Elements tab.....................................................18
Features tab................................................................30
Customization rules.......................................................... 31
To customize the Web Intelligence interface appearance.................................31
6.2 Web Intelligence content alignment..................................................33
To set content alignment for the Web Intelligence Applet interface..........................33
7 Customizing Web Intelligence with UI Extension Points.................................35
7.1 About Extensions...............................................................35
Deployment Scenarios........................................................ 35
Contributions...............................................................36
JavaScript APIs............................................................. 37
7.2 UI Extension Points Task Sequence..................................................37
2
C U S T O M E R
SAP BusinessObjects BI Developer’s Guide for Web Intelligence and the BI Semantic Layer
Content

7.3 Prerequisites..................................................................38
7.4 Creating an Extension as an OSGI Bundle Fragment......................................38
About the Extension Bundle.....................................................38
Where to Find the Bundle Host...................................................39
To Import the Bundle Host......................................................39
To Create an Extension Bundle...................................................40
Declaring the Extension....................................................... 40
To Develop with the JavaScript APIs...............................................50
To Make the Extension Visible on the Interface........................................53
To Test the Extension Bundle....................................................53
To Build the Extension Bundle...................................................54
To Deploy the Extension Bundle in Production........................................55
7.5 Creating an Extension as a non-OSGI web application.....................................56
To Create a Web Project........................................................56
Declaring the Extension........................................................57
To Build the Extension.........................................................57
To Deploy the Extension........................................................57
To Enable the Extension in Web Intelligence..........................................58
7.6 About the Web Intelligence UI Extension Point Sample.................................... 59
To Use the Extension JAR Sample................................................ 60
8 Creating Visualizations with a Custom Element Service................................ 61
8.1 About the Custom Element Service APIs..............................................63
8.2 Getting the Supported Formats.....................................................64
8.3 Getting the Visualization Types.....................................................65
8.4 Getting the Visualization Icon......................................................66
8.5 Getting the Visualization Feed Denitions..............................................67
8.6 Rendering the Visualization....................................................... 69
8.7 Getting the Rendering Settings.....................................................72
8.8 To congure an extension point as a custom elements service...............................78
9 Exposing Web Intelligence Features with REST Web Services............................ 79
10 Consuming BI Semantic Layer Universes with REST Web Services........................ 80
11 Developing Applications to Design and Administrate Universes...........................81
12 Creating a Data Access Driver....................................................82
SAP BusinessObjects BI Developer’s Guide for Web Intelligence and the BI Semantic Layer
Content
C U S T O M E R 3
1 Document Version History
The following table provides an overview of the most important document changes.
Table 1:
Version
Date Change
SAP BusinessObjects BI Developer's
Guide for Web Intelligence and the BI Se
mantic Layer 4.2 Suppot Package 4
April 2017 You can use extension points as a cus
tom element service.
See To congure an extension point as a
custom elements service [page 78]
A new API know lets you get a visualiza
tion sample of a custom element.
See Getting the Visualization Icon [page
66].
New parameters have been added to the
Render API.
See Rendering the Visualization [page
69].
4 C U S T O M E R
SAP BusinessObjects BI Developer’s Guide for Web Intelligence and the BI Semantic Layer
Document Version History

Version Date Change
SAP BusinessObjects BI Developer's
Guide for Web Intelligence and the BI Se
mantic Layer 4.2 Support Package 3
August 2016
You can hide the following menu items of
SAP BusinessObjects Web Intelligence
through customization in the CMC:
● Data source items from the Create a
Document dialog box (or New
Document dialog box in Web
Intelligence Rich Client
), the Query
Panel and the New Data Provider di
alog box in Design mode
● Subtab items of the Report
Elements, Formatting, Data Access,
Analysis, and Page Setup tabs in De
sign mode
● The whole report area contextual
menu in Design mode
See User Interface Elements tab [page
18].
The following enhancements to UI exten
sion points are provided:
● You can declare an extension and its
contributions in a JSON le instead
of compiling a Java class.
● You can write your extension as a
non OSGI application and deploy it
to the BI platform application server
or to an external web application
server.
● You can make your extension con
tribute to a new perspective.
● The getcontext JavaScript API
has been updated.
● SAP recommends you use the asyn
chronous mode when developing
extensions.
● A note about WebGL support has
been added.
See Customizing Web Intelligence with
UI Extension Points [page 35].
The following enhancements to custom
element APIs are provided:
● The rendering API now returns de
fault color palette settings of the
visualization and information on re
port and document that host the
custom element.
● A new API returns the rendering set
tings to Web Intelligence.
SAP BusinessObjects BI Developer’s Guide for Web Intelligence and the BI Semantic Layer
Document Version History
C U S T O M E R 5

Version Date Change
See Creating Visualizations with a Cus
tom Element Service [page 61].
SAP BusinessObjects BI Developer's
Guide for Web Intelligence and the BI Se
mantic Layer 4.2 Support Package 1
December 2015 The following updates have been made
to the chapter Customizing Web Intelli
gence with UI Extension Points
:
● Completed prerequisites, see Pre
requisites [page 38]
● JDK version 1.8.0 supported, see To
Import the Bundle Host [page
39]
SAP BusinessObjects BI Developer's
Guide for Web Intelligence and the BI Se
mantic Layer 4.2
November 2015
You can hide the Comments and Share
Elements interface items from the Side
Panel of SAP BusinessObjects Web
Intelligence through customization in the
CMC.
You can develop your own visualizations
for Web Intelligence through the Custom
Element Service APIs.
SAP BusinessObjects BI Developer's
Guide for Web Intelligence and the BI Se
mantic Layer 4.1 Support Package 6
June 2015
The Embedded Applet has been modi
ed to follow the SAP branding standard.
A new image folder must be deployed
along with the applet.
You can hide the SAP Marketplace but
ton from the Status Bar of SAP
BusinessObjects Web Intelligence
through customization in the CMC.
This document now provides sections on
the JavaScript APIs used to develop an
extension, and a link to the API refer
ence.
The chapter "Developing Applications to
Design and Administrate Universes" now
mentions the Universe Design Tool COM
SDK.
This document now provides a chapter
about creating drivers with the Driver
Development Kit.
SAP BusinessObjects BI Developer's
Guide for Web Intelligence and the BI Se
mantic Layer 4.1 Support Package 5
November 2014 First release of the document. The docu
ment contains the Extension Points doc
umentation.
6 C U S T O M E R
SAP BusinessObjects BI Developer’s Guide for Web Intelligence and the BI Semantic Layer
Document Version History

2 About This Guide
The SAP BusinessObjects BI platform 4.2 is the key foundation for your analytics applications. It comes with a
comprehensive set of tools from which you can pick up the one that suits the technologies you are ready to use
and your business objectives. To this end, the SAP BusinessObjects BI Developer's Guide for Web Intelligence and
the BI Semantic Layer is your new entry point to learn how to develop applications, using SDKs, samples, and
extension framework, to enforce and take advantage of the Web Intelligence and BI Semantic Layer capabilities.
This guide provides information and references about:
● The Embedded Applet for Web Intelligence and how to deploy its sample in your portal
● How to customize the DHTML or Java Web Intelligence user interface via the Central Management Console
● How to extend Web Intelligence features using UI extension points
● How to create your visualizations with Web Intelligence custom elements
● How to use REST APIs to work with Web Intelligence documents and reports in non-SAP client tools
● How to use REST APIs to access universes and run queries in non-SAP client tools
● How to create, edit, secure and deploy universes with the BI Semantic Layer Java SDK
● How to create a JavaBean driver or an Open driver with the Driver Development Kit
This guide relates to the SAP BusinessObjects Business Intelligence platform 4.2 Support Package 3 release.
SAP BusinessObjects BI Developer’s Guide for Web Intelligence and the BI Semantic Layer
About This Guide
C U S T O M E R 7

3 Audience
As it serves as en entry point to the Web Intelligence and BI Semantic Layer customization area, the BI Developer's
Guide is intended for various readers.
This guide is for you if:
● You are an SAP consultant who wants to help SAP partners and customers in their BI platform customization
project
● You are an SAP partner who would like to provide customizations and extensions of Web Intelligence to your
customer
● You are an SAP BusinessObjects administrator who wants to use Web Intelligence in their corporate portal
● You are a JavaScript developer responsible for developing extensions to Web Intelligence user interfaces
● You are a Java developer responsible for developing applications that perform creation, editing, and
publication tasks on UNX and UNV universes
● You are a developer responsible for writing programs that access and consume the BI platform web services
● You are a developer responsible for developing data access drivers to help the BI platform to communicate
with your company's data sources
8
C U S T O M E R
SAP BusinessObjects BI Developer’s Guide for Web Intelligence and the BI Semantic Layer
Audience

4 Conventions in This Guide
In this guide, the placeholder <bip-install-dir> is the install root path of the SAP BusinessObjects Bi
platform. On Microsoft Windows, the default <bip-install-dir> stands for the C:\Program Files
(x86)\SAP Business Objects\SAP BusinessObjects Enterprise XI 4.0
directory.
The placeholder <tomcat-dir> stands for the C:\Program Files (x86)\SAP BusinessObjects\tomcat
directory.
SAP BusinessObjects BI Developer’s Guide for Web Intelligence and the BI Semantic Layer
Conventions in This Guide
C U S T O M E R 9
5 Setting Up Web Intelligence as an
Embedded Applet
You can set up the Web Intelligence Java applet to run as an applet embedded in your own portal, rather than
running it from the BI launch pad. The Embedded Applet provides the same functionality as the Web Intelligence
applet that is launched through the BI launch pad.
End-users will be able to open Web Intelligence documents stored in your BI platform repository directly from your
portal. Using this applet, documents can be viewed, refreshed, printed, and saved locally as snapshots. No refresh
will be available for documents saved locally.
A JSP sample demonstrating how to include the Embedded Applet in your own web application is also provided.
Restriction
● With the Embedded Applet, you cannot use the following services:
○ Scheduling reports
○ Checking the Document History
○ Using the ‘Send To‘ function
● You cannot change the drill options managed via the BI launch pad Web Intelligence preferences.
● You cannot set a language dierent to your portal language. The Embedded Applet accepts the Language
parameter, but your deployment will have to pass it to the applet. This is not exposed to end-users.
5.1 Prerequisites
Software Requirements
● The SAP BusinessObjects BI platform servers
● Apache Tomcat web application server
● Java SE Runtime Environment 7
User Rights
In the Embedded Applet, the user rights are managed in the same way as in the BI launch pad version of the
applet: the CMC administrator assigns user rights and authorizations, and these settings are applied when the
user launches the applet and logins to the session. If you use your own login method, then all users will be able to
perform all operations.
To set the user rights for the Embedded Applet, you must have:
10
C U S T O M E R
SAP BusinessObjects BI Developer’s Guide for Web Intelligence and the BI Semantic Layer
Setting Up Web Intelligence as an Embedded Applet

● Access to the Central Management Console (CMC)
● The authorization to edit the settings of the Web Intelligence Adaptive Processing Server
● The rights to manage the portal
5.2 Where to Find the Embedded Applet
The Web Intelligence Embedded Applet is a ZIP le installed by default with the SAP BusinessObjects BI platform
servers. It is located in <bip-install-dir>\Samples\webi\WebIntelligenceEmbeddedApplet.zip.
5.3 Package Content
The WebIntelligenceEmbeddedApplet.zip archive le contains the following series of folders:
● js
● jsp
● lib
● sample
● webiApplet
Table 2:
Folder
Description
js
The Embedded Applet utility
jsp
The conguration les of the Embedded Applet
lib
The list of mandatory JAR les to make the Embedded Applet work
sample
The list of JSP and image sample les to create and manage a user session to the CMS
webiApplet
The Embedded Applet resources
5.3.1 The Embedded Applet Utility
The applet_util.js le helps the embedded applet to detect the web browser in which the applet is launched,
the operating system of the machine, and the Java version.
5.3.2 The Embedded Applet Properties File
The embeddedapplet.properties le provides the necessary values for the conguration of the applet, which
are used in the
appletpopup.jsp le.
SAP BusinessObjects BI Developer’s Guide for Web Intelligence and the BI Semantic Layer
Setting Up Web Intelligence as an Embedded Applet
C U S T O M E R 11

The following table lists the property description and values that congure the applet sample.
Table 3:
Property Description Value
portalroot The end of the portal URL /BOE/portal/1303180624
portal_port The port of the portal URL 8080
help_url The end of the help URL /AnalyticalReporting
gateway_url The end of the gateway URL /rebean3ws/services/Gateway
applet_url URL of the applet on the web application
server
/webiApplet
5.3.3 The webiApplet Folder Content
The webiApplet folder mainly contains the Embedded Applet resources:
● The Embedded Applet JAR le (webiapplet.jar)
● JAR les to manage applet localization in dierent languages
● Splash screens used when the applet is loading
5.3.4 The JSP and Image Sample Files
The Embedded Applet provides a series of JSP and image sample les that allow you to login to the applet in your
portal. The image les are stored in the img subfolder.
Note
These les are only samples. You do not need to use them to create your own application.
Table 4:
JSP File
Description
index.jsp
The sample index le that represents the portal in which you want to use the Embedded Applet
loginForm.jsp The form that you use to get login information. The form calls the login.jsp le.
login.jsp
The JSP le used to login the end-user to the portal and create an IEnterpriseSession. It directs to
the
appletpopup.jsp le.
appletpopup.jsp
The JSP le used to load the Embedded Applet in the portal with the session created in the
login.jsp le.
closeSession.jsp
The le used to close the session. The login form page is displayed again after the session is
closed.
12 C U S T O M E R
SAP BusinessObjects BI Developer’s Guide for Web Intelligence and the BI Semantic Layer
Setting Up Web Intelligence as an Embedded Applet

Table 5:
Image File Description
center_normal_logo
n.gif
Background image for the Logon button. It is used in the LoginForm.jsp le.
uhBodyTextureTop.p
ng
Portal background image used in the index.jsp le
uhLogo2.png SAP logo used in the index.jsp le
Embedded Applet CallBack
The appletpopup.jsp le calls the AppletCallBack_updateDocumentTitle function when the end-user is
performing any of the following actions on a Web Intelligence document that could lead to a change to the current
document name:
● Create
● Open
● Save as
● Close
This JavaScript function must be present in the parent of the iFrame which has the appletpopup.jsp le on it. It
is implemented in the index.jsp le.
IEnterpriseSession Attributes
One of the roles of the login.jsp le is to provide the attributes of the IEnterpriseSession object with correct
values. This enables the creation of the user session on the CMS.
Table 6:
Attribute
Description
WebIEmbeddedApplet_EnterpriseSession
The IEntrepriseSession object
WebIEmbeddedApplet_CMSName
The name of the CMS which the applet will connect to
WebIEmbeddedApplet_PortalPort
The sample gateway port used to create the gateway
URL
WebIEmbeddedApplet_ProductLanguage
The locale to use for the applet localization
5.4 Managing the Locale
The locale is not the one managed through the end-user properties in the BI launch pad. You must set the locale
through the WebIEmbeddedApplet_ProductLanguage attribute.
SAP BusinessObjects BI Developer’s Guide for Web Intelligence and the BI Semantic Layer
Setting Up Web Intelligence as an Embedded Applet
C U S T O M E R 13

5.5 Managing the Session
The Embedded Applet does not manage the lifecycle of the IEnterpriseSession object. So your portal
implementation should take care of the creation and deletion of the session.
5.6 Deploying the Embedded Applet Sample
This section describes the deployment of the applet sample provided in the
WebIntelligenceEmbeddedApplet.zip le.
5.6.1 To Create the Deployment Root Directory
Context
Before you deploy the Embedded Applet, you should congure the web application server where you want to run
the Embedded Applet, for example Apache Tomcat.
Procedure
1. Stop Apache Tomcat.
2. Create the EmbeddedAppletTest folder as the root directory for the applet sample deployment on the web
application server, under
<tomcat-dir>/webapps.
If your Apache Tomcat is brand new, the directories under <tomcat-dir>/webapps should look like the
following:
○ docs
○ EmbeddedAppletTest
○ examples
○ host-manager
○ manager
○ ROOT
14
C U S T O M E R
SAP BusinessObjects BI Developer’s Guide for Web Intelligence and the BI Semantic Layer
Setting Up Web Intelligence as an Embedded Applet

5.6.2 To Deploy the Embedded Applet
Prerequisites
You must make sure that JAVA_HOME environment variable is set correctly, for example:
JAVA_HOME= C:\Program Files (x86)\Java\jre7
Procedure
1. Copy to <tomcat-dir>\webapps\EmbeddedAppletTest:
○ The webiApplet folder
○ The js folder
○ The sample folder content, including the img subfolder
○ The appletpopup.jsp le from the jsp folder of the ZIP le
2. Create the <tomcat-dir>\webapps\EmbeddedAppletTest\WEB-INF\classes directory.
3. Copy all the properties les from the jsp folder of the ZIP le to this folder (embeddedapplet.properties,
webi_applet_jars.properties, and webi_applet_lang_jars.properties).
4. Copy the lib folder to <tomcat-dir>\webapps\EmbeddedAppletTest\WEB-INF.
5. Start Apache Tomcat.
Results
The nal folder hierarchy should contain the following folders and les:
● img
● js
● webiApplet
● WEB-INF
● appletpopup.jsp
● closesession.jsp
● index.jsp
● login.jsp
● loginForm.jsp
The WEB-INF folder should contain the following subfolders:
● classes
● lib
SAP BusinessObjects BI Developer’s Guide for Web Intelligence and the BI Semantic Layer
Setting Up Web Intelligence as an Embedded Applet
C U S T O M E R 15

5.6.3 To Test the Deployment
Procedure
1. Open an Internet Explorer browser window on the same machine where you have deployed the Embedded
Applet.
2. Go to http://localhost:8080/EmbeddedAppletTest/.
You should see the login form displayed on a web page called Web Intelligence Embedded Applet.
3. Login to the portal as an end-user can do.
This starts SAP BusinessObjects Web Intelligence as an applet embedded in the portal.
4. Perform any action on a Web Intelligence document, save your modications and close the document.
5. Click Logo in the upper-right corner of the web page to close SAP BusinessObjects Web Intelligence and the
user session.
16
C U S T O M E R
SAP BusinessObjects BI Developer’s Guide for Web Intelligence and the BI Semantic Layer
Setting Up Web Intelligence as an Embedded Applet

6 Customizing Web Intelligence User
Interfaces
You can simplify the appearance of Web Intelligence Rich Client and the DHTML and Java interfaces of SAP
BusinessObjects Web Intelligence by hiding some functionalities through the CMC.
6.1 Customizing Web Intelligence interface elements by user
group and folders
In the CMC, you can customize the appearance of Web Intelligence interface elements for a user, depending on the
user group they belong to and the folders containing Web Intelligence documents. For example, the entire toolbar
or specic items in a toolbar, and customize access to specic document modes. You can also customize Web
Intelligence by enabling extensions.
All interface elements appear by default. If you do not want specic elements to appear, you deselect them in the
CMC. All extension points are disabled by default. If you want to make them available to users, you enable them in
the CMC.
Note
● The customization and the enabled extension points are applicable to all Web Intelligence application
clients: HTML, Java Applet, and Rich Client.
● It might happen that the customization and enabled extension points do not work on Web Intelligence Rich
Client because of proxy or DNS conguration. To solve this problem, log in to the CMC with the IP address
of the server instead of the server name when you customize Web Intelligence. This IP address will be used
as a reference during customization.
6.1.1 Customization Interface
The Customization interface contains the following section and tabs:
● Customized folders area
On this area, you can select folders containing Web Intelligence documents for which you want to customize
user interface and enable extensions.
● User Interface Elements tab
On this tab, you can select individual interface elements to hide, such as a toolbar or tab, or their subelements,
for example a button command. You can also select data sources to hide when creating a new document
(Create a document dialog box in the HTML and Applet interfaces and New Document dialog box in Web
Intelligence Rich Client), adding a new query (Query Panel) and adding a new data provider to the document
(New data provider dialog box) in Design mode.
SAP BusinessObjects BI Developer’s Guide for Web Intelligence and the BI Semantic Layer
Customizing Web Intelligence User Interfaces
C U S T O M E R 17
Note
Users can still edit existing documents based on data sources to which they don't have access.
● Features tab
On this tab, you can choose to hide all user interface elements related to a function; for example, Refresh.
● Extensions tab
On this tab, you can enable Web Intelligence user interface extensions that you have created and deployed in
your installation.
6.1.2 User Interface Elements tab
The user interface elements that you can customize are identied in the subsequent sections and diagrams.
Splash Screen
You can hide the SAP BusinessObjects Web Intelligence splash screen that appears by default when a user opens
Web Intelligence.
Application Contextual Menu
This menu appears when a user right-clicks in the Web Intelligence screen. You can hide the whole menu or any of
its menu items.
18
C U S T O M E R
SAP BusinessObjects BI Developer’s Guide for Web Intelligence and the BI Semantic Layer
Customizing Web Intelligence User Interfaces

Report Area Contextual Menus
These menus appear when a user right-clicks in the report or in a report element. You can hide the whole menus
only.
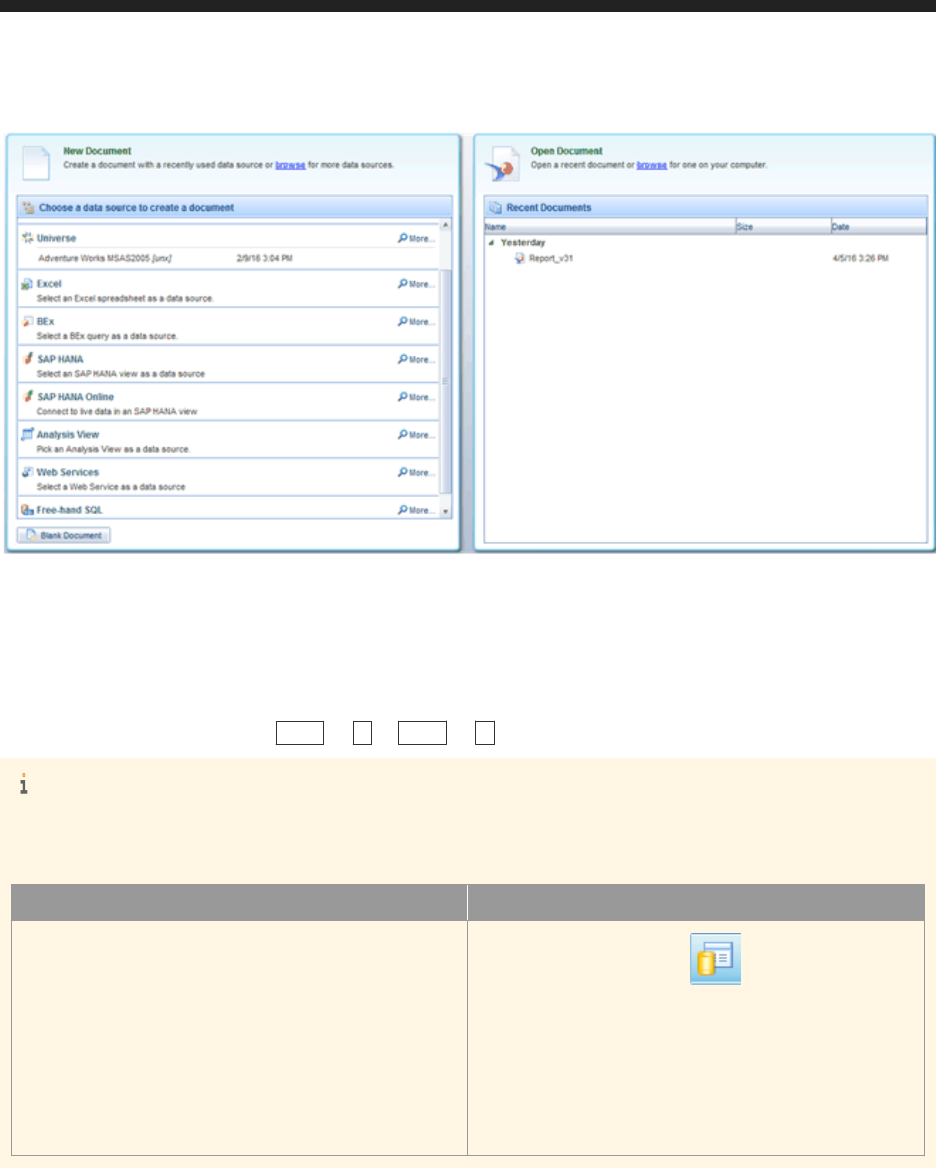
Create a Document Dialog Box
This dialog box appears when a user wants to create a document. You can hide any of the data sources that display
in the dialog box. If all the data sources or the Document Creation Dialog Box parent checkbox is selected in the
CMC, then the dialog box does not display. A blank document is created instead.
SAP BusinessObjects BI Developer’s Guide for Web Intelligence and the BI Semantic Layer
Customizing Web Intelligence User Interfaces
C U S T O M E R 19

Find the next interface elements in the English examples of the Reading Mode below.
HTML Interface
20 C U S T O M E R
SAP BusinessObjects BI Developer’s Guide for Web Intelligence and the BI Semantic Layer
Customizing Web Intelligence User Interfaces

Java Applet Interface
SAP BusinessObjects BI Developer’s Guide for Web Intelligence and the BI Semantic Layer
Customizing Web Intelligence User Interfaces
C U S T O M E R 21

Web Intelligence Rich Client
Find the next interface elements in the English examples of the Design Mode below.
22
C U S T O M E R
SAP BusinessObjects BI Developer’s Guide for Web Intelligence and the BI Semantic Layer
Customizing Web Intelligence User Interfaces

HTML Interface
Java Applet Interface
SAP BusinessObjects BI Developer’s Guide for Web Intelligence and the BI Semantic Layer
Customizing Web Intelligence User Interfaces
C U S T O M E R 23

Web Intelligence Rich Client
Side Panel
The Side Panel (2) next to the report panel allows users access to various information tabs.
Subelement List:
● Document Summary (2a)
● Navigation Map or Report Map (2b)
● Input Controls (2c)
● Web Service Publisher (2d)
● User Input (2e)
● Available Objects (2f)
● Document Structure and Filters (2g)
● Data (only in Data mode)
● Shared Elements (2h)
● Comments (2i)
24
C U S T O M E R
SAP BusinessObjects BI Developer’s Guide for Web Intelligence and the BI Semantic Layer
Customizing Web Intelligence User Interfaces

Status Bar
The Status Bar (3) is the bar where the user sees information on document action statuses and can perform
zoom, page navigation, and formula bar activation tasks.
Subelement List:
● Report dropdown list (3a)
● Printing status icon (3b)
● Track data changes (3c)
● Page Navigation (3d)
● Pagination Mode (3e)
● Zoom List (3f)
● Zoom Slider (3g)
● SAP Marketplace (3h)
● Workspace Status
The Workspace Status indicator ( ) appears between the Zoom Slider and the Last Refresh Date if a
problem occurs in the workspace.
● Last Refresh Date (3i)
● Connection Status (3j)
This is the Web Intelligence Rich Client connection status.
Report Zone
The report zone includes reports tabs, scrolling tool and formula editor.
Subelement List:
● Report Tabs (4a)
● Bi-directional Page Scrolling (4b)
● Formula Bar (4c)
Reading Mode Toolbar
You can hide the following toolbars (5) displayed in Reading mode.
Subelement List:
● Web Intelligence dropdown list (5a)
● File Group (5b)
● Standard Actions Group (5c)
● Analysis Group (5d)
SAP BusinessObjects BI Developer’s Guide for Web Intelligence and the BI Semantic Layer
Customizing Web Intelligence User Interfaces
C U S T O M E R 25

Design Mode Toolbar
You can hide the toolbars and tabs (6) displayed in Design mode.
Subelement List:
● File tab (6a)
● Properties tab (6b)
● Standard Actions Group (6c)
● Report Elements tab (6d)
● Format tab (6e)
● Data Access tab (6f)
● Analysis tab (6g)
● Page Setup tab (6h)
Under Data Access tab, a New data provider parent tab allows you to choose the data source used when the user
creates a data provider. You can hide the whole menu or any of its menu items.
Initial Toolbar
The initial toolbar (7) appears when a user opens the Web Intelligence application and when no document is open.
Subelement List:
● Web Intelligence dropdown list (7a)
● File Group (7b)
26
C U S T O M E R
SAP BusinessObjects BI Developer’s Guide for Web Intelligence and the BI Semantic Layer
Customizing Web Intelligence User Interfaces

Application Control Toolbar
This toolbar (8) also appears in the upper toolbar of Web Intelligence when no document is open.
Subelement List:
● Application mode buttons (8a)
● Tools (8b)
● Help (8c)
● Close
Query Panel Toolbar
Options under Query Panel Add Query are used to choose the possible data sources when adding a new
query. You can hide the whole menu or any of its menu items.
Subelement list:
● Universe
● Excel
● BEx
● SAP HANA
● Text
● Free-hand SQL
● Analysis View
● Web Services
SAP BusinessObjects BI Developer’s Guide for Web Intelligence and the BI Semantic Layer
Customizing Web Intelligence User Interfaces
C U S T O M E R 27

Welcome Screen
The New Document - Open Document dialog box appears when Web Intelligence Rich Client opens and allows the
user to select a data source to create a document. You can hide any of the data sources that display in the dialog
box. If all the data sources are hidden, then the dialog box is empty. If the Welcome Screen parent checkbox is
selected, then the dialog box does not display.
Subelement list:
● No data source
● Universe
● Excel
● BEx
● SAP HANA
● SAP HANA Online
● Text
● Free-hand SQL
● Analysis View
● Web Services
28
C U S T O M E R
SAP BusinessObjects BI Developer’s Guide for Web Intelligence and the BI Semantic Layer
Customizing Web Intelligence User Interfaces
Shortcuts
Keyboard shortcuts, for example, CTRL + N or CTRL + S .
Note
In Data Mode, the following items can be hidden:
Table 7:
Web Intelligence Interface
Elements and Subelements
Applet
● Side Panel (2): Data icon
● Status Bar (3): Last Refresh Date (3i)
● Application Control Toolbar (8):
○ Application mode buttons (8a)
○ Tools (8b)
○ Help (8c)
○ Close (8d)
SAP BusinessObjects BI Developer’s Guide for Web Intelligence and the BI Semantic Layer
Customizing Web Intelligence User Interfaces
C U S T O M E R 29

Web Intelligence Interface Elements and Subelements
Rich Client
● Side Panel (2): Data icon
● Status Bar (3):
○ Last Refresh Date (3i)
○ Connection Status (3j)
● Application Control Toolbar (8):
○ Application mode buttons (8a)
○ Tools (8b)
○ Help (8c)
○ Close (8d)
6.1.3 Features tab
You can choose on this Feature tab to disable some functions at once, without having to disable them one after the
other.
Table 8:
Feature Item
Description Aects the following interface items
Refresh Users can refresh documents to up
date the data from the data source.
The Refresh button in the Standard Action Group toolbar used in
the Reading and Design modes.
Drill Users can drill up and down on data
in a document.
The Drill button available in the following locations:
● The Analysis Group toolbar in the Reading mode.
● The Interact subtab under the Analysis tab in Design mode.
Reading Mode Users can view a document in Read
ing mode.
The Reading button in the following locations:
● Application Contextual Menu
● Application Control Toolbar
Design Mode Users can view a document in Design
mode.
The Design button in the following locations:
● Application Contextual Menu
● Application Control Toolbar
Data Mode Users can view a document in Data
mode.
The Data button in the following locations:
● Application Contextual Menu
● Application Control Toolbar
Comments Users can add comments to reports. The Comments interface items
Shared Elements Users can reuse reports parts multi
ple times.
The Shared Elements interface items
30 C U S T O M E R
SAP BusinessObjects BI Developer’s Guide for Web Intelligence and the BI Semantic Layer
Customizing Web Intelligence User Interfaces

6.1.4 Customization rules
The following rules are used to dene customizations to apply to a user:
● If the user belongs to dierent groups, only the customization dened to the group whose ID is lower applies.
The customization dened for the other groups containing the user does not apply.
● For nested folder structure, the immediate parent folder of the document that has been added in the list of
customized folders dene customizations for the document for user interface elements, features, and
extensions.
● The customization dened for Default Folders apply for the documents stored in Personal Documents and
Inboxes, and for documents for which the parent folder is not customized.
● The customization dened for user interface elements have priority over customization dened for features as
features is only a shortcut to enable all user interface elements.
6.1.5 To customize the Web Intelligence interface appearance
Context
You can customize the appearance of the Web Intelligence user interface by hiding menu items, subitems, and
features for a selected User Group and document folder.
Procedure
1. Log into the CMC as an Administrator.
2. From the Organize list, select Users and Groups.
3. In the Group Hierarchy list, select a user group.
4. In the Actions list, select Customization.
5. In the Customized folders section, do one of the following:
Option
Description
To dene the default customization 1. Select Default Folders in the Customized folders area.
To add the document folders for which you want to apply
customization for the selected user group
1. Click Add Folder.
2. Select the folders.
The folders displays in the Customized folders area.
To avoid redening the same customization for other
folders
1. In the Customized folders area, select the folder from
which you want to copy the customization.
2. In the dropdown list, click Duplicate Customization.
3. Select the folder to which you want dene the customi
zation.
4. Click Paste Customization.
5. Go to step 7.
SAP BusinessObjects BI Developer’s Guide for Web Intelligence and the BI Semantic Layer
Customizing Web Intelligence User Interfaces
C U S T O M E R 31

Option Description
To remove the customization for a specic folder 1. In the Customized folders area, select the folder.
2. In the dropdown list, click Remove Folder.
3. Go to step 7.
Note
You cannot remove Default Folders.
6. Do one of the following:
Option
Description
To hide items in Web Intelligence Deselect them in the User Interface Elements or Features
tab.
To display items in Web Intelligence Select them in the User Interface Elements or Features tab.
If you select or deselect a parent item in User Interface Elements tab, then all its children are also selected or
deselected.
If you deselect all children of a parent item, the parent item is not deselected. However it is hidden in Web
Intelligence.
7. Click Save & Close.
Results
When you save the customization, all users of the selected group will see these changes the next time they log on
to BI launch pad and open Web Intelligence.
Note
We recommend that you log on to BI launch pad as a user from the group you have just customized, start Web
Intelligence, and verify that the interface corresponds to your customization settings.
Related Information
User Interface Elements tab [page 18]
32
C U S T O M E R
SAP BusinessObjects BI Developer’s Guide for Web Intelligence and the BI Semantic Layer
Customizing Web Intelligence User Interfaces

6.2 Web Intelligence content alignment
Choose the way document content will be aligned (left-to-right or right-to-left) when users create Web Intelligence
documents.
For the Web Intelligence Applet interface, you can set the content alignment in the CMC. Choose from these
options:
● Right-to-Left only when both the Preferred viewing and Product locales are set to Right-to-Left languages (the
default option)
● Right-to-Left or Left-to-Right depending on the user's Preferred viewing locale
● Always Right-to-Left
● Always Left-to-Right
Note
The content alignment setting applies to all users.
For the Web Intelligence Rich Client interface, the content alignment is determined by the locales set in the BI
launch pad preferences:
● The system uses right-to-left alignment only when both the Preferred Viewing Locale and Product Locale are
set to right-to-left languages.
● In all other cases, the content alignment is left-to-right.
Note
For information about how to set locales, see the Business Intelligence Launch Pad User Guide.
Note
Content alignment applies only at document creation time, and does not aect existing documents.
6.2.1 To set content alignment for the Web Intelligence Applet
interface
Set content alignment for the Web Intelligence Applet interface.
Procedure
1. Log into the CMC as an Administrator.
2. From the Manage list, select Applications.
3. Select Web Intelligence.
SAP BusinessObjects BI Developer’s Guide for Web Intelligence and the BI Semantic Layer
Customizing Web Intelligence User Interfaces
C U S T O M E R 33

4. Click Manage Properties .
5. Scroll down to the Content Alignment for New Documents section and select the appropriate option.
34 C U S T O M E R
SAP BusinessObjects BI Developer’s Guide for Web Intelligence and the BI Semantic Layer
Customizing Web Intelligence User Interfaces

7 Customizing Web Intelligence with UI
Extension Points
You can customize the interfaces of SAP BusinessObjects Web Intelligence and Web Intelligence Rich Client using
extensions.
7.1 About Extensions
You develop extensions to provide Web Intelligence users with custom reporting and analysis via UIElements.
These UIElements can be an icon button in the left-side pane, a toggle button on the status bar, or a custom
perspective.
Note
Web Intelligence Rich Client and the Java interface of SAP BusinessObjects Web Intelligence do not support
extensions that use WebGL.
7.1.1 Deployment Scenarios
You have dierent ways to deploy an extension on your system.
You can create an OSGI extension bundle and generate a JAR le that you deploy on the BI platform application
server. You can also create a non-OSGI web application and generate a WAR le that you deploy either on the BI
platform application server (Apache Tomcat) or on an external application server. In this last case, you make the
extension available through a URL registered on the CMC.
Table 9:
File to Deploy
Extension
Declaration
Deployment Scenario Deployment Description CMC Detection
JAR Java class File system of the BI platform
and of its application server
You copy the JAR le to the
following places of the BI plat
form server and Apache Tom
cat application server:
● <bip-install-dir>
\warfiles\webapps
\BOE\WEB-INF
\eclipse\plugins
● <tomcat-dir>
\webapps\BOE\WEB-
The CMC displays the exten
sion automatically. As an ad
ministrator, you can select the
extension to make it available
in Web Intelligence.
SAP BusinessObjects BI Developer’s Guide for Web Intelligence and the BI Semantic Layer
Customizing Web Intelligence with UI Extension Points
C U S T O M E R 35

File to Deploy Extension
Declaration
Deployment Scenario Deployment Description CMC Detection
JAR JSON le
INF\eclipse
\plugins
● <tomcat-dir>\work
\Catalina
\localhost\BOE
\eclipse\plugins
WAR
JSON le BI platform application server You copy the WAR le to the
application server folder. You
can do it via the application
server manager or manually.
As an administrator, you reg
ister the extension URL on the
CMC. You can select the ex
tension to make it available in
Web Intelligence.
WAR
JSON le External application server
What is the Extension Loading Process?
When Web Intelligence loads your extensions:
1. First, it looks for the JAR le extensions deployed on the application server le system.
2. Then it looks for the WAR le extensions registered through an URL and deployed on the BI platform
application server or an external application server.
Related Information
Declaring the Extension [page 40]
7.1.2 Contributions
You can make your extension contribute to the Web Intelligence interface as the following UIElements:
● A button on the left-side pane
● A button or toggle button on the status bar
● A button as supplementary pespective on the right of the existing perspective buttons
About Custom Perspectives
A custom perspective has no left-side pane nor status bar, and only displays the other perspective buttons as well
as the options and help, depending on the Web Intelligence interface (Java, DHTML, or Rich Client). Your extension
is intended to run inside this custom perspective.
36
C U S T O M E R
SAP BusinessObjects BI Developer’s Guide for Web Intelligence and the BI Semantic Layer
Customizing Web Intelligence with UI Extension Points

You can develop several extensions to contribute to several perspectives, one extension contributing to one
perspective. Perspective buttons are added to the toolbar in their registration order.
7.1.3 JavaScript APIs
You make the extension work with the application by using the Web Intelligence Application and Service JavaScript
APIs.
You set up the Applet or DHTML interface with the Web Intelligence Application JavaScript functions to make your
extensions work with documents and reports. You can for example listen to and dispatch events, update the
DHTML client context, display wait cursor and dialog boxes. You provide custom reporting and analysis via your
extension with the Web Intelligence Service JavaScript functions.
To do so, you create for your extension a target page such as an HTML or a JSP page that includes the appropriate
JavaScript API les.
Note
You can also use these functions with Web Intelligence Rich Client in Connected mode only, because the
extension is installed on the BI platform server.
Table 10:
Related Documentation
Description
See the SAP BusinessObjects Web Intelligence UI Extension
Points JavaScript API reference on the Web Intelligence page of
the
SAP Help Portal.
The ocial JavaScript functions reference
Related Information
To Append Contribution Files [page 49]
To Develop with the JavaScript APIs [page 50]
7.2 UI Extension Points Task Sequence
Here is the series of tasks to perform for customizing SAP BusinessObjects Web Intelligence with an extension:
1. Build your development environment.
2. Create the extension point.
3. Declare the extension to the extension point.
4. Create a function for your extension with the help of the Javascript APIs.
5. Build the extension as a JAR or WAR le.
6. Test the extension on your development environment.
SAP BusinessObjects BI Developer’s Guide for Web Intelligence and the BI Semantic Layer
Customizing Web Intelligence with UI Extension Points
C U S T O M E R 37

7. Do one of the following:
○ Deploy the JAR le on the BI platform server and Apache Tomcat server of your production environment.
○ Deploy the WAR le either on the Apache Tomcat server or on the external application server.
8. Do one the following in the customization panel of the CMC:
○ If you deploy a JAR le, select the extension that you want to make available to specic users, groups of
users, or folders.
○ If you deploy a WAR le, register the extension URL and select the extension.
7.3 Prerequisites
Before creating an extension:
● You must have the SAP BusinessObjects BI platform servers installed on your Microsoft Windows
development machine.
● SAP recommends that you build your development environment on Eclipse 3.6 or higher and use Apache
Tomcat version 8.
● SAP also recommends to set sapjvm as the only installed JRE. It is located in <bip-install-dir>
\win64_x64\sapjvm.
● The compilation level must be 1.6.
Note
To learn how to build your development environment, see the Creating Extensions to SAP BusinessObjects Web
Intelligence document on the SAP Community Network .
7.4 Creating an Extension as an OSGI Bundle Fragment
You can create an OSGI extension bundle and generate a JAR le that you deploy on the BI platform application
server.
7.4.1 About the Extension Bundle
The extension bundle is a fragment linked to the webpath.AnalyticalReporting bundle host. In the BI
platform OSGI framework, the bundle host and its fragment bundles such as language packs and extensions are
merged. To avoid overriding les, respect the following organization of the extension bundle folders:
web
webiApplet
webiDHTML
viewer
…
extension
38
C U S T O M E R
SAP BusinessObjects BI Developer’s Guide for Web Intelligence and the BI Semantic Layer
Customizing Web Intelligence with UI Extension Points

<Provider>
<ExtensionName>
WEB-INF
lib
Table 11:
Folder Description
web
Top folder of all webpath bundles
extension
Subfolders that belong to an extension bundle
<Provider>
The name of bundle provider. The provider can be a vendor or a company name.
<ExtensionName>
The extension. It should reect the functionality provided by the extension.
WEB-INF/lib
The folder where you can deploy libraries. Mainly JAR les.
The web/extension/<Provider>/<ExtensionName> root path of the extension bundle is the folder from
where the resource les are deployed. The bundle resources can be for example HTML, JavaScript, JSP, or images
les. All URLs to resources must be related to the root path.
Remember
Add folders and JAR les to the CLASSPATH so that they can be found and loaded by the class loader.
7.4.2 Where to Find the Bundle Host
The webpath.AnalyticalReporting bundle host is installed with SAP BusinessObjects BI platform server at
C:\Program Files (x86)\SAP BusinessObjects\SAP BusinessObjects Enterprise XI
4.0\warfiles\webapps\BOE\WEB-INF\eclipse\plugins.
7.4.3 To Import the Bundle Host
Context
The webpath.AnalyticalReporting bundle host is the master bundle, which the extension bundles will refer
to.
Procedure
1. Open Eclipse, select Window Open Perspective Other and select Plug-in Development as your work
perspective.
2. Select Window Preferences to set the Java/Installed runtimes to sapjvm.
SAP BusinessObjects BI Developer’s Guide for Web Intelligence and the BI Semantic Layer
Customizing Web Intelligence with UI Extension Points
C U S T O M E R 39

3. Select File Import .
4. In the Import dialog box, select Plug-in Development Plug-ins and Fragments and click Next.
5. Select the Directory option in Import From.
The directory must be C:\Program Files (x86)\SAP BusinessObjects\SAP BusinessObjects
Enterprise XI 4.0\warfiles\webapps\BOE\WEB-INF\eclipse\plugins.
6. Select com.businessobjects.webpath.AnalyticalReporting (1.0.0) bundle from the list of plug-ins and
fragments, click Add and Finish.
7.4.4 To Create an Extension Bundle
Procedure
1. Select File New Project .
2. In the New Project dialog box, select Plug-in Development Fragment Project and click Next.
3. Fill in the New Fragment Project dialog box as below and click Next.
a. Enter the project name:
com.businessobjects.webpath.AnalyticalReporting_<Provider>_<ExtensionName>.
<Provider> and <ExtensionName> must be the same as those provided by the extension attributes.
They must contain only alphanumeric characters. SAP does not recommend that you use space
characters, but underscores instead.
b. Select Use default location.
c. Select Create a Java project with (Source folder: src, and Output folder: bin).
d. Select the Equinox OSGi framework. and click Next.
The Equinox Registry contains a list of all extensions and extension points belonging to the loaded and
resolved bundles during the Apache Tomcat startup.
4. Fill in the Fragment Content as below:
a. ID: com.businessobjects.webpath.AnalyticalReporting_<Provider>_<ExtensionName>
b. Version: 1.0.0
c. Name: <ExtensionName>
d. Provider: <Provider>
e. Execution Environment: JavaSE-1.6
f. Plug-in ID: com.businessobjects.webpath.AnalyticalReporting
5. Click Finish.
7.4.5 Declaring the Extension
There are two ways to dene the properties of an extension and to declare its contributions.
40
C U S T O M E R
SAP BusinessObjects BI Developer’s Guide for Web Intelligence and the BI Semantic Layer
Customizing Web Intelligence with UI Extension Points

Table 12:
How to Declare your Extension See
Create a JSON le
1. To Create a JSON File [page 41]
2. To Declare the Extension Bundle Contribution [page 49]
3. To Append Contribution Files [page 49]
Write a Java class
1. To Implement the IExtension Interface [page 44]
2. To Declare the Extension Bundle Contribution [page 49]
3. To Append Contribution Files [page 49]
The JSON le must contain the necessary information to make your extension contribute properly to the interface:
● Extension properties (name, description, language)
● Types of contribution
● Paths to contribution les (icon URL, target page)
You only need to create one JSON le to declare several contributions for your extension.
The Java class must implement specic interface and methods to retrieve these properties and the types of
contribution.
In both methods you must append contribution les manually to the extension folder tree.
Note
SAP recommends you create a JSON le to declare the extension. This method removes the requirement of a
Java implementation and Eclipse dependency, and therefore is less error-prone.
7.4.5.1 To Create a JSON File
Procedure
1. Create a text le according to the following template and enter the extension properties and contributions.
{
properties:
{
id: "<extension identifier>",
name: "<extension name>",
provider: "<provider name>",
version: "<version number>",
languages:
{
<language code>:
{
title: "<localized title of the extension>",
description: "<localized description of the extension>"
}
}
},
contributions:[
{
SAP BusinessObjects BI Developer’s Guide for Web Intelligence and the BI Semantic Layer
Customizing Web Intelligence with UI Extension Points
C U S T O M E R 41

type: "sidepanebutton",
name: "<contribution name>",
iconURL: "<icon relative URL>",
targetPage: "<target page relative URL>",
perspectives: <array of perspectives,>
languages:
{
<language code>:
{
title: "<localized title of the tooltip>",
description: "<localized description of the tooltip>"
}
}
},
{
type: "statusbarbutton",
name: "<contribution name>",
iconURL: "<icon relative URL>",
targetPage: "<target page relative URL>",
languages:
{
<language code>:
{
text: "<localized text of the button>",
title: "<localized title of the tooltip>",
description: "<localized description of the tooltip>"
}
}
},
{
type: "statusbartogglebutton",
name: "<contribution name>",
iconURL: "<icon relative URL>",
targetPage: "<target page relative URL>",
languages:
{
<language code>:
{
text: "<localized text of the button>",
title: "<localized title of the tooltip>",
description: "<localized description of the tooltip>"
}
}
},
{
type: "perspectivebutton",
name: "<contribution name>",
targetPage: "<target page relative URL>",
languages:
{
<language code>:
{
text: "<localized text of the button>",
title: "<localized title of the tooltip>",
description: "<localized description of the tooltip>"
}
}
}]
}
Table 13:
Properties
id
Extension identier
name
Extension name
42 C U S T O M E R
SAP BusinessObjects BI Developer’s Guide for Web Intelligence and the BI Semantic Layer
Customizing Web Intelligence with UI Extension Points

provider
Provider name
version
Version number (x.x.x)
languages 2-letter language code, for example en, fr, de. Could be
more than one language.
title
Extension title displayed in the CMC. Is localized according to
languages.
description
Extension description displayed in the CMC. Is localized ac
cording to
languages.
Contributions
type
The contribution type. The extension contributes as a
sidepanebutton, statusbarbutton,
statusbartogglebutton, or perspective.
name
Contribution name
iconURL
Icon relative URL, for buttons only
targetPage
Target page
perspectives
Array of perspectives, which contribution to left-side pane
button applies to. Could be one or several items in
welcome,
reading, pdf, design, structure, and data, for ex
ample: [reading, design].
languages 2-letter language code, for example en, fr, de.
text
Text displayed in status bar and perspective buttons. Is local
ized according to
languages.
title
Title of the button tooltip. Is localized according to
languages.
description
Description of the button tooltip. Is localized according to
languages.
Note
id, name, provider, and version are optional in the JSON le if you enter these extension properties in
Eclipse. Extension properties set in Eclipse take precedence if both JSON le and Eclipse elds are lled.
2. Save the le and add it to the extension folder, either at the extension/<Provider>/<ExtensionName>
root folder or at the most convenient place for you.
Example
Declaring an Extension as a Button of the Status Bar
Extension is localized in English and French.
{
properties:
{
id: "com.sap.statusbarbutton",
name: "StatusbarButton",
provider: "SAP",
version: "1.0.0",
languages:
SAP BusinessObjects BI Developer’s Guide for Web Intelligence and the BI Semantic Layer
Customizing Web Intelligence with UI Extension Points
C U S T O M E R 43

{
en:
{
title: "Statusbar Button",
description: "Status Bar Button sample"
},
fr:
{
title: "Bouton dans la status bar",
description: "Exemple d'un bouton de la status bar"
}
}
},
contributions:[
{
type: "statusbarbutton",
name: "MyButton",
iconURL: "assets/img/extIcon.png",
targetPage: "statusbartest.html",
languages:
{
en:
{
text: "Statusbar Button",
title: "Status Bar Button",
description: "Extension pane for testing Web Intelligence application APIs"
}
}
}]
}
7.4.5.2 To Implement the IExtension Interface
Context
The extension bundle must implement the IExtension interface to contribute to the bundle host. A Java class is
created in the com.sap.webi.toolkit.extension package, which must be exported to make the interface
available for the extensions.
Procedure
1. Create the com.<Provider>.<ExtensionName> package.
The package name must contain alphanumeric characters and a dot character as separator. It should be only
in lower case.
2. Create a folder tree for extension les under the project.
web
extension
<Provider>
<ExtensionName>
assets
css
img
44
C U S T O M E R
SAP BusinessObjects BI Developer’s Guide for Web Intelligence and the BI Semantic Layer
Customizing Web Intelligence with UI Extension Points

js
WEB-INF
lib
3. Select the created package and right-click it to create the Extension Java class.
The Java class must implement the IExtension interface.
4. Implement the getExtensionProperties and getContribution methods.
7.4.5.2.1 getExtensionProperties
The getExtensionProperties(String lang) method returns an instance of the ExtensionProperties
class in the required language. The lang parameter takes the current user interface language as value.
The instance is provided by the extension and must contain the following properties:
Table 14:
Property
Description
Title The extension title displayed in Extension Management UI in the CMC.
Description A short description of the feature provided by the extension.
Example
public class Extension implements IExtension {
public ExtensionProperties getExtensionProperties(String lang)
{
Properties props = getProperties(lang);
ExtensionProperties extProperties = new ExtensionProperties();
extProperties.setTitle(props.getProperty("extension.title"));
extProperties.setDescription(props.getProperty("extension.description"));
return extProperties;
}
...
7.4.5.2.2 getContribution
The getContribution(String lang) method returns a list of UIElement objects. The lang parameter takes
the current user interface language as value.
Contribution to the Left-Side Pane
A contribution to the left-side pane can only be a Button widget. There can be more than one contribution.
SAP BusinessObjects BI Developer’s Guide for Web Intelligence and the BI Semantic Layer
Customizing Web Intelligence with UI Extension Points
C U S T O M E R 45

Each contribution is an instance of the SidepaneButton class. The class is a UIElement that contains a set of
properties of a button on the left-side pane:
Table 15:
Property
Description
Name Button identier. It must be unique within the extension.
Title Text displayed on the drop-down list of available buttons in the side pane. It also displays as tooltip of the
button.
Description Button description. It is only displayed on the Java Web Intelligence application.
IconURL URL related to the icon button. SAP recommends to use the image type as "png" and the size of 24 * 24.
TargetPage URL related to the main page. The content of this page is displayed on the Side panel frame. The page
type could be any type that can be displayed by your Java application server.
Perspectives List of perspectives where the added UIElement is visible. The list of available perspectives is listed in the
Perspective class.
Example
public class Extension implements IExtension {
...
public List<IUIElement> getContribution(String lang)
{
System.out.println("I am extension");
Properties props = getProperties(lang);
SidepaneButton button = new SidepaneButton();
button.setName("Custom Button");
button.setTitle(props.getProperty("sidepane.button.title"));
button.setIconURL("assets/img/custombutton.png");
button.setTargetPage("myPage.html");
//Select Perspectives where the button can be displayed
List<Perspective> perpectiveList = new ArrayList<Perspective>();
perpectiveList.add(Perspective.Reading);
button.setPerspectives(perpectiveList);
List<IUIElement> buttons= new ArrayList<IUIElement>();
buttons.add(button);
return buttons;
}
}
Contribution to the Status Bar
A contribution to the status bar can be a Button or a Toggle Button widget. There can be more than one
contribution.
46
C U S T O M E R
SAP BusinessObjects BI Developer’s Guide for Web Intelligence and the BI Semantic Layer
Customizing Web Intelligence with UI Extension Points

Each contribution is an instance of the StatusbarButton or StatusbarToggleButton class. The class is a
UIElement that contains a set of properties of a button on the status bar:
Table 16:
Property
Description
Name Button identier. It must be unique within the extension.
Title Text displayed on the drop-down list of available buttons in the status bar. It also displays as tooltip of the
button.
Description Button description. It is only displayed on Java Web Intelligence application.
IconURL URL related to the icon button. SAP recommends you use the image type as "png" and the size of 16 * 16.
TargetPage URL related to the main page. The content of this page is displayed on the Side panel frame. The page
type could be any type that can be displayed by your Java application server.
Text Text to display in the button.
Example
public class Extension implements IExtension {
...
public List<IUIElement> getContribution(String lang)
{
Properties props = getProperties(lang);
StatusbarButton button = new StatusbarButton();
button.setName("Button Test");
button.setText(props.getProperty("extension.title"));
button.setTitle(props.getProperty("sidepane.button.title"));
button.setIconURL("assets/img/buttontest.png");
button.setTargetPage("buttontest.html");
List<IUIElement> buttons= new ArrayList<IUIElement>();
buttons.add(button);
return buttons;
}
}
Example
public class Extension implements IExtension {
...
public List<IUIElement> getContribution(String lang)
{
Properties props = getProperties(lang);
StatusbarButton button = new StatusbarToggleButton();
button.setName("Create Drill Filter");
button.setText(props.getProperty("extension.title"));
button.setTitle(props.getProperty("sidepane.button.title"));
button.setIconURL("assets/img/drillfilter.png");
button.setTargetPage("drillfilter.html");
List<IUIElement> buttons= new ArrayList<IUIElement>();
buttons.add(button);
return buttons;
}
SAP BusinessObjects BI Developer’s Guide for Web Intelligence and the BI Semantic Layer
Customizing Web Intelligence with UI Extension Points
C U S T O M E R 47

}
Contribution as a Custom Perspective
Your extension in a custom perspective can be accessed through a Button widget next to the existing perspective
buttons of the interface. There can be more than one perspective button.
Each contribution is an instance of the PerspectiveButton class. The class is a UIElement that contains a set of
properties of a button:
Table 17:
Property
Description
Name Button identier. It must be unique within the extension.
Title Text displayed on the drop-down list of available buttons in the status bar. It also displays as tooltip of the
button.
Description Button description. It is only displayed on Java Web Intelligence application.
TargetPage URL related to the main page. The content of this page is displayed in the custom perspective frame. The
page type could be any type that can be displayed by your Java application server.
Text Text to display in the button.
Example
public class Extension implements IExtension {
...
public List<IUIElement> getContribution(String lang)
{
Properties props = getProperties(lang);
CustomPerspective pers = new CustomPerspective();
pers.setName("MyPerspective");
pers.setText(props.getProperty("perspective.title"));
pers.setTargetPage("perspective/index.html");
pers.setBindToAction(Action.Create);
List<IUIElement> buttons= new ArrayList<IUIElement>();
buttons.add(pers);
return buttons;
}
48
C U S T O M E R
SAP BusinessObjects BI Developer’s Guide for Web Intelligence and the BI Semantic Layer
Customizing Web Intelligence with UI Extension Points

7.4.5.3 To Append Contribution Files
Context
Once you have created the Java class or the JSON le, you need to add an image that represents the extension on
the user interface, and a target le of the functionality provided by the extension.
A target page can be any page type supported by Java application servers (HTML, JSP, Servlet, and so on.).
When adding a button to Web Intelligence, the icon size must be 24x24 pixels.
Procedure
1. Add your contribution icon to the web\extension\<Provider>\<ExtensionName>\assets\img folder.
2. To create an HTML page, right-click the <ExtensionName> root folder of the extension and select New
Other .
3. Select Web HTML File and click Next.
4. Select the parent folder, enter the HTML le name and click Finish.
7.4.5.4 To Declare the Extension Bundle Contribution
Context
The extension bundle is created to contribute to the webpath.AnalyticalReporting bundle host. You declare
the extension in the MANIFEST.MF le.
Procedure
1. Open the MANIFEST.MF le and select the Overview tab.
2. Click Extensions in Extension/Extension Point Content area.
3. In Extensions tab, click Add to display the list of available extension points.
4. Select the com.businessobjects.webpath.AnalyticalReporting.webiApplication extension point
and click Finish.
5. Select the created extension
com.businessobjects.webpath.AnalyticalReporting_<Provider>_<ExtensionName> and dene attributes.
a. id: com.<Provider>.<ExtensionName>
The id attribute can take the bundle or package name.
b. name: <ExtensionName>
SAP BusinessObjects BI Developer’s Guide for Web Intelligence and the BI Semantic Layer
Customizing Web Intelligence with UI Extension Points
C U S T O M E R 49

c. provider: <Provider>
d. One of the following:
○ class: com.<Provider>.<ExtensionName>.Extension
The class attribute refers to the Java class that implements the IExtension interface.
○ json: <JSON file>
The json attribute refers to the name or path to the JSON le. Add the name if you place the le at the
extension/<Provider>/<ExtensionName> root folder. Add the path if you place it elsewhere. For
example: extension/SAP/CustomButton/assets/extension.json.
Remember
You must specify either of these attributes. If you specify both class and json, the class takes
precedence.
e. version: 1.0.0
6. In the Runtime tab, click Add to add the extension class path and select the bin folder.
7. In the Overview tab, check that the minimum execution environment is JavaSE-1.6.
8. Save the changes.
7.4.6 To Develop with the JavaScript APIs
Context
Once you have created the target page, you need to develop the functionality provided by the extension with the
Web Intelligence Application and Service JavaScript APIs.
Procedure
1. To access the Web Intelligence Application APIs, include the following les into your target pages:
○ webi.application.js
○ webi.application.sidepane.js
○ webi.application.dialogbox.js
○ webi.application.bar.js
○ For a left-side pane:
<script type="text/javascript" src="../../../js/extension/
webi.application.js"></script>
<script type="text/javascript" src="../../../js/extension/
webi.application.sidepane.js"></script>
○ For a dialog box:
<script type="text/javascript" src="../../../js/extension/
webi.application.js"></script>
50
C U S T O M E R
SAP BusinessObjects BI Developer’s Guide for Web Intelligence and the BI Semantic Layer
Customizing Web Intelligence with UI Extension Points

<script type="text/javascript" src="../../../js/extension/
webi.application.dialogbox.js"></script>
○ For a status bar button:
<script type="text/javascript" src="../../../js/extension/
webi.application.js"></script>
<script type="text/javascript" src="../../../js/extension/
webi.application.bar.js"></script>
2. To access the Web Intelligence Service APIs, include the webi.services.js le into your target pages as
follows:
<script type="text/javascript" src="../../../js/extension/webi.services.js"></
script>
3. Develop the functionality of the extension.
Caution
The XMLHttpRequest specication has deprecated the requests to servers in synchronous mode. If you use
the Application and Service JavaScript APIs in this mode, the end-user may receive an
InvalidAccessError exception when using the extension.
SAP recommends you to use the asynchronous mode. The APIs are not modied. You simply use a callback
function as additional argument of any Services APIs and of the WebiApplication.loadReport API.
This function will receive the response asynchronously. For example:
Synchronous Mode:
function getConnections()
{
var res = WebiServices.getConnections();
if (!res.error)
{
var cnx = res.connections.connection;
if (!isArray(cnx))
cnx = [ cnx ];
var table = document.getElementById("connections-table");
table.options.length = 0;
for (var i = 0; i < cnx.length; i++)
{
var entry = cnx[i];
table.options.add(new Option(entry.name, JSON.stringify(entry)));
}
}
else
alert(res.error.message);
}
...
var res = WebiServices.document.addDataProvider(
{
dataprovider:
{
name: xlsEntry.name,
dataSourceId: xlsEntry.id,
properties: properties
}
});
SAP BusinessObjects BI Developer’s Guide for Web Intelligence and the BI Semantic Layer
Customizing Web Intelligence with UI Extension Points
C U S T O M E R 51

Asynchronous Mode:
function getConnections()
{
WebiServices.getConnections(function(res) {
if (!res.error)
{
var cnx = res.connections.connection;
if (!isArray(cnx))
cnx = [ cnx ];
var table = document.getElementById("connections-table");
table.options.length = 0;
for (var i = 0; i < cnx.length; i++)
{
var entry = cnx[i];
table.options.add(new Option(entry.name, JSON.stringify(entry)));
}
}
else
alert(res.error.message);
});
}
...
function createExcelDataProvider()
{
...
var arg =
{
dataprovider:
{
name: xlsEntry.name,
dataSourceId: xlsEntry.id,
properties: properties
}
};
WebiServices.document.addDataProvider(arg, function(res) {
if (res.success)
{
WebiServices.document.refreshDocument(function(response) {
var docContext = WebiApplication.getContext();
WebiApplication.loadReport({
reportId:docContext.selectedReportId},function()
{
alert("Report loaded!");
});
});
}
else
alert(res.error.message);
});
}
The Web Intelligence Applet, DHTML, and Rich Client interfaces support the synchronous and
asynchronous modes.
Related Information
https://xhr.spec.whatwg.org/
52
C U S T O M E R
SAP BusinessObjects BI Developer’s Guide for Web Intelligence and the BI Semantic Layer
Customizing Web Intelligence with UI Extension Points

7.4.7 To Make the Extension Visible on the Interface
Context
The BOE Equinox must load the extension to make it visible in the BI launch pad.
Remember
You must perform this task in your development environment. This is done automatically in a production
environment.
Procedure
1. Under the BOE project, open the WebContent\WEBI-INF\eclipse\configuration\config.ini le for
editing.
2. Add a reference to your extension as follows:
#Eclipse Runtime Configuration File
osgi.bundles= \
org.eclipse.equinox.common@2:start, \
org.eclipse.update.configurator@start, \
org.eclipse.equinox.ds@start, \
com.businessobjects.servletbridge.core@start, \
reference\:file\:C\:/workshop/
com.businessobjects.webpath.AnalyticalReporting_<Provider>_<ExtensionName>
osgi.bundles.defaultStartLevel=4
3. Save the le.
4. In the Server view, start the Apache Tomcat server.
5. In the Console view, type ss and press Enter to check that the extension bundle has been loaded properly.
You should see the following information on the fth line:
5 RESOLVED
com.businessobjects.webpath.AnalyticalReporting_
<Provider>_<ExtensionName>_1.0.0
7.4.8 To Test the Extension Bundle
Context
To test the extension in your development environment, you need to select it as a Web Intelligence customization
in the CMC.
SAP BusinessObjects BI Developer’s Guide for Web Intelligence and the BI Semantic Layer
Customizing Web Intelligence with UI Extension Points
C U S T O M E R 53

Procedure
1. Log on to the CMC (http://<server-name>:8090/BOE/CMC) and click Users and Groups on the home
page.
Remember
Since the extension has not been deployed at this point, you must use the port congured for the Tomcat
server of Eclipse (8090) to see the extension in the CMC.
2. Click Group List on the left pane to display all available groups.
3. Right-click on a group name you want to customize and click Customization.
A customization dialog page is displayed.
4. Click Add Folders to select the document folders for which you want to enable the extension point.
The folder appears in the list of customized folders.
5. Select the Extensions tab to display all installed extensions.
6. Check the extension you want to validate and make available for the customized folder of the users of the
selected group.
If you check the extension “<ExtensionName> 1.0.0”, it will be added as an icon to the application user
interface.
7. Click Save to save your selection.
8. Log on to the BI launch pad (http://<server-name>:8090/BOE/BI) and open a Web Intelligence
document.
You must use the port congured for the Tomcat server of Eclipse.
Remember
To be able to see the extension icon:
○ The test User must be a member of the customized User Group.
○ The document must belong to the customized folder of the test User.
Results
You should see the extension icon on the application interface.
7.4.9 To Build the Extension Bundle
Context
You build the extension bundle to create a deployable JAR le. In our use case we only create a build binary.
In the out-of-the-box installation, Tomcat 8 is used as an application server. The bundles are not deployed as JAR
les but as subfolders under the <tomcat-dir>\webapps\BOE\WEB-INF\eclipse\plugins folder.
54
C U S T O M E R
SAP BusinessObjects BI Developer’s Guide for Web Intelligence and the BI Semantic Layer
Customizing Web Intelligence with UI Extension Points

Procedure
1. In Project Explorer or Package explorer, double-click the build.properties le to open it.
2. Select the following folders in Binary Build:
○ META-INF
○ bin
○ fragment.xml
○ web
3. Click File Export .
4. In the Export dialog box, select Deployable plug-ins and fragments and click Next.
5. Select the extension bundle project in Available Plug-ins and Fragments and specify in the Destination tab the
folder where the JAR le is generated.
If you select the project folder, then a new folder with name “plugins” is created and the JAR le is copied to
this folder.
7.4.10 To Deploy the Extension Bundle in Production
Context
You deploy the extension in your production environment.
Remember
You must install Java 8 on your client machine to use the extension bundle with the Java interface of Web
Intelligence.
Procedure
1. Stop Apache Tomcat.
2. Copy the extension JAR le to the following folders:
○ <bip-install-dir>\warfiles\webapps\BOE\WEB-INF\eclipse\plugins
○ <tomcat-dir>\webapps\BOE\WEB-INF\eclipse\plugins
○ <tomcat-dir>\work\Catalina\localhost\BOE\eclipse\plugins
3. Start Apache Tomcat.
SAP BusinessObjects BI Developer’s Guide for Web Intelligence and the BI Semantic Layer
Customizing Web Intelligence with UI Extension Points
C U S T O M E R 55

Next Steps
To use the extension in your production environment, make sure you selected the extension in the CMC. Use the
port congured for the Tomcat server of the BI platform (8080). See To Test the Extension Bundle [page 53].
7.5 Creating an Extension as a non-OSGI web application
You can create a non-OSGI web application and generate a WAR le that you deploy either on the BI platform
application server or on an external application server.
With this method, you declare the extension through a JSON le only. The WAR le is deployed automatically on a
running Apache Tomcat application server. You do not need to stop and restart the server, which is particularly
convenient for a production environment.
The following procedures apply to a web project developed in JavaScript and built in Eclipse. You can create your
extension in another programming language like PHP and deploy the resulting WAR le on any external application
server.
As for any extension bundle, you enable the web application via the Customization pane in the CMC. You also apply
any necessary security settings for your external application server in the CMC (proxy, authentication).
7.5.1 To Create a Web Project
Procedure
1. Select File New Project .
2. In the New Project dialog box, select Web Dynamic Web Project and click Next.
3. Enter the project name, make sure Apache Tomcat 8.0 is selected and click Finish.
4. Create the following folder tree under WebContent:
WebContent
extension
<Provider>
<ExtensionName>
assets
css
img
js
Note
Make sure you use the same tree structure if you intend to deploy the extension on an external application
server.
56
C U S T O M E R
SAP BusinessObjects BI Developer’s Guide for Web Intelligence and the BI Semantic Layer
Customizing Web Intelligence with UI Extension Points

7.5.2 Declaring the Extension
The only way to dene the extension properties and declare its contributions is to create a JSON le and place it
under the extension root folder. The root folder is extension/<Provider>/<ExtensionName>. Also, you do not
need to edit the MANIFEST.MF le.
Table 18:
How to Declare your Extension
See
Create a JSON le
1. To Create a JSON File [page 41]
2. To Append Contribution Files [page 49]
7.5.3 To Build the Extension
Context
You build the extension to create a deployable WAR le.
Procedure
1. Select the project.
2. Click File Export Web WAR le and click Next.
3. Enter:
○ The project name
○ The destination folder
4. Select Tomcat 8 application server.
5. Click Finish.
Results
A WAR le is created and copied to the destination folder.
7.5.4 To Deploy the Extension
Context
You do not need to stop Apache Tomcat to deploy your extension.
SAP BusinessObjects BI Developer’s Guide for Web Intelligence and the BI Semantic Layer
Customizing Web Intelligence with UI Extension Points
C U S T O M E R 57

Procedure
1. Copy the WAR le from the destination folder to <tomcat-dir>\webapps.
The application server unzips the WAR le automatically.
2. Check that your extension is running on the application server.
For example, you can call the index.html le of your extension into a web browser. If the content of
index.html displays, then the WAR le has been deployed successfully.
To Deploy the Extension Using Apache Tomcat Manager
Context
You can also deploy your extension by using Apache Tomcat Manager. You need to stop the application server and
add a specic Tomcat user to communicate with the Manager.
Procedure
1. Stop Apache Tomcat.
2. Open the <tomcat-dir>\conf\tomcat-users.xml le for editing.
3. Uncomment the following line to add a Tomcat user with username and password.
<user username="<user>" password="<password>" roles="standard,manager"/>
4. Save the le.
5. Restart Apache Tomcat.
6. Launch the manager from http://<server-name>:<port>/manager/.
7. Upload the WAR le.
7.5.5 To Enable the Extension in Web Intelligence
Prerequisites
To use the Extensions feature, you must have created and deployed the appropriate extension in your installation.
58
C U S T O M E R
SAP BusinessObjects BI Developer’s Guide for Web Intelligence and the BI Semantic Layer
Customizing Web Intelligence with UI Extension Points

Context
As BI platform administrator, you enable the extension via the CMC.
Procedure
1. Log in to the CMC as an Administrator.
2. From the Organize list, select Users and Groups.
3. In the Group Hierarchy list, select a user group.
4. In the Actions list, select Customization.
5. Click the Extensions tab.
6. Click Add.
7. Enter the extension URL.
This is the URL of the JSON le.
Note
Replace any blank space of the URL with %20.
Examples:
○ Apache Tomcat application server:
http://myserver/webiextension/extension/SAP/RayLight_Embedded/extension.json
○ External application server:
http://www.mysite.org/documents/web/extension/Custom%20Button/extension.json
8. Select Set proxy information if required by your application server and enter server name and port number.
9. Select either No authentication or Basic authentication if required by your application server and enter user
name and password.
10. Click OK and select the extension.
11. Click Save.
7.6 About the Web Intelligence UI Extension Point Sample
The sample is a ready-to-use extension that demonstrates the usage of the JavaScript APIs. It allows you to test
the following features:
● Refresh reports periodically
● List document reports in JSON format
The sample is installed with the SAP BusinessObjects BI platform servers at <bip-install-dir>\Samples
\webi\com.businessobjects.webpath.AnalyticalReporting_SAP_ExtensionSample_1.0.0.jar.
SAP BusinessObjects BI Developer’s Guide for Web Intelligence and the BI Semantic Layer
Customizing Web Intelligence with UI Extension Points
C U S T O M E R 59

The JAR le is deployed automatically at installation in the following directories:
● <bip-install-dir>\warfiles\webapps\BOE\WEB-INF\eclipse\plugins
● <tomcat-dir>\webapps\BOE\WEB-INF\eclipse\plugins
● <tomcat-dir>\work\Catalina\localhost\BOE\eclipse\plugins
The JAR le content is extracted automatically on the Tomcat server.
7.6.1 To Use the Extension JAR Sample
Context
The com.businessobjects.webpath.AnalyticalReporting_SAP_ExtensionSample_1.0.0.jar sample
has been deployed automatically on the BI platform and Tomcat servers at platform installation.
Procedure
1. Logon to the CMC to make the extension visible on the Web Intelligence interface.
See instructions To Test the Extension Bundle [page 53].
2. Logo from the CMC and logon to the BI launch pad.
3. Open any Web Intelligence document.
The Extension Sample pane displays in the Web Intelligence left-side pane.
4. Play with the extension:
○ Enter a refresh schedule time (in seconds) and click Start. Click Stop to stop the refresh.
○ Click Display. A dialog box opens that contains the list of reports as a JSON object.
60
C U S T O M E R
SAP BusinessObjects BI Developer’s Guide for Web Intelligence and the BI Semantic Layer
Customizing Web Intelligence with UI Extension Points

8 Creating Visualizations with a Custom
Element Service
You can extend the list of visualizations supported by SAP BusinessObjects Web Intelligence through custom
elements.
Custom elements are a type of visualizations whose rendering is delegated to a third-party service. You develop
this service (or ask a service provider to develop it for you) by implementing REST API calls, in order to allow the
third-party server to communicate with Web Intelligence servers.
A custom element service must provide useful information for Web Intelligence, such as the size of the custom
element, how to display the data in the chart, and the rendering settings.
You can develop as many custom element services as you need. A service can also host several custom elements,
hence several visualizations.
What You Need to Do
1. Develop or ask a service provider to develop the custom element service. The service must implement the
REST APIs calls.
2. Deploy your service on your third-party server.
3. As an administrator, connect to the CMC and add the name and URL of the custom element service you have
deployed. Click Test to make sure the service respects the API contract.
Note
This is the responsibility of the administrator to ensure that data exchange between the service and the BI
platform does not aect the security of the production system.
Users can now use custom elements in their reports. For more information, see Managing Web Intelligence settings
in the Business Intelligence Platform Administrator Guide.
How Custom Elements Display in Web Intelligence
Once a custom element service has been added to the Web Intelligence settings in the CMC, the visualizations
provided by the service display as available charts in the Web Intelligence client interfaces. The end-user can select
one of them to display their data as in any other charts supported by Web Intelligence.
A custom element is dened as any other report block by the following properties:
● Size, position, and borders
● Formulas on feeds
● Rendering settings
SAP BusinessObjects BI Developer’s Guide for Web Intelligence and the BI Semantic Layer
Creating Visualizations with a Custom Element Service
C U S T O M E R 61

For more information, see Working with charts in reports in the SAP BusinessObjects Web Intelligence User's Guide.
Note
To export a custom element into a PDF document or a Microsoft Excel le, the service must return the custom
element as an image. Otherwise, the custom element displays as blank.
Remember
Make sure your conguration allows access to the third-party server from the BI platform server. Otherwise, the
custom element won't display. In the case of a Web Intelligence Rich Client not connected to the CMS
repository, the custom element does not display either.
How the Service Works
When an administrator congures a custom element service
To conrm that the service is up and running and to select an output format for the custom element visualizations,
the administrator tests the service in the Central Management Console. See Getting the Supported Formats [page
64] for more information.
When an end-user inserts a custom element visualization in a Web Intelligence document:
The name of the custom element service is the name chosen by the administrator when conguring this service. In
the interface, the end-user can select a visualization in the list oered by the service. Since the 4.2 SP4 release, the
service can also display a thumbnail of each visualization to better illustrate its content. See Getting the
Visualization Types [page 65] and Getting the Visualization Icon [page 66] for more information.
The end-user can assign data to the visualization he has selected according to the feeding dened by the custom
element service. See Getting the Getting the Visualization Feed Denitions [page 67] for more information.
When an end-user customizes the parameters of a custom element visualization (since 4.2
SP3):
The end-user can modify the settings values supported by the custom element service for the selected
visualization. See Getting the Rendering Settings [page 72] for more information.
When a report that contains a custom element is displayed:
Based on end-user choices, the Web Intelligence server performs the calculation and sends the computed data
and their metadata to the service. The service then generates an image or an HTML document as output of the
request. Finally, the HTML output is added to an <iframe> tag and the image output to a standard <div> tag to the
report, which is displayed in the Web Intelligence interface.
When publishing or printing a Web Intelligence document displaying custom elements:
The Web Intelligence server requests an image output from the custom element service, independently of the
output format selected by the administrator in the Central Management Console.
62
C U S T O M E R
SAP BusinessObjects BI Developer’s Guide for Web Intelligence and the BI Semantic Layer
Creating Visualizations with a Custom Element Service

8.1 About the Custom Element Service APIs
You implement the custom element service APIs to display your visualization through a custom element in Web
Intelligence.
Using these REST APIs, you allow Web Intelligence to:
● Get the formats supported by the service
● Get the types of visualization provided by the service
● Get the feeding denitions of a specic custom visualization
● Display the visualization properly
● Get the rendering settings of the visualization
Base URL
The base URL to use within the call requests must refer to the server where the service is deployed. For example:
http://myvisualizationserver.domain.com:8095
Response Status and Error Messages
Table 19: HTTP Codes and Descriptions
Code
Description
200 Successful request
500 Failed request
If the request has failed, the call returns a response in JSON format as follows:
{
"code":"XXX 00001",
"message":"Invalid feeding."
}
Where:
● code species an error code for a type of issue. The preferred format consists of 3 letters indicating your
service name and a 5-digit number separated by a space character.
● message is a descriptive error message.
SAP BusinessObjects BI Developer’s Guide for Web Intelligence and the BI Semantic Layer
Creating Visualizations with a Custom Element Service
C U S T O M E R 63

Localization
Although the service must use the English locale by default for responses, it should also support other languages
according to user preferences. To this end, you can use the locale query parameter that contains the country and
optionally the language code in requests. For example:
api/visualizations?locale=en
api/vizualisations/vizID/feeds?locale=fr_FR
8.2 Getting the Supported Formats
Returns the list of media types supported by the custom element service.
The Web Intelligence server needs this information to know what media types the service supports.
It can be a selection of the following types:
● text/html
● image/png
● image/jpg
● image/gif
● image/bmp
The preferred media type is text/html, which allows interactivity in SAP BusinessObject Web Intelligence
interfaces and a better user experience. The preferred image output is image/png.
The custom element service can return several media types. For example, it can return text/html to display the
custom elements in a Web Intelligence report and image/png to export that report into a PDF document or a
Microsoft Excel le.
Request
URI: api/formats
HTTP Method: GET
Request Parameters: None
Response
Format: JSON
Response Example:
{
64
C U S T O M E R
SAP BusinessObjects BI Developer’s Guide for Web Intelligence and the BI Semantic Layer
Creating Visualizations with a Custom Element Service

"formats": [
"text/html",
"image/png"
]
}
8.3 Getting the Visualization Types
Returns the list of visualizations supported by the Custom Element service.
The Web Intelligence server needs this information to know what visualizations the service supports.
Request
URI: api/visualizations
HTTP Method: GET
Request Parameter:
Table 20:
Parameter
Required Data Type Description Parameter Type
locale
No String The user locale as a language and/or
country string. For example:
● en
● fr_FR
Query parameter
Response
Format: JSON
Response Example:
GET /api/visualizations?locale=en
{
"visualizations": [
{
"id": "bullet-chart",
"name": "Bullet chart",
"description": "This a bullet chart"
},
{
"id": "funnel",
"name": "Funnel chart",
"description": "This is a funnel chart"
}
]
SAP BusinessObjects BI Developer’s Guide for Web Intelligence and the BI Semantic Layer
Creating Visualizations with a Custom Element Service
C U S T O M E R 65

}
Table 21:
Output Description
id
The visualization identier. Must be unique in the scope of the service.
name
The visualization name as it appears in Web Intelligence. Its translation can be returned, de
pending on the
locale query parameter.
description
The visualization description as it appears in Web Intelligence. Its translation can be returned,
depending on the
locale query parameter.
8.4 Getting the Visualization Icon
Returns a picture that illustrates the visualization type identied by identier.
You get the visualization identier with the api/visualizations call.
Web Intelligence calls this API to display the visualization thumbnail in the dialog box listing all available charts.
The picture’s requested dimensions (width and height) are passed in the request. In this case, the requested
dimensions are 50x50 pixels and the requested format is picture/png.
Request
URI: api/visualizations/<vizID>/sample
HTTP Method
URI: POST
Request Headers:
Table 22:
Header
Required Value
Accept Yes The output format. For example,
image/png
Content-type Yes application/json
66 C U S T O M E R
SAP BusinessObjects BI Developer’s Guide for Web Intelligence and the BI Semantic Layer
Creating Visualizations with a Custom Element Service

Request Parameters:
Table 23:
Parameter Required Data Type Description Parameter Type
height Yes Numeric The sample height Request body
width Yes Numeric The sample width Request body
Request Example:
POST /api/visualizations/funnel/sample?height=50&width=50
Response
Format: a 50x50 pixels .png image representing the visualization sample.
8.5 Getting the Visualization Feed Denitions
Returns the list of data feeds of a visualization type specied by its identier.
The Web Intelligence server needs this information to know the feed denition that a specic visualization type
supports. You get the visualization identier with the api/visualizations call.
Request
URI: api/visualizations/<vizID>/feeds
HTTP Method: GET
Request Parameters:
Table 24:
Parameter
Required Data Type Description Parameter Type
<vizID>
Yes String The visualization type identier Path
locale
No String The user locale as a language and/or
country string. For example:
● en
● fr_FR
Query
SAP BusinessObjects BI Developer’s Guide for Web Intelligence and the BI Semantic Layer
Creating Visualizations with a Custom Element Service
C U S T O M E R 67

Response
Format: JSON
Response Example:
GET /api/visualizations/funnel/feeds?locale=en
{
"feeds": [
{
"id": "category-axis",
"name": "Category Axis",
"description": "The primary chart axis",
"axis": "0",
"type": "dimension",
"min": "1",
"max": "-1"
},
{
"id": "region-color",
"name": "Color",
"description": "This feeds is used to customize bar colors",
"type": "dimension",
"axis": "1",
"min": "0",
"max": "-1"
},
{
"id": "primary-values",
"name": "Values",
"description": "Feeds for measures",
"type": "measure",
"min": "0",
"max": "-1"
}
]
}
Table 25:
Output
Description
id
The unique identier in the scope of the current visualization type
name The human-readable name of the feed. Can be localized using the locale query parameter
description The human-readable description of the feed. Can be localized using the locale query param
eter.
type The type of data provided by the feed: measure or dimension, which includes the BI Se
mantic Layer types dimension, detail, hierarchy, and level
axis The axis type: primary (0) or secondary (1). Mandatory for feeds of type dimension
min
The minimum number of formulas required by the feed
max The maximum number of formulas that the feed can manage. max=-1 means there is no limit
to the number of formulas.
68 C U S T O M E R
SAP BusinessObjects BI Developer’s Guide for Web Intelligence and the BI Semantic Layer
Creating Visualizations with a Custom Element Service

8.6 Rendering the Visualization
Renders the visualization in the specied format.
The request contains the following inputs:
● The output format details (height, width, and dpi)
● The default font and palette settings to use in the visualization
● The end-user settings
● The Web Intelligence expressions applied by the end-user to each feed
● The metadata of the visualization and the dataset
You get the end-user settings from the call Getting the Rendering Settings [page 72]. Rendering setting values
are saved in the Web Intelligence document.
Request
URI: api/visualizations/<vizID>/render
HTTP Method: POST
Request Headers:
Table 26:
Header
Required Value
Accept
Yes
The output format. For example: image/png
Content-Type
Yes
application/json
Request Parameters:
Table 27:
Parameter
Required Data Type Description Parameter Type
<vizID>
Yes String The visualization type identier Path
locale
No String The user locale as a language and/or
country string. For example:
● en
● fr_FR
Query
width
Yes Numeric The visualization width Request body
height
Yes Numeric The visualization height Request body
dpi
Yes Numeric The visualization dpi Request body
font
Yes JSON object The default font to use in the visualiza
tion. Must be installed on the third-
party server.
Request body
SAP BusinessObjects BI Developer’s Guide for Web Intelligence and the BI Semantic Layer
Creating Visualizations with a Custom Element Service
C U S T O M E R 69

Parameter Required Data Type Description Parameter Type
feed
Yes JSON array The list of Web Intelligence formulas
applied by the end-user to each feed.
Each feed contains an array of expres
sions. Each expression contains a ref
erence to an object of the
data pa
rameter based on its identier.
Request body
data
Yes JSON array The metadata of the visualization.
Each
data entry contains the follow
ing:
● A unique identier
● An optional title
● dataType that can be string,
double or date
● dataStructure that can be
tree if it is based on hierarchical
data or
simple if it is at data
● The data itself
● cardinality that species if
the data is contained in an array
(1) or a matrix (2).
Request body
instances
Yes JSON object The custom element source, specied
by the following:
● The Web Intelligence document
CUID
● The report identier
● The block identier
● The instance identier, which can
be used to dierentiate two docu
ments with the same CUID
● The temporary reference to the
report element instance (not valid
after a refresh)
● The unique reference identier
that can be used even after a re
fresh
Request body
settings
Yes JSON array The values dened by the end-user in
the Format Custom Element dialog box
in
Web Intelligence. It contains only
non-default values. You get these val
ues from the call Getting the Render
ing Settings [page
72]. The property
identier may contain a slash (/) if the
property has subproperties.
Request body
customPrope
rties
Yes JSON array The custom properties dened on the
custom element. Can be set using a
Web Intelligence UI Extension Point.
See
Customizing Web Intelligence with
UI Extension Points [page 35].
Request body
70 C U S T O M E R
SAP BusinessObjects BI Developer’s Guide for Web Intelligence and the BI Semantic Layer
Creating Visualizations with a Custom Element Service

Parameter Required Data Type Description Parameter Type
palette
Yes JSON array The list of default hexadecimal colors
to use in the visualization.
Request body
Request Example:
POST /api/visualizations/funnel/render?locale=en_US
{
"width":400.0,
"height":300.0,
"dpi":96,
"font":{
"name":"Arial",
"size":9,
"color":"#333333",
"isBold":false,
"isItalic":false
},
"feeding":[
{
"id":"category-axis",
"expressions":[
{
"dataId":3
}
]
},
{
"id":"region-color"
},
{
"id":"primary-values",
"expressions":[
{
"dataId":1
}
]
}
],
"data":[
{
"id":"3",
"title":"Year",
"values":{
"dataType":"string",
"rawvalues":[
"2004",
"2005",
"2006"
],
"dataStructure":"simple",
"cardinality":1
},
"type":"dimension"
},
{
"id":"1",
"title":"Sales revenue",
"values":{
"dataType":"double",
"rawvalues":[
8095814,
1.3232246E7,
1.50591428E7
SAP BusinessObjects BI Developer’s Guide for Web Intelligence and the BI Semantic Layer
Creating Visualizations with a Custom Element Service
C U S T O M E R 71

],
"dataStructure":"simple",
"cardinality":1
},
"type":"measure"
}
],
"instance":{
"documentId":"AVyTZhNVc9dHlaVGjuyOoqw",
"instanceId":"7130cd02788a5cb8b1a44f409bfed81d58eb2c0c",
"reportId":"4",
"blockId":"5",
"iref":"5.c",
"uiref":"UIREF:RID=5:BID=38"
},
"settings":[
{
"property":"location",
"region":"legend",
"value":"top"
}
],
"customProperties":[
{
"property":"Custom_Prop2",
"value":"{\"value1\":\"myvalue\", \"value2\":\"myCustomJSONDefinedSetting\"}"
},
{
"property":"Custom_Prop1",
"value":"myvalue"
}
],
"palette":[
"#008fd3ff","#99d101ff","#f39b02ff","#9fcfecff","#4ba707ff","#f6d133ff","#cb4d2cff",
"#cac7baff
]
}
Response
Format: a stream containing the response.
● If the output format is text/html, it is an HTML document that will be loaded to the dedicated Iframe.
● If the output format is an image, it is the resulting image.
8.7 Getting the Rendering Settings
Returns the list of end-user settings supported by a type of visualization.
Web Intelligence needs this information to display the rendering settings returned by the service. You send the
values actually set by the end-user by calling the service for rendering. Use these settings in the call Rendering the
Visualization [page 69].
Settings are organized by regions such as title, legend, and axis. Each region contains several groups, and each
group may contain several categories. Finally, a category contains a list of properties.
72
C U S T O M E R
SAP BusinessObjects BI Developer’s Guide for Web Intelligence and the BI Semantic Layer
Creating Visualizations with a Custom Element Service

Settings are displayed in the Format Custom Element dialog box of Web Intelligence. Each region, group, and
category of a setting is represented respectively as a left-pane button, section, and area of the dialog box. Web
Intelligence assigns the appropriate widget to the setting according to its type (boolean, string, integer, and so on).
A setting is displayed if at least one category is dened.
Request
URI: api/visualizations/<vizType>/settings
HTTP Method: GET
Request Headers:
Table 28:
Header
Required Values
Content-Type
Yes
application/json
SAP BusinessObjects BI Developer’s Guide for Web Intelligence and the BI Semantic Layer
Creating Visualizations with a Custom Element Service
C U S T O M E R 73

Request Parameters:
Table 29:
Parameter Required Data Type Description Parameter Type
<vizType>
Yes String The visualization type Path
locale
No String The user locale as a language and/or
country string. For example:
● en
● fr_FR
Query
Response
Format: JSON
Response Example:
GET api/visualizations/funnel/settings?locale=en
Rendering settings are the following:
● Region is Legend.
● Group is Design.
● Design categories are General and Layout.
● General properties are isVisible, font and background color. The font property has 5 subproperties (name, size,
bold, italics, and underline).
● Layout properties are location and spacing. Location has only 4 possible values. Spacing has a set of
parameters that restrict its possible values.
{
"regions":[
{
"id":"legend",
"name":"Legend",
"groups":[
{
"name":"Design",
"categories":[
{
"name":"General",
"description":"General design properties",
"properties":[
{
"id":"isVisible",
"name":"Visible ?",
"description":"Indicates if title of the visualization is displayed or
not",
"type":"boolean",
"default":"true"
},
{
"id":"font",
"name":"Font",
"description":"Font of the legend.",
"type":"font",
"default":"",
"properties":[
74
C U S T O M E R
SAP BusinessObjects BI Developer’s Guide for Web Intelligence and the BI Semantic Layer
Creating Visualizations with a Custom Element Service

{
"id":"name",
"name":"Font name",
"description":"Font name",
"type":"string",
"default":"arial"
},
{
"id":"size",
"name":"Font size",
"description":"Font size",
"type":"integer",
"default":"8"
},
{
"id":"bold",
"name":"Is bold?",
"description":"Is bold?",
"type":"boolean",
"default":"false"
},
{
"id":"italic",
"name":"Is italic?",
"description":"Is italic?",
"type":"boolean",
"default":"false"
},
{
"id":"underline",
"name":"Is underline?",
"description":"Is underline?",
"type":"boolean",
"default":"false"
},
{
"id":"color",
"name":"Font color",
"description":"Font color",
"type":"color",
"default":"#ffffffff"
}
]
},
{
"id":"backgroundColor",
"name":"Background color",
"description":"Background color",
"type":"color",
"default":"#d0d0d0cc"
}
]
},
{
"name":"Layout",
"description":"Layout properties",
"properties":[
{
"id":"location",
"name":"Location",
"description":"Indicates where the title should be displayed",
"type":"state",
"default":"right",
"choices":[
{
"id":"top",
"name":"Top",
"description":"Display title at the top."
SAP BusinessObjects BI Developer’s Guide for Web Intelligence and the BI Semantic Layer
Creating Visualizations with a Custom Element Service
C U S T O M E R 75

},
{
"id":"left",
"name":"Left",
"description":"Display title on the left."
},
{
"id":"bottom",
"name":"Bottom",
"description":"Display title at the bottom."
},
{
"id":"right",
"name":"Right",
"description":"Display title on the right."
}
]
},
{
"id":"spacing",
"name":"Spacing",
"description":"Indicates space between items",
"type":"integer",
"default":"4",
"parameters":{
"min":"2",
"max":"6",
"step":"1"
}
}
]
}
]
}
]
}
]
}
Table 30: Regions
Output
Output Type Description
id
String The region identier. Must be unique in
the scope of the service.
name
String The region name. Is localized.
groups
JSON array The groups of a region
Table 31: Groups
Output
Output Type Description
name
String The group name. Is localized.
categories
JSON array The categories of a group
Table 32: Categories
Output
Output Type Description
name
String The category name. Is localized.
description
String The category description. Is localized.
76 C U S T O M E R
SAP BusinessObjects BI Developer’s Guide for Web Intelligence and the BI Semantic Layer
Creating Visualizations with a Custom Element Service

Output Output Type Description
properties
JSON array The properties of a category
Table 33: Properties
Output
Output Type Description
id
String The property identier. Is unique in the
region and must contain only characters
from [a-z], [A-Z], [0-9], and [. | - | _].
name
String The property name. Is localized.
description
String The property description. Is localized.
type
Enum The property type. Is one of the follow
ing:
● boolean
● color
● double
● font
● integer
● state
● string
default
String The property default value.
In the case of a color, default is a hexa
decimal string.
In the case of a font, default is an empty
string.
parameters
JSON object
The property parameters if any, for int
and double type properties only.
Species constraints to the property
value.
If a property describes a size, the param
eter isUnit is added and set to true.
Hence, all parameters are expressed in
metrics so that Web Intelligence can
convert them into the end-user unit de
ned by its preferred viewing locale.
properties
JSON array The subproperties of a property if any.
The property itself has no value in this
case. For example, the property of type
font has a set of subproperties.
Properties: state
The values of a property of type state are restricted to a set of specic values. The default value must be one of
the identiers of these values. A property of type state cannot have parameters.
SAP BusinessObjects BI Developer’s Guide for Web Intelligence and the BI Semantic Layer
Creating Visualizations with a Custom Element Service
C U S T O M E R 77

Table 34:
Output Output Type Description
choices
JSON array The list of the possible values of the
property
id
String The value identier. Is unique in the
property
name
String The value itself. Is localized.
description
String The value description. Is localized.
8.8 To congure an extension point as a custom elements
service
To be able to use an extension as a custom elements service, you need to deploy it rst, and congure it in the
Central Management Console.
Context
Procedure
1. In the Central Management Console, go to Users and Group.
2. Right-click Adminitrators.
3. Click Customization.
4. In the Extensions tab, click Add.
5. After you've congured the extension, click Applications Web Intelligence Custom Elements Add
Service... .
6. Select the extension in the dropdown list.
7. Click Test and select a media type.
8. Click OK.
9. Check the check mark next to the name of the extension.
78
C U S T O M E R
SAP BusinessObjects BI Developer’s Guide for Web Intelligence and the BI Semantic Layer
Creating Visualizations with a Custom Element Service

9 Exposing Web Intelligence Features with
REST Web Services
The Web Intelligence RESTful Web Service SDK provides a series of REST APIs that allows you to expose the Web
Intelligence functionalities into your analytics applications.
Since the SDK is provided with the BI platform, you have nothing to install on the developer machine or where your
application is deployed. The major benet of the SDK is that you can use the REST APIs with any programming
language that support the HTTP protocol, so that end-users can access the broad range of Web Intelligence
features in many ways. A web service performs CRUD (Create, Read, Update, Delete) operations on data over
HTTP, sending requests and receiving responses either in XML or JSON format. The way you implement these
services is at your convenience. For example, you can automate batch operations on Web Intelligence documents.
You can also make documents and reports available into non-SAP web applications.
The REST APIs expose features that relate to all Web Intelligence functional domains:
● Creating documents and building queries
● Creating reports with tables, sections, and charts
● Refreshing documents to get data
● Formatting reports
● Saving and exporting documents and reports
● Scheduling documents
Some Java samples are also provided to help you understand the REST APIs. They are supplied in the archive
<bip-install-dir>\Samples\webi\RaylightRESTWS_Samples.zip.
Note
Before using the APIs, you need to logon to the BI platform and access the document or universe folder via the
BI platform RESTful Web Service SDK.
Table 35:
Related Documentation
Description
See the SAP BusinessObjects RESTful Web Service SDK User
Guide for Web Intelligence and the BI Semantic Layer on the
SAP Help Portal.
The ocial guide for developing with the Web Intelligence
RESTful Web Service SDK
See the Business Intelligence platform RESTful Web Service
Developer Guide on the SAP Help Portal.
The ocial guide for developing with the BI platform RESTful
Web Service SDK
Note
Access to these guides is restricted to customers with a logon to the SAP Support Portal.
SAP BusinessObjects BI Developer’s Guide for Web Intelligence and the BI Semantic Layer
Exposing Web Intelligence Features with REST Web Services
C U S T O M E R 79

10 Consuming BI Semantic Layer Universes
with REST Web Services
The BI Semantic Layer RESTful Web Service SDK provides a series of REST APIs that allow you to access relational
universes, browse universe metadata, create and execute queries. It supports UNV universes created with the
universe design tool as well as UNX universes created with the information design tool.
Since the SDK is provided with the BI platform, you have nothing to install on the developer machine or where your
application is deployed. The major benet of the SDK is that you can use the REST APIs with any programming
language that support the HTTP protocol. For example, you can rewrite a query panel using JavaScript. A web
service performs CRUD (Create, Read, Update, Delete) operations on data over HTTP, sending requests and
receiving responses either in XML or JSON format. The way you implement these services is at your convenience.
Result sets are returned using the OData protocol.
The REST APIs expose features that relate to the main functional domains of the SAP BusinessObjects reporting
tools:
● Browsing universes and retrieving metadata
● Building queries on universes and retrieving data
Some Java samples are provided to help you understand the REST APIs. They are supplied in the archive <bip-
install-dir>\SL SDK\SDK Samples\SLRESTWebService.zip.
Note
Before using the APIs, you need to logon to the BI platform and access the universe folder via the BI platform
RESTful Web Service SDK.
Table 36:
Related Documentation
Description
See the SAP BusinessObjects RESTful Web Service SDK User
Guide for Web Intelligence and the BI Semantic Layer on the
SAP Help Portal.
The ocial guide for developing with the BI Semantic Layer
RESTful Web Service SDK
See the Business Intelligence platform RESTful Web Service
Developer Guide on the SAP Help Portal.
The ocial guide for developing with the BI platform RESTful
Web Service SDK
Note
Access to these guides is restricted to customers with a logon to the SAP Support Portal.
80
C U S T O M E R
SAP BusinessObjects BI Developer’s Guide for Web Intelligence and the BI Semantic Layer
Consuming BI Semantic Layer Universes with REST Web Services

11 Developing Applications to Design and
Administrate Universes
The BI Semantic Layer Java SDK allows you to access the features of the information design tool within a program
of your own. You can develop Java applications to design the UNX universe resources (data foundations, business
layers, and connections), to publish them in a CMS repository, and to congure security settings on published
universes.
Some samples are also provided to help you understand the Java SDK APIs. They are supplied in the archive
<bip-install-dir>\SL SDK\SDK Samples\com.sap.sl.sdk.authoring.samples.source.jar. For
instructions on how to use the samples, see the SAP BusinessObjects BI Semantic Layer Java SDK Developer
Guide.
Similarly, the Universe Design Tool COM SDK gives you access to the features of the universe design tool. You can
develop applications to design and manage UNV universes using the provided COM objects.
Table 37:
Related Documentation
Description
See the SAP BusinessObjects BI Semantic Layer Java SDK De
veloper Guide on the SAP Help Portal.
The ocial user guide for developing with the BI Semantic
Layer Java SDK
SAP BusinessObjects BI Semantic Layer Java API Reference The reference for interfaces and methods of the Java APIs
See the SAP BusinessObjects BI Semantic Layer Java Object
Model Diagrams on the SAP Help Portal
The object model diagrams of the BI Semantic Layer Java SDK
SAP BusinessObjects Universe Design Tool COM API Refer
ence
The reference for the COM objects and methods. This docu
ment version is related to the 4.0 platform, but its content is
also valid for 4.2 releases.
SAP BusinessObjects Universe Design Tool Object Model Dia
grams
The object model diagrams of the Universe Design Tool COM
SDK
SAP BusinessObjects BI Developer’s Guide for Web Intelligence and the BI Semantic Layer
Developing Applications to Design and Administrate Universes
C U S T O M E R 81

12 Creating a Data Access Driver
A data access driver is a software component that runs with the data access service of the BI platform called
Connection Server to perform requests to data sources and retrieve data for UNV and UNX universes. SAP
BusinessObjects applications use a wide range of data access drivers to communicate with database middleware.
In addition to the supplied data access drivers, you can use the Driver Development Kit to develop, using Java, data
access drivers for data sources for which there are no drivers available.
Note
The JavaBean driver installed on the BI platform manages data that only results from stored procedure
execution. Only UNV universes support stored procedures.
Some JavaBean and Open driver samples are provided at <bip-install-dir>\data access
\connectionServer\DDK\examples to help you develop your own Java driver:
● The Open driver sample illustrates how to develop a driver that accesses data stored in a comma-separated
value (CSV) le.
● The JavaBean driver sample illustrates how to develop a JavaBean driver that accesses data stored in an Excel
spreadsheet.
Table 38:
Related Documentation
Description
SAP BusinessObjects Data Access Driver Java SDK Developer
Guide
The ocial guide for developing your own driver with the
Driver Development Kit. This document is the latest version for
4.2 BI platform releases.
SAP BusinessObjects Data Access Driver Java API Reference The reference for interfaces and methods of the Java APIs.
This document version is related to the 4.1 platform, but its
content is also valid for 4.2 releases.
82 C U S T O M E R
SAP BusinessObjects BI Developer’s Guide for Web Intelligence and the BI Semantic Layer
Creating a Data Access Driver

Important Disclaimers and Legal Information
Coding Samples
Any software coding and/or code lines / strings ("Code") included in this documentation are only examples and are not intended to be used in a productive system
environment. The Code is only intended to better explain and visualize the syntax and phrasing rules of certain coding. SAP does not warrant the correctness and
completeness of the Code given herein, and SAP shall not be liable for errors or damages caused by the usage of the Code, unless damages were caused by SAP
intentionally or by SAP's gross negligence.
Accessibility
The information contained in the SAP documentation represents SAP's current view of accessibility criteria as of the date of publication; it is in no way intended to be a
binding guideline on how to ensure accessibility of software products. SAP in particular disclaims any liability in relation to this document. This disclaimer, however, does not
apply in cases of willful misconduct or gross negligence of SAP. Furthermore, this document does not result in any direct or indirect contractual obligations of SAP.
Gender-Neutral Language
As far as possible, SAP documentation is gender neutral. Depending on the context, the reader is addressed directly with "you", or a gender-neutral noun (such as "sales
person" or "working days") is used. If when referring to members of both sexes, however, the third-person singular cannot be avoided or a gender-neutral noun does not
exist, SAP reserves the right to use the masculine form of the noun and pronoun. This is to ensure that the documentation remains comprehensible.
Internet Hyperlinks
The SAP documentation may contain hyperlinks to the Internet. These hyperlinks are intended to serve as a hint about where to nd related information. SAP does not
warrant the availability and correctness of this related information or the ability of this information to serve a particular purpose. SAP shall not be liable for any damages
caused by the use of related information unless damages have been caused by SAP's gross negligence or willful misconduct. All links are categorized for transparency (see:
http://help.sap.com/disclaimer).
SAP BusinessObjects BI Developer’s Guide for Web Intelligence and the BI Semantic Layer
Important Disclaimers and Legal Information
C U S T O M E R 83

go.sap.com/registration/
contact.html
© 2017 SAP SE or an SAP aliate company. All rights reserved.
No part of this publication may be reproduced or transmitted in any
form or for any purpose without the express permission of SAP SE
or an SAP aliate company. The information contained herein may
be changed without prior notice.
Some software products marketed by SAP SE and its distributors
contain proprietary software components of other software vendors.
National product specications may vary.
These materials are provided by SAP SE or an SAP aliate company
for informational purposes only, without representation or warranty
of any kind, and SAP or its aliated companies shall not be liable for
errors or omissions with respect to the materials. The only
warranties for SAP or SAP aliate company products and services
are those that are set forth in the express warranty statements
accompanying such products and services, if any. Nothing herein
should be construed as constituting an additional warranty.
SAP and other SAP products and services mentioned herein as well
as their respective logos are trademarks or registered trademarks of
SAP SE (or an SAP aliate company) in Germany and other
countries. All other product and service names mentioned are the
trademarks of their respective companies.
Please see http://www.sap.com/corporate-en/legal/copyright/
index.epx for additional trademark information and notices.
