
USG SHEETROCK
®
BRAND
INSTALLATION
AND FINISHING GUIDE
usg.com
USG
Interior
Panel &
Finishing
Solutions

Achieving a smooth
interior fi nish with
USG Sheetrock
®
Brand
Gypsum Panels is easy
with proper planning
from the start.
To get your project
moving in the right
direction, determine
the materials and your
application method,
measure surfaces,
estimate quantities and
obtain the necessary
tools to ensure a job
well done.
PLANNING THE JOB
Selecting Materials
1 USG Sheetrock® Brand UltraLight Panels are
innovative lightweight gypsum wallboard panels for
use on walls and ceilings. Their high strength-to-
weight ratio and superior sag resistance eliminate the
need for traditional 1/2" sag-resistant ceiling panels.
2 USG Sheetrock® Brand UltraLight Panels Mold
Tough® are the lightest moisture- and mold-resistant
panels available. The panel’s core is noncombustible,
moisture-resistant and encased in 100% recycled
moisture– and mold-resistant face and back papers.
3 USG Sheetrock® Brand Gypsum Panels have long
edges tapered on the face side to form a shallow
recess to receive joint compound and tape. Made in
four thicknesses: 5/8", 1/2", 3/8" and 1/4". (The 1/4"
thick panel should not be applied as a single layer but
only to cover existing wall and ceiling surfaces.)
4 USG Sheetrock® Brand Firecode® X Gypsum Panels
combine all the advantages of regular panels with
additional resistance to fi re exposure. Consult local
building codes for fi re-resistance requirements.
5 USG Sheetrock® Brand UltraLight Panels Firecode 30®
are ideal for interior applications where 5/8" Type X
panels are not required.
6 USG Sheetrock® Brand UltraLight Panels Firecode® X
is available in one of two UL Type Designations (Type
ULX and Type ULIX), depending on the market. Both
panels have been formulated to achieve all of the
strength and performance characteristics as standard
5/8" USG Sheetrock® Brand Firecode® X Gypsum
Panels at a signifi cantly reduced weight.
2 3
UltraLightweight
Gypsum Panel / Tapered Edge
6
UltraLightweight
Gypsum Panel / Tapered Edge
F
IRECODE
®
C
ORE
Type X
Gypsum Panel
Tapered Edge
Gypsum Panel
Tapered Edge
4
1
3
5
2

PLANNING THE JOB
4 5
Application Products
Type W Bugle Head
Screws attach single-
layer gypsum panels to
wood framing. Screws
provide greater holding
power than wallboard
nails, minimize popping and help
prevent damage to the panels.
1 USG Sheetrock® Brand
Dur-A-Bead® Corner
Bead is a galvanized steel
reinforcement for protecting
external corners.
2 USG Sheetrock® Brand
No. 200-B Metal Trim is
an L-shaped casing that
provides protection and a
neat fi nished appearance
around window and door
openings. Available for 1/2"
and 5/8" gypsum panels.
3 USG Sheetrock® Brand
Paper-Faced Metal Bead
and Trim provides superior
resistance to edge cracking
and nail pops. Available in
numerous styles and sizes,
including 90° and bullnose
p r o fi l e s .
Horizontal or Vertical
Application
Panels may be applied
horizontally (long dimension
across studs or joists) or vertically
(long dimension parallel to studs
or joists). Horizontal application
using 12' panel lengths is ideal
for walls because linear footage
of joints is minimized. If possible,
span the entire wall or ceiling
from corner to corner. To
minimize joints, use the longest
length panels available and o set
all end joints in adjacent rows.
Finishing Products
4 USG Sheetrock® Brand Paper
Joint Tape is a high-strength
paper tape that is lightly
precreased for inside corner
application and designed
specifi cally for use with
USG Sheetrock® Brand joint
compounds to provide
optimum performance.
5 USG Sheetrock® Brand All
Purpose Joint Compound is
used for embedding tape,
fi nishing coats and fi lling
coats over metal corner bead,
trim and fasteners.
6 USG Sheetrock® Brand Plus
3® Lightweight All Purpose
Joint Compound o ers all the
benefi ts of USG Sheetrock®
Brand All Purpose Joint
Compound with these
exclusive advantages: up
to 25% less weight than
conventional-weight ready-
mixed compounds, less
shrinkage and easier sanding.
Requires only two coats over
metal corner bead and trim.
7 USG Sheetrock® Brand Easy
Sand™ Lightweight Setting-
Type Joint Compound
(available in 5, 20, 45, 90 or
210 minute working times)
is an easy-mixing, smooth-
applying, quick-hardening,
easy-sanding joint compound
with low shrinkage and
superior bonding. Ideal for
patching projects.
8 USG Sheetrock® Brand
UltraLightweight All
Purpose Joint Compound
is up to 40% lighter than
conventional-weight
compounds and provides
overall high performance,
as well as superior working
qualities and good open
time. It o ers excellent bond
over bead, trim and fastener
concealments.
Decorating Products
9 USG Sheetrock® Brand First
Coat™ Primer is a fl at latex
paint specially formulated
to provide an excellent fi rst
(prime) coat over gypsum
panels. It also equalizes
surface porosity and texture
di erences, and minimizes
decorating problems. It is not
intended as a fi nish coat.
USG Sheetrock® Brand Wall
and Ceiling Texture Paint
applies easily and provides
custom designs and patterns
for interior surfaces. Note
that this product is available
in select markets. Check
with your local USG sales
representative for availability.
PANEL 00
WALLS
CEILINGS
4
5
5
6
8
4
3
9
7
1
2

PLANNING THE JOB
6 7
Tools Needed
• Fasteners
• Wallboard nails (per ASTM
C514) for 1/4", 3/8" and 1/2"
thick panels: 1-3/8" nails
• 1-1/4" Type W bugle head
screws; screw gun or
electric drill with special bit
• Panel adhesive (per ASTM
C557 for wood framing).
Adhesives for attaching
gypsum panel products to
steel framing members shall
be as specifi ed by the adhesive
manufacturer.
• Caulk gun
• 4' straightedge or wallboard
T-square
• Utility knife and extra blades
• Metal tape measure
• Marking pencil
• Portable work light,
extension cord
• Drop cloths
• Keyhole saw or jab saw
• Tin snips
• 5", 8" and 10" wide joint-
fi nishing knives
• Wallboard hammer
• Sanding block or piece
of 2" x 4"
• Mud pan
• Mud mixer
• 150- or 220-grit sandpaper or
sanding sponge
• Dust mask
• Safety gloves for cut protection
• Safety glasses
• Sponge (small-celled
polyurethane)
• Stepladder
• Panel lifter
• Sca olding
• Pole or power sander with dust
collection
Measuring and
Estimating Quantities
To fi nd out how many panels
you will need, measure the
length and height then multiply
to determine square footage
for each wall. Subtract the square
footage of all large openings
such as doorways and picture
windows; don’t bother with small
openings such as electrical boxes
and pipe fi ttings. Do the same
for the ceiling. Total the fi gures
and use the table on page seven
to calculate the number of
panels needed.
Read all instructions
before installing
gypsum panels so you
know what you have to
do and how much time
you will need.
Gypsum Panel Coverage Calculator
No. of Panels
Size of Panels (sq. ft.)
4'x8' 4'x10' 4'x12'
10 320 400 480
11 352 440 528
12 384 480 576
13 416 520 624
14 448 560 672
15 480 600 720
16 512 640 768
17 544 680 816
18 576 720 864
19 608 760 912
20 640 800 960
21 672 840 1008
22 704 880 1056
23 736 920 1104
24 768 960 1152
25 800 1000 1200
26 832 1040 1248
27 864 1080 1296
28 896 1120 1440
29 928 1160 1392
30 960 1200 1440
31 992 1240 1488
Use the following table to determine the maximum frame spacing
for direct application of gypsum panels to wood framing.
Frame Spacing for Single-Layer Application
Board
Thickness
Location Application Method
(1)
Max. Frame
Spacing o.c. in.
3/8" ceiling
(2, 3)
perpendicular
(3)
16
— sidewall parallel or perpendicular 16
1/2" ceiling
(4)
parallel
(3)
16
— — perpendicular 24
(5)
— sidewall parallel or perpendicular 24
5/8" ceiling
(4)
parallel
(3)
16
— — perpendicular 24
— sidewall parallel or perpendicular 24
For USG Sheetrock® Brand UltraLight Panels
Board
Thickness
Location Application Method
(1)
Max. Frame
Spacing o.c. in.
1/2" ceilings parallel or perpendicular
24
(1) Long edge position relative to framing.
(2) Not recommended below unheated spaces.
(3) Not recommended if water-based texturing material is to be applied.
(4) USG Sheetrock® Brand Mold Tough® Panels are not recommended for
ceiling where framing is greater than 12" o.c. for single-layer resilient
application where tile is to be applied.
(5) Max. spacing 16" o.c. if water-based texturing material to be applied.
PANEL 1 PG.6

PLANNING THE JOB
8 9
1 MARKING
Place panel with light-colored
face paper side up. Measure
and mark panel size desired.
2 CUTTING
Line up straightedge or
T-square with the marks and
hold fi rmly against the panel.
Draw pencil line as guide for
scoring. Score through paper
and lightly into the core. Wear
a glove on your holding hand
to protect you from cutting
your hand.
To break the panel core,
securely grasp the board
edges on both sides of the
score line and snap board
with a quick, fi rm movement.
Use utility knife with sharp
blade for scoring. Complete
cutting by running knife
through back paper for the
length of the panel and
snapping back to face.
After cutting the panel,
smooth the cut edge with
a drywall rasp or sandpaper
wrapped around a block
of wood such as a piece of
2" x 4" lumber. Be sure to
keep edge as square as
possible. Always wear a dust
mask when sanding.
TIP
Gypsum panels are heavy and
may bend or snap under their
own weight. Be sure panels
are properly supported prior
to scoring.
PANEL 1
Illustrations for Booklet on:
How to Install and Finish SHEETROCK
Brand
Gypsum Panels
NEW FOR PG 9. NEW FOR PG 9. NEW FOR PG 12
NEW FOR PG 12 NEW FOR PG 14 NEW FOR PG 16
NEW FOR PG 17 NEW FOR PG 23
NEW FOR PG 24
NEW FOR PG 24
PANEL 2 G.9
PANEL 3 PG.9
PANEL 6
PANEL 2 G.9
PANEL 3 PG.9
Illustrations for Booklet on:
How to Install and Finish SHEETROCK
Brand Gypsum Panels
NEW FOR PG 9. NEW FOR PG 9. NEW FOR PG 12
NEW FOR PG 12 NEW FOR PG 14 NEW FOR PG 16
NEW FOR PG 17 NEW FOR PG 23
NEW FOR PG 24
NEW FOR PG 24
To estimate the quantity of fasteners, compound and tape you
will need, use the table below.
Fastener/Compound/Tape Calculator
With this amount
of USG Sheetrock®
Brand Gypsum
Panels
Use this amount
of wallboard
nails
(1)
Or this amount of
Type W Screws
(2)
Use this
amount of USG
Sheetrock®
Brand Joint Tape
sq. ft. lb. lb. ft.
100 0.6 0.3 37
200 1.1 0.6 74
300 1.6 0.9 111
400 2.1 1.2 148
500 2.7 1.4 185
600 3.2 1.6 222
700 3.7 1.9 259
800 4.2 2.2 296
900 4.8 2.4 333
1000 5.3 2.7 370
With this amount
of USG Sheetrock®
Brand Gypsum
Panels
Use this
amount of USG
Sheetrock®
Brand All
Purpose Joint
Compound
(3)
Use this amount
of USG Sheetrock®
Brand Plus 3®
Lightweight All
Purpose Joint
Compound
(3)
Use this
amount of USG
Sheetrock®
Brand First
Coat™ Primer
(4)
sq. ft. gal. gal. gal.
100 1.0 0.9 0.25
200 2.0 1.8 0.50
300 3.0 2.7 0.75
400 4.0 3.6 1.00
500 5.0 4.5 1.25
600 6.0 5.4 1.50
700 7.0 6.3 1.75
800 8.0 7.2 2.00
900 9.0 8.1 2.25
1000 10.0 9.0 2.50
(1) Spaced 7" on ceiling; 8" on wall. Reduce by 50% for adhesive/
nail-on application.
(2) Spaced 12" on ceiling; 16" on wall.
(3) Coverage fi gures shown here approximate the amount of joint compound
needed to treat the fl at joints, inside corners and outside corners using
metal corner bead, in a typical room. Coverage can vary widely depending
on factors such as condition of substrate, tools used, application methods
and other job factors.
(4) Calculations assume 400 sq. ft./gal.

PLANNING THE JOB
10 11
3 CUTOUTS
For openings such as an
electrical outlet or switch
box, measure across from the
point where the side edge of
the panel will rest to the near
and far sides of the installed
box. Then measure from the
point where the top or the
bottom edge of the panel will
fall to the top and bottom of
the box.
Trace the outline of the
electrical box at the
appropriate position on the
gypsum panel.
Cut with keyhole saw, jab saw
or rotozip. Wear a dust mask
if excessive dust is produced
and the area cannot be
ventilated.
4 FRAMING
Prior to panel attachment,
inspect the kiln-dried studs
to ensure that the face of
the the kiln-dried studs is
straight and aligned. Warped
or crooked framing should be
repaired or replaced.
5 NAIL ATTACHMENT
Panel must be held tight to
framing. Nail center of panel
fi rst, perimeter last. Space
nails maximum of 7" apart
on ceilings, 8" on walls and
at least 3/8" from ends and
edges of panels.
Seat nail so head is in a
shallow dimple formed by last
blow of drywall hammer.
TIPS
For 1/4", 3/8" and 1/2" thick
panels, use 1-1/4" wallboard
nails. For 5/8" panels, use
1-3/8" wallboard nails.
Drive nails in straight, not at
an angle. Do not overdrive or
countersink nails. This results
in breaking the face paper or
fracturing the gypsum core.
If a nail happens to go in
crooked, hold the panel tight
against the framing and drive
a second nail in about 2" from
the nail that punctured the
paper. Then drive the fi rst
nail in below the surface of
the board.
Double-nailing reduces the
likelihood of nail pops. It is
highly recommended for
ceilings. Drive fi rst nails 12"
o.c. along framing in the fi eld
of the board and second nails
about 2" from the fi rst. Fasten
the perimeter 7" o.c. for
ceilings and 8" o.c. for walls.
6 SCREW ATTACHMENT
Space screws a maximum of
12" apart on ceilings, 16" on
walls and at least 3/8" from
ends and edges of panels.
Sink screws to just below the
panel surface, leaving the
paper intact.
Use an electric screwgun
equipped with an adjustable
screw depth control head
and Phillips bit. If an electric
drill is used, be careful not to
overdrive screws.
PANEL 7
PANEL 12
PANEL 9
PANEL 7 PG.11
PANEL 8 PG.11
PANEL 5 PG.10
PANEL 4 PG.10
PANEL 6 PG.10
PANEL 15
PANEL 11
PANEL 16
PANEL 5 PG.10
PANEL 4 PG.10
PANEL 6 PG.10
PANEL 7 PG.11
PANEL 8 PG.11
PANEL 5 PG.10
PANEL 4 PG.10
PANEL 6 PG.10

12 13
ATTACHING THE PANELS
TIP
On 3/8", 1/2" and 5/8" thick
panels, use 1-1/4" Type W
Bugle Head Screws for
superior holding power and
high resistance to popping
due to wood shrinkage.
7 ADHESIVE
ATTACHMENT
Select the proper adhesive
for specifi c job requirements.
Make sure that framing is
clean, sound and free from
oil, dirt or contamination.
Apply adhesive and nails
per instructions on adhesive
cartridge. Do not use only
adhesive to secure panels.
Use either nails or screws.
Make sure adhesive is fully
cured before fi nishing to
avoid screw pops.
8 CEILINGS
Apply ceilings fi rst. Because
panels are di cult to
maneuver over one’s head,
it’s best to have a helper or
two. Fasten panels to all joists
and perimeter framing. Space
nails maximum 7" apart along
framing, screws 12" apart,
starting in the center of the
panel and working toward
the perimeter. Double-nailing
is recommended to reduce
nail pops.
TIP
Make T-braces consisting
of 1"x4" nailed to 2"x4"
uprights that are 1/2" longer
than fl oor-to-ceiling height.
Wedge T-braces between
fl oor and panel to support
panel while driving fasteners
to ensure fi rm contact with
joists. The preferred method
is to use a panel lifter tool
(available at many building
material rental outlets). See
the table Frame Spacing for
Single-Layer Application on
page seven for application
on ceilings.
9 WALLS
Apply panels horizontally
or vertically to framing.
If applied horizontally,
install top row fi rst. Position
fi rst panel tight against the
installed ceiling panel and
fasten to studs. Space nails
maximum 8" apart along
framing, screws 16" apart,
starting in the center of the
panel and working toward
the perimeter. Cut panels
accurately so they do not
have to be forced into place.
Continue around the room.
Apply lower row of panels
so tapered edges meet with
those of top row. Vertical
joints should be staggered.
Avoid vertical joints directly
above or below a window,
door or other opening for
best decorating results.
TIPS
Use a panel lifter tool to help
install bottom panels. A fi ller
strip may be needed to bring
the wall to ceiling height. Put
the fi ller strip at the bottom
of the wall, cut edge down.
The bottom joint usually is
hidden by the baseboard.
To join panels at an inside
corner, butt the second
panel against the fi rst and
fasten the end of the second
to a stud.
To join panels at an outside
corner, lap the end of the
second board over the end
of the fi rst. Make sure panels
abut neatly—do not overlap
or extend the end of the
second board beyond the
fi rst. Fasten both panel ends
to their common stud.
PANEL 21
Illustrations for Booklet on:
How to Install and Finish SHEETROCK Brand Gypsum Panels
NEW FOR PG 9. NEW FOR PG 9. NEW FOR PG 12
NEW FOR PG 12 NEW FOR PG 14 NEW FOR PG 16
NEW FOR PG 17 NEW FOR PG 23
NEW FOR PG 24
NEW FOR PG 24
PANEL 9 PG.12
PANEL 10 PG.12
PANEL 11 PG.14
PANEL 22
PANEL 9 PG.12
PANEL 10 PG.12
PANEL 11 PG.14
PANEL 23
PANEL 15
PANEL 18
PANEL 20

14 15
FINISHING THE PANELS
10 CORNERS
Method 1—USG Sheetrock®
Brand Dur-A-Bead® Corner
Bead Reinforcement
Using USG Sheetrock® Brand
Dur-A-Bead® Corner Bead
reinforcement, apply it to
all exterior corners of walls,
so ts and window returns.
Hold bead fi rmly against
corner and nail bead through
small holes every 9" on each
fl ange. Make sure that nails
penetrate framing members.
Drive all nails below nose of
corner bead and tightly into
fl ange so joint compound
will cover smoothly and
evenly. Be careful not to dent
the metal. Screw attachment
is not recommended.
Install USG Metal Trim where
gypsum panels butt windows
or concrete block. Nail trim
every 9" through small holes
in fl ange. Make sure that nails
penetrate framing members.
TIPS
The easiest way to trim a
corner bead to the correct
length is to cut through
the fl anges with tin snips
one fl ange at a time, bend
and snap. Wear gloves to
protect you from cutting
your hands.
Force bead onto corner being
careful that the fl anges don't
spread beyond 90° angle,
making it hard to cover them
with joint compound.
Method 2—USG Sheetrock®
Brand Paper-Faced Metal
Corner Bead and Trim
Measure length of corner
and cut trim to length with
metal snips. For vertical wall
installations, cut the corner
trim 1/2" (12.7 mm) shorter
than the wall height.
Using a 4" taping knife,
apply USG Sheetrock®
Brand Joint Compound
(All Purpose, Plus 3®
Lightweight All Purpose
or UltraLightweight All
Purpose) or USG Sheetrock®
Brand Setting-Type Joint
Compound (Durabond®
or Easy Sand™) to drywall
slightly beyond where the
edge of the trim will be.
Helpful Hint: For this step,
application of the compound
often works best if the
compound is thinned slightly
with water. Add water in
small increments (for 1 gallon
of compound, add water in
2 oz. increments) and mix
with compound.
Be careful not to overthin
compound. (For outside
corners, extend compound
approximately 2" or 50mm
from the corner on each side;
for inside corners, extend
1-1/2" or 38mm from the
other corner on each side.)
Place trim on wall and press
into position. Corner bead
should be aligned tight
to ceiling. Embed trim by
running the knife over it with
even pressure at a 45° angle.
Use the knife (or a damp
sponge) to remove excess
compound, eliminating any
air bubbles under the paper.
Allow to dry.
Using a 6" taping knife for
outside corners (4" for inside
corners), apply another coat
of joint compound (USG
Sheetrock® Brand Easy
Sand™, Topping, All Purpose,
or Lightweight All Purpose).
Keep this coat as smooth as
possible. Feather out 5" to
6" (125 to 150mm) from the
nose of the trim on each side
for outside corners (1" or
25 mm past previous coat for
inside corners). Let dry. Sand
sides lightly where needed.
Use an 8" or larger fi nishing
knife for outside corners
(4"-6" knife for inside corners)
to apply a fi nishing coat
of the same ready-mixed
or setting-type compound.
Feather compound 8"
(200 mm) from nose of
trim for outside corners
(1" [25 mm] past previous
coat for inside corners). Let
dry. Sand and prime.
PG 4 Paper Faced Metal Bead and Trim Installation Guide Illustrations
34
56
Start with Quality Products
1
6
Hopper and Roller Method
5
4
PG 5 Paper Faced Metal Bead and Trim Installation Guide Illustrations
1
2
Illustrations for Booklet on:
How to Install and Finish SHEETROCK
Brand Gypsum Panels
NEW FOR PG 9. NEW FOR PG 9. NEW FOR PG 12
NEW FOR PG 12 NEW FOR PG 14 NEW FOR PG 16
NEW FOR PG 17 NEW FOR PG 23
NEW FOR PG 24
NEW FOR PG 24
PANEL 27
1
2
2
1
6
Hopper and Roller Method
5
4
PG 5 Paper Faced Metal Bead and Trim Installation Guide Illustrations
1
2
PANEL 26
PG 3. Paper Faced Metal Bead and Trim Installation Guide Illustrations
2
Start with Quality Products
1
1
6
Hopper and Roller Method
5
4
PG 5 Paper Faced Metal Bead and Trim Installation Guide Illustrations
1
2

16 17
FINISHING THE PANELS
11 FIRST COAT, BUTT AND
TAPERED JOINTS
For best results, joint
compound should be thinned
slightly with water for easier
application. Add water in
small increments (for 1 gal. of
compound, add water in 2 oz.
increments.) Start with butt
joints. Apply an even coat of
thinned joint compound for
the length of the joint with a
5" fi nishing knife.
Center and lightly press tape
into wet joint compound
with fi ngers. Draw 5" knife
fi rmly along joint to tightly
embed tape. Be sure there
is su cient joint compound
under tape to prevent
blistering of the tape.
While embedding the
tape, remove excess joint
compound from edge and
apply as a thin coat over
the tape.
To reinforce tapered joints,
follow same procedure. Tape
should overlap tape applied
to butt joints.
TIPS
For best results, apply
medium pressure and hold
knife at a 45° angle to panel.
To apply joint compound
neatly, dip the knife sideways
into the pan so you load only
half the width of the blade.
Keep the blade clean,
especially of dried bits of
compound, to avoid leaving
scratches in the wet joint
compound as you draw the
knife over it. Discard any
compound containing dried
bits of material. Clean blade
by drawing it over edge
of pan.
While embedding tape, draw
the knife slowly along the
length of the tape to provide
an even distribution of joint
compound. Don’t worry about
a few grooves or streaks in
the joint compound. They
will be covered over in the
subsequent coats.
12 FIRST COAT, INSIDE
CORNERS
Use a 5" joint fi nishing knife
to apply thin layer of joint
compound on both sides of
corner. Extend compound
slightly beyond area to be
covered by tape.
Fold tape along center crease
and lightly press into position
with your fi ngers.
Tightly embed tape as with
other joints.
PANEL 35
PANEL 37
PANEL 28
PANEL 31
PANEL 36
PANEL 33
PANEL 38
CHANGED FOR PG 23
NEW FOR PG 24
NEW FOR PG 16
PANEL 30
PANEL 28
PANEL 34
PANEL 32

18 19
FINISHING THE PANELS
13 FIRST COAT,
FASTENERS
For each fastener depression,
apply joint compound with
5" knife. Holding the blade
almost fl ush with the panel,
draw the joint compound
across a fastener head and
the dimple surrounding it.
Then raise the knife blade
to a more upright position
and scrape o excess with
a second stroke at a right
angle to the fi rst stroke.
Compound should be level
with panel surface.
TIP
To determine if fasteners
are properly seated prior
to fi nishing, draw clean
knife over each fastener. If
metallic ring occurs, drive
fastener below surface,
being careful not to break
paper.
14 FIRST COAT, OUTSIDE
CORNERS AND
METAL TRIM
Apply joint compound with
8" knife onto one fl ange
of the corner bead. Work
down the entire length
of the bead. Hold knife
at 45° angle and smooth
compound—one edge of knife
riding the metal, the other
on the surface of the panel.
Compound should extend
onto panel a minimum of 4".
Repeat application for other
fl ange. Use same application
method for metal trim.
TIP
After fi lling fi rst fl ange, the
metal corner edge may
have some lumps of joint
compound. To remove, run
8" blade up the bead while
also moving it to the side. In
this way, the compound is
continuously moved aside as
it is scraped o .
15 SECOND COAT,
FLAT JOINTS AND
FASTENERS
Allow fi rst coat to dry
overnight (drying time
may vary, depending on
temperature, humidity and
jobsite conditions). Scrape
o bumps, ridges and other
imperfections with knife.
Be careful not to damage
surface.
Apply joint compound to
tapered joints using an 8"
knife the length of the joint.
Apply pressure to knife
edge farthest from the
joint and lift the other edge
just slightly above surface.
Draw knife down joint.
Repeat for opposite edge.
This technique is called
feathering. Joint compound
should extend beyond fi rst
coat for a total width of 7"
or 8".
Apply a 7"-8" coat of joint
compound to each side
of butt joints and feather.
Compound should extend
beyond fi rst coat for a total
width of 14".
Apply a second coat to
fasteners in same manner as
fi rst coat, leaving a very light
mound of compound over
fastener.
16 SECOND COAT, INSIDE
CORNERS
Allow fi rst coat to dry
overnight (drying time
may vary, depending on
temperature, humidity and
jobsite conditions). Apply
joint compound on one side
using a 5" knife for the length
of the corner. Scrape o any
compound that laps onto
the second side. Feather out
beyond fi rst coat and allow
to dry. After fi rst side is dry,
apply compound on other
side and feather.
PANEL 46
PANEL 39
PANEL 42
PANEL 47
PANEL 43
PANEL 48
PANEL 40
PANEL 45
PANEL 41
PANEL 44

20 21
FINISHING THE PANELS
17 SECOND COAT,
OUTSIDE CORNERS
AND METAL TRIM
Allow fi rst coat to dry
overnight (drying time
may vary, depending on
temperature, humidity and
jobsite conditions). Apply
second coat with 8" knife,
feathering slightly beyond
fi r s t c o a t .
18 THIRD COAT,
FLAT JOINTS AND
FASTENERS
Allow second coat to dry
overnight (drying time
may vary, depending on
temperature, humidity
and jobsite conditions).
If necessary, remove
imperfections with knife
or sandpaper. Apply a thin
fi nishing coat with a 10"
knife to the fl at joints and
a 5" knife to the fastener
heads. Press knife fi rmly
so joint compound fi lls
depressions but does
not signifi cantly add to
thickness. Feather edges at
least 2" beyond second coat.
TIPS
Do not sand unless it is
necessary. If you do sand,
use fi ne-grit sandpaper
and be careful not to scu
the gypsum panel paper to
minimize surface touch-up
requirements. Use dust
collection with HEPA fi lter
with power sanding. Wear a
dust mask if excessive dust
is produced and the area
cannot be ventilated.
Before applying the fi nal
coat,
check to see if tapered
joints are level with surface.
Hold the 10" blade across
the joint, straight out from
the wall. If the blade can
be rocked across the joint,
the joint is crowned. It must
be hidden by feathering
the fi nal coat out as far as
possible.
When applying earlier coats,
minor depressions and
grooves were not a problem.
However, do not leave any
during the application of this
fi nal coat or they will mar
the fi nished surface.
19 THIRD COAT, OUTSIDE
CORNERS AND METAL
TRIM
Allow second coat to dry
overnight (drying time
may vary, depending on
temperature, humidity and
jobsite conditions). Sand
lightly if necessary. Apply
third coat with 10" knife,
feathering slightly beyond
second coat. A third coat
is typically not required if
USG Sheetrock® Brand Plus
3® Lightweight All Purpose
Joint Compound is used.
20 SANDING
Allow third coat to dry
overnight (drying time
may vary, depending on
temperature, humidity
and jobsite conditions).
Lightly sand imperfections
in fi nished joints, corners
and over fastener heads.
Carefully remove sanding
dust with damp sponge.
Use a dust collection with
a HEPA fi lter with power
sanding. Wear a dust mask
if excessive dust is produced
and the area cannot be
ventilated.
TIP
Use a fi ne-grit sandpaper
wrapped around a block of
wood so you don’t dig into
the joint compound. Avoid
roughening the surface
paper when sanding. If you
do roughen it by
accident,
repair the damage by
applying a little joint
compound with a 5" knife.
PANEL 49
PANEL 51
PANEL 12 PGS 20 &.21
PANEL 13 PG. 21
PANEL 52
PANEL 12 PGS 20 &.21
PANEL 13 PG. 21
PANEL 50
PANEL 54
PANEL 53

22 23
FINISHING THE PANELS
Wet Sanding
When only minimal sanding
is needed, try wet sanding
with a sponge. It eliminates
dust and does not scu the
surface paper. Use a small-
celled polyurethane sponge
similar in appearance to
carpet padding. Saturate
sponge and wring to prevent
dripping. Rub joints to
remove high spots, using as
few strokes as possible.
Clean the sponge frequently
during use. Wear a dust
mask if excessive dust is
produced and the area
cannot be ventilated.
21 STORAGE AND
CLEANUP
Before storing unused joint
compound, clean sides
and lid of container so no
dried compound falls into
the mixture. Level joint
compound surface with
knife and cover container
tightly. If storing for an
extended period, cover
surface of joint compound
with approximately 1/2"
of clean water and cover
container. Do not store in
direct sunlight or where
freezing conditions may
occur. Pour o water before
reusing joint compound.
Clean tools with warm,
soapy water.
Decorating the Panels
22 PRIMING
Prior to painting, apply
USG Sheetrock® Brand
First Coat™ Primer or a
high quality, high solids
fl at latex paint. Follow
the manufacturer’s
recommendations. For best
results, use a high-quality
roller with 1/8" to 1/4" nap.
TIP
Keep the roller wet during
application and do not
rework the primer once it’s
applied. Overworking the
primer may thin or remove
underlying compound.
23 PAINTING AND
TEXTURING
After the prime coat is
dry, apply USG Sheetrock®
Brand Wall and Ceiling
Texture Paint or a high
quality interior paint. Follow
the recommendations on
the container.
When repairing damaged
panels, the ideal products
to use are USG Sheetrock®
Brand Easy Sand™
Lightweight Setting-Type
Joint Compounds described
on page fi ve under Finishing
Products.
1 PATCHING DENTS,
VO
IDS, HOLES, POPPED
NAILS AND CRACKS
a. To repair a dent, sand
and then fi ll with joint
compound. Let harden. Add
second coat if necessary.
Sand and prime when dry.
b. To repair a small hole or
crack, trim any loose pieces
from the damaged area
and wipe it clean. Fill with
joint compound, using a
putty knife. Let harden. Add
second coat if necessary.
Sand and prime when dry.
c. To repair a popped nail,
drive and dimple new nail
1-1/2" from popped nail.
Drive and dimple popped
nail. Cover with joint
compound. Sand and prime
when dry.
2 PATCHING MEDIUM
HOLES
a. Trim any loose pieces from
the
damaged area using a
knife and wipe it clean.
b. Apply generous amounts
of joint compound around
edges and coat the
perimeter of hole.
c. Crisscross two or three
strips of joint tape over
opening and embed tape
in joint compound. Let
harden.
PANEL 55
PANEL 56
PANEL 57
PANEL 59
NEW PANEL 18
PANEL 58
PANEL 60
CHANGED FOR PG 23
NEW FOR PG 24
NEW FOR PG 16
REPAIRING DAMAGED PANELS
24 25
REPAIRING DAMAGED PANELS
d. Apply coat of joint
compound over taped
area. Let harden and apply
second coat. Sand and
prime when dry.
3 REPAIRING
LARGE CRACKS
(OVER 1/8")
a. Trim any loose pieces
from the damaged area
using a knife and wipe
it clean.
b. Apply compound to crack
with 5" fi nishing knife.
c. Embed tape in compound
to bridge crack. Draw knife
fi rmly over crack to tightly
embed tape. Let compound
harden.
d. Apply compound over
tape with knife. Let harden
and apply second coat of
compound if necessary.
Sand and prime when dry.
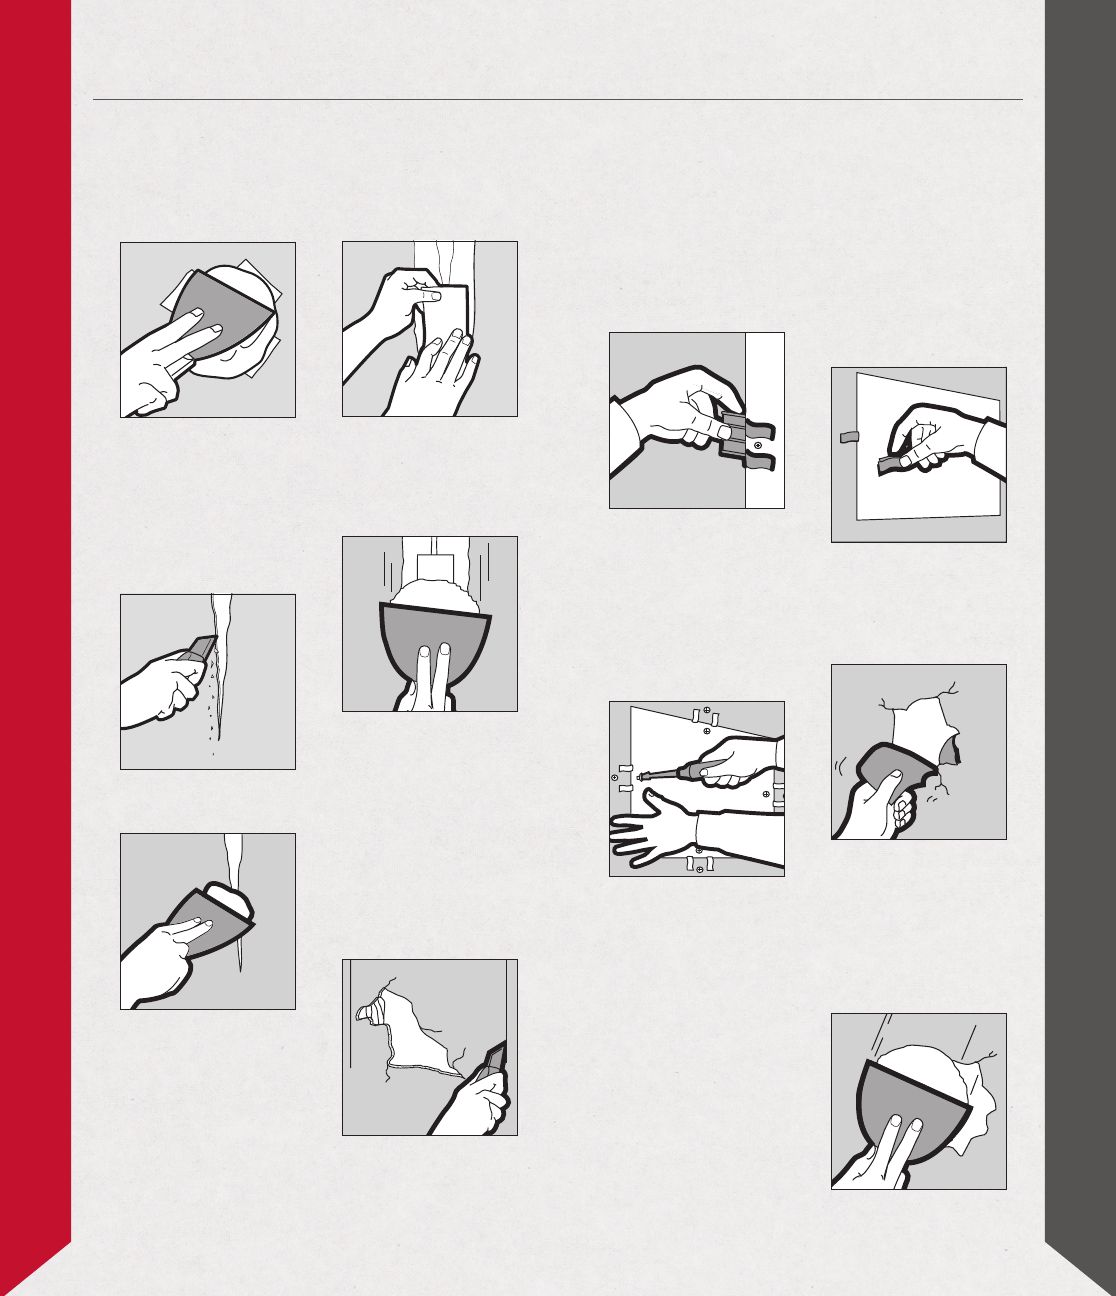
4 REPAIRING LARGE
HOLES (OVER 2") OR
WATER-DAMAGED
AREAS
a. Cut out damaged panel
section using a utility knife
along the studs and a
keyhole saw between the
studs. Remove section with
a hammer and remove old
screws or nails.
b. Slip drywall repair
clips onto the edge of the
damaged wall. Position
screws about 3/4" in from
the edge and centered
between the tabs. This will
line up the screws with
perforations in the clips.
Screw through wall into
each drywall repair clip.
c. Measure and cut new
drywall panel section to
fi t damaged area. Screw
through new drywall
into each drywall repair
clip. Screw into drywall,
positioning screw opposite
screw holding clip and about
3/4" from edge.
d. Remove tabs from each
drywall repair clip. Apply
compound and tape to
all four section sides. Do
not overlap tape. Apply
second and third coats of
joint compound, allowing
each coat to harden before
applying next coat and
feathering out from
previous coats. Sand and
prime when dry.
5 TORN GYPSUM PANEL
FACE PAPER
a. Peel and remove loose
face paper.
b. Apply a skim coat of joint
compound with a joint-
fi nishing knife to damaged
area and feather to get
a smooth fi nish. Let dry
and apply second coat if
necessary. Sand and prime
when dry.
Illustrations for Booklet on:
How to Install and Finish SHEETROCK
Brand Gypsum Panels
NEW FOR PG 9. NEW FOR PG 9. NEW FOR PG 12
NEW FOR PG 12 NEW FOR PG 14 NEW FOR PG 16
NEW FOR PG 17 NEW FOR PG 23
NEW FOR PG 24
NEW FOR PG 24
Illustrations for Booklet on:
How to Install and Finish SHEETROCK
Brand Gypsum Panels
NEW FOR PG 9. NEW FOR PG 9. NEW FOR PG 12
NEW FOR PG 12 NEW FOR PG 14 NEW FOR PG 16
NEW FOR PG 17 NEW FOR PG 23
NEW FOR PG 24
NEW FOR PG 24
PANEL 65
PANEL 69
PANEL 66
PANEL 70
PANEL 71
PANEL 63
PANEL 68
PANEL 67
CHANGED FOR PG 23
NEW FOR PG 24
NEW FOR PG 16

PRODUCT INFORMATION
See usg.com for the most up-to-date product information.
CUSTOMER SERVICE
800 621-9523
TECHNICAL SERVICE
800 USG.4YOU (874-4968)
WEBSITE
usg.com
NOTICE
We shall not be liable for incidental and consequential damages,
directly or indirectly sustained, nor for any loss caused by application
of these goods not in accordance with current printed instructions
or for other than the intended use. Our liability is expressly limited to
replacement of defective goods. Any claim shall be deemed waived
unless made in writing to us within thirty (30) days from date it was
or reasonably should have been discovered.
NOTE
Products described here may not be available in all geographic
markets. Consult your USG Company sales o ce or representative
for information.
SAFETY FIRST!
Follow good safety and industrial hygiene practices during handling
and installation of all products and systems. Take necessary
precautions and wear the appropriate personal protective equipment
as needed. Read Safety Data Sheets and related literature on
products before specifi cation and/or installation.
J371/rev. 9-15
© 2015 USG Corporation and/or its affiliates. All rights reserved. Printed in U.S.A.
The trademarks USG, DUR-A-BEAD, DURABOND, EASY SAND, FIRECODE, FIRECODE 30, FIRST COAT,
MOLD TOUGH, PLUS 3, SHEETROCK, IT’S YOUR WORLD. BUILD IT., the USG logo, the design elements
and colors, and related marks are trademarks of USG Corporation or its affiliates.
