
QLab Setup Guide
for CL/QL/TF Series
2
Table of Contents
1. Introduction ......................................................................................................... 3
2. What you can control from QLab ........................................................................ 3
3. Equipment used .................................................................................................. 4
4. Downloading the script template ......................................................................... 5
5. Connecting the console and Mac ........................................................................ 6
6. Configuring the IP addresses .............................................................................. 7
7. Configuring the script templates .......................................................................... 8
8. Programming QLab (for CL/QL series) ............................................................. 10
8-1. Recalling Scenes ............................................................................................ 12
8-2. Setting input channel on/off, pan and fader levels ........................................... 13
9. Programming QLab (for TF series) ................................................................... 16
9-1. Recalling Scenes ............................................................................................ 17
9-2. Setting the channel on/off, pan and fader levels of each channel .................... 19
History
August 2019 v1.0 released
All Yamaha products described in this document are the registered trademarks of Yamaha Corporation.
All pictures, graphics and screenshots of QLab are used by courtesy of Figure 53, LLC. All rights reserved.
3
1. Introduction
This guide describes how CL/QL/TF series is remotely controlled by QLab, the industry standard
show control software running on Mac, how to set up and configure the system, and how to use
the script templates available on our website. Please note, CL/QL/TF can be also controlled by
using Terminal application for sending commands to the console. However, this document
specifically explains how to run Python scripts on QLab for controlling it.
2. What you can control from QLab
By using QLab, you can remotely control the following functions and parameters:
・ Recall Scenes
・ Turn on/off each input channel
・ Set the pan of each input channel (to the Stereo bus)
・ Set the Fader level of each input channel

4
3. Equipment used
This guide will utilize the following equipment and software
・ Yamaha CL3 (Version 3.11 or later) and Yamaha TF (Version2.00 or later)
・
Figure 53 QLab 4 (Audio or Bundle edition) running on Mac (Mac OSX10.10[Yosemite] or
higher is required)
[Figure 53 QLab 4 (Audio)]
・ Script Template
[Script Template (zip file)]

5
4. Downloading the script template
The script template file can be downloaded from the Downloads page of CL/QL series on our
website:
https://usa.yamaha.com/files/download/other_assets/0/1266290/Python_Script_Template_V100.zip
(US website)
Unzip the downloaded file and you will find the included files as below. Please make sure that the
folder is saved on the Desktop so you can smoothly follow the instructions later in this document.
[Unzipped script templates]
6
[Python_Script_Template_V100.zip] – included files
・ command_list.pdf – A list of commands to be used for controlling the console
・ command.py – a Python script file for handling the control commands
・ Readme_EN.pdf/Readme_JA.pdf – a readme file for instruction
・ recall_a.py/recall_b.py – A script file for recalling Scene (for TF series console)
・ recall.py – A script file for recalling scene (for CL/QL series console)
・ TFXQLab folder – A sample package for controlling TF containing QLab file, TF Console
file, Python script files etc.)
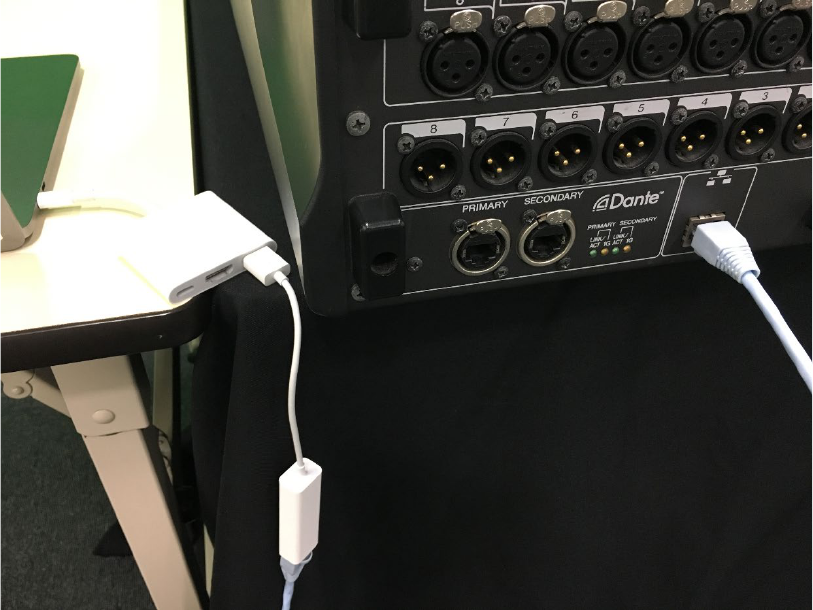
5. Connecting the console and Mac
Once you have downloaded the Script Template file and unzipped it, now we will connect the
console and your Mac via LAN cable. You can use a switch or directly connect them to each other.
Use the console’s LAN port rather than Dante port.
[Connect the console and Mac via LAN cable]

7
6. Configuring the IP addresses
Next, set the IP address of the Console and Mac. The IP address of the CL/QL series needs to
be set in FOR MIXER CONTROL (not FOR DEVICE CONTROL) in NETWORK screen while it
needs to be set in [NETWORK] – [Static IP] for TF series. Here, the address is set at
192.168.0.128 with the subnet mask of 255.255.255.0.
[NETWORK – FOR MIXER CONTROL(CL/QL)]
[NETWORK – Static IP (TF)]

8
On Mac, the address also needs to be set manually with the same network address (192.168.0.x)
as well as the same subnet mask (255.255.255.0). Here, set the following parameters:
・ Configure IPv4 Manually
・ IP Address 192.168.0.100
・ Subnet Mask 255.255.255.0
[Settings - Network]
7. Configuring the script templates
For CL/QL, next thing to do is to configure the script templates that you have downloaded and
unzipped on your desktop. First, open “command.py” file, and make sure the “host =
“192.168.0.128”” line shows the IP address of the console that you have set. Change those
numbers accordingly, if you have set a different IP address and save the files.

9
[command.py]
Similarly, check the same “host =” line in the “recall.py” file and make sure the IP address is the
same as that of the console.
[recall.py]
And for TF, open “recalla0.py”, “recallb1.py” and “MultiCh.py” in “TFxQLab” folder and make sure
the “host = “192.168.0.128”” line is the IP address of the console that you have set. Change the
address accordingly if you have set a different IP address and save the files.

10
8. Programming QLab (for CL/QL series)
QLab allows you to control the following functions and parameters of CL/QL.
・ Recall Scenes
・ Turn on/off each input channel
・ Set the pan position and the Fader level of each input channel
In order to control the console, we will use the “Script Cue” function of QLab.
Script cues allow you to execute AppleScripts from within QLab. Here, in this example, Script
Cues running on QLab will run python scripts in AppleScript, while the python scripts will send the
control commands to the console.
QLab 4 Script Cue
In QLab, open a New Workspace from the File menu and a blank workspace will open.
[QLab File Menu]
Apple Scripts
run python scripts
Python scripts
send out the control
commands

11
[QLab’s blank Workspace]
Click on the icon and a blank script cue will be created. Click on the “Script” tab and you will
see a text field in which you can program the AppleScript codes.
[QLab Script Cue]

12
8-1. Recalling Scenes
In the text field, by default, there is the following text:
Between the two lines, add the following line:
do shell script "python ~/Desktop/Python_Script_Template_V100/recall.py 1"
The number at the end of the line after “recall.py” (“1” in this case), is the Scene number to be
recalled and if you want to recall Scene 8, for example, type:
do shell script "python ~/Desktop/Python_Script_Template_V100/recall.py 8"
Once you have typed the line, click on the “Compile Script” button and see if the script is compiled
without an error.
Then, name each Script Cue (such as “Scene 1 Recall”) so you can easily understand what each
cue will do.

13
Click on the target row, and then click on “GO” button or hit the space bar, and the target Scene
will be recalled.
8-2. Setting input channel on/off, pan and fader levels
In addition to recalling Scenes, you can set the on/off statuses, pan levels and the fader levels of
the input channels at the same time, or separately.
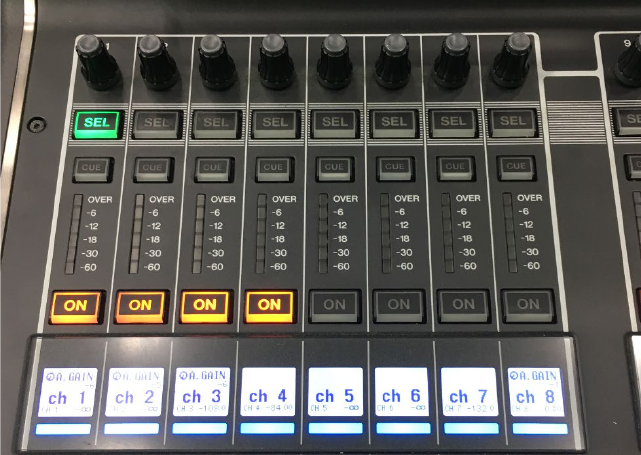
First, we will turn on the input channels 1-4 while turning off the input channels 5-8. Add a new
Script cue, type (or copy & paste) the following lines in the script and compile it.
do shell script "python ~/Desktop/Python_Script_Template_V100/command.py set MIXER:Current/InCh/Fader/On 0 0 1"
do shell script "python ~/Desktop/Python_Script_Template_V100/command.py set MIXER:Current/InCh/Fader/On 1 0 1"
do shell script "python ~/Desktop/Python_Script_Template_V100/command.py set MIXER:Current/InCh/Fader/On 2 0 1"
do shell script "python ~/Desktop/Python_Script_Template_V100/command.py set MIXER:Current/InCh/Fader/On 3 0 1"
do shell script "python ~/Desktop/Python_Script_Template_V100/command.py set MIXER:Current/InCh/Fader/On 4 0 0"
do shell script "python ~/Desktop/Python_Script_Template_V100/command.py set MIXER:Current/InCh/Fader/On 5 0 0"
do shell script "python ~/Desktop/Python_Script_Template_V100/command.py set MIXER:Current/InCh/Fader/On 6 0 0"
do shell script "python ~/Desktop/Python_Script_Template_V100/command.py set MIXER:Current/InCh/Fader/On 7 0 0"
14
After compiling, run the script and make sure if the input channels 1-8 are turned on/off
accordingly.
[Channel on/off remotely controlled]
For setting the pan positions of the input channels 1-8, add a new Script Cue, type the following
lines in the script and compile it. Please note, -63 is hard left, while 0 is the center and 63 is hard
right.
do shell script "python ~/Desktop/Python_Script_Template_V100/command.py set MIXER:Current/InCh/ToSt/Pan 0 0 -63"
do shell script "python ~/Desktop/Python_Script_Template_V100/command.py set MIXER:Current/InCh/ToSt/Pan 1 0 -45"
do shell script "python ~/Desktop/Python_Script_Template_V100/command.py set MIXER:Current/InCh/ToSt/Pan 2 0 -30"
do shell script "python ~/Desktop/Python_Script_Template_V100/command.py set MIXER:Current/InCh/ToSt/Pan 3 0 -10"
do shell script "python ~/Desktop/Python_Script_Template_V100/command.py set MIXER:Current/InCh/ToSt/Pan 4 0 10"
do shell script "python ~/Desktop/Python_Script_Template_V100/command.py set MIXER:Current/InCh/ToSt/Pan 5 0 30"
do shell script "python ~/Desktop/Python_Script_Template_V100/command.py set MIXER:Current/InCh/ToSt/Pan 6 0 45"
do shell script "python ~/Desktop/Python_Script_Template_V100/command.py set MIXER:Current/InCh/ToSt/Pan 7 0 63"
And for setting the Fader levels of the input channel 1-8, add another Script Cue, type the following
lines and compile it.
do shell script "python ~/Desktop/Python_Script_Template_V100/command.py set MIXER:Current/InCh/Fader/Level 0 0 0"
do shell script "python ~/Desktop/Python_Script_Template_V100/command.py set MIXER:Current/InCh/Fader/Level 1 0 -1000"
do shell script "python ~/Desktop/Python_Script_Template_V100/command.py set MIXER:Current/InCh/Fader/Level 2 0 -2000"
do shell script "python ~/Desktop/Python_Script_Template_V100/command.py set MIXER:Current/InCh/Fader/Level 3 0 -3000"
do shell script "python ~/Desktop/Python_Script_Template_V100/command.py set MIXER:Current/InCh/Fader/Level 4 0 -5000"
do shell script "python ~/Desktop/Python_Script_Template_V100/command.py set MIXER:Current/InCh/Fader/Level 5 0 -10000"
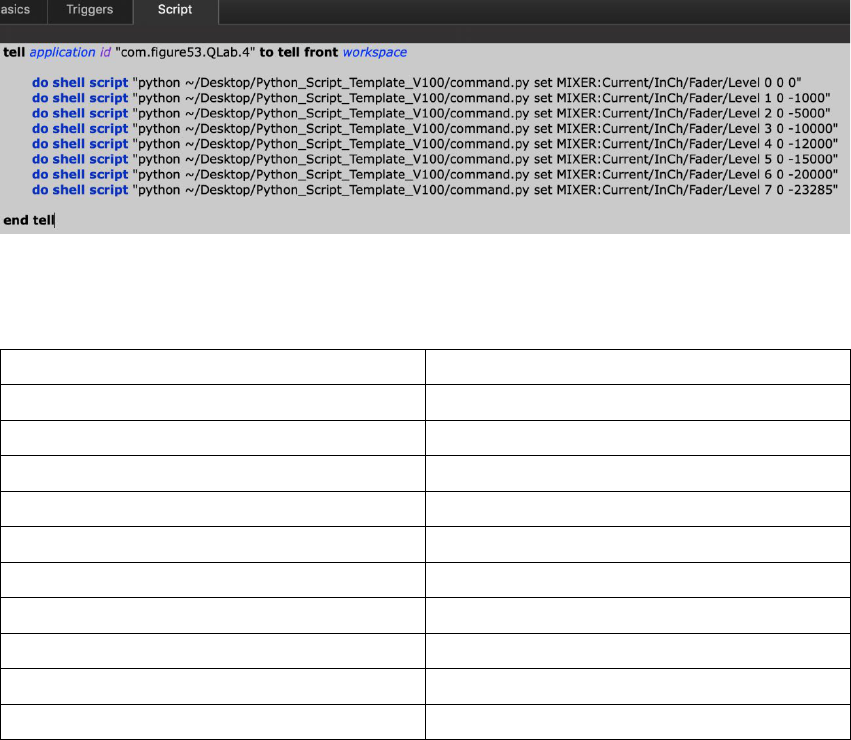
15
do shell script "python ~/Desktop/Python_Script_Template_V100/command.py set MIXER:Current/InCh/Fader/Level 6 0 -12000"
do shell script "python ~/Desktop/Python_Script_Template_V100/command.py set MIXER:Current/InCh/Fader/Level 7 0 -23285"
And below is a simple chart comparing the Fader levels and their Fader levels.
Desired Fader Level
Fader value to be set
+10dB
1,000 [maximum]
+1dB
100
0dB
0
-10dB
-1,000
-20dB
-2,000
-30dB
-3,000
-50dB
-5,000
-99dB (-100dB is not available)
-10,000
-120dB
-12,000
-Infinity dB
-32,768[minimum] - -23,285
16
9. Programming QLab (for TF series)
For TF users, we have prepared a sample project package in the “TFxQLab” folder which contains.
Please make sure to move “TFxQLab” Folder and all files in the folder out of the unzipped folder
onto your Desktop.
・ TF Console file (TF_ConsoleFile.tff)
・ QLab Workspace file (QLab_File.qlab4)
・ recalla0.py
・ recallb1.py
・ MultiCh.py
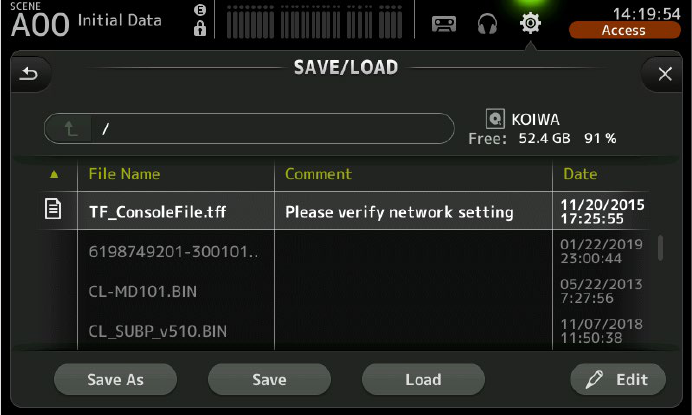
First, load the Console file onto TF.
[Loading TF_ConsoleFile.tff]

17
Next, run QLab and open the “QLab_File.qlab4”
[Opening QLab_File.qlab4]
9-1. Recalling Scenes
With TF, there are two groups of Scenes (A/B) , and we have two python files for recalling the
Scene A0 (“recalla0.py”) and B1 (“recallb1.py”) respectively.
[TFxQLab folder]
18
For recalling Scene B1, simply run the first Script Cue on QLab, and for recalling Scene A0, run
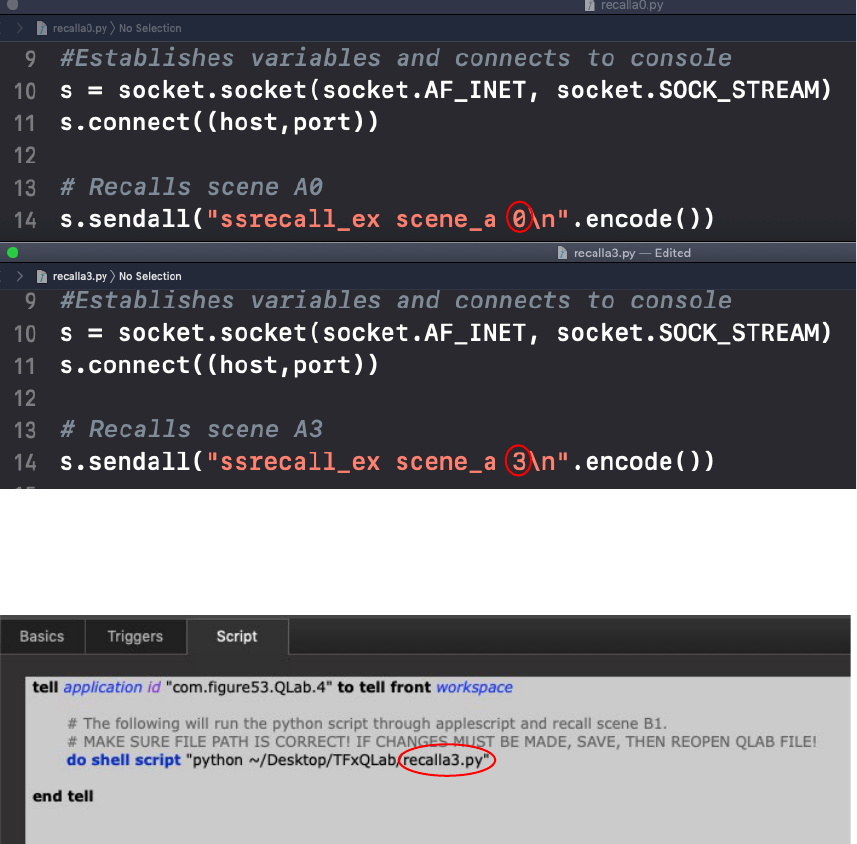
the second Script Cue. If you would like to edit “recalla0.py” so another Scene, A3 for example,
is recalled, change the “argument” (a variable associated with a function), change it from 0 to 3
in the example below. Save it with a different file name (such as “recalla3.py”)
Going back in the Script Cue of QLab4, change the script file to be triggered accordingly.
do shell script "python ~/Desktop/TFxQLab/recalla3.py"

19
9-2. Setting the channel on/off, pan and fader levels of each channel
In this example, setting the on/off statuses and the Fader levels can be done at a time by editing
the “MultiCh.py”.
[MultiCh.py]
To set the input channel on/off, edit the numbers in red and blue as below:
s.sendall(“set MIXER:Current/Inch/Fader/On 0 0 0\n”.encode())
Channel number (0=Input Channel 1, 1=Input Channel2…)
1=ON, 0=OFF
Similarly, for setting the pan position and the Fader level of each input channel, edit:
s.sendall(“set MIXER:Current/Inch/ToSt/Pan 0 0 0\
n”.encode())
Channel number (0=Input Channel 1, 1=Input Channel2…)
-63=L63, 0=Center, 63=R63
s.sendall(“set MIXER:Current/Inch/Fader/Level 0 0 0\n”.encode())
Channel number (0=Input Channel 1, 1=Input Channel2…)
-32,768=-Infinity dB, 1000=+10.00 dB

