
Safety, Storage, Installation,
Operation & Maintenance Manual
Flooded Lead-Acid Batteries
C, D, E, F and G
Publication No. US-FL-IOM-AA September 2016
This manual provides instructions regarding safety, storage, installation, operation and
maintenance. Failure to
observe the precautions as presente
d may result in injury or loss of life.
This document is proprietary to EnerSys. This document cannot be copied or reproduced in
whole or in
part, nor ca
n its contents be revealed in any manner or to any person except to meet
the purpose for which it was delivered, without the express written permission of EnerSys.

www.enersys.com Publication No. US-FL-IOM-AA September 2016 i
GENERAL SAFETY INSTRUCTIONS
Warnings in this manual appear in any of three ways:
The danger symbol is a lightning bolt mark enclosed in
a triangle. The danger symbol is used to indicate
imminently
hazardous situations, locations and
conditions which, if not avoided, WILL result in death,
serious injury and/or severe property damage.
Danger
The warning symbol is an exclamation mark in a
triangle. The warning symbol is used to indicate
potentially hazardous situations and conditions, which,
if not avoided, COULD result in serious injury or death.
Severe property damage COULD also occur.
Warning
The caution symbol is an exclamation mark enclosed
in a triangle.
The caution symbol is used to indicate
potentially h
azardous situations and conditions, which,
if not avoided, may result in injury. Equipment damage
may also occur.
Caution
Other warning symbols may appear along with the Danger, Warning, and Caution symbol and
are used to specify special hazards. These warnings describ
e particular areas where special
care and/or procedures are required in order to prevent serious injury and possible death:
The electrical warning symbol is a lightning bolt mark
enclosed in
a triangle. T
he electrical warning symbol is
used to indicate high voltage locat
ions and conditions,
which may cause serious injury or death if the proper
precautions are not observed.
Electrical
warnings
The explosion warning symbol is an explosion mark
enclosed in
a triangle. T
he explosio
n warning symbol is
used to indicate locations and conditions where
molten, exploding parts may cause serious injury or
death if the proper precautions are not observed.
Explosion
warnings

ii
www.enersys.com Publication No. US-FL-IOM-AA September 2016
IMPORTANT SAFETY INSTRUCTIONS
DANGER
A battery can present a risk of electrical shock and high short circuit current.
The following precautions should be observed when working with batteries:
1. Verify that the Charging Power Supply to the battery is off and that all power is
disconnected from the power source.
2. Remo
ve watches, rings or other metal objects.
3. Use tools with insulated handles to prevent inadvertent shorts.
4. Wear rubber gloves and boots.
5. Do not lay tools or metal parts on top of batteries.
6. Determine if the battery is inadvertently grounded. If inadvertently grounded, remove
source of g
round. Contact with an
y part of a grounded battery can result in electrical
shock. The likelihood of such shock will be reduced if such grounds are removed during
installation and maintenance.
7. Verify circuit polarities before making connections.
8. Disconnect charging source and load before connecting or disconnecting terminals.
9. Vented lead-acid (VLA) batteries can contain an explosive mixture of hydrogen gas. Do
not smoke, cause a fl
ame or spark in the immediate area of the batteries. This includes
static electricity from the body and other items that may come in contact with the battery.
10. Use proper lifting means when moving batteries and wear all appropriate safety clothing
and equipment.
11. Do not dispose of lead acid batteries except through channels in accordance with local,
state and fe
deral regulations.

www.enersys.com Publication No. US-FL-IOM- AA September 2016 iii
IMPORTANT SAFETY INSTRUCTIONS
SAVE THESE INSTRUCTIONS
This manual contains important instructions for Flooded Lead-Acid Battery Systems that should
be followed during the installation an
d maintenance of the battery system.
Only a qualified EnerSys service representative who is knowledgeable in batteries and the
required precautions should perform servicing of the batteries. Keep unauthorized personnel
away fro
m batteries.
Misuse of this equipment could result in human injury and
equipment damage. In no event will EnerSys be responsible or
liable for either indirect or consequential damage or injury that may
result from the use of this equipment.
Caution
Caution
Do not dispose of the batteries in a fire. The batteries may
explode.
Caution
Do not mutilate the batteries. Released electrolyte is harmful to
the eyes and skin and may also be toxic.
This unit contains flood
ed lead acid batteries. Lack of preventative
maintenance could resu
lt in batteries exploding
and emitting
gasses and/or flame. An authorized, trained technician must
perform annual preventative maintenance.
Warning
Failure to replace a battery before it becomes exhausted may
cause the case to crack, possibly releasing ele
ctr
olyte from inside
the battery and resulting in secondary faults such as odor, smoke
and fire.
Warning
Installation and servicing of batteries should be performed by
personnel knowledgeable about batteries and the required
precautions. Keep unauthorized personnel away from the
batteries.
Warning
Proper maintenance to the battery system of this unit must be done
by a qualified service technician. This is essential to the safety and
reliability of your power supply system.
Warning

iv
www.enersys.com Publication No. US-FL-IOM-AA September 2016
TABLE OF CONTENTS
GENERAL SAFETY INSTRUCTIONS ..........................................................................................i
1.0
GENERAL INFORMATION ........................................................................................ 1
1.1 Introduction ................................................................................................................. 1
1.2 Precautions .................................................................................................................1
1.3 Service ........................................................................................................................1
2.0
SAFETY ...................................................................................................................... 2
2.1 General .......................................................................................................................2
2.2 Safety Equipment and Clothing................................................................................... 2
2.3 Safety Precautions ...................................................................................................... 3
2.3.1 Sulfuric Acid Burns .......................................................................................... 3
2.3.2 Explosive Gases.............................................................................................. 4
2.3.3 Electrical Shocks and Burns............................................................................ 4
3.0
INSPECTING BATTERY SHIPMENT......................................................................... 6
3.1 General .......................................................................................................................6
3.2 Visible External Damage.............................................................................................6
3.3 Concealed Damage ....................................................................................................7
4.0
BATTERY STORAGE BEFORE INSTALLATION ..................................................... 8
4.1 General .......................................................................................................................8
4.2 Storage Interval...........................................................................................................8
4.3 Advance Preparation................................................................................................... 8
5.0
INSTALLATION CONSIDERATIONS ........................................................................ 9
5.1 General .......................................................................................................................9
5.2 Considerations for Connecting the Battery System to Operating Equipment............ 11
5.3 Considerations for Parallel Installation......................................................................11
6.0
UNPACKING AND HANDLING FOR INSTALLATION............................................12
6.1 General .....................................................................................................................12
6.2 Recommended Installation Equipment and Supplies................................................12
6.3 Cell/Jar Handling.......................................................................................................13
6.3.1 Small Cell Handling (C) ................................................................................. 13
6.3.2 Medium Cell Handling (E and F) ................................................................... 13
6.3.3 Large Cell Handling (D and G) ...................................................................... 15
7.0
SYSTEM INSTALLATION ........................................................................................18
7.1 System Layout ..........................................................................................................18
7.2 Installation Considerations ........................................................................................19
7.2.1 Installation Precautions ................................................................................. 19
7.2.2 Arrangement.................................................................................................. 19
7.2.3 Spacing ......................................................................................................... 19
7.3 Battery Installation..................................................................................................... 20
7.4 Preparing and Installing Connections .......................................................................23
7.4.1 Terminal Posts .............................................................................................. 23
7.4.2 Intercell Connectors ...................................................................................... 23
7.4.3 Terminal Plates ............................................................................................. 26

www.enersys.com Publication No. US-FL-IOM-AA September 2016 v
8.0
INITIAL and/or FRESHENING CHARGE.................................................................28
9.0
OPERATION .............................................................................................................30
9.1 Float Operation..........................................................................................................30
9.2 Hydrometer Readings - Specific Gravity ...................................................................31
9.3 Full-Charge Specific Gravity......................................................................................31
9.4 Equalizing Charge .....................................................................................................33
9.4.1 Equalizing Charge Method ............................................................................ 33
9.5 Operating Temperature .............................................................................................34
10.0
BATTERY TAPS.......................................................................................................35
11.0
PILOT CELL .............................................................................................................35
12.0
MAINTENANCE ........................................................................................................35
12.1 Battery Cleaning........................................................................................................35
12.1.1 Standard Cleaning.......................................................................................35
12.1.2 Corrosion Cleaning......................................................................................36
12.1.3 Heavy Corrosion Cleaning...........................................................................36
12.1.4 Cleaning Flame Arrestors............................................................................37
12.1.5 Replacing or Isolating a Cell........................................................................37
12.2 Maintenance Records ...............................................................................................37
12.3 Corrective Actions .....................................................................................................39
12.4
Adding Water.............................................................................................................39
12.5 Quality of Water.........................................................................................................40
Storage Battery Report - Battery in Float Service .......................................................................41
12.6
Filling and Charging Moist-Charged Cells.................................................................42
13.0
TEST PROCEDURES...............................................................................................44
13.1 Procedure for Battery Capacity Tests........................................................................44
APPENDIX - HYDROGEN EVOLUTION CALCULATION.........................................................46

www.enersys.com Publication No. US-FL-IOM-AA September 2016 Page 1
1.0 GENERAL INFORMATION
1.1 Introduction
EnerSys flooded lead-acid batteries set the benchmark for reliability and durability in flooded
lead-acid batteries and battery systems.
1.2 Precautions
BEFORE UNPACKING, STORING, HANDLING, INSTALLING, OPERATING OR
PERFORMING MAINTENANCE ON THE FLOODED LEAD-ACID STATIONARY BATTERY
SYSTEM
READ
THE FOLLOWING
INFORMATION THOROUGHLY!
It is important to read, understand and strictly follow the instructions in this manual.
If the following precautions are not fully understood, or if local conditions are not covered,
contact your nearest EnerSys sales/service repr
esentative for clarification, or call the corporate
office number listed on the back of this manual and ask for EnerSys Reserve Power Service.
Also, refer to all applicable federal, state and local regulations and industry standards.
YOU SHOULD BE TRAINED IN HANDLING, INSTALLING, OPERATING AND MAINTAINING
BATTERIES BEFORE YO
U WORK ON ANY
BATTERY SYSTEM.
1.3 Service
Should you require installation supervision, service, parts, accessories or maintenance,
EnerSys has a nationwide service organization to assist with your new battery purchase.
Please call your nearest EnerSys sales/service representative for more information, or, call the
corporate office number listed on the back of this manual and ask for EnerSys Res
erve Power
Service.

Page 2
www.enersys.com Publication No. US-FL-IOM-AA September 2016
2.0 SAFETY
2.1 General
All flooded, lead-acid batteries, may leak, release hydrogen gas or cause acid misting. Always
follow the generally accepted safety procedures for handling batteries. In addition, it is vitally
important that you observe the precautions recommended in this manual.
YOU SHOULD BE TRAINED IN HANDLING, INSTALLING, OPERATING AND
MAINTAINING BATTERIES BEFORE YOU WORK ON ANY BATTERY SYSTEM.
You MUST understand the risk of working with batteries and BE PREPARED and
EQUIPPED to take the necessary safety precautions. If not, contact EnerSys Reserve
Power Service.
2.2 Safety Equipment and Clothing
When working with any battery system, be sure you have the necessary tools and safety
equipment, including but not limited to:
• insulated tools • rubber apron • face protection / face shield
• rubber gloves • safety goggles • emergency eye wash and
shower, if available
• fire extinguisher • acid spill cleanup kit
ALWAYS:
• remove all jewelry (i.e., rings, watches, chains, etc.)
• keep sparks, flames and smoking materials away from the battery
NEVER lay tools or other metallic objects on the battery/cell.
Using the correct tools and wearing proper safety equipment will help prevent injury should an
accident occur.

www.enersys.com Publication No. US-FL-IOM-AA September 2016 Page 3
2.3 Safety Precautions
2.3.1 Sulfuric Acid Burns
Batteries are safe when operated and handled properly. However, they do contain sulfuric acid,
which can cause burns and other serious injuries.
Always wear protective clothing AND use the correct safety tools.
In case of S
KIN CONTACT
with sulfuric acid, IMMEDIATELY
1. REMOVE contaminated CLOTHI
NG
2. FLUSH the area THOR
OUGHLY with WATER
3. Get MEDICAL ATTENTION, if required.
In case of EYE CONTA
CT with sulfuric acid, IMMEDIATELY
1. FLUSH THOROUGHLY for at least 15 minutes with
large amounts of WATER.
2. Get MEDICAL ATTENT
ION.
In case of
sulfuric acid CONTACT WITH CLOT
HING OR
MATERIAL, IMMEDIATELY
1. REMOVE C
ONTAMINATED CLOTHING
2. Apply a solution of sodiu
m
bicarbonate solution (
1.0 lb/1.0
gal or 0.5 kg/5.0 liters of water) on the clothing or material.
3. Apply the solution until bubbling stops, then rinse
with clean
water.
NOTE: In case of a sulfuric acid SPILL, bicarbonate of soda or an emergency spill kit
should be within the battery room in accordance with OSHA regulation
1910.178g2.

Page 4
www.enersys.com Publication No. US-FL-IOM-AA September 2016
2.3.2 Explosive Gases
Batteries can generate gases which, when released, can explode, causing blindness and other
serious personal injury.
• Always wear protective clothing and use the correct safety tools.
• Eliminate any potential of sparks, flames or arcing.
• Provide adequate ventilation. See Appendix.
IN CASE OF FIRE: To extinguish a fire in a battery room containing lead acid batteries, use
CO2, foam, or dry chemical extinguishing media. Do NOT discharge t
he extinguisher directly
onto the battery. The resulting thermal shock may cause cracking of the battery case/cover.
SPECIAL PROCEDURES:
If batteries are on charge, shut off power. Use positive pressure, self-contained breathing
apparatus.
Water applied to elec
trolyte generates heat and causes it to splatter. Wear acid-
resistant clothing.
TOXIC FUMES:
Burning plastic may cause toxic fumes. Leave area as soon as possible if toxic fumes are
present. We
ar breathing apparatus if
required to remain in the area.
2.3.3 Electrical Shocks and Burns
Multi-cell battery systems can attain high voltage and/or currents. Do NOT
touch uninsulated batteries, connectors or terminals. To prevent serious
electrical burns and shock, use EXTREME CAUTION when working
with the system.
• Always wear protective clothing and use nonconductive or insulated tools when
working with ANY battery system.
• Remove all jewelry that could produce a short circuit.
BEFORE working on th
e system:
1.
Disconnect ALL loads
and power sources to t
he battery. Use appropriate lockout/tagout
procedures.
2. If working on an assembled battery system, sectionalize (interrupt the
battery in sections)
into safe working voltage levels.
3. Check the battery system grounding. Grounding of
the battery system is NOT
recommended. However, grounding of the rack is recommended
.

www.enersys.com Publication No. US-FL-IOM-AA September 2016 Page 5
IF BATTERY SYSTEM IS GROUNDED (system is intentionally gro
unded by connecting a
battery terminal to ground):
1. a shock hazard exists between all o
ther terminals and
ground (i.e., dirt and acid on top of battery cell touching
rack).
2. if an unintentional ground developes within the already
grounded system, a short circuit may occur and cause
cause explosion or fire.
IF BATTERY SYSTEM IS UNGROUNDED (system is NOT grounded):
1. if an uninte
ntional ground develops within the
system, an
increased shock hazard exists between the terminals and
ground.
2. if a second unintentional ground develops within the already
unintentionally grounded system, a short circuit may occur
and cause explosion or fire.
Therefore, should you be required to work on a grounded battery system, make absolutely sure
you use the correct safety precautions, equipment and clothin
g.
IMPORTANT!!
If you have ANY question concerning safety when working with the battery system, contact your
local EnerS
ys sales/service representative to clarify any of the noted safety precautions, or, call
the corporate office number listed on the back of this manual and ask for EnerSys Reserve
Power Service.

Page 6
www.enersys.com Publication No. US-FL-IOM-AA September 2016
3.0 INSPECTING BATTERY SHIPMENT
3.1 General
Precautions have been taken to pack the cells/battery units for shipment to ensure its safe
arrival. However, upon receipt, you should inspect for evidence of damage that may have
occurred during transit.
WARNING
During inspections, take precautions against electrical shock.
You are handling LIVE batteries.
3.2 Visible External Damage
IMMEDIATELY upon delivery (while the carrier representative is still on-site), inventory all
materials against the Bill of Lading and inspect for visible external damage.
Check material quantities received against the Bill of Lading, including the number of battery
pallets and the number of accessory boxes.
Note any:
•
damage to packing mate
rial.
• wetness or stains, indicating electrolyte leakage.
If damage is noted:
1. Make a descriptive nota
tion on the delivery receipt before sig
ning.
2. Request an inspection by
the carrier.
3. File a damage report.

www.enersys.com Publication No. US-FL-IOM-AA September 2016 Page 7
3.3 Concealed Damage
Within 15 days of receipt (or as soon as practical), unpack the cells and check for
concealed damage.
Remember, you are handling a LIVE battery. Take
precautions against a shock hazard. Follow all safety precautions as noted in
Section 2.0.
Examine the electrolyte level to ensure that none has been spilled. If electrolyte has been lost in
transit and t
he lev
e
l is less than 1/2 inch (12 mm) below the top of the plates, add Battery Grade
sulfuric acid electrolyte of the nominal operating specific gravity indicated on the cell nameplate,
and bring to the low level line on open circuit.
If the electrolyte level is more than 1/2 inch (12 mm) below the top of the plates, request an
inspection
b
y
a representative of the carrier and file a claim for concealed damage.
NOTE: For export, cells are usually shipped assembled, moist charged with
separate electrolyte. Fill when ready to place in service, not before.
Refer to Section 12.6, “Filling and Charging Moist-Charged Cells”.
Check the received materials against the detailed packing list to verify receipt of all materials in
the quantities specified.
DELAY IN
NOTIFYING THE CARRIER MAY RESULT IN LOSS OF YOUR RIGHT TO
REIMBURSEMENT FOR DAMAGES. Refer to the Bill of Lading, if, when performing the parts
inventory, you are unsure about the appearance of a part.
If you have questions concerning potential damages, contact your local EnerSys sales/service
representative, or, call the corporate office number listed on the back of this manual and ask for
EnerSys Reserve Power Service.

Page 8
www.enersys.com Publication No. US-FL-IOM-AA September 2016
4.0 BATTERY STORAGE BEFORE INSTALLATION
4.1 General
Batteries should be unpacked, installed and charged as soon as possible after receipt.
However, if
this
is
impractical, follow the instructions below for storing the battery before
installation.
Store batteries indoors in a clean, dry and cool location. Storage at higher temperatures will
result in accelerated rates of self-discharge an
d possible deterioration
of battery
performance
and life.
Do NOT stack pallets. DAMAGE MAY OCCUR AND THE WARRANTY WILL BE VOIDED.
4.2 Storage Interval
Do NOT store flooded batteries longer than the following intervals without giving periodic
freshening charges. Under higher temperature conditions, greater charging frequency may be
required. Use date of battery shipment to determine freshening charge requirements.
• Lead Antimony — every three months
• Lead Calcium — every six months
Storage times exceeding
the above may result in plate sulfation, which may adversely affect
electrical pe
rformance and expected life.
Give the battery a freshening charge before
the end of the recommended storage interval. See
Section 8 for charging information.
Repeat the freshening charge for each additional storage interval until th
e battery is installed.
Maximum total storage time before installation is two years from date of shipment from the
factory to the customer. Freshening charges are required a
minimum
of every three to six
months during the storage time period, as noted above.
4.3 Advance Preparation
If freshening time interval is likely to be exceeded in storage, make advance preparation to have
an adequate charger available and adjacent to an appropriate AC supply voltage. Positioning of
the cells to accept the temporary intercell connectors is another consideration of advance
planning. Keep cells on styrofoam pads until they are installed on the rack.
Make every effort to get the battery installed and connected to the charger before the expiration
of the stora
ge period, t
hereby avoi
ding the additional labor cost of preliminary freshening
charges.
WARNING
FAILURE TO CHARGE AS NOTED VOIDS THE BATTERY’S WARRANTY.

www.enersys.com Publication No. US-FL-IOM-AA September 2016 Page 9
BEFORE INSTALLATION
READ THIS SECTION THOROUGHLY.
5.0 INSTALLATION CONSIDERATIONS
5.1 General
If you have any questions concerning the installation considerations, contact your EnerSys
sales/ service representative. The diagrams shown are general representations and may not
depict all models and options.
When planning the system space requirements for the EnerSys flooded stationary batteries,
consider the following:
• space • ventilation
• environment • battery system configuration
• temperature • floor loading
• distance from operating equipment • floor anchoring
Use Table 5.1 to ensure that all requirements for installation location are considered.
TABLE 5.1
CONSIDERATION RECOMMENDATION
Space It is recommended that the aisle space provided in front of all racks be a
minimum of 36 inches (915 mm). The designer must verify the
requirements for aisle space in all applicable local codes or regulations.
A minimum of 9 inches (230 mm) is desirable above the tops of the cell
posts of the top row of cells to permit access for ma
intenance or cell
removal.
Each cell should be accessible for the addition of water and for taking
individual cell voltage and hydromete
r readings.
Environment
Clean, cool and dry. The location should be selected to keep water, oil, and
dirt away from all cells
.
Temperature
Ambient temperature between 72
o
- 78
o
F (23
o
- 26
o
C).
Elevated temperatures reduce operating life. Lower temperatures reduce
battery performance.
Minimize temperature variations between the cells.
• To avoid temperature variation between the cells, do NOT locate
the battery near HVAC ducts or exhausts, heat sources
(i.e., equipment that generates heat) or direct sunlight.

Page 10
www.enersys.com Publication No. US-FL-IOM-AA September 2016
Table 5.1 (continued)
CONSIDERATION RECOMMENDATION
Ventilation Adequate ventilation must be provided, so as to prevent hydrogen gas
from exceeding a 2% concentration as shown in IEEE 484-1987.
Hydrogen accumulation must be limited to less than 2% of the total
volume of the battery area
.
Ventilation must be adequate to ensure that pockets of trapped
hydroge
n gas do not develop, particularly at the ceiling.
See Appendix for additional information
Grounding It is recommended that the racks be grounded in accordance with NEC
and/or local codes.
Codes Building codes and fire codes may require a spill containment system
for battery installations. Please consult local building codes. EnerSys
offers spill containment systems. Contact your EnerSys sales/ service
representative for more information.
Floor Reasonably level. Shim up to 1/4 inch (6 mm) maximum to level battery
rack or cabinet front to rear and side to side. Capable of supporting the
weight of the battery as well as any auxiliary equipment.
Anchoring Anchoring should meet all local, state, and federal codes and all
industry standards.
Floor anchoring and its design are the responsibility of the user.
Racks EnerSys flooded stationary batteries designed for racks or cabinets
must be installed on racks specifically designed for those batteries by
the manufacturer. Use of any other rack design is the responsibility of
the user.

www.enersys.com Publication No. US-FL-IOM-AA September 2016 Page 11
5.2 Considerations for Connecting the Battery System to Operating
Equipment
The battery has been sized based on a specific load (amps or KW) for a specific run time to a
specific end voltage. Consult with the system/equipment supplier to determine these
parameters, because battery performance is based on these values, as measured at the battery
terminals.
Therefore, ensure that the load cables:
• between the battery and its load are the shortest routing possible to the terminal,
allowing sufficient additio
nal cable (about 6 inches/15 cm) for connect/disconnect.
• are the proper size to minimize the voltage drop between the battery output terminals
and the load.
To select th
e proper cable size:
1. Determine the cable size necessary to carry the design load.
2. Calculate the voltage drop of the cable between the battery termi
nal plate and the
operating equipment.
3. Increase cable size to a
chieve the allowable voltage drop.
Cable selection should create no greater voltage drop than allowed between the battery system
and the operating equipment as determined by
the equipment/system supplier. Excessive
voltage drop will reduce the desired support time of the battery system.
5.3 Considerations for Parallel Installation
If it is necessary to connect the battery system in parallel to obtain sufficient capacity, cable
connections to each of the parallel strings are important.
To obtain:
• proper load sharing on the discharge,
• satisfactory recharge, and
• the same float voltage for each string.
cables from the batteries to the load
must be:
• as short as possible,
• of equal lengths to the load (do not exceed cable ampacity), and
• of sufficient ampacity.

Page 12
www.enersys.com Publication No. US-FL-IOM-AA September 2016
6.0 UNPACKING AND HANDLING FOR INSTALLATION
6.1 General
Batteries are shipped assembled, charged, and filled with the electrolyte near the low level lines
marked on the jar. If the electrolyte level is significantly above the low level line after the battery
has been on a long open circuit stand, care must be taken to avoid flooding during the
freshening charge. Electrolyte may be removed to the low level line to prevent overflowing.
All accessories for installation and use are supplied as optional prepackaged kits. Cells may be
packed in w
ooden boxes, which must be opened completely and carefully. The cells are then
handled as
described in
Section 6.3.
6.2 Recommended Installation Equipment and Supplies
Before working with the battery system, be sure that you have the proper protective clothing,
safety equipment and insulated tools as specified in Section 2.0. Additional equipment for the
installation of the battery system is listed in Table 6.1.
TABLE 6.1
CHECK IF
ON HAND EQUIPMENT REQUIRED
Forklift or Portable Lift Crane
Chalk Line
Torpedo Level (Plastic)
Torque Wrench (10-200 in-lbs)
Torque Wrench (50-100 ft-lbs)
Drift Pins
Floor Anchors (User-supplied per battery system and attached stress analysis)
Floor Shims (User-supplied)
Insulated 3/8 inch Drive Ratchet Wrench with Minimum 3" Extension
With 3/8 inch thru 11/16 inch Sockets
Insulated Box Wrenches (3/8 inch to 11/16 inch)
Screwdrivers
Wipes, Paper or Cloth
Plastic Bristle Brush or Nonmetallic Cleaning Pad
Tape Measure (Nonmetallic)
Safety Equipment and Clothing
Small Paint Brush
Standard Allen Wrench Set
NO-OX-ID Grease
Be sure you have all the proper protective clothing and safety tools
and equipment on hand before starting the installation.

www.enersys.com Publication No. US-FL-IOM-AA September 2016 Page 13
6.3 Cell/Jar Handling
To prevent damage to the cells and personal injury when moving/handling the batteries, follow
the procedures in this section. For ease of explanation, lifting/handling instructions are grouped
into three categories depending on the size of the units:
See Section 6.3.1 — small cell handling (C)
See Section 6.3.2 — medium cell handling (E and F)
See Section 6.3.3 — large cell handling (D and G)
DO NOT lift any cell by the terminal posts as this
will void the
warranty. When lifting large
cells/units with crane, hoist or similar device, use the lifting belt(s) and protective styrofoam
shipping cover(s) provided.
DO NOT tamper with the seal nuts on the cell
posts as t
hi
s will void the warranty.
6.3.1 Small Cell Handling (C)
1. Lift and move these batteries manually.
2. Position hands under the bottom of the cell/jar to lift it,
and place the cell/unit in the
desired location.
6.3.2 Medium Cell Handling (E and F)
Never lift a cell by the posts. Lifting the cell by the post can damage the seals and will void the
warranty. When lifting medium-size cells, use the lifting belt and protective styrofoam shipping
cover provided.
Use a mechanical device, such as a hoist or crane, for lifting.
1. Tilt the cell about 1 inch (25 mm) so as to position the lifting belt. See Figure 6.1.
LIFTING MEDIUM-SIZE CELL
Figure 6.1

Page 14
www.enersys.com Publication No. US-FL-IOM-AA September 2016
2. Slide belt underneath cell. See Figure 6.2.
3. Place the styrofoam cover on top of the cell, with
the beveled ends up. See Figure 6.3.
4. Bring the end rings of the belt together over the cover and engage the hook of the lifting
device in bo
th rings. Always lift vertically and balance the cell. See Figure 6.4.
5. Remove the belt and cover after positioning the
cell.
LIFTING MEDIUM-SIZE CELL
Figure 6.2
LIFTING MEDIUM-SIZE CELL
Figure 6.2
LIFTING MEDIUM-SIZE CELL
Figure 6.2
LIFTING MEDIUM-SIZE CELL
Figure 6.2
LIFTING MEDIUM-SIZE CELL
Figure 6.4
LIFTING MEDIUM-SIZE CELL
Figure 6.4
LIFTING MEDIUM-SIZE CELL
Figure 6.4
LIFTING MEDIUM-SIZE CELL
Figure 6.4
LIFTING MEDIUM-SIZE CELL
Figure 6.3

www.enersys.com Publication No. US-FL-IOM-AA September 2016 Page 15
6.3.3 Large Cell Handling (D and G)
Cells are shipped on a pallet, with each cell packaged in an individual styrofoam shipping base
and top.
Never lift a cell by the posts. Lifting the cell by the posts can damage the seals and will void the
wa
rranty. When lifting large-size cells, use the lifting belt and protective styrofoam shipping
cover provided.
Use a mechanical device, such as a hoist or crane, for lifting.
Each battery shipment includes one lifting belt, about 14 feet (4.3 meters) long x 1 inch
(25 mm)
wide.
All cells are
shipped with
a molded styrofoam insert covering the posts and intercell connectors.
This insert
should remain in place
for lifting the cells. As t
he cell is lifted, the belts will tighten
against the shipping top. The belts will cut into the styrofoam. This is desirable, because the
indentations created will help to keep the belts positioned and the cell stable.
1. Remove the packaging from around the cells/units, and remove the wooden cleats from the
perimeter of the shipping pallet.
2. Leave the molded top in
sert in plac
e. You will use it in lifting the cell.
3. Fold the lifting belt in h
alf and push each loop end Down between the cells/units until the
loops touch the shipping pallet. See Figure 6.5.
NOTE: Ensure that the straps are
placed around the two
sides of the cell/unit that
will be
p
ositioned across
LIFTING LARGE-SIZE
CELL

Page 16
www.enersys.com Publication No. US-FL-IOM-AA September 2016
4. Use a 24 inch (600 mm) length of stiff wire with a hook
formed on one end. In
sert the hook end through the
slot between the bottom of the jar and the shipping
base (on the opposite side from the belt) and engage
one of the loop ends with the hook. See Figure 6.6.
LIFTING LARGE-SIZE CELL
Figure 6.6
5. Pull this loop end of the
belt from under the
cell and out through the slot. Disengage
the wire hook from the loop and again
insert the hook through a different slot
between the bottom of the jar and the
shipping base. See Figure 6.7.
LIFTING LARGE-SIZE CELL
Figure 6.7
6. Engage the other belt
loop with th
e wire
hook and p
ull it out through the slot on the
same
side. Adjust the belt until the middle
loop is even with the loops on the two free
ends. See Figure 6.8.
LIFTING LARGE-SIZE CELL
Figure 6.8

www.enersys.com Publication No. US-FL-IOM-AA September 2016 Page 17
7. Place the loops on the two free ends of the belt over
the hook of the lifting device, and then place the middle
loop over the hook. See Figure 6.9.
LIFTING LARGE-SIZE CELL
Figure 6.9
Be sure the belt is not twisted. Straighten the belts down each
side and under the bottom of the cell/unit, so that they are
parallel with
each other. The space between the belts should
be the same as the distance between the belt notches on the
edge of the styrofoam. Correct belt spacing is important
because it permits removal of the belt after the cell/unit has
been placed on the rack rails.
8. Lift cell into position and remove belt.
Exercise extreme care when initially lifting cells and when
lowering them into final
position on the rack. To prevent one
end of the unit from "kicking out," assign one person to steady
the unit on a level plane during the entire lifting procedure.

Page 18
www.enersys.com Publication No. US-FL-IOM-AA September 2016
7.0 SYSTEM INSTALLATION
EnerSys flooded batteries are installed on racks that differ in type, size, seismic rating, and
configuration. Refer to the RACK ASSEMBLY DRAWING and instructions included with the rack
shipment for the details of your installation.
7.1 System Layout
Lay out the battery system before installation. Consult Section 5.0 for installation considerations.
1. Locate the system position in the area designated as determined in Section 5.0.
2. Mark the floor with system outline dimensions.
3. Using the RACK ASSE
MBLY DRAWING and instructions and rack components, locate the
position of the floor anchors.
Floor anchors are the responsibility of the owner. Follow the installation instructions of the
anchor manufacturer.
The floor must be level. Shimming up to 1/4 inch (6 mm) may be required to have the
Battery System fully level.
NOTE: The floor must be capable of supporting the weight of the Battery.
The Battery Rack must be securely anchored to the floor. Anchoring should meet all local,
state and/or federal codes and such
compliance is the responsibility of the owner. Floor
anchoring and its design are the responsibility of the owner. Ensure seismic requirements
are considered.
4. Batteries should be kept in the orig
inal shipping containers until installed. However, if you
must remove the batteries before installation, see the procedures in Section 6.3, “Cell/Jar
Handling.”

www.enersys.com Publication No. US-FL-IOM-AA September 2016 Page 19
7.2 Installation Considerations
7.2.1 Installation Precautions
1. Install the system in a well-ventilated location; allow at least 4 inches (10 cm) on all sides
for air ventilation and maintenance.
2. Install the u
nit in a stab
le, level and upright posit
ion which is free of vibration.
3. Install the unit where the ambient temperature is within the correct operating range.
4. Do not install the Battery System in areas that ar
e subject to high humidity.
5. Do not allow direct sunlight to shine
on the system.
6. Do not install the Battery System in areas that are subject to contamination, such as high
levels of air
borne dust, metal particles or flammable gasses.
7. Avoid installation near sources of electrica
l noise and always make sure that the unit
ground is intact to prevent electrical shock and to help reduce electrical noise.
8. Do not install where water, or any other foreign object or substances may get inside the
Battery System.
NOTE: Contact your nearest EnerSys sales/service representative
when paralleling Battery Systems, to ensure compatibility of
mating different batteries. Or, call the corporate office
number listed on the back of this manual and ask for
EnerSys Reserve Power Service.
7.2.2 Arrangement
Arrange the cells so that the positive terminal of one cell/jar will be adjacent to the negative
terminal of the next cell/jar throughout the battery.
Cells/jars are usually positioned on rack rails with plates perpendicular to the rails. However, F
and large G cells are also positioned
with plates parallel to the rails.
Take care when positioning cells to ensure that main battery terminals are not close together on
step or back-to-back racks.
7.2.3 Spacing
Maintain proper spacing between cells/jars on the rack to provide thermal management and
ensure proper fit of hardware connections. Position cells/jars such that a ¼ inch (6mm) is
maintained between the covers of adjoining units.

Page 20
www.enersys.com Publication No. US-FL-IOM-AA September 2016
7.3 Battery Installation
To install an EnerSys battery system, follow the procedures below:
1. Install the rack according to the rack assembly information detailed in “
Instructions for
Assembling and Maintaining Standard and Seismic Battery Racks” or “Instructions for
Assembling Seismic Racks” (included with the rack shipment).
2. Before lifting cells/jars, determine which two sides will be positioned across
the rails.
3. Employ the appropriate lifting/handling method for the cells to be installe
d
(as described in Section 6.3).
WARNING
Allowing the cell/unit to drop quickly may damage
the internal cell components.
Exercise extreme caution when initially lifting cells and when lowering them into final
position on the rack. To
prevent one end of the unit from “kicking out,” assign one person to
steady the unit on a level plane during the entire lifting procedure.
4. Position the first cell/jar on the bottom shelf, centered across the rails. After placement,
remove the lifting belt (if used) from the hook and pull the belt from under the module. Also
remove any remaining protective packing covers. See Figure 7.1.
WARNING
Improper lifting may result in damage
to the module or in personal injury
.
CELL/JAR PLACEMENT
Figure 7.1
To lubricate the rack rails for sliding cells into position, use only EnerSys
Pro-Slide or Dow
Corning Silicon Compound #111.
When sliding the cells on the lubricated rails, Do NOT push on the center of the cell/unit.
Hold the cell by placing hands on the corners of the jar and then push to slide.

www.enersys.com Publication No. US-FL-IOM-AA September 2016 Page 21
SPACER
(OPTIONAL)
CELL/JAR PLACEMENT
Figure 7.2
5. If provided, place the long rubber angle cell spacer on
the mid-point of the cell cover. Position one leg on top
of the cover and the other so that it extends down over
the edge of the cover to the side where the next cell/jar
is to be positioned. See Figure 7.2.
6.
Lift the next cell/jar to be installed and place it next to
the previously installed unit. See Figure 7.3. Be certain
to allow proper spacing between cells/jars as outlined
in Section 7.2.2. Observe proper polarity orientation.
Exercise extreme care when positioning cells.
Bumping or scraping a cell against the ad
jacent
cell/unit or rack member may damage the jar
material.
Do NOT use any kind of tool to pry cells into position.
CELL/JAR PLACEMENT
Figure 7.3
7.
Remove the belt loops (if used) from the lifting hook and
pull the belt free from under the unit. Also remove any
remaining protective packing covers. See Figure 7.4.
Move cell into final position, observing spacing
requirements.
CELL/JAR PLACEMENT
Figure 7.4

Page 22
www.enersys.com Publication No. US-FL-IOM-AA September 2016
8. Repeat Procedures 5 thru 7 until all units are installed on all tier/steps of the rack. See
Figure 7.5.
To lubricate the rack rails for sliding cells into position,
use only EnerSy
s Pro-Slide or Dow Corning Silicon
Compound #111.
9. As soon as cells are unpacked and installed on the rack,
remove the shipping vent plugs and immediately install the
flame arrestors. DO NOT attempt to charge cells unless
flame arrestors are in place.
Once installed, DO NOT REMOVE
the flame arrestors.
They are provided with a filling funnel for adding water and
measuring the electrolyte temperature. Do not permit the
lectrolyte level to drop below the bottom of the tube on the
flame arrestor. Allowing too low a level defeats the flame
arrestor function.
10. Number the
cells
starting
from the positive terminal of
the battery. The cell numbers supplied are backed
with pressure-sensitive adhesive and should be
applied to the rails or the jars. Before applying the
cell numbers, clean surfaces according to Procedure
3 in Section 12.1.1.
FULL RACK OF CELLS
Figure 7.5

www.enersys.com Publication No. US-FL-IOM-AA September 2016 Page 23
7.4 Preparing and Installing Connections
The cells are now positioned and ready to be connected.
Before preparing and making the connections,
heat NO-OX-ID grease in hot water as necessary
to soften for application with a paintbrush.
7.4.1 Terminal Posts
All terminal posts of the cells are greased at the factory to prevent oxidation.
1. Remove the grease with a paper towel.
2. Inspect each terminal post. If discoloration or ta
rnishing is noted, neutralize the post
with
sodium bicarbonate and water solution (Section 12.1.2, Procedure 2). Dry thoroughly.
3. Clean the contact surface with a st
iff-bristle nonmetallic brush/pad until a clean, bright
surface is obtained. Do NOT expose copper.
4. Apply a light coat of NO-OX-ID greas
e.
7.4.2 Intercell Connectors
The connections are made by bolting the plated copper intercell connectors to the cell posts of
opposite polarity on adjacent cells. When more than one intercell connector for each cell is
furnished, bolt the connectors on opposite sides of the cell posts.
1. Clean the
contact surf
ace of the intercell connector using a stiff bristle non
metallic
brush/pad. Use care so as NOT to remove the plating and expose any copper.
Note: Tin-plated connectors do not require plating material removal to provide an
adequate contact surface, only foreign material removal. Very light brushing and cleaning
with a cloth is generally sufficient.
2. With a small paintbrush, apply a light coat of
heated NO-OX
-
ID grease to the contact
surface of the intercell connector.

Page 24
www.enersys.com Publication No. US-FL-IOM-AA September 2016
3. Bolt all intercell connectors and assemble as shown in Figures 7.6a, 7.6b and the
details. Figure 7.6a is applicable to CA & CC models, Figure 7.6b is a representative
diagram for CX, DX, DXC, EA, EC, ES, FTA, FTC, GC, GT, GU.
Certain intercell connectors (such as those for all “G” cells) are furnished with the bolt
holes lo
cat
ed off-cent
er. Install these connectors so that the bottom edge of the
connector does not interfere with the post ledge (Figure 7.6b and the detail).
Stamped flat washers may have
one sharp edge. Install with this
edge away from the plated
copper intercell connector to
avoid damaging the plating.

www.enersys.com Publication No. US-FL-IOM-AA September 2016 Page 25
4. Secure all connections finger-tight to allow for some adjustment of position.
5. After all connections are completed, torque all stainless steel connector
bolts according
to Table 7.1.
TABLE 7.1
316SS Bolt Size
Diameter -
Threads/Inch
Initial Torque Value
Inch-Pounds
(Newton Meter)
Retorque Value
Inch-Pounds
(Newton Meter)
1/4 - 20 70 – 75
(8.0 - 8.5)
60 – 65
(7.0 - 7.5)
5/16 - 18 120 – 125
(13.6 - 14.1)
110 – 115
(12.5 - 13.0)
1/2 - 13 130 – 135
(14.7 - 15.3)
120 – 125
(13.6 - 14.1)
Make sure that all bolted battery connections are torqued to
the recommended values. The increased resistance of a loose
connection can generate heat and become a fire hazard.
6. Apply a light coat of heated NO-OX-ID grease to the bolted connection with a small
paintbrush in the area of the terminal post only.

Page 26
www.enersys.com Publication No. US-FL-IOM-AA September 2016
7.4.3 Terminal Plates
Terminal plates are supplied with the battery system to provide a system connection point
(except for “C” line). All system connections must be made to the terminal plate and NEVER to
the cell terminal post (except for “C” line).
1. Clean the electrical contact areas of the terminal plate, terminal connectors, and cell/jar
posts with a stiff-bristle nonmetallic brush/pad until the surface is bright. Be careful not to
remove the plating with excessive brushing. A typical terminal plate is illustrated in Figure
7.7.
2. With a sma
ll paintbrush, apply a
light coating
of heated NO-OX-ID grease to contact
areas.
3. Install the terminal connectors to
cell posts. Tighten all connections according to the
torque values in Table 7.1.
TERMINAL PLATE
CABLE CONNECTOR
WITH NEMA LUG
TERMINAL CONNECTOR
L SHAPE
OPTIONAL
TERMINAL PLATE INSTALLATION
Figure 7.7

www.enersys.com Publication No. US-FL-IOM-AA September 2016 Page 27
4. With a small paintbrush, apply a light coat of heated NO-OX-ID grease to the electrical
contact areas of the terminal plate.
5. Install the te
rminal plate to the terminal connector
s
using the t
orque values in Table 7.
1.
6. Connect the
positive lead from the charger to the posit
ive terminal plate of the battery and
the negative lead from the charger to the negative terminal plate of the battery. (Some
seismic installations have interface connections.)
7. Connectors
to battery t
erminal plat
es shou
ld b
e flexible
since rigid terminal connectors
may transmit vibrations or strain to cell posts that could result in loose connections.
Support cables so that the cell post does not bear the load.
8. Before activating the charger:
a.
Inspect the cell connections of the system to ensure that all cells are connected
correctly, POSITIVE (+)
to NEGATIVE (-),
b. Measure the voltage ac
ross the system terminals. Voltage of the battery should
equal approximately 2.06 times the number of cells in the string for 1.215
nominal specific gravity systems and 2.10 times the number of cells in t
he string
for 1.250 nominal specific gravity systems, and
c. Measure and record the resistance of cell-to-cell and cell-to
-terminal connections.
If the resistance of any connection is more than 10% or 5 µΩ (micro-ohms)
whichever is greater, above the average, unbolt and remove the affected
connectors and follow the cleaning procedure in Section 12.1.3.
NOTE: Do NOT recalculate the average resistance and
do NOT repeat the cleaning procedure.
Then remake the connection.

Page 28
www.enersys.com Publication No. US-FL-IOM-AA September 2016
8.0 INITIAL and/or FRESHENING CHARGE
Batteries lose some initial charge during shipment and storage. Depending on storage time, a
battery may require a freshening charge. See Section 4.0 for battery storage times.
Before switching on the charger, ensure that shipping vent plugs are removed and flame
arrestors are installed.
Do NOT attempt a freshening charge unless the electrolyte levels are near the low level
line on open circuit. When necessary, remove electrol
yte to that level from cells with
high levels.
Most chargers of modern design utilize the principle of constant voltage (potential) charging.
The preferred charge method is t
o use a constant voltage of 2.50 volts per cell times the
number of cells. If this voltage is too high for the equipment (load) connected to the DC bus, the
use of lower voltage is accceptable. See Table 8.1. Should the charge current cause electrolyte
to flood out onto the cover, reduce the charge voltage at once.
Least desirable is to put the battery on at the float voltage - particularly for calcium alloy cells.
Equalize ch
arging at 2.33 volts per cell is the
minimu
m acceptable procedure for 1.215 calcium
alloy cells.
1. Determine the maximum voltage that may be applied to
the system equipment (or
maximum charger voltage if load is not yet connected). Refer to the recommendations of
the manufacturer/supplier of system equipment, connected to DC bus.
2. Divide the maximum total system voltage by the number of cells (not units) connected in
series. This is the maximum volts per cell that may be used for the initial charge.
3. Check the nameplate to determine
whether the battery is of a lead-antimony type
or a
lead-calcium type.
4. Connect battery positive (+) terminal to charger bus positive (+) terminal.
5. Connect battery negative (-) terminal to charger bus negative (-) terminal.
www.enersys.com Publication No. US-FL-IOM-AA September 2016 Page 29
6. Raise the voltage to the maximum value permitted by the equipment as shown in Table
8.1.
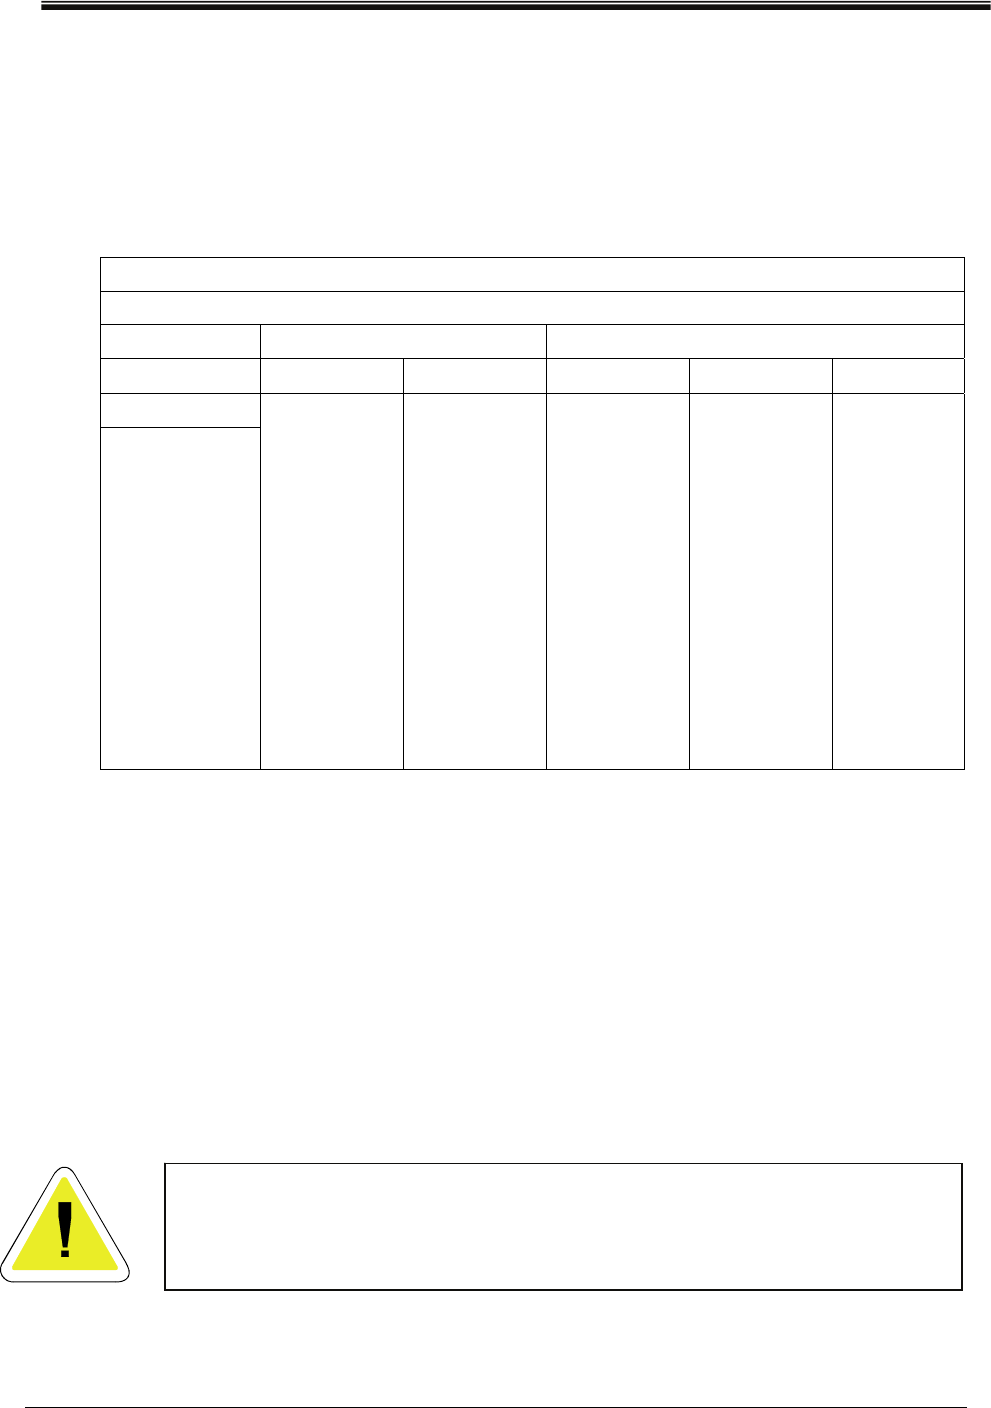
Table 8.1 lists the hours of freshening charge to be given after cha
r
ge current
has
stabilized for 24 hours. Freshen charge must be given at a voltage high enough to
cause gassing/mixing of the electrolyte. Do not charge at voltages higher than in Table
8.1.
TABLE 8.1
MINIMUM HOURS OF CHARGE AFTER CURRENT STABILIZATION
Alloy Antimony Calcium
Sp. Gr. 1.215 1.250 1.215 1.250 1.300
V.P.C.
- - -
2.27 140 210
2.30 100 150
- - -
2.33 70 110
- -
140
2.36 50 78
100
-
160
2.39 35 56
70
110
-
2.42 25 -
50
80
125
2.45 24 -
40
55
85
2.50 22 -
36
50
60
2.60 - -
30
44
50
2.70
-
-
24
36
44
Table 8.1 applies for cell temperatures between 60
o
to 90
o
F (16
o
to 32
o
C). For cell
temperatures 40
o
to 59
o
F (5
o
to 15
o
C), use twice the number of hours. For cell
temperatures 39
o
F (4
o
C) or below, use four times the number of hours.
On “C," “D,” “E,” “F,” and “G” cells, you may insert the thermometer in the funnel of the
pilot cell'
s flame arrestor and leave it there by a
djusting the
rubber washer to the correct
height and leaving off the dust cap. DO NOT LEAVE thermometers in place in
seismic regions.
7. When charging current has decreased and sta
bilized (i.e., no further reduction for 24
hours), charge for the hours shown in Table 8.1.
Monitor the battery temperature during the charge. If the battery exceeds
110
o
F (43
o
C), stop the charge immediately and allow the temperature to
decrease below 100
o
F ( 38
o
C). Failure to follow this warning may result
in severe overcharge and damage to the cell/battery.

Page 30
www.enersys.com Publication No. US-FL-IOM-AA September 2016
9.0 OPERATION
9.1 Float Operation
In this type of operation, the battery and the critical load circuits are continuously connected in
parallel with
a constant voltage charg
er. The char
ger must be capable of:
• charging the battery from the discharged condition while supplying the DC power to the
connected DC
load,
• providing the required constant float
voltage, and
• providing voltage for equalizing the battery.
Float voltage sustains the battery in a fully charged condition and makes it available to provide
the emergency power required in the event of an AC power interruption
or charger failure.
The table below lists the recommended average float volts per cell for nominal specific gravities
used in stat
ionary service.
TABLE 9.1
RECOMMENDED AVERAGE FLOAT VOLTS PER CELL
FOR NOMINAL SPECIFIC GRAVITIES
Average Float Volts per Cell
Nominal Specific Gravity
Suffix
Antimony Calcium
1.250
1.215
B
None
2.17 - 2.21
2.15 – 2.20
2.21 – 2.30
2.17 – 2.26
An equalizing charge should be given when:
• the temperature corrected specific gravity has fallen more than 10 points (.010).
• one or more cells fall below the following critical voltages on float, corrected for
temperature. (Refer to Section 9.4 for equalizing charge.)
TABLE 9.2
MINIMUM TEMPERATURE – CORRECTED FLOAT VOLTAGES
Nominal Specific Gravity Cell Voltage
1.215
1.250
2.13
2.14

www.enersys.com Publication No. US-FL-IOM-AA September 2016 Page 31
9.2 Hydrometer Readings - Specific Gravity
Specific gravity is a measurement of the density or weight of the electrolyte compared wit
h
water (1.00
0). Specific gravity decreases on discharge and rises again on charge as a result of
the electrochemical reaction within the cell.
Because both the cell temperature and the electrolyte level affect the specific gravity reading,
they should be recorded
at the same time as the gravity readi
ng.
Do not take gravity
readings immediately after adding water to the cells. Complete mixing
usually take
s several days for antimony cells and several weeks for calcium cells. Because of
the low charging currents in float service, especially with lead calcium cells, mixing of the
electrolyte is a very slow process.
All calcium cells, except “C” size cells, are provided with an electrolyte withdrawal tube, located
in the corner of the cell cover adjacent to the positive post(s). Other co
rner holes are sealed off
with plugs. Keep these plugs tightly closed and do not open them to withdraw acid sample.
Antimony cells are not provided with an electrolyte withdrawal tube. To take a specific gravity
reading, use the flame arrestor's center funnel. Access this funnel by removing the dust cap of
the flame arrestor. (All the corner holes are sealed with plugs. Keep these plugs tightly
closed and do NOT open them to withdraw acid sample.)
Using the long-stemmed hydrometer (Cat. 81332) will result in sampling of the electrolyte at a
point one-third down from the top of the plate. The long stem of the hydrometer must be cut to
7 3/4 inches (200 mm) f
or "E" cells; to 9 inches (230 mm) for "D" and "F" cells; or 12 inches (300
mm) for "G" cells. At
this level the
e
lectrolyte gives a reliable indication of the state of charge of
a cell.
When taking a hydrometer reading, insert the full length of the hydrometer stem into the
withdrawal tube hole, so that the base of the stem rests on top of the withdrawal tube.
9.3 Full-Charge Specific Gravity
With the cells fully charged, the electrolyte level at the midpoint between level lines and the cells
on float for a minimum of 72 hours, the specific gravity of the electrolyte at
77
o
F (25
o
C) should
read between the limits on the cell nameplate.
These gravity limits are adjusted at the factory and will not require any further adjusting during
the life of the battery unless elec
trolyte is actually lost from a cell. If electrolyte should
accidentally be lost, it should be replaced with electrolyte of the same specific gravity as that in
the adjacent cells.
When taking hydrometer readings, hold the hydrometer stem in an upright position so that the
hydrometer floats freely and does no
t touch at either the top or the sides (See Figure 9.1).

Page 32
www.enersys.com Publication No. US-FL-IOM-AA September 2016
1.215
FLOAT
STEM
Hydrometer
Cat. 81332
Figure 9.1
Periodically clean the hydrometer barrel and float with soap and water for ease of reading and
improved accuracy.
Specific grav
ity readings should be corrected for temperature. For every
3
o
F (1.67
o
C) of
temperature above
77
o
F (258
o
C), add one point (.001) to the hydrometer reading. For every 3
o
F
(1.67
o
C) of temperature below 77
o
F (25
o
C), subtract one point (.001) from the hydrometer
reading.

www.enersys.com Publication No. US-FL-IOM-AA September 2016 Page 33
9.4 Equalizing Charge
Under NORMAL conditions an equalizing charge is NOT required. An equalizing charge is a
special charge given to a battery wh
en nonuniformity in voltage has developed between cells. It
is given to restore all cells to a fully charged condition.
Nonuniformity of cells may result from:
• low float voltage due to improper adjustment of the charger.
• a panel voltmeter that reads high, resulting in a low charger output voltage.
• selection of too low a float voltage.
• variations in cell temperatures in the series at a given time, due to environmental
conditions or module arrangement. The maximum cell-to-cell temperature difference is
5˚F (3˚C). If cell temperature is the problem, review the location instructions in Section
5.0 to ensure proper location of the battery system.
9.4.1 Equalizing Charge Method
Constant voltage charging is the method for giving an equalizing charge.
Determine the equalizing voltage based on the maximum voltage allowed by the system
equipment connected to the DC bus.
The charge table shown
in Table 9.3 lists the minimum hours of equalizing charge to be given
after the charging curren
t has stabilized (no further current reduction for 24 hrs).
TABLE 9.3 – MINIMUM HOURS OF CHARGE
AFTER CURRENT STABILIZATION
Alloy Antimony Calcium
Sp. Gr. 1.215 1.250 1.215 1.250 1.300
V.P.C.
100 160
2.24
70 110
2.27
50 78 100
2.30
35 55 70 110
2.33
25 28 50 80 125
2.36
35 55 90
2.39
25 40 60
2.42
28 45
2.45
30
2.48
Table 9.3 applies for cell temperatures between 60
o
to 90
o
F (16
o
to 32
o
C). For cell
temperatures 40
o
to 59
o
F (5
o
to 15
o
C), use twice the number of hours. For cell temperatures
39
o
F (4
o
C) or below, use four times the number of hours.
NOTE: The voltage of a warm cell will be lower than the average. Its voltage can be
corrected for temperature by adding 0.003V for each degree Fahrenheit (0.005 V/
o
C)
that the cell temperature is above the average temperature of the other cells.
Page 34
www.enersys.com Publication No. US-FL-IOM-AA September 2016
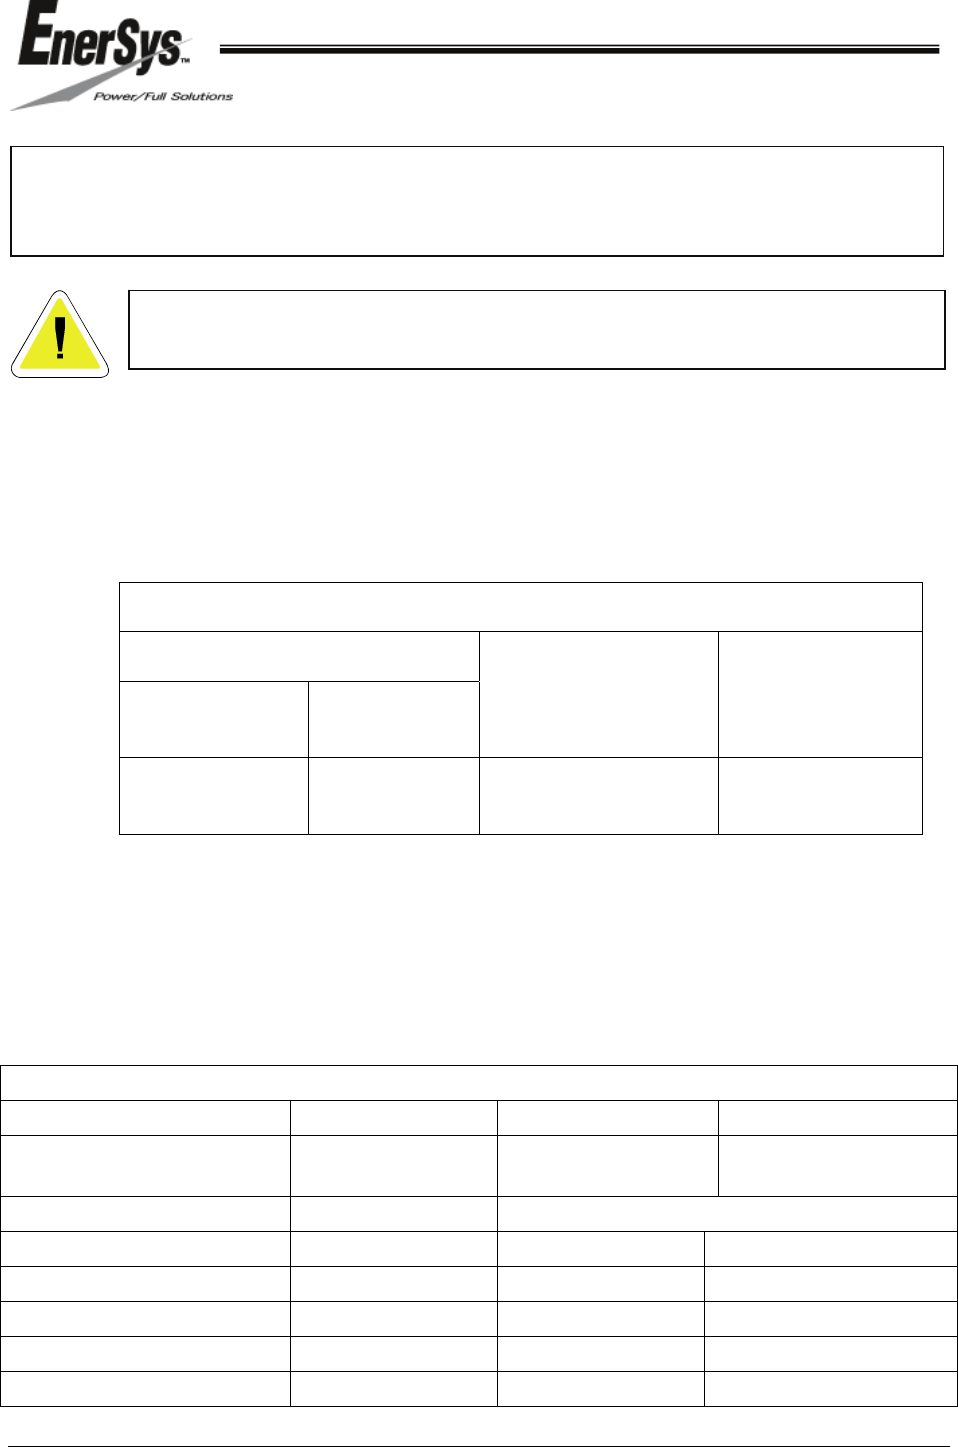
9.5 Operating Temperature
Normal battery life may be expected only when batteries are operated under the following
temperature conditions:
TABLE 9.4 – RECOMMENDED BATTERY TEMPERATURES
Nominal Specific Gravity
Calcium Antimony
Annual Average
Battery Temperature
Any Cell Temp.
Not To Exceed
for More Than
30 Day
s Per Year
1.215
1.250
1.215
1.250
77
o
F (25
o
C)
72
o
F (22
o
C)
90
o
F (32
o
C)
85
o
F (29
o
C)
The room air circulation should be adequate to maintain all cells in the battery within 5
o
F (3
o
C)
of each other.
High temperature increases realized capacity but decreases life expectancy, while low
temperatures decrease
capacity, but may no
t affect life
expectancy. Table 9.5 shows the
relationship between average temperature and battery life.
TABLE 9.5 – RELATIONSHIP OF TEMPERATURE TO BATTERY LIFE
% of 8-Hr. Capacity Antimony Flat Plate Calcium Flat Plate
Approx. number of cycles
at 80% discharge
― 300 50
Average operating Temp.
o
F Life Expectancy in Full Float Application (years)
107 109 6 5
92 105 12 10
77 100 20 20
62 92 22 22
47 83 25 25
During the equalizing charge, monitor the temperature of a pilot cell. It should not rise above
110
o
F (43
o
C). If it does, the equalizing voltage should be lowered to 2.20 or 2.25 VPC until
the cells cool down to a temperature of 100
o
F (38
o
C), or lower.
Failure to follow this warning may result in severe overcharge and damage
to the cell/battery. At this point, the equalizing charge may be resumed.

www.enersys.com Publication No. US-FL-IOM-AA September 2016 Page 35
10.0 BATTERY TAPS
Connections made to a battery for tapping a certain group of cells to provide a voltage other
than the total battery voltage is NOT recommended and can void the warranty
. Tapping results
in an imbalance of the system during charging and discharging, causing unsatisfactory
operation.
11.0 PILOT CELL
One cell in a battery is usually selected as a pilot cell. It becomes an indicator of the general
condition of
the entire battery with regard to voltage, gravity and temperature. Pilot cell readings
serve as an interim indicator between regularly scheduled voltage and gravity readings of the
complete battery. The thermometer should be permanently mounted in the pilot cell flame
arrestor (except in seismic areas).
Because a small amount of electrolyte may be lost in taking hydrometer readings, you should
select a d
i
ff
erent cell as the pilot cell annually.
Read and record the pilot cell voltage on a monthly basis between regularly scheduled
individual cell readings.
12.0 MAINTENANCE
EnerSys also recommends to follow IEEE Std. 450 for the battery maintenance in
addition to the following:
12.1 Battery Cleaning
Observe the battery for cleanliness at regular intervals. Keep cell terminals and connectors free
of corrosion. Terminal corrosion may adversely
affect the performance of the battery, and it
could present a safety hazard.
12.1.1 Standard Cleaning
To perform a standard cleaning of the battery, follow the procedure below:
1. Disconnect the battery.
2. Wipe off any accumulation of dust on the cell covers with a cloth dampened with clean
water.
3. If the
cell covers or jars are damp with spilled el
ectrolyte, wipe with a cloth dampened with a
solution of sodium bicarbonate and cold water, mixed in the proportions of 1.0 lb/1.0 gal (0.5
kg/5.0 liter) of water. Follow this by wiping with a cloth dampened in clear water and then
wipe dry with a clean cloth.

Page 36
www.enersys.com Publication No. US-FL-IOM-AA September 2016
Do NOT use any type of oil, solvent, detergent, petroleum-based solvent or
ammonia solution to clean the jars or covers. These materials will cause
permanent damage to the battery jar and cover and will void the warranty.
12.1.2 Corrosion Cleaning
To clean mild corrosion from cell posts, follow the procedure below:
1. Disconnect the battery.
2. Remove corrosion by wiping with a cloth dampened with bicarbonate of soda so
lution [mix 1
gallon (4l) of water with 1 lb. (500g) of bicarbonate of soda]. Follow with a cloth dampened
with clear water.
3. Dry with a clean cloth.
4. With a small paintbrush, apply a light coat of he
ated NO-OX-ID grease to the entire bolted
connection.
12.1.3 Heavy Corrosion Cleaning
If the routine cleaning of bolted connections has been neglected, heavy post
corrosion may occur. The performance of the battery under load could be adversely
affected, and this condition could present a safety hazard.
To perform the heavy corrosion cleaning, follow the procedure below:
1. Arrange to maintain continuity of the circuit, if r
equired.
2. Unbolt and remove connectors.
3. Apply a solution of bicarbonate of soda and water to the cell
posts and connectors to
neutralize the corrosion (as described in Section 12.1.2, Procedure 2).
4. Clean the contact surfa
ces by rubbing the surfa
ce of the post or terminal and plated contact
surfaces with a stiff-bristle nonmetallic brush/pad. Exercise care so you do NOT remove
the plating on the connectors, terminal plates or lugs, exposing copper.
5. Recoat the contact surfaces with a thin applica
tion of the NO-OX-ID grease, heated to a
liquid form and applied with a small paintbrush.
6. Reinstall and tighten connections to
appropriate retorque value in Table 7.1.

www.enersys.com Publication No. US-FL-IOM-AA September 2016 Page 37
12.1.4 Cleaning Flame Arrestors
When cells are overfilled with electrolyte (above the high level line) or are excessively
overcharged, the diffuser material of the flame arrestor may become partially clogged from
electrolyte spray. Replace all flame arrestors having clogged pores or clean the arrestors as
follows.
Immerse the flame arrestor several times in a plastic bucket filled with fresh water. After each
immersion, eject the water by vigorous shaking or with an air blast. Following the immersion of
15 flame arrestors, dump and refill the bucket with clean water.
Do not use any cleaning or neutralizing agents in the cleaning water, since any dry residue may
clog the pores of the diffuser materials.
12.1.5 Replacing or Isolating a Cell
To replace or isolate a cell for maintenance, follow the procedure below.
1. Arrange to maintain the continuity of the circui
t, if required.
2. Unbolt and remove conn
ectors.
3. Remove and replace cell OR isolate the required cell.
4. Reinstall an
d torque con
nections a
ccording to Section 7.4.
12.2 Maintenance Records
A complete recorded history of the battery operation is essential for obtaining satisfactory
performance. Good records will show when corrective action is required to eliminate possible
charging, maintenance or environmental problems.
Should you have ANY questions concerning how to perform the required maintenance, contact
your nearest EnerSys s
ales/service representative or call the corporate office number listed on
the back of this manual and ask for EnerSys Reserve Power Service.
Accumulate and permanently record the following data for review by supervisory personnel so
that any necessary remedial action
may be taken:
The initial records are those readings taken after the battery has been in regular float service for
3 months (90 days). These should include the battery termi
nal float voltage and specific gravity
reading of each cell corrected to 77
o
F (25
o
C), all cell voltages, the electrolyte level,
temperature of one cell on each row of each rack, and cell-to-cell and terminal connection detail
resistance readings. It is important that these readings be retained for future comparison.
The frequency and types of readings recorded are usually governed by the standard operating
procedures and policies of the us
er. Adequate battery records are an invaluable aid as a check
on maintenance procedures, environmental problems, system failures and corrective actions
taken in the past.

Page 38
www.enersys.com Publication No. US-FL-IOM-AA September 2016
While specific gravity readings are a good indication of the health of a cell, other readings can
be used to indicate relative health.
However, it is highly recommended that a supplimental full
set of readings on each cell (including specific gravity) be taken approximately two years after
service initilization to verify that the floating conditions of the battery are appropriate.
The following schedule is recommended for good maintenance and records.
Monthly
• General appearance and cleanliness
• Charger output amps and volts
• Electrolyte levels
• Cracks in cells or leakage of electrolyte
• Evidence of corrosion at terminals or connectors
• Ambient temperature and condition of ventilating equipment
• Pilot cell voltage, specific gravity and electrolyte temperature
• Evidence of voltage leaks to ground
Quarterly
In addition to the monthly items also obtain and record the following:
• For antimony cells, specific gravity of each cell (optional for calcium cells)
• Voltage of each cell
• Total battery voltage
• Temperature of one cell on each row on each rack
• Randomly select and check 10% of intercell connection resistances
AnnuaIIy
In addition to the quarterly items, also do the following:
• Perform detailed visual inspection of each cell
• Check all bolted connections as indicated in IEEE 450 to see if retorquing is
required. Tighten all bolted connections to the retorque value specified in Table 7.1.
Then obtain and record the connection resistance of cell-to-cell and cell-to-terminal
connections.
• Check integrity of rack.
THE ABOVE FREQUENCY OF RECORD TAKING IS THE ABSOLUTE MINIMUM TO
PROTECT THE WARRANTY. This data will be required for any warranty claim made on the
battery. For system protection and to suit local conditions/requirements, more frequent readings
(quarterly) are desirable. A sample record chart is provided. Make a copy of the chart to use for
your permanent records.

www.enersys.com Publication No. US-FL-IOM-AA September 2016 Page 39
12.3 Corrective Actions
Low electrolyte levels should be corrected by following the procedures given in Section 12.4
below.
If charger output voltage is not within the recommended voltage range, make adjustments. Then
determine the cause of the shift and correct the p
roblem.
Keep cells clean, terminal posts and connectors corrosion-free, and grounds eliminated by
following the procedures
in Section 12.1.
When cell temperatures deviate more than 5
o
F (3
o
C), from each other during an inspection,
determine the cause and correct the problem.
When the connection resistance value of any intercell or terminal connection exceeds the
installation b
ase value by more than 20%, correct it using the procedures in Section 12.1.3.
12.4 Adding Water
Cells on charge normally show a very gradual lowering of the electrolyte level over a period of
time, due to a loss of water from the electrolyte. Hydrogen and oxygen gasses are liberated by
electrolysis as a result of charging current. Cells also lose water from normal evaporation at a
rate relative to the cell temperature and the humidity.
At regular intervals this water loss must be replaced with distilled, deionized or approved water,
so as to
maintain the
electrolyte level at the
mid-point between the high and low level lines
marked on the jar while on float.
Cells are equipped with flame arrestors with a filling funnel. Add water through the filling funnel
by removing the dust ca
p, but without removing the flame arrestors from the cell covers.
The best time to add water to the stationary lead-acid battery is when the recharge or equalizing
charge is about two-thirds completed. In this condition the electrolyte should be brought up to
the high line
. Water tends to float on top of the electrolyte for awhile, but the gassing action of
the latter part of the charging period will mix the water into the electrolyte. If temperatures may
possibly drop below freezing, water should be added at the start of the recharge or equalizing
charge to ensure thorough mixing with the acid solution.
Take care to keep the solution level below the top mark of the cell jar’s solution level markings
while on equalize. Overflow of solution can occur during gassing if too m
uch water is added to
the electrolyte.
Under certain conditions some batteries may never require an equalizing charge. These
batteries may be watere
d when required. The mixing of the water with the electrolyt
e is a very
slow process, especially with the low float current
s of lead-calcium cells. In these cases realistic
specific gravity readings may be obtained only after six or more weeks of charging at float
voltages.

Page 40
www.enersys.com Publication No. US-FL-IOM-AA September 2016
In cold climate with unheated battery rooms, water should be added only when the battery
temperature is 50
o
F (10
o
C), or above.
Never add any special types of powders, solutions or jellies to the batteries.
12.5 Quality of Water
Only distilled, deionized or other approved water (Deionizer Cat. 94866, Watering Gun Cat.
92755) should be added to the battery.
Approved water is water that has been analyzed by a qualified laboratory and found safe for use
with lead-acid storage batteries. Lo
cal municipal water supplies in the U.S.A. & Canada are
usually satisfactory. Obtain an analysis from the local municipality to be sure the results comply
with the impurity levels in Table 12.1.
Before drawing water from a tap or spigot, run the water for several mi
nutes to cle
ar metallic
impurities fr
om the pipes.
Do not store the water in a metal container. Use a clean container made of glass, rubber or
plastic. The container should not have stored anything but water in the past.
The following table shows the maximum allowable impurities:
TABLE 12.1 — BATTERY WATER QUALITY
MAXIMUM IMPURITIES
Requirements Maximum Allowable Limits
Parts Per Million (P.P.M.)
Total Solids* 350.0
Fixed Solids* 200.0
Organic and Volatile* 150.0
Iron 4.0
Chloride 25.0
Ammonium (NH 4.0
4
)
10.0 Nitrates (NO
2
)
10.0 Nitrates (NO
3
)
0.07 Manganese
40.0 Calcium and Magnesium
* ASTM Spec. D-1888 Method A or equal

www.enersys.com Publication No. US-FL-IOM-AA September 2016 Page 41
STORAGE BATTERY REPORT - Battery in Float Service Sheet No. _________
Company _______________________________ Batt. Type ___________ Date Installed
_______________
Location _______________________________ Pilot Cell No. __________ (rotate as needed)
Battery No. _______________________________ Full Charge Gravity (Range)
_______________
Monthly Quarterly
CHARGER
TEMPERATU
RES
DATE
DATE &
INITIALS
OF
READER
BAT
T.
TER
M
VOL
TS
VOL
TS
A
M
PS
ACI
D
LEV
EL
PILOT
CELL
HYDRO
METER
READING
S
PILO
T
CEL
L
ROO
M
CELL
VOL
TS
HYD.
RDG
VOL
TS
HYD.
RDG
VOL
TS
HYD.
RDG
VOL
TS
HYD.
RDG
VOL
TS
HYD.
RDG
1
2
3
4
5
6
7
8
9
10
11
12
13
14
15
16
17
18
19
20
21
22
23
24
25
26
27
28
29
30
31
32
33
34
35
36
37
38
39
40
41
42
43
44
45
46
47
48
49
50
51
52
53
54
55
56
57
58
59
Notes
Quarterly
ADDING WATER
(when required)
Add water after completing hydrometer readings.
Date Quantity
_________________ _________ Qts.
Annually
Connector Bolts
Retorqued
Record contact resistance readings and any
calculations.
Date Range of Resistance
Values Intercell Connectors
_____________ ________________________
Acceptance Test Results — Date
Performance Test Results — Date
60

Page 42
www.enersys.com Publication No. US-FL-IOM-AA September 2016
12.6 Filling and Charging Moist-charged Cells
Cells may be received moist-charged. This type of cell should be activated (filled with electrolyte
and charged) only when ready to be placed in service. Moist-charged cells are active and
contain charge. DO NOT SHORT THE TERMINAL POSTS. Moist-charged cells may be stored
for up to five years without deterioration in cool, low-humidity locations (<90
o
F, <50%H).
To activate the cells, remove and discard the pressure-relief valves and fill the cells to the low
level line with an approved grade electrolyte. Mix the electrolyte before use to eliminate
stratification.
NOTE: The filling electrolyte specific gravity must be 15 points (.015)
less than the cell nominal specific gravity.
When mixing electrolyte, always add acid to water. Pour slowly and stir constantly, to avoid
excessive heat or violent chemical reaction.
Allow the battery to stand for four hours after filling. Add additional sulfuric acid of the filling
electrolyte specific gravity to bring the electrolyte level up to the low level line. The charge must
be started within 12 hours of the initial fill.
Before charging, install the flame arrestors, and then lock in place with one quarter turn
clockwise. Then install the dust cap
, when provided, on each arrestor.
The preferable way to charge antimony alloy cells is a constant voltage averaging 2.50 volts per
cell. For calcium alloy cells, the voltage needs
to be 2.70 volts per cell. Charge for the time
shown in Table 8.1 after current stabilization.
Methods to accomplish such initial charging are:
• Parallel the battery to reduce the effective number of cells by half when the charger
voltage can be reduced significantly to achieve the volts per cell specified above, or
• Charge 80% of the cells on system charger, and use an auxiliary charger to charge the
remaining cells, or
• Charge about 80% of the cells from the positive end, using the maximum voltage
indicated previously. Then reconnect about 80% of the cells from the negative end,
and using maximum voltage indicated, charge until the remaining 20% of the cells that
were not charged the first time are fully charged. Do not be concerned if 60% of the
cells obtain twice the normal charge; however, they may require some additional
water.
If cell temperatures exceed 110
o
F (43
o
C), interrupt the charge and wait until the
temperature has dropped to 100
o
F (38
o
C). Then the charging may be resumed.

www.enersys.com Publication No. US-FL-IOM-AA September 2016 Page 43
Add filling electrolyte, where necessary, so all cells are at the high level line when the activating
charge is about two-thirds complete.
At the completion of th
e charge, the specific gravity of all cells, corrected to 77
o
F (25
o
C),
should be within the range indicated on the nameplate. At the end of charge, if the specific
gravity is higher, remove some electrolyte and replace with water. If lower, remove some
electrolyte and replace with electrolyte of higher specific gravity. At some remote locations,
electrolyte with higher specific gravity may not be available. In this case, adjust the level with
electrolyte instead of water. Measure the specific gravity and keep adjusting the level with
electrolyte until a normal specific gravity reading is achieved.
TABLE 12.2
ELECTROLYTE QUALITY
DILUTE SULFURIC ACID (H
2
SO
4
)
MAXIMUM IMPURITIES
% By Weight 1.250 – 1.300
Sp. Gr.
1.170 – 1.215
Sp. Gr.
Organic Matter
Platinum (Pt)
Sulfurous Acid (SO
2
)
Iron (Fe)
Copper (Cu)
Zinc (Zn)
Arsenic (As)
Antimony (Sb)
Selenium (Se)
Nickel (Ni)
Manganese (Mn)
Nitrates (NO
3
)
Ammonium (NH
4
)
Chloride (Cl)
Fixed Residue
None
None
0.0016
0.0020
0.0001
0.0016
0.00004
0.00004
0.0008
0.00004
0.000008
0.0002
0.0004
0.0004
0.012
None
None
0.0013
0.0016
0.00008
0.0013
0.00003
0.00003
0.0006
0.00003
0.000006
0.00016
0.0003
0.0003
0.009
For test method — See Federal Specification 0S-801 (latest issue)

Page 44
www.enersys.com Publication No. US-FL-IOM-AA September 2016
13.0 TEST PROCEDURES
13.1 Procedure for Battery Capacity Tests
At least 3 days but not more than 7 days before a battery capacity test, give the battery an
equalizing charge as described in Section 9.4.
1. Make sure all battery connections are clean, tigh
t and free of corrosion.
2. While the battery is on float, read and record th
e specific gravity and voltage of each cell,
the temperature of at least every tenth cell, and battery terminal float voltage.
3. Disconnect t
he battery charger and any other load on the ba
ttery to be tested.
4. To perform a rate adju
sted discharg
e test, select the discharge rate based upon the critical
load and time period. The test discharge current is equal to the rated discharge current
divided by the K Factor (see Table 13.1) for the initial battery electrolyte temperature (See
IEEE-450-2002 for reference).
5. With the variable load bank having
an ammeter in series and a volt
mete
r across the battery
terminals, connect the load, simultaneously starting the timing device. Maintain the correct
current while periodically reading and recording total battery voltage. When the minimum
total voltage has been reached, it is desirable to read and record each cell voltage including
an intercell connector.
6. Observe the
battery for intercell co
n
nector heating.
7. Calculate the capacity us
ing the following formula:
% Capacity at 77
o
F (25
o
C) = Ta x 100
Ts
Where Ta = test discharge time to specified voltage.
Where Ts = rated discharge time to specified voltage.
8. Recharge the battery, preferably using an equalizing charge
(Section 9.
4) to minimize the
recharge time.

www.enersys.com Publication No. US-FL-IOM-AA September 2016 Page 45
K TABLE
TABLE 13.1
Initial Temperature
(
o
C) (
o
F)
Factor K
16.7
17.2
17.8
18.3
18.9
19.4
20.0
20.6
21.1
21.7
22.2
22.8
23.4
23.9
24.5
25.0
25.6
26.1
26.7
27.2
27.8
28.3
28.9
29.4
30.0
30.6
31.1
31.6
32.2
32.8
33.4
62
63
64
65
66
67
68
69
70
71
72
73
74
75
76
77
78
79
80
81
82
83
84
85
86
87
88
89
90
91
92
1.098
1.092
1.086
1.080
1.072
1.064
1.056
1.048
1.040
1.034
1.029
1.023
1.017
1.011
1.006
1.000
0.994
0.987
0.980
0.976
0.972
0.968
0.964
0.960
0.956
0.952
0.948
0.944
0.940
0.938
0.936

Page 46
www.enersys.com Publication No. US-FL-IOM-AA September 2016
APPENDIX
HYDROGEN EVOLUTION CALCULATION
Significant amounts of hydrogen are evolved only as the battery approaches full charge. The
maximum hy
drogen evolution rate is 0.000267 cubic feet (7.56 x 10
-6
cubic meters) per minute
per charging ampere per cell at 77
o
F (25
o
C).
To calculate the amount of hydrogen produced, consider an antimony alloy type (flat plate or
tubular) batt
ery at a point where it is nearing end
of life, or equalize charge at 2.33 VPC.
Float Current demand of
fully charged stationary lead-acid cells.
Milliamperes per 100 Ah @ 8-hr. rate
Charge Voltage Antimony Calcium
NEW – OLD
2.15 vpc 15 – 60 —
2.17 vpc 19 – 80 4
2.20 vpc 26 – 105 6
2.23 vpc 37 – 150 8
2.25 vpc 45 – 185 11
2.27 vpc 60 – 230 12
2.33 vpc 120 – 450 24
2.37 vpc 195 – 700 38
2.41 vpc 300 – 1100 58
NOTE: The above values apply when the electrolyte temperature is 77
o
F (25
o
C).
The values will double for every 15
o
F (8
o
C) of temperature rise. If the
temperature drops, the current value will be halved for every 15
o
F (8
o
C)
decrease. Antimony ranges indicate current increases due to cell aging.

www.enersys.com Publication No. US-FL-IOM-AA September 2016 Page 47
HYDROGEN FORMULA
Formula for hydrogen evolved evolved—C = FC
x AH x K x N
1000 100
C = Cubic feet (cubic meters) of hydrogen per minute
FC = Float current per 100 AH (temperature compensated) in milliamperes
AH = Ampere hours (nominal 8 hr.)
K = Constant = 0.000267 cubic feet (7.56 x 10
-6
cubic meters)
per minute of hydrogen per Ah.
N = Number of cells
EXAMPLE
60 cell GT-41 (3730 AH) near end of life, on equalize at 2.33 VPC at 92
o
F (33
o
C)
electrolyte temperature
FC = 450 (from table) x 2 for 92
o
F (33
o
C) = 900 milliamperes
C = 900
x 3730 x 0.000267 cu. ft. (7.56 x 10
-6
cu. m.) x 60
1000 100
Hydrogen = 0.538 cu. ft. (0.0152 cu. m.) per minute
Assume a room size of 16,000 cu. ft. (452.5 cu. m.) that is allowed a 2% concentration of
hydrogen or 320 cu. ft. (9.06 cu.
m.). At the above hydrogen evolution rate of 0.538 cu. ft.
(0.0152 cu. m.) per minute, it would require 10 hours to reach 2% concentration. Thus with one
air change every 10 hours, the hydrogen concentration could be maintained below 2%.

PRECAUTIONS*
Do Not bring any heat or flame source near battery.
1.
USE EDGE OF MODULE
WHEN POSITIONING BATTERY
DO NOT PUSH ON CENTER
TO POSITION BATTERY
Do Not use any lubricant other than EnerSys Pro-Slide or Dow Corning Silicon
Compound #111 to lubricate rails to facilitate sliding of batteries.
2.
Do Not lift any cells by the terminal posts.
3.
Do Not tamper with seal nuts on the cell post.
4.
Do Not remove coating from post or connectors and expose any bare copper.
5.
6.
Do Not allow cell temperature to exceed 110
o
F during charging.
Publication No. US-FL-IOM-AA September 2016 • Subject to revisions without prior notice. E.& O.E.
Do Not clean cell with anything other than water/bicarbonate of soda.
7.
Do Not over torque connections.
8.
Do Not store EnerSys Lead Antimony batteries for over three months without charge –
9.
EnerSys Lead Calcium for over six months without charge, at normal temperatures.
*
These are only a few of the precautions. Please read this manual thoroughly for complete details.
Represented by:
EnerSys EnerSys EMEA
P.O. Box 14145 Brussels, Belgium
Reading, PA 19612-4145 Tel: +32 (0)2 247 94 47
USA EnerS
ys
Asia
Printed in U.S.A
Tel: +1-610-208-1991 Guangdong, China
© 2007 EnerSys. All rights reserved.
+1-800-538-3627 Tel: +86 755 2689 3639
Trademarks and logos are the property
of EnerSys and its affiliates unless
otherwise noted.
www.enersys.com
