
Public | V240m+ External User Manual | Version 1.5 | September 15
th
2020
V240m+ External User Manual
Verifone (U.K.) Ltd.
3 Roundwood Avenue, Stockley Park, Uxbridge, UB11 1AF
IMPORTANT NOTICE

V240m+ User Manual 2
Public | V240m+ External User Manual | Version 1.5 | September 15
th
2020
Verifone, the Verifone logo, VeriCentre, SoftPay, Omni, NURIT, VeriShield Protect, V
x
Solutions, VX
Evolution, SC, and MX Solutions are trademarks of Verifone Systems, Inc. in the United States or other
countries.
All other brand names and trademarks appearing in this publication are the property of their respective
owners.
NO WARRANTY
Although Verifone has attempted to ensure the accuracy of the contents of this manual, this manual may
contain errors or omissions. This manual is supplied “as-is,” without warranty of any kind, either expressed
or implied, including the implied warranties of merchantability and fitness for a particular purpose.
LIMITED LIABILITY
In no event shall Verifone be liable for any indirect, special, incidental, or consequential damages including
damages for loss of business, profits, or the like, even if Verifone or its representatives have been advised
of the possibility of such damages.
Verifone (U.K.) Ltd.
3 Roundwood Avenue
Stockley Park
Uxbridge
UB11 1AF
UK
www.verifone.com
Copyright © 2018 Verifone Systems, Inc. All rights reserved
No part of this publication may be copied, distributed, stored in a retrieval system, translated into any human
or computer language, transmitted in any form or by any means without the prior written consent of Verifone
Systems, Inc. or Verifone UK Ltd.
REVISION HISTORY
Version
Author
Date
Changes
1.0
MKB
29/05/2018
First Release
1.1
AJW
03/04/2019
Minor corrections and updates for latest app
release

V240m+ User Manual 3
Public | V240m+ External User Manual | Version 1.5 | September 15
th
2020
1.2
CH
14/08/2019
Updated to include
* Account Verification
* CNP Telephone Order
* Purchase
* Refund
* Signature Transaction
1.3
CH
03/09/19
Added in updates as per requests from
helpdesk
1.4
CH
21/07/2020
Added in detail on how to set up GPRS
1.5
PW
15/09/2020
Added in detail on communications fallback
Updated Sim Card details.

V240m+ User Manual 4
Public | V240m+ External User Manual | Version 1.5 | September 15
th
2020
CONTENTS
Contents
REVISION HISTORY .............................................................................................................................................. 2
CONTENTS ........................................................................................................................................................... 4
1 INTRODUCTION ................................................................................................................................................ 6
2 GET TO KNOW THE V240m+DEVICE ................................................................................................................. 7
2.1 OVERVIEW ................................................................................................................................................. 7
2.2 TERMINAL FRONT ...................................................................................................................................... 8
2.3 TERMINAL BACK ........................................................................................................................................ 9
2.4 TERMINAL BASE STATION ........................................................................................................................ 10
2.5 FULL FEATURED TERMINAL BASE STATION .............................................................................................. 11
3 GENERAL USE ................................................................................................................................................. 12
3.1 REPLACING PAPER ROLL .......................................................................................................................... 12
3.2 FULL FEATURED BASE CONNECTIONS ...................................................................................................... 13
3.3 UNDERSTANDING THE KEYPAD ............................................................................................................... 14
3.4 ENVIRONMENTAL FACTORS .................................................................................................................... 15
3.5 POWER .................................................................................................................................................... 15
3.6 HOW TO INSERT A CARD.......................................................................................................................... 16
3.7 HOW TO SWIPE A CARD........................................................................................................................... 16
3.8 HOW TO PROCESS A CONTACTLESS CARD ............................................................................................... 17
4 HOW TO CONNECT YOUR DEVICE .................................................................................................................. 18
4.1 WI-FI ........................................................................................................................................................ 18
4.1.1 Visible Wi-Fi Networks .......................................................................................................................... 18
4.1.2 Hidden Wi-Fi Networks ......................................................................................................................... 23
4.2 Bluetooth ................................................................................................................................................. 29
4.3 GPRS ........................................................................................................................................................ 34
4.4 COMMUNICATIONS FALLBACK ................................................................................................................ 39
5 TRANSACTION PROCESSING ........................................................................................................................... 40
5.1 USER LOGON ........................................................................................................................................... 40
5.2 SALE ICC ................................................................................................................................................... 42
5.3 SALE SWIPE .............................................................................................................................................. 45

V240m+ User Manual 5
Public | V240m+ External User Manual | Version 1.5 | September 15
th
2020
5.4 SALE CTLS ................................................................................................................................................. 48
6.1 REFUND ................................................................................................................................................... 51
6.2 CUSTOMER NOT PRESENT – SALE MAIL ORDER....................................................................................... 54
6.3 CUSTOMER NOT PRESENT – REFUND MAIL ORDER ................................................................................. 60
6.4 CUSTOMER NOT PRESENT – SALE TELEPHONE ORDER ............................................................................ 65
6.5 CUSTOMER NOT PRESENT – REFUND TELEPHONE ORDER ...................................................................... 71
6.6 ACCOUNT VERIFICATION ......................................................................................................................... 76
7 FREQUENTLY ASKED QUESTIONS .................................................................................................................... 78
Q: Blank Display ............................................................................................................................................. 78
Q: Keypad Does Not Respond ........................................................................................................................ 78
Q: Transactions Fail to Process ...................................................................................................................... 78
8 CONTACT DETAILS .......................................................................................................................................... 79
MERCHANT HELPDESK ................................................................................................................................... 79
TECHNICAL SERVICES ..................................................................................................................................... 79
CUSTOMER SERVICES .................................................................................................................................... 79
SALES ENQUIRIES ........................................................................................................................................... 79

V240m+ User Manual 6
Public | V240m+ External User Manual | Version 1.5 | September 15
th
2020
1 INTRODUCTION
This guide is the primary source of the information for setting up, installing and screen messages
that will be seen during transaction processing the Verifone V240m+payment device, when used
in conjunction with the PAYWare Ocius Gateway.

V240m+ User Manual 7
Public | V240m+ External User Manual | Version 1.5 | September 15
th
2020
2 GET TO KNOW THE V240m+DEVICE
2.1 OVERVIEW
The V240m+is a consumer-facing handheld device. The product’s design is equally appealing as
a handheld terminal for PIN entry and robust enough to look and function appropriately in a fixed
mount setting.
The V240m+can utilize over-the-air connectivity, facilitating mobile telephony technology for
sending and receiving data, using existing operator-provided Wi-Fi, Bluetooth, or 3G connectivity.
This guide provides an introduction and basic setup procedures for V240m+terminals.

V240m+ User Manual 8
Public | V240m+ External User Manual | Version 1.5 | September 15
th
2020
2.2 TERMINAL FRONT
The V240m+includes the following features: -
• Capacitive touch LCD display and CTLS tap area
• Smart card reader
• Magnetic card reader
• Integrated thermal printer
• Secure keypad supporting 3x5 matrix containing 0-9, *, #, Cancel (Red), Backspace/Clear
(Yellow), and Enter (Green) keys.

V240m+ User Manual 9
Public | V240m+ External User Manual | Version 1.5 | September 15
th
2020
2.3 TERMINAL BACK
After removing the rear cover and battery, the underside of the V240m+device shows
the following:
A Micro SD slot
• Dual MSAM slots to support stored-value card programs or other merchant card requirements
• Dual MICRO SIM Card compartments

V240m+ User Manual 10
Public | V240m+ External User Manual | Version 1.5 | September 15
th
2020
2.4 TERMINAL BASE STATION
The V240m+Base provides a stable mounting platform for the V240m+terminal. The Charging
Base supports charging only with no communication functionality. The Charging Base
accommodates and supplies power to the V240m+portable terminals.

V240m+ User Manual 11
Public | V240m+ External User Manual | Version 1.5 | September 15
th
2020
2.5 FULL FEATURED TERMINAL BASE STATION
In addition to charging the terminal the full-featured base also provides the following cable
configurations: -
• Ethernet port RJ-45 socket (for connecting PINPad to LAN infrastructure)
• RS232 port RS232 socket (for connecting PINPad to LAN infrastructure),
• MOD-8 socket, Mini USB & DC-in jack
• USB ports Mini USB and type A USB
V240m+ User Manual 12
Public | V240m+ External User Manual | Version 1.5 | September 15
th
2020
3 GENERAL USE
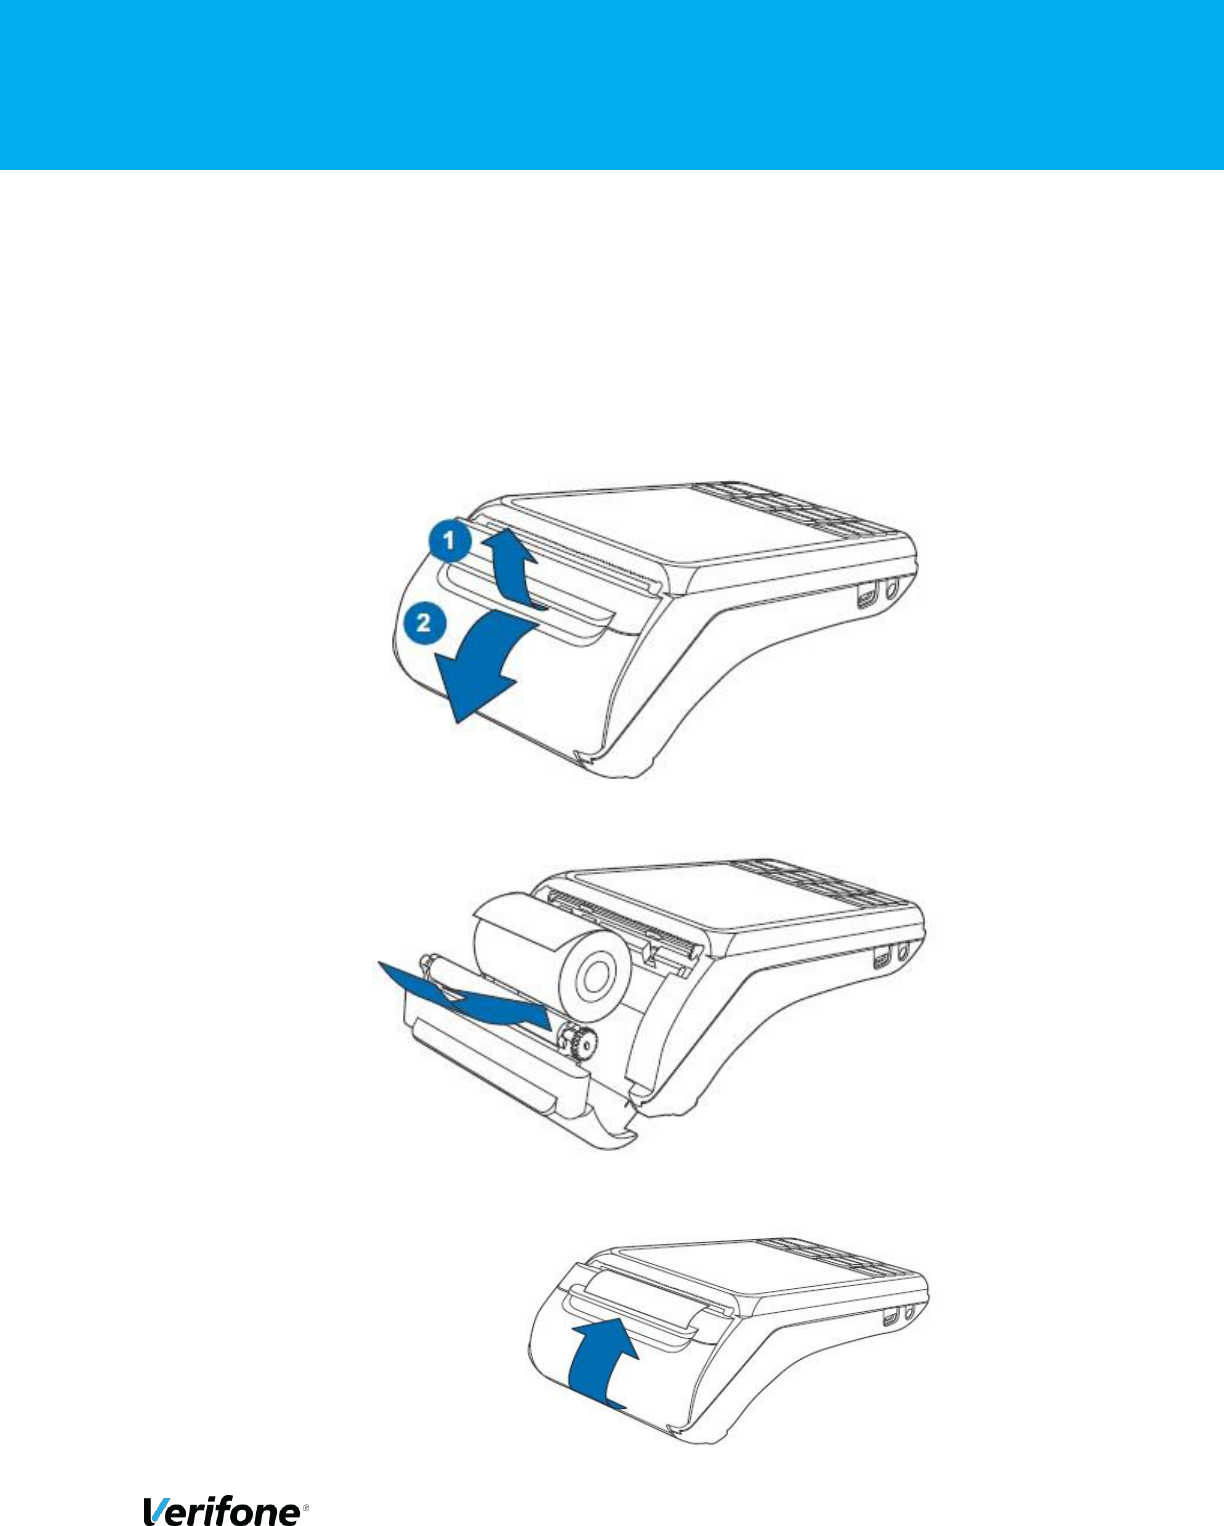
3.1 REPLACING PAPER ROLL
Use the following steps to load a roll of 57mm x 40mm thermal printer paper into the compartment.
1) Unlock the paper compartment by pulling up the latch and swinging the door
downwards.
2) Load the paper roll as shown in below, with the edge of the paper on the top of the roll.
Pull a length of paper up over the serrated cutter and close the compartment door.

V240m+ User Manual 13
Public | V240m+ External User Manual | Version 1.5 | September 15
th
2020
3.2 FULL FEATURED BASE CONNECTIONS
To connect the terminal to other devices via Ethernet, RS-232 use the V240m+full feature base.
The full-featured Base provides a standard RJ-45 LAN socket, RS-232 port, a mini-USB port. The
V240m+terminal must be docked on the base to utilize cable connectivity.
Ethernet

V240m+ User Manual 14
Public | V240m+ External User Manual | Version 1.5 | September 15
th
2020
3.3 UNDERSTANDING THE KEYPAD
This section will explain which buttons will
allow the operator to key in particular
characters.
Key
Characters
1
1 Q Z . q z
2
2 A B C a b c
3
3 D E F d e f
4
4 G H I g h i
5
5 J K L j k l
6
6 M N O m n o
7
7 P R S p r s
8
8 T U V t u v
9
9 W X Y w x y
*
Scroll up on the menus
0
0 * # . - + Space , ‘ “ ! : ; @ =
& / \ % $ ( ) ^ _
#
Scroll down on the menus

V240m+ User Manual 15
Public | V240m+ External User Manual | Version 1.5 | September 15
th
2020
3.4 ENVIRONMENTAL FACTORS
The following are the temperature and humidity specifications of the V240m:
• Operating temperature: 0° to 50° C (32° to 122° F)
• Storage temperature: -20° to 70° C (-4° to 158° F)
• Relative humidity: 5% to 90% (RH non-condensing)
Subjecting the V240m+to extreme environmental conditions will result in tamper events.
Any temperatures above 100 ºC (± 5 degrees) or below -37 ºC (± 5 degrees) will result in
a tamper condition. Additionally, should the battery voltage drift outside of the range of 2.2
VDC to 3.3 VDC, the unit will tamper as well.
3.5 POWER
Unit Rating: 5VDC, 1A/2.2A
Power Adaptor:
• Input: 100 – 240V ~ 150mA 50 - 60Hz
• Output: 5.0V === 1.0A
V240m+ User Manual 16
Public | V240m+ External User Manual | Version 1.5 | September 15
th
2020
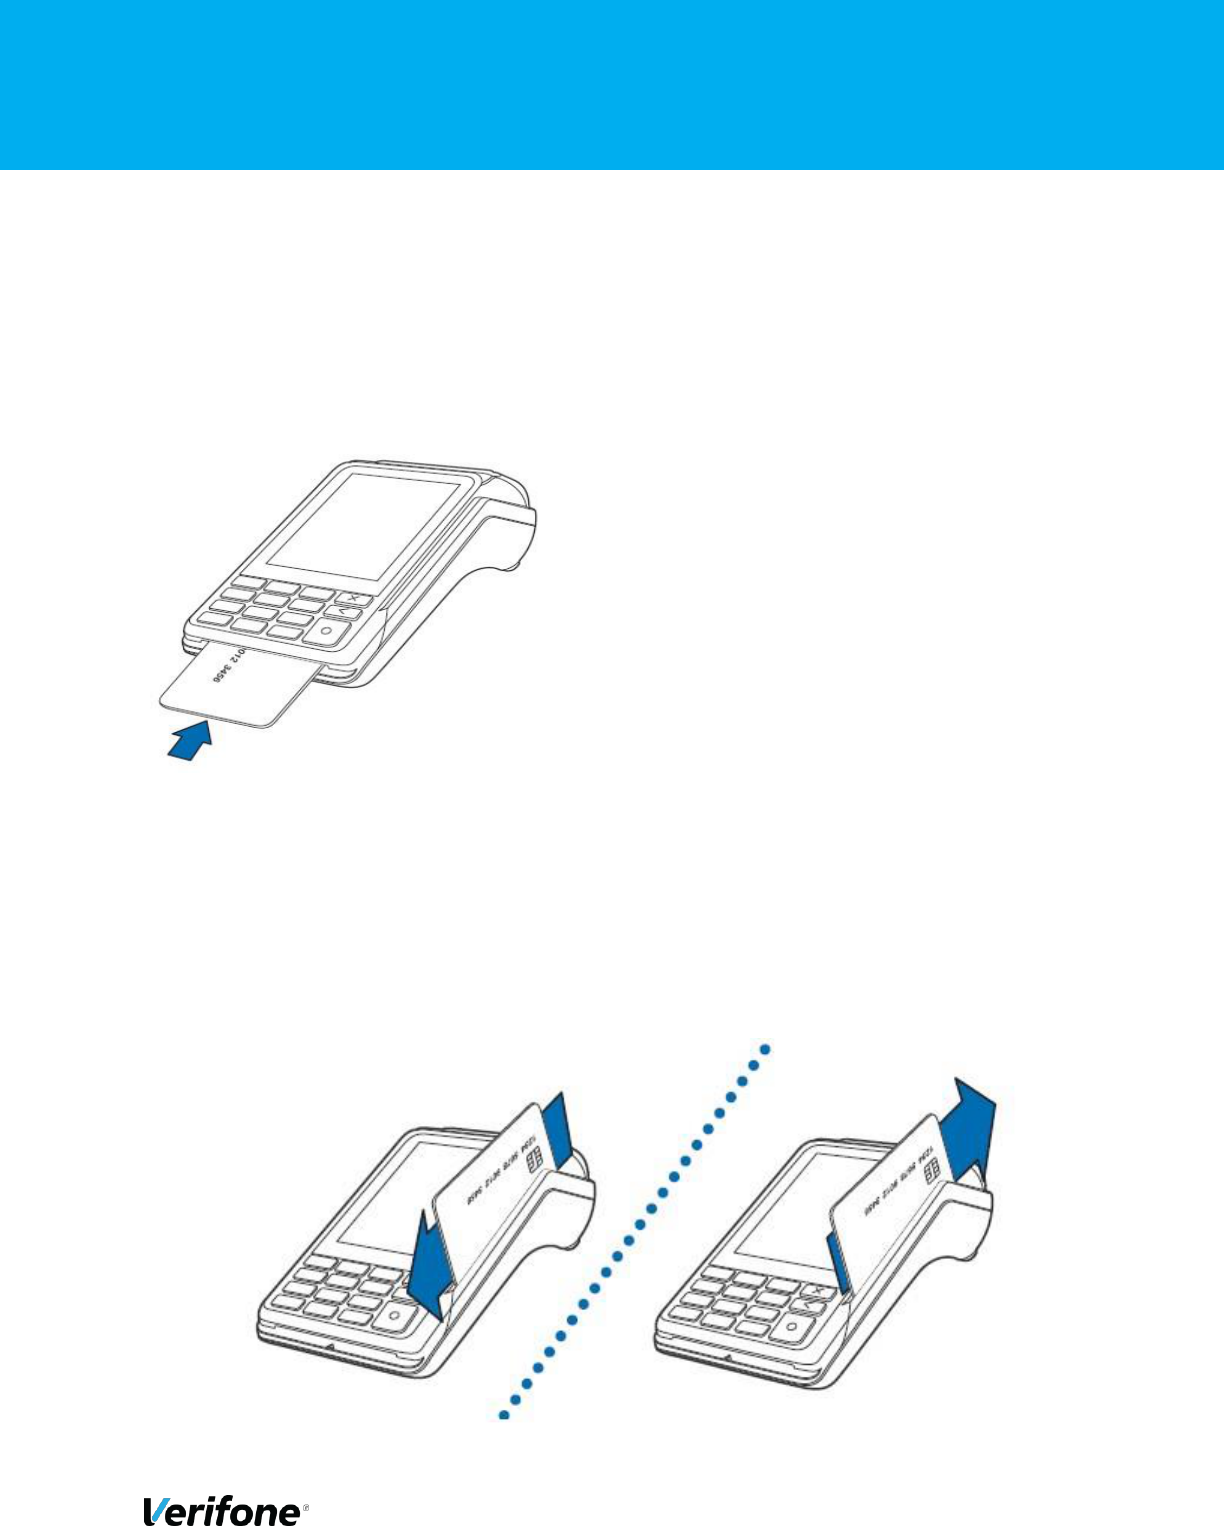
3.6 HOW TO INSERT A CARD
To conduct a smart card transaction: -
1) Position the smart card with the gold contacts facing upward.
2) Insert the card into the smart card reader slot in a smooth, continuous motion until it seats
firmly.
3) Remove the card when the display indicates the transaction is completed.
3.7 HOW TO SWIPE A CARD
To conduct a magnetic swipe transaction: -
1) Position a magnetic card with the stripe facing the keypad. 2)
Swipe it through the magnetic card reader.

V240m+ User Manual 17
Public | V240m+ External User Manual | Version 1.5 | September 15
th
2020
3.8 HOW TO PROCESS A CONTACTLESS CARD
To perform a contactless smart card transaction: -
1) Gently tap the card onto or hold the card (within 4 cm) against the surface of the display
where the contactless logo appears.
2) An activated LED visual on the display accompanied by a short beeping sound indicates
a successful transaction.
V240m+ User Manual 18
Public | V240m+ External User Manual | Version 1.5 | September 15
th
2020
4 HOW TO CONNECT YOUR DEVICE
Please note that most option numbers do not have numbers assigned, however, the menu options
will respond to the numbers in the guide. To navigate up and down the menus, the * and # keys
respectively should be used.
4.1 WI-FI
This section will cover setting up the Wi-Fi connection when both the network is visible and
hidden
4.1.1 Visible Wi-Fi Networks
Step
Instruction
Screen Information
1
Either Tap “Green Bar” at the bottom of the screen or
press “Green Circle” or ”Enter” button to enter to the Main
menu.
2
Press “3” to go to the “Supervisor” menu.

V240m+ User Manual 19
Public | V240m+ External User Manual | Version 1.5 | September 15
th
2020
Step
Instruction
Screen Information
3
Enter the Supervisor’s password.
4
Press “2” to go to the “Communication” menu.
5
In “Communication Panel” menu, slide the finger on the
screen upward to view the remaining options.
6
Select “Configuration” option. It should go to the
“Configuration” menu.

V240m+ User Manual 20
Public | V240m+ External User Manual | Version 1.5 | September 15
th
2020
Step
Instruction
Screen Information
7
In the “Configuration” menu, select “Network Interface”
option.
8
In the “Network Interface” menu, select “WiFi” option.
9
In the “WiFi” Menu, select “WiFi Scan”.
10
You will see that the device is now searching for the WiFi
networks.

V240m+ User Manual 21
Public | V240m+ External User Manual | Version 1.5 | September 15
th
2020
Step
Instruction
Screen Information
11
Selecting your desired WiFi network. In this example, the
“VFI_GUEST” is selected.
12
Enter “Add” to continue.
13
In the “Password Wizard”, press “Pre-Shared-Key (PSK)”
to provide the password.
14
Enter the WiFi’s password and press “OK” to continue.

V240m+ User Manual 22
Public | V240m+ External User Manual | Version 1.5 | September 15
th
2020
Step
Instruction
Screen Information
15
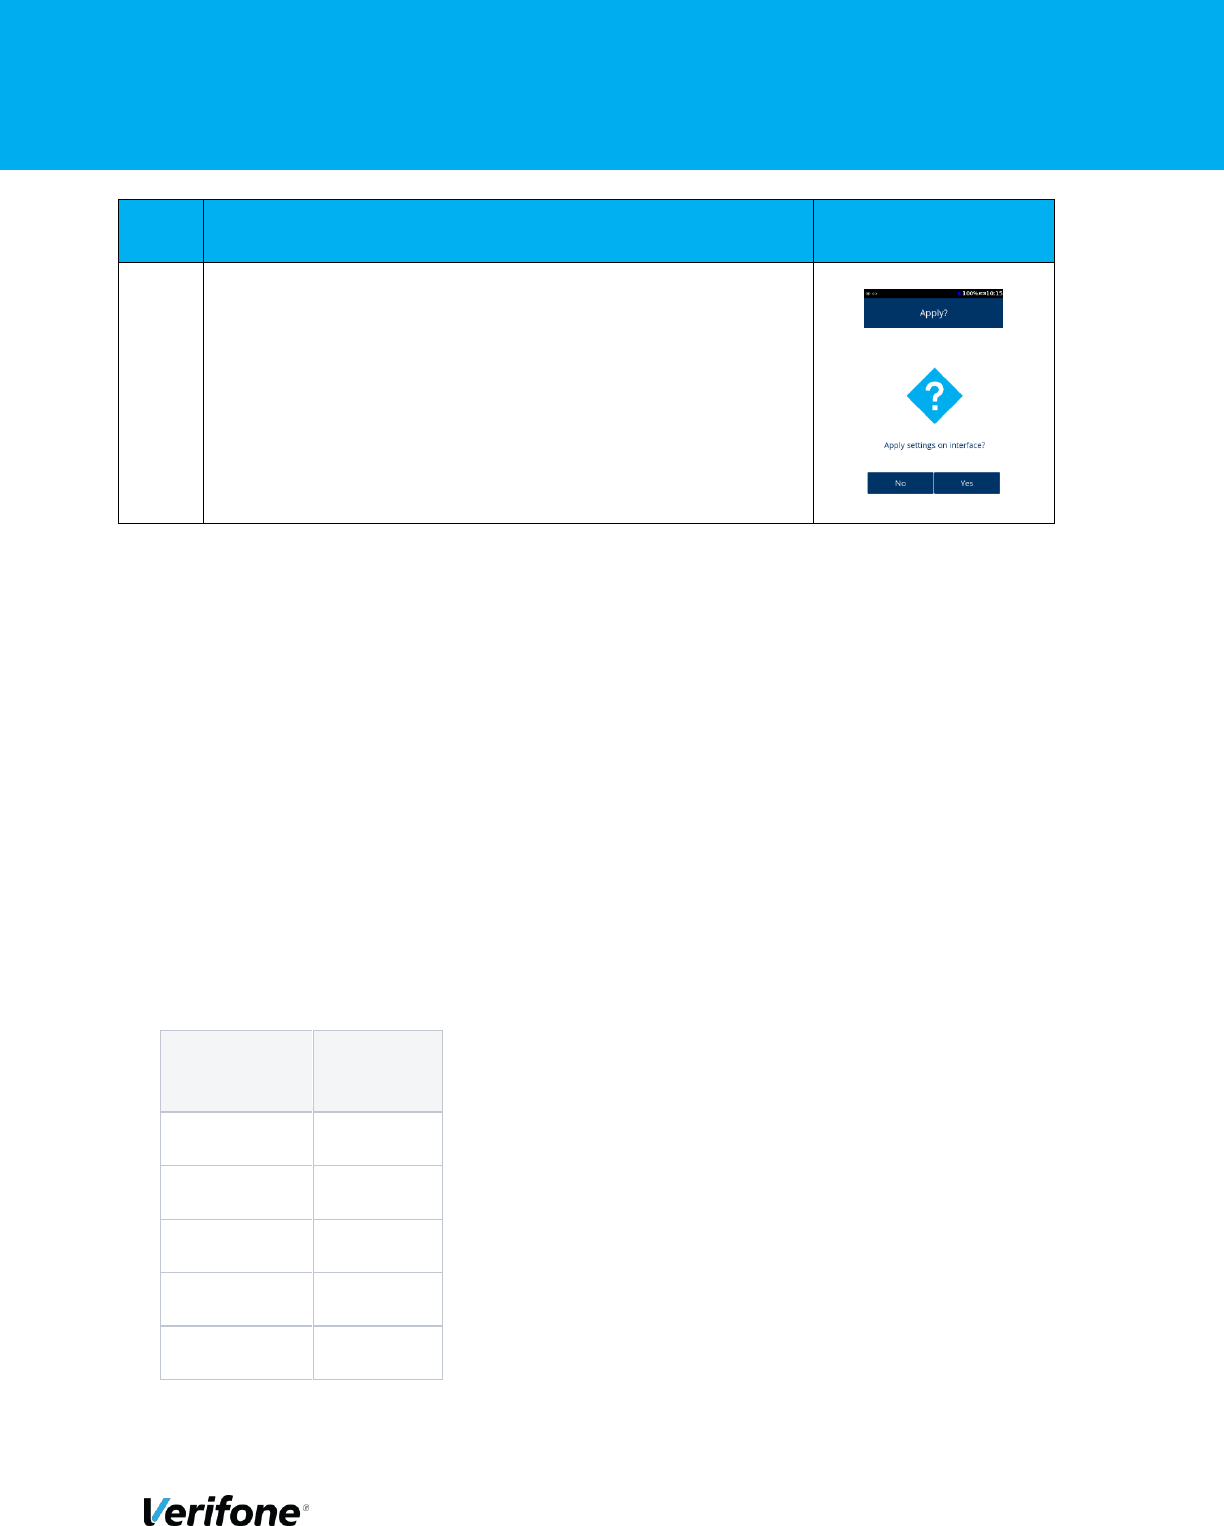
Press “Save” to save the WiFi’s configuration.
16
Press “OK” to confirm.
17
Click “Yes” to apply the settings on the interface.
18
Either Tap the top bar (WiFi) or press “X” button to exit
“WiFi” menu.

V240m+ User Manual 23
Public | V240m+ External User Manual | Version 1.5 | September 15
th
2020
4.1.2 Hidden Wi-Fi Networks
Step
Instruction
Screen Information
1
Either press “Green Bar” at the bottom of the screen” or
press “Green Circle” or “Enter” button to enter the Main
menu.
2
Press “3” to go to the “Supervisor” menu.
3
Enter the Supervisor’s password.
4
Press “2” to go to the “Communication” menu.

V240m+ User Manual 24
Public | V240m+ External User Manual | Version 1.5 | September 15
th
2020
Step
Instruction
Screen Information
5
In “Communication Panel” menu, slide the finger on the
screen upward to view the remaining options.
6
Select “Configuration” option. It should go to the
“Configuration” menu.
7
In the “Configuration” menu, select “Network Interface”
option.
8
In the “Network Interface” option, select “WiFi” option.

V240m+ User Manual 25
Public | V240m+ External User Manual | Version 1.5 | September 15
th
2020
Step
Instruction
Screen Information
9
Tap “New” to manual setup the hidden WiFi network.
10
Tap “SSID” to go to SSID menu.
11
Enter “SSID” name.
12
As an example, “VFI_GUEST” is entered. Then press “OK”
to confirm.

V240m+ User Manual 26
Public | V240m+ External User Manual | Version 1.5 | September 15
th
2020
Step
Instruction
Screen Information
13
Under the SSID, you should see “VFI_GUEST”.
14
Tap “Authentication” to set up the WiFi’s credential.
15
In the “Authentication” menu, select the Authentication’s
protocol accordingly. In this example, “WPA-PSK” is
selected.
16
Now Tap the “Pre-Shared-Key (PSK)” option to provide the
passkey.

V240m+ User Manual 27
Public | V240m+ External User Manual | Version 1.5 | September 15
th
2020
Step
Instruction
Screen Information
17
In “Pre-Shared-Key (PSK) menu, enter the WiFi’s credential.
18
Tap “OK” to confirm and return to the previous menu.
19
As shown under the “Pre-Shared-Key (PSK)” option, there
are a number of Asterisk(s) shown below. Either press “X” or
Tap on top of the screen bar “Authentication” to exit.
20
Press “OK” to confirm.

V240m+ User Manual 28
Public | V240m+ External User Manual | Version 1.5 | September 15
th
2020
Step
Instruction
Screen Information
21
Click “Yes” to apply the settings on the interface.
22
You will see that the device is updating the network
interface.
23
Press “OK” to confirm.
24
Either Tap the top bar (WiFi) or press “X” button to exit “WiFi”
menu.

V240m+ User Manual 29
Public | V240m+ External User Manual | Version 1.5 | September 15
th
2020
4.2 Bluetooth
Step
Instruction
Screen Information
1
Either press “Green Bar” at the bottom of the screen” or
press “Green Circle” or “Enter” button to enter the Main
menu.
2
Press “3” to go to the “Supervisor” menu.
3
Enter the Supervisor’s password.
4
Press “2” to go to the “Communication” menu.

V240m+ User Manual 30
Public | V240m+ External User Manual | Version 1.5 | September 15
th
2020
5
In “Communication Panel” menu, slide the finger on the
screen upward to view the remaining options.
6
Select “Configuration” option. It should go to the
“Configuration” menu.
7
In the “Configuration” menu, select “Network Interface”
option.
8
In the “Network Interface” menu, select “Bluetooth” option.
9
Pair with Base – Either:
1. Dock the v240m+with the base, wait a few seconds then
select Pair with Docked Base

V240m+ User Manual 31
Public | V240m+ External User Manual | Version 1.5 | September 15
th
2020
Or
1. Press the button on the front of the base and select
Search
10
Tap “OK” to continue.
11
Once the device has completed the scan, select your
target device for paring.
12
Tap “Yes” to confirm pairing.
13
You will be prompted to add in the PIN of the base station
(123456)
Enter the PIN and Tap “OK” to continue.

V240m+ User Manual 32
Public | V240m+ External User Manual | Version 1.5 | September 15
th
2020
16
You should see on the screen that device is pairing.
17
Tap “OK” to acknowledge that the device has completed
paring successfully.
18
To activate the Bluetooth connection if not done
automatically go to the configuration screen again and
select configure devices
19
Select the base unit you’d like to activate

V240m+ User Manual 33
Public | V240m+ External User Manual | Version 1.5 | September 15
th
2020
20
Select to activate
21
Activation will show as succeeded, press ok.
22
Now go back to the main network interface page and
select BT Lan IPv4 or IPv6
23
Select to enable, select yes

V240m+ User Manual 34
Public | V240m+ External User Manual | Version 1.5 | September 15
th
2020
24
Please note, if you’d like to enter a static IP this can also
be done here under DHCP setting select No
25
By selecting no you will get additional menu options to add
in IP address, subnet mask, Gateway IP Address, DNS 1
and DNS 2 which you can now enter.
4.3 GPRS
The below section will cover how to set up GPRS on your device. Prior to following these steps
ensure there is a valid SIM card in your device. These instructions will provide the details for the
Verifone default SIM cards.
Step
Instruction
Screen Information
1
Either press “Green Bar” at the bottom of the screen” or press
“Green Circle” or “Enter” button to enter the Main menu.

V240m+ User Manual 35
Public | V240m+ External User Manual | Version 1.5 | September 15
th
2020
Step
Instruction
Screen Information
2
Press “3” to go to the “Supervisor” menu.
3
Enter the Supervisor’s password.
4
Press “2” to go to the “Communication” menu.

V240m+ User Manual 36
Public | V240m+ External User Manual | Version 1.5 | September 15
th
2020
Step
Instruction
Screen Information
5
In “Communication Panel” menu, slide the finger on the screen
upward to view the remaining options.
6
Select “Configuration” option. It should go to the “Configuration”
menu.
7
In the “Configuration” menu, select “Network Interface” option.

V240m+ User Manual 37
Public | V240m+ External User Manual | Version 1.5 | September 15
th
2020
Step
Instruction
Screen Information
8
In the network interface menu select “Mobile Data” option.
9
In mobile data select “Mobile settings”
10
In the mobile settings you will see the following screen
11
Set the APN
Verifone Telenor Sims - verifone.inc.cxn

V240m+ User Manual 38
Public | V240m+ External User Manual | Version 1.5 | September 15
th
2020
Step
Instruction
Screen Information
12
Set the autostart to yes if you need it to always be on
13
Set PPP username
Verifone Telenor Sims - Blank
14
Set PPP Password
Verifone Telenor Sims - Blank
15
Press save
V240m+ User Manual 39
Public | V240m+ External User Manual | Version 1.5 | September 15
th
2020
Step
Instruction
Screen Information
16
Device will then ask if you’d like to apply these settings on your
interface, select yes
Your GPRS is now setup and working
4.4 COMMUNICATIONS FALLBACK
Communications fallback is supported on the V240m+ in standalone mode only for WiFi, GPRS and
Bluetooth communication types.
For example, if your WiFi connection is a primary connection and is lost, the next connection method
available that has been setup (say GPRS) should be used to keep communications to Verifone
gateway alive.
Regarding the recovery of lost communications, if your primary communication was set as WiFi and
had been lost previous but came back available, then the terminal would look to re-connect to the
primary communication method available.
This recovery of connectivity to the primary communication can occur before and during the
transaction process (before authorisation to Verifone gateway takes place).
Communication Method Priority List - Please note, this is a default configuration priority applied to
all Engage terminal types
Priority Order
Number
Interface
Type
1
LAN
2
USB
3
WIFI
4
BLUETOOTH
5
GPRS

V240m+ User Manual 40
Public | V240m+ External User Manual | Version 1.5 | September 15
th
2020
5 TRANSACTION PROCESSING
This section will cover the on-screen messages that you will see on the terminal. Please note
messaging will be dependent on the settings enabled on the account and level of integration
performed by your POS provider.
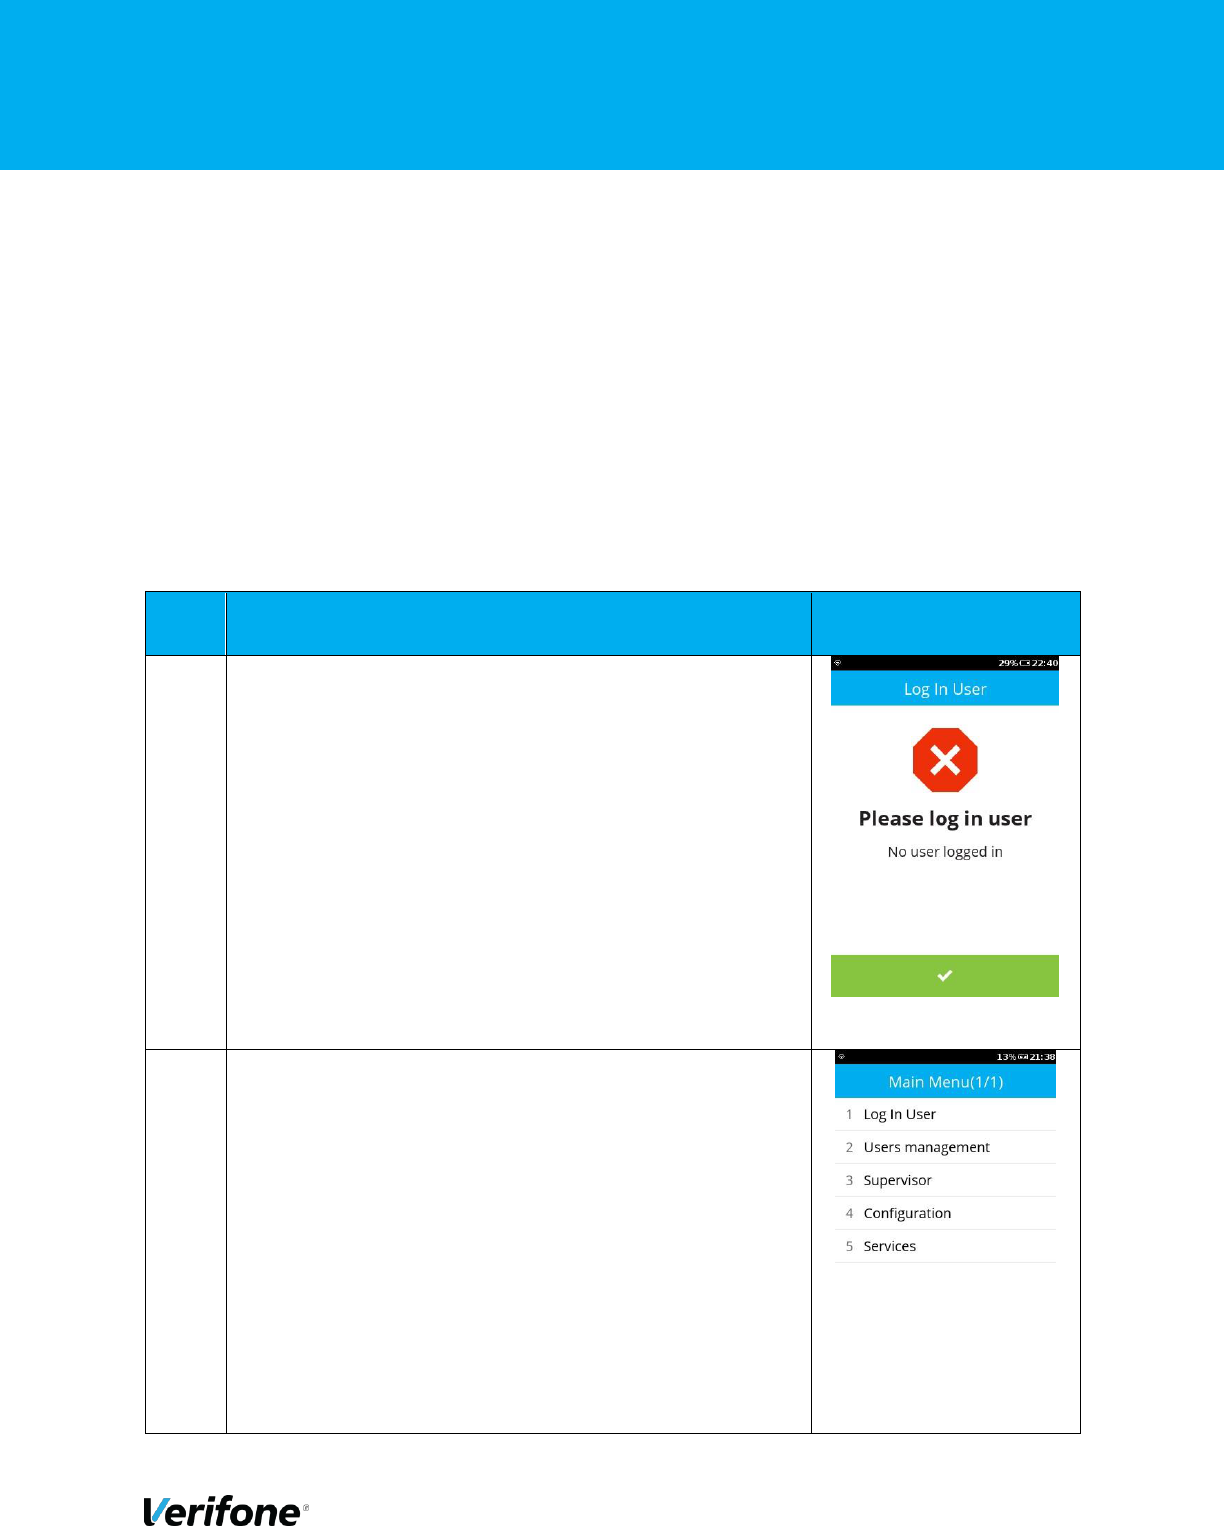
5.1 USER LOGON
Step
Instruction
Screen Information
1
Either press “Green Bar” at the bottom of the
screen” or press “Green Circle” or “Enter”
button to enter the Main menu.
2
Press “1” to go to the “Log In User” menu.
3
Enter “User ID” and press “Enter” to continue.

V240m+ User Manual 41
Public | V240m+ External User Manual | Version 1.5 | September 15
th
2020
Step
Instruction
Screen Information
4
Enter “Password” and press “Enter” to
continue.
5
The device is now connecting the server.
6
Either press “Green Bar” at the bottom of the
screen” or press “Green Circle” or “Enter”
button to complete.
7
After the successful login, the device can
accept the payment.

V240m+ User Manual 42
Public | V240m+ External User Manual | Version 1.5 | September 15
th
2020
5.2 SALE ICC
Step
Instruction
Screen Information
1
To initiate the Sale payment, just enter the required amount.
2
After amount entered, press the “Green” button or “Green
Circle” button to start the transaction.
3
Option to add the gratuity, Press “Green” to add gratuity or
“Red” to skip.

V240m+ User Manual 43
Public | V240m+ External User Manual | Version 1.5 | September 15
th
2020
Step
Instruction
Screen Information
4
On this screen, the user can choose the card payment method,
i.e. Tap for contactless, Swipe for MSR or Insert for ICC
transaction. In this example, we have chosen ICC transaction.
5
After the card has been inserted, the device will prompt for the
PIN. Enter the PIN.
6
After the transaction have been approved, the terminal will
display a confirmation message as shown. Either press “Green
Bar” at the bottom of the screen” or press “Green Circle” or
“Enter” button to complete.
7
Remove the card as prompted.

V240m+ User Manual 44
Public | V240m+ External User Manual | Version 1.5 | September 15
th
2020
Step
Instruction
Screen Information
8
The terminal will display the printing message.
9
Once complete the terminal will return to the main menu

V240m+ User Manual 45
Public | V240m+ External User Manual | Version 1.5 | September 15
th
2020
5.3 SALE SWIPE
Step
Screen Information
Instruction
1
To initiate the Sale payment, just enter the required amount.
2
After amount entered, press the “Green” button or “Green
Circle” button to start the transaction.
3
Option to add the gratuity, Press “Green” to add gratuity or
“Red” to skip.

V240m+ User Manual 46
Public | V240m+ External User Manual | Version 1.5 | September 15
th
2020
4
On this screen, the user can choose the card payment method,
i.e. Tap for contactless, Swipe for MSR or Insert for ICC
transaction. In this example, we are showing a swipe
transaction.
5
After the card has been swiped the device will prompt for
signature verification (at this point a merchant receipt will be
printed with a box for a signature)
6
You may see a screen where the terminal is “connecting”, this
screen should only show for a couple of seconds while the
terminal is establishing a connection.

V240m+ User Manual 47
Public | V240m+ External User Manual | Version 1.5 | September 15
th
2020
7
After the transaction have been approved, the terminal will
display a confirmation message as shown. Either press “Green
Bar” at the bottom of the screen” or press “Green Circle” or
“Enter” button to complete.
8
The terminal will display the printing message.
9
When complete the terminal will return to the main menu.

V240m+ User Manual 48
Public | V240m+ External User Manual | Version 1.5 | September 15
th
2020
5.4 SALE CTLS
Instruction
Screen Information
Step
1
To initiate the Sale payment, just enter the required
amount.
2
After amount entered, press the “Green” button or “Green
Circle” button to start the transaction.
3
Option to add the gratuity, Press “Green” to add gratuity or
“Red” to skip.

V240m+ User Manual 49
Public | V240m+ External User Manual | Version 1.5 | September 15
th
2020
4
On this screen, the user can choose the card payment
method, i.e. Tap for contactless, Swipe for MSR or Insert
for ICC transaction. In this example, we are showing a
CTLS transaction.
5
After the card has been tapped the device will show “card
read ok”
*unable to capture this screen as it only flashes up for a
second
After the transaction have been approved, the terminal will
display a confirmation message as shown. Either press
“Green Bar” at the bottom of the screen” or press “Green
Circle” or “Enter” button to complete.
The terminal will display the printing message.

V240m+ User Manual 50
Public | V240m+ External User Manual | Version 1.5 | September 15
th
2020
When complete the terminal will return to the main menu.

V240m+ User Manual 51
Public | V240m+ External User Manual | Version 1.5 | September 15
th
2020
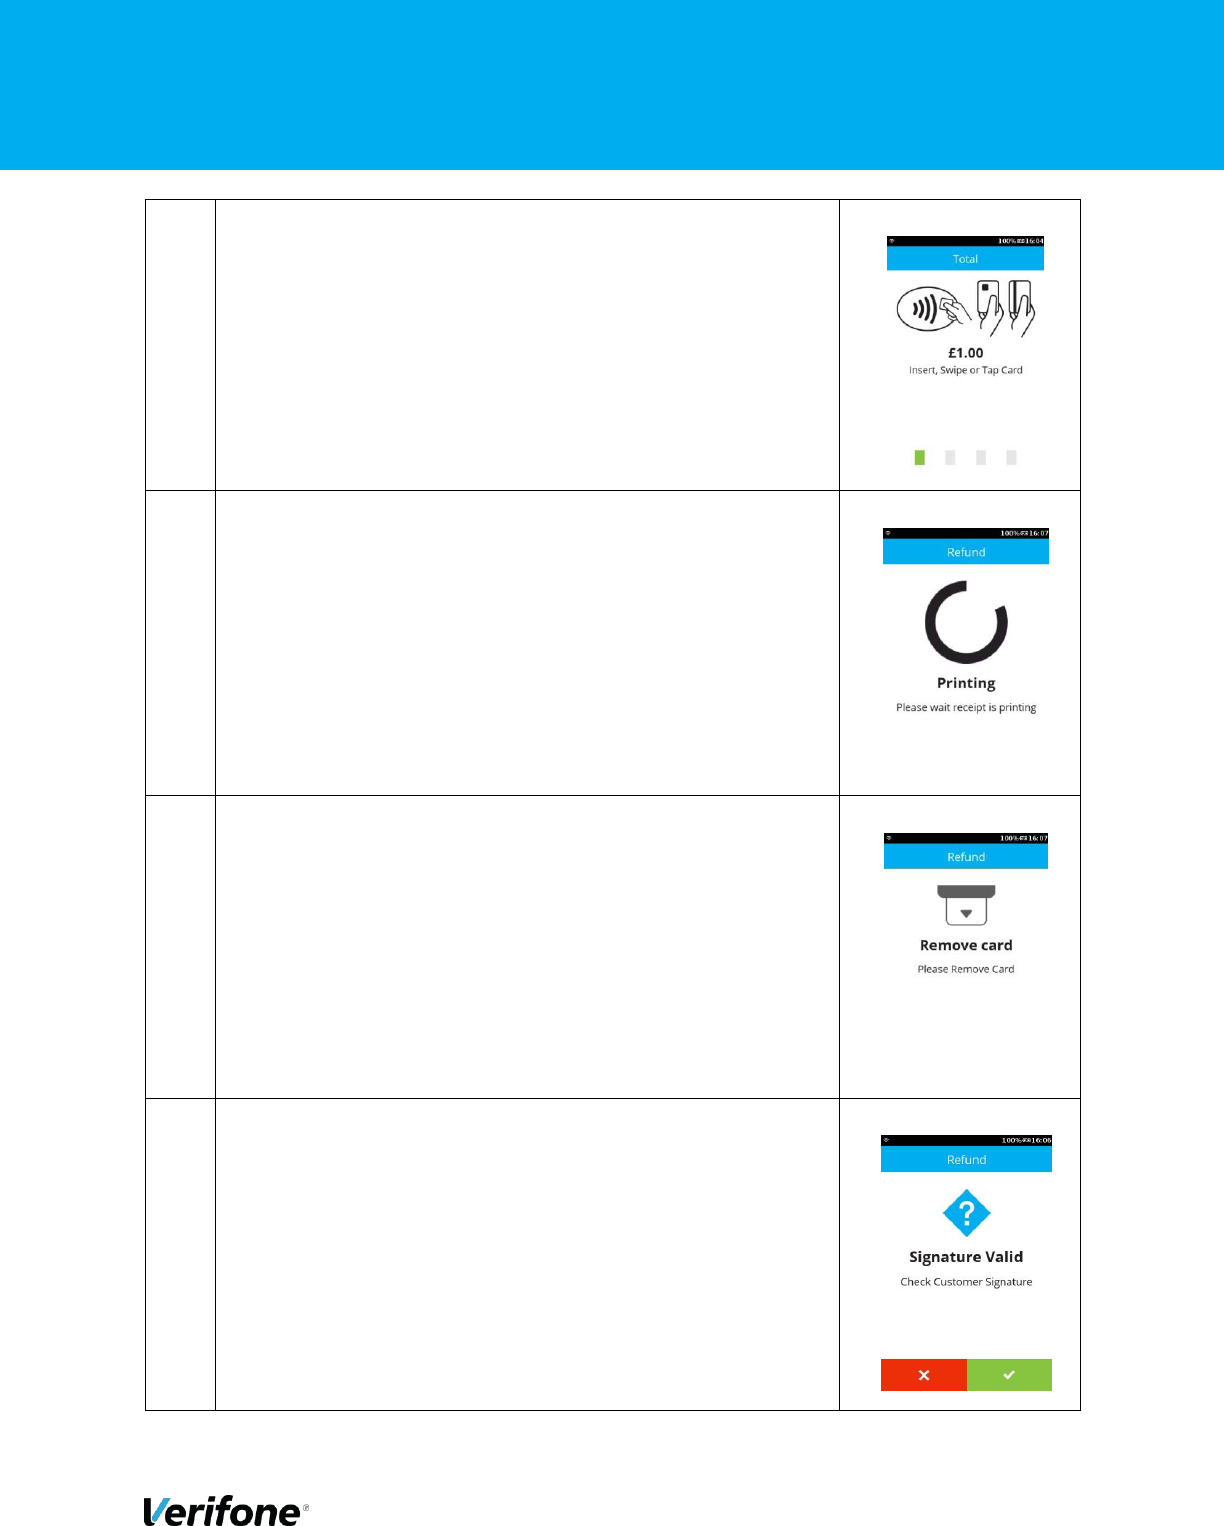
6.1 REFUND
Step
Instruction
Screen Information
1
Tap the “Verifone” logo to access the Main menu.
2
Press “2” to select “Refund”.
3
To initiate the refund transaction, just enter the required
amount. After amount entered, press the “Green” button or
“Green Circle” button to start the transaction.
V240m+ User Manual 52
Public | V240m+ External User Manual | Version 1.5 | September 15
th
2020
4
On this screen, the user can choose the card payment
method, i.e. Tap for contactless, Swipe or Insert. This
example will follow Chip and PIN route.
5
After the card has been inserted, the device will print the
merchant receipt with signature prompt.
6
Remove the card as prompted.
7
Press the “Green” button or “Green Circle” button to confirm
the signature matched or else “Red” button or “Red Cross”
button to cancel the transaction.

V240m+ User Manual 53
Public | V240m+ External User Manual | Version 1.5 | September 15
th
2020
8
After the transaction have been approved, the terminal will
display a confirmation message as shown. Either press
“Green Bar” at the bottom of the screen” or press “Green
Circle” or “Enter” button to complete.
9
Once complete the terminal will return to the main menu

V240m+ User Manual 54
Public | V240m+ External User Manual | Version 1.5 | September 15
th
2020
6.2 CUSTOMER NOT PRESENT – SALE MAIL ORDER
Step
Instruction
Screen Information
1
Tap the “Verifone” logo to access the Main menu.
2
Tap “Grey Bar” at the bottom of the screen” to view more
options below.
3
Press “4” for “Card Not Present” option.

V240m+ User Manual 55
Public | V240m+ External User Manual | Version 1.5 | September 15
th
2020
4
In the “Card Not Present” Menu, there are options of CNP
Transaction. Choose one appropriately. In this example, the
“Sale Mail Order” was selected.
5
To initiate the Sale payment, just enter the required amount.
After amount entered, press the “Green” button or “Green
Circle” button to start the transaction.
6
Option to add the gratuity, Press “Green” to add gratuity or
“Red” to skip.
7
Use the keypad to enter the Card Number and press “Enter”
to continue.

V240m+ User Manual 56
Public | V240m+ External User Manual | Version 1.5 | September 15
th
2020
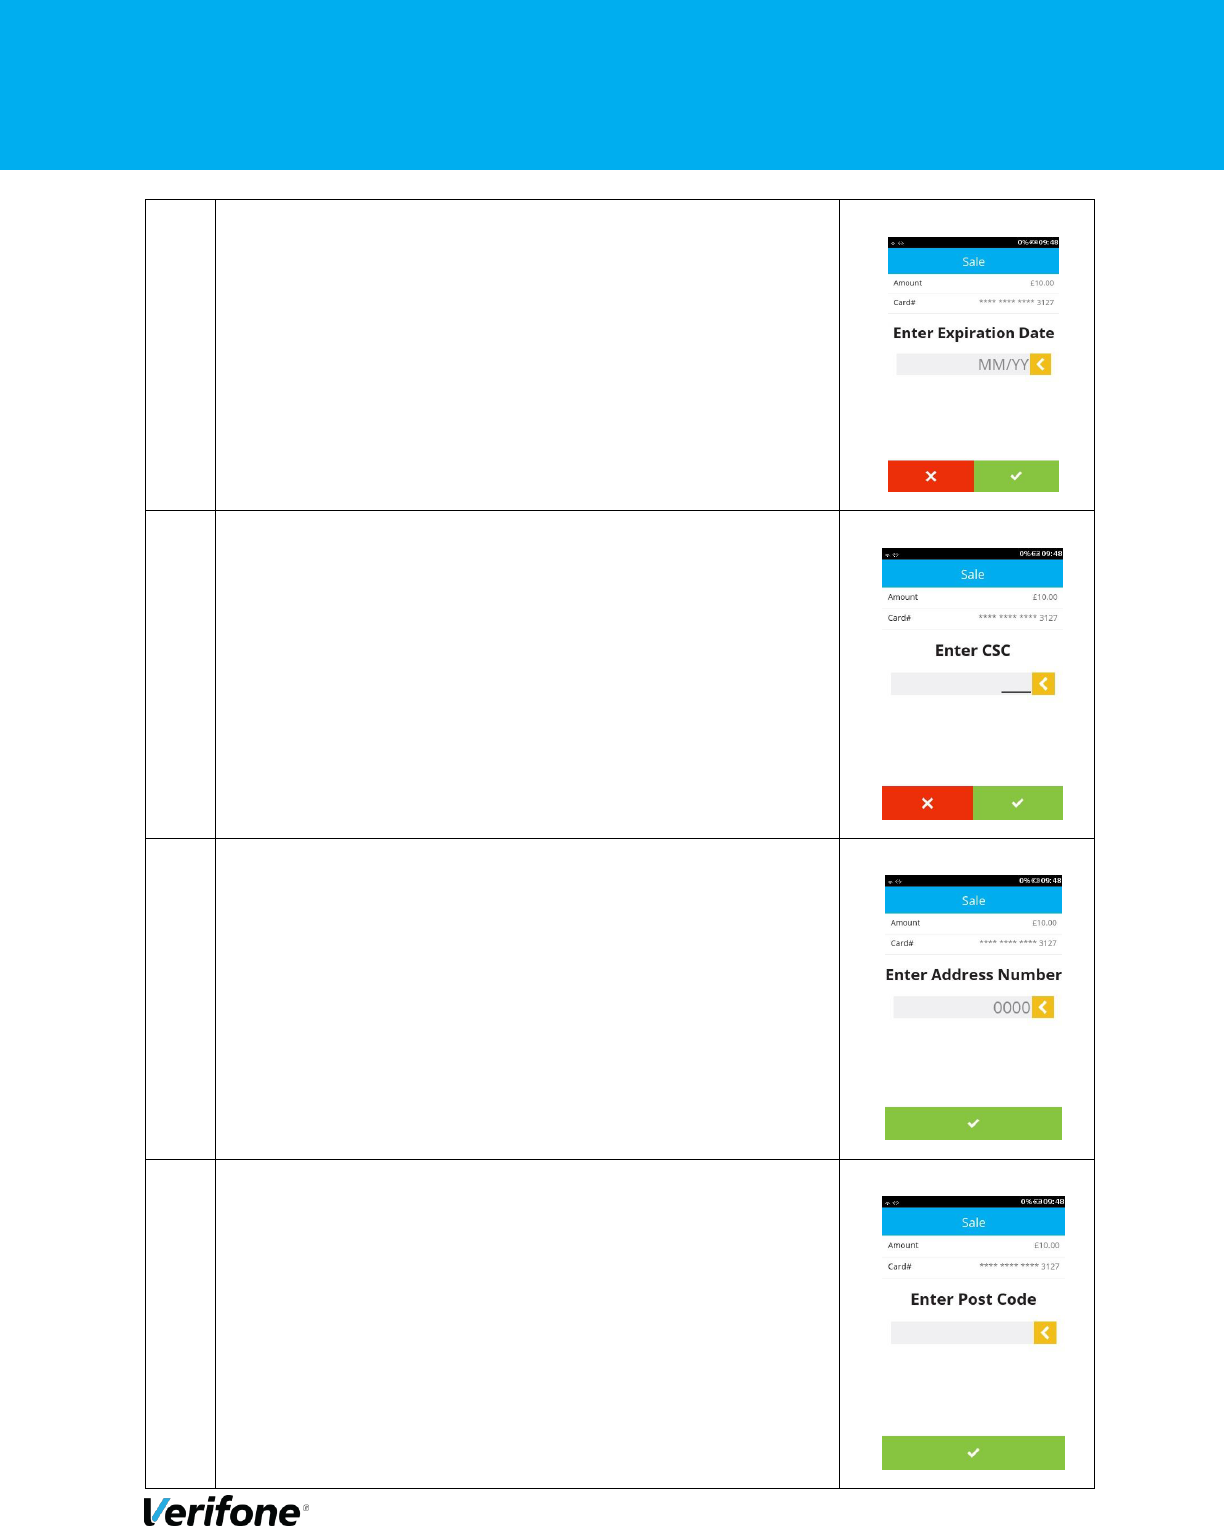
8
Enter “Expiry Date” and press “Enter” to continue.
9
Enter “CSC” and press “Enter” to continue.
10
Enter “Address Number” and press “Enter” to continue.
11
Enter “Postcode” and press “Enter” to continue.

V240m+ User Manual 57
Public | V240m+ External User Manual | Version 1.5 | September 15
th
2020
Step
Instruction
Screen Information
12
The device is showing transaction’s processing status.
13
The device is showing transaction’s authorising message.
14
The device is showing transaction’s authorising message.

V240m+ User Manual 58
Public | V240m+ External User Manual | Version 1.5 | September 15
th
2020
Step
Instruction
Screen Information
15
Press the “Green” button or “Green Circle” button to proceed
or “Red” button or “Red Cross” button to cancel the
transaction.
16
The device is now connecting the server.
17
After the transaction have been approved, the terminal will
display a confirmation message as shown. Either press
“Green Bar” at the bottom of the screen” or press “Green
Circle” or “Enter” button to complete.

V240m+ User Manual 59
Public | V240m+ External User Manual | Version 1.5 | September 15
th
2020
18
After the card has been inserted, the device will print the
merchant receipt with signature prompt.
19
The device is showing the transactions processing status.
20
Once complete the terminal will return to the main menu

V240m+ User Manual 60
Public | V240m+ External User Manual | Version 1.5 | September 15
th
2020
6.3 CUSTOMER NOT PRESENT – REFUND MAIL ORDER
Step
Instruction
Screen Information
1
Tap the “Verifone” logo to access the Main menu.
2
Tap “Grey Bar” at the bottom of the screen” to view more
options below.
3
Press “4” for “Card Not Present” option.

V240m+ User Manual 61
Public | V240m+ External User Manual | Version 1.5 | September 15
th
2020
4
In the “Card Not Present” Menu, there are options of CNP
Transaction. Choose one appropriately. In this example, the
“Refund Mail Order” was selected.
5
To initiate the Sale payment, just enter the required amount.
After amount entered, press the “Green” button or “Green
Circle” button to start the transaction.
6
Use the keypad to enter the Card Number and press “Enter”
to continue.

V240m+ User Manual 62
Public | V240m+ External User Manual | Version 1.5 | September 15
th
2020
7
Enter “Expiry Date” and press “Enter” to continue.
8
The device is now connecting the server.
9
The device is showing transaction’s authorising message.

V240m+ User Manual 63
Public | V240m+ External User Manual | Version 1.5 | September 15
th
2020
10
The device is now connecting the server.
11
After the transaction have been approved, the terminal will
display a confirmation message as shown. Either press
“Green Bar” at the bottom of the screen” or press “Green
Circle” or “Enter” button to complete.
12
After the card has been inserted, the device will print the
merchant receipt.

V240m+ User Manual 64
Public | V240m+ External User Manual | Version 1.5 | September 15
th
2020
13
Once complete the terminal will return to the main menu

V240m+ User Manual 65
Public | V240m+ External User Manual | Version 1.5 | September 15
th
2020
6.4 CUSTOMER NOT PRESENT – SALE TELEPHONE ORDER
Step
Instruction
Screen Information
1
Tap the “Verifone” logo to access the Main menu.
2
Tap “Grey Bar” at the bottom of the screen” to view more
options below.
3
Press “4” for “Card Not Present” option.

V240m+ User Manual 66
Public | V240m+ External User Manual | Version 1.5 | September 15
th
2020
4
In the “Card Not Present” Menu, there are options of CNP
Transaction. Choose one appropriately. In this example, the
“Sale Telephone Order” was selected.
5
To initiate the Sale payment, just enter the required amount.
After amount entered, press the “Green” button or “Green
Circle” button to start the transaction.
6
Option to add the gratuity, Press “Green” to add gratuity or
“Red” to skip.
7
Use the keypad to enter the Card Number and press “Enter”
to continue.
V240m+ User Manual 67
Public | V240m+ External User Manual | Version 1.5 | September 15
th
2020
8
Enter “Expiry Date” and press “Enter” to continue.
9
Enter “CSC” and press “Enter” to continue.
10
Enter “Address Number” and press “Enter” to continue.
11
Enter “Postcode” and press “Enter” to continue.

V240m+ User Manual 68
Public | V240m+ External User Manual | Version 1.5 | September 15
th
2020
Step
Instruction
Screen Information
12
The device is showing transaction’s processing status.
13
The device is showing transaction’s authorising message.
14
The device is showing transaction’s authorising message.

V240m+ User Manual 69
Public | V240m+ External User Manual | Version 1.5 | September 15
th
2020
15
Press the “Green” button or “Green Circle” button to proceed
or “Red” button or “Red Cross” button to cancel the
transaction.
16
The device is now connecting the server.
17
After the transaction have been approved, the terminal will
display a confirmation message as shown. Either press
“Green Bar” at the bottom of the screen” or press “Green
Circle” or “Enter” button to complete.

V240m+ User Manual 70
Public | V240m+ External User Manual | Version 1.5 | September 15
th
2020
18
After the card has been inserted, the device will print the
merchant receipt with signature prompt.
19
The device is showing the transactions processing status.
20
When complete the terminal will return to the main menu.

V240m+ User Manual 71
Public | V240m+ External User Manual | Version 1.5 | September 15
th
2020
6.5 CUSTOMER NOT PRESENT – REFUND TELEPHONE
ORDER
Step
Instruction
Screen Information
1
Tap the “Verifone” logo to access the Main menu.
2
Tap “Grey Bar” at the bottom of the screen” to view more
options below.
3
Press “4” for “Card Not Present” option.

V240m+ User Manual 72
Public | V240m+ External User Manual | Version 1.5 | September 15
th
2020
Step
Instruction
Screen Information
4
In the “Card Not Present” Menu, there are options of CNP
Transaction. Choose one appropriately. In this example, the
“Refund Telephone Order” was selected.
5
To initiate the refund, enter the required amount. After
amount entered, press the “Green” button or “Green Circle”
button to start the transaction.
6
Use the keypad to enter the Card Number and press “Enter”
to continue.

V240m+ User Manual 73
Public | V240m+ External User Manual | Version 1.5 | September 15
th
2020
7
Enter “Expiry Date” and press “Enter” to continue.
8
The device is now connecting the server.
9
The device is showing transaction’s authorising message.

V240m+ User Manual 74
Public | V240m+ External User Manual | Version 1.5 | September 15
th
2020
10
The device is now connecting the server.
11
After the transaction have been approved, the terminal will
display a confirmation message as shown. Either press
“Green Bar” at the bottom of the screen” or press “Green
Circle” or “Enter” button to complete.
12
After the card has been inserted, the device will print the
merchant receipt.

V240m+ User Manual 75
Public | V240m+ External User Manual | Version 1.5 | September 15
th
2020
13
When complete the terminal will return to the main menu.

V240m+ User Manual 76
Public | V240m+ External User Manual | Version 1.5 | September 15
th
2020
6.6 ACCOUNT VERIFICATION
Step
Instruction
Screen Information
1
Access the main menu via the * key, you should see the
option of account verification if enabled.
2
Terminal will prompt for the user to insert, swipe or tap the
card. For this example we will swipe the card.
3
If enabled you may be prompted for account on file

V240m+ User Manual 77
Public | V240m+ External User Manual | Version 1.5 | September 15
th
2020
4
Account verification should be authorised and will show an
auth code on screen
5
A merchant receipt will be printed with a space for signature
6
You will be prompted to validate the signature
7
The customer receipt will then be printed and the terminal will
return back to the idle screen

V240m+ User Manual 78
Public | V240m+ External User Manual | Version 1.5 | September 15
th
2020
7 FREQUENTLY ASKED QUESTIONS
This chapter lists typical problems that may occur while operating a V240m+device and the
appropriate corrective action. If the problem persists – even after performing the outlined
guidelines, or if the problem is not described, contact your merchant helpdesk for assistance N.B.
The V240m+device uses a tamper-evident case and contains no user-serviceable parts. Do not,
under any circumstance, attempt to disassemble the unit. Perform only those adjustments or
repairs specified in this guide. For all other services, contact your local merchant helpdesk.
Service conducted by parties other than authorized Verifone representatives may void any
warranty.
Q: Blank Display
A: Use the following steps to check the display panel: -
1) Check all the cable connections.
2) Check the terminals power supply to be sure the outlet is supplying sufficient power.
Substitute the terminals power supply unit with another identical one if available. Contact
the merchant helpdesk for assistance with this.
3) The terminals application program might not be loaded correctly. Contact your Merchant
Helpdesk for support.
4) If the problem persists, Contact your Merchant Helpdesk for support.
Q: Keypad Does Not Respond
A: Use the following steps to check the keypad: -
1) Check the display panel. If there are no characters, or the wrong characters are displayed,
refer to Blank Display.
2) If the problem persists, contact your Merchant Helpdesk.
Q: Transactions Fail to Process
A: There are several possible reasons why the unit may not be processing transactions. Use the
following steps to troubleshoot failures.
1) Perform a test transaction using one or more different cards to ensure the problem is not
a defective card.
2) Ensure that the card is being inserted/swiped/tapped the correct way. Refer to the
Transaction section of this manual for more information.
3) Check for communication/connection errors.
4) If the problem persists, contact your Merchant Helpdesk.

V240m+ User Manual 79
Public | V240m+ External User Manual | Version 1.5 | September 15
th
2020
8 CONTACT DETAILS
VERIFONE U.K Ltd.
3 Roundwood Avenue
Stockley Park
Uxbridge
UB11 1AF
MERCHANT HELPDESK
T: 0333 323 6677
Monday – Saturday – 08:00 – 20:00
Sunday – 10:00 – 17:00
Bank Holidays – 08:00 -20:00 Closed
Christmas Day.
TECHNICAL SERVICES
T: 0333 323 6667
Monday – Friday 09:00 – 17:30
Saturday & Sunday – Closed
Bank Holidays - Closed
CUSTOMER SERVICES
T: 0333 323 6676
Monday – Friday – 09:00 – 17:30.
Saturday & Sunday – Closed.
Bank Holidays - Closed.
SALES ENQUIRIES
T: 08444 828 203
