
RingCentral Phone
Desktop App™
User Guide

RingCentral Phone Desktop App | Table of Contents | 1
1
3 Welcome
4 What’s New
4 International SMS
4 New Global Office Countries
4 System Stability and Performance
4 Delete Specific Call Log Records
4 Kerberos Support on Windows
5 Supported Languages
5 Fax Templates
6 Product Tour
7 Product Tour (continued)
8 Product Tour (continued)
9 Download and Install the App
9 System Requirements
9PC
9 Mac
10 Log in to RingCentral Phone
11 Set Your Default Number
12 RingCentral Global Office Support
13 Favorites
14 Contacts: Add or Update Your Contacts List
14 View Your Contacts
14 Updating Your Contacts List
15 Favorites: Create a List of Favorite Contacts
15 View Your Favorites List
15 Make a Contact a Favorite
15 Google Contacts Integration
15 Remove a Favorite Contact
16 View Presence Status of a Favorite Contact
17 Adding a Photo Avatar to any Contact
17 Add an Avatar
18 Updating Your Personal Contacts List
18 Add a Contact
18 Edit a Contact
18 Delete a Contact
19 Make a Call
19 Caller ID
20 HD Voice and Secure Call Indicators
20 VoIP Unavailable
21 Call Management
22 Answer a Call
22 Pick up the call
23 Respond with a Courtesy Message
23 To respond with a prepared message
23 To respond with a custom message
23 To respond to an urgent request
24 Screen Voicemail
24 Screen the call
24 Send the Call to Voicemail
24 Forward the call
25 Call Switch

RingCentral Phone Desktop App | Table of Contents | 2
2
26 Call Screening
27 Switchboard Support
28 Call Recordings
29 View or Listen to a Message
29 To View Your Messages
29 Voicemail-to-Text Transcription
30 To Listen to a Voicemail Message
30 To Read a Text Message
30 To View a Fax
31 Send or Receive a Text Message
31 International SMS
32 Hold an Audio Conference Call
32 Premium Conference Numbers
32 To Hold an Audio Conference Call
33 Launch an Online Meeting
34 Send or Receive a Fax
34 Send a fax:
35 Set Caller ID for Faxes
36 View Your Call Activity Records
37 Personalize RingCentral Phone
38 Sound Menu
39 Calls Menu - General
40 Calls Menu - Incoming
41 Calls Menu - Outgoing
42 Messaging Menu
43 Contacts Menu - Integrate with Microsoft Outlook
44 Contacts Menu - Integrate with Mac Address Book
45 Join Now
46 Hotkeys for Microsoft Windows
47 Hotkeys for Mac
48 Technical Support
49 About
50 Head Up Display
56 HUD Call Monitoring
57 Active Call Layout
58 Park Locations at HUD
59 Check for Updates
60 Give Us Feedback
61 Log Out of RingCentral Phone

RingCentral Phone Desktop App | Welcome
3
Welcome
RingCentral Phone turns your PC or Mac computer into an all-in-one
communication hub completely synced to your office network so you can
collaborate with your colleagues and clients anywhere you have a
broadband connection and a headset.
With RingCentral Phone, you're ready to communicate as soon as you log
in to your computer, no matter where you are. RingCentral Phone
combines the call handling power you expect from your desk phone with
the collaboration tools you rely on most—like texting, conferencing, and
faxing—so you can stay productive with fewer devices to worry about.
RingCentral Phone is easy to install and even easier to use. We’ll show you
how.

RingCentral Phone Desktop App | What’s New
4
What’s New
International SMS
Enables customers to send international SMS messages. Enables
customers to send/receive international SMS from non-
international numbers. For US and Canada only. Contact your
account representative for availability. See “International SMS”
on page 31.
New Global Office Countries
Global Office will extend into two new countries: Hungary and
Croatia.
System Stability and Performance
Improvements have been made in this release to provide better
stability and performance. These improvements help to prevent
a single device failure from affecting the system.
In some circumstances, the user may be warned that a logout in
VoIP only mode is undesirable.
Delete Specific Call Log Records
The Call Log edit mode now supports the individual deletion of
call log records. This restores previously removed capability. See
“View Your Call Activity Records” on page 36.
Kerberos Support on Windows
Computer network authentication using Kerberos in your SSO is
now available for Windows platforms.

RingCentral Phone Desktop App | Supported Languages
5
Supported Languages
The following languages are supported by RingCentral from release 10.0.
The user interface in applications and online account reflect the regional
settings.
• English (US)
• English (UK)
• English (Australia)
• French
• French (Canada)
• German
• Italian
• Japanese
• Portuguese (Brazilian)
• Spanish
Set the Language
Select new languages in the Regional Settings menu.
Fax Templates
Fax templates for added languages are available.
• Fax templates do not support non-ASCII characters.
• Older Cisco and some Polycom (VVX101/VVX201) models may not
display non-ASCII characters properly on devices.
• Characters might display improperly when using intercom and page.
Note: Japanese and Brazilian Portuguese have not been integrated into Q365,
SFDC, Zendesk, MS Dynamics, Global c2D, or Microsoft Outlook.

RingCentral Phone Desktop App | Product Tour
6
Product Tour

RingCentral Phone Desktop App | Product Tour
7
Product Tour (continued)

RingCentral Phone Desktop App | Product Tour
8
Product Tour (continued)

RingCentral Phone Desktop App | Download and Install the App
9
Download and Install the App
It’s quick and easy to get RingCentral Phone installed on your computer.
Before you start, check the system requirements to ensure that your
computer can use RingCentral Phone.
To download and install RingCentral Phone:
1. Log into your RingCentral online account.
2. Go to the Tools menu and select RingCentral Phone.
3. Download the version of the app compatible with your computer,
either PC or Mac.
4. Run the install wizard.
Now you’re ready to log into RingCentral Phone.
System Requirements
Your computer needs the following minimum requirements to best use
RingCentral Phone:
PC
• Windows 7 (or later)
• 2 GHz (32-bit or 64-bit) processor
• Minimum 4 GB RAM (8 GB recommended)
• 400 MB free hard drive space
• Required minimum screen resolution is 1,024 x 768
Mac
• Mac OS X® 10.11 El Capitan (or later)
• Intel processor
• Minimum 4 GB of memory (8 GB recommended)
• 400 MB hard drive space
• Required minimum screen resolution is 1,024 x 768

RingCentral Phone Desktop App | Log in to RingCentral Phone
10
Log in to RingCentral Phone
1. Click on your computer desktop.
2. Click Log in. Or, click Single Sign On and log in with your credentials
to access RingCentral Phone and all of your company applications
with a single sign on. Learn more about Single Sign On here Learn
about logging in to RingCentral Global Office on page 12.
Select your region
Enter phone & password and click Sign In
Your profile appears.

RingCentral Phone Desktop App | Set Your Default Number
11
Set Your Default Number
When you launch RingCentral Phone, the application shows your default
phone number. You have the choice of displaying your direct number or
company number. Select your direct number or your company number
following these steps:
1. Click on your phone number at the top to open your profile.
2. Click Direct Number.
3. Select the number from the menu you would like to display as your
direct number.

RingCentral Phone Desktop App | RingCentral Global Office Support
12
RingCentral Global Office Support
Global Office Support simplifies and consolidates the management of the phone system across all international branch offices into one account, thereby
reducing the cost of IT management and reducing international calling charges. RingCentral Global Office Support is available in Australia, Austria, Belgium,
Canada, Czech Republic, Croatia, Denmark, Finland, France, Germany, Hong Kong, Hungary, Ireland, Israel, Italy, Luxembourg, Mexico, Netherlands, Norway,
Portugal, Singapore, Spain, Sweden, Switzerland, Taiwan, United Kingdom and United States. International number formatting for each country is supported.
Global Office Support increases the efficiency of office-to-office communications with free extension-to-extension dialing. It provides Instant activation of
extensions with international numbers directly from the number pool, and comprehensive billing and service summaries divided by calling zones. Outbound
calls with competitive in-region dial plans are supported across all end points, including mobile and desktop apps. Learn more about the benefits of RingCentral
Global Office Support here.

RingCentral Phone Desktop App | Favorites
13
Favorites
RingCentral Phone opens to the Favorites screen the first time you log in, and displays icons linked to everything else you want all on one screen. You can add a
favorite from your list of contacts by clicking and selecting from your All, Company, Personal, or Outlook contacts lists using this filter . You can also
choose from OSX or Google contacts. Mouse over a name (for example, Dave Richards) to reveal your contact options—Call or Text. Here’s a quick rundown on
how to get around RingCentral Phone. Note: Contacts and Favorites are now sorted by letters first, numbers next, and special /Unicode characters last.
Unicode characters last.
Your account presence. Set your availability status.
Messages. View all your messages in one place. Messages are always
current and synced from your other devices.
Favorites. Add colleagues you contact often. See their Presence status
and contact them directly from this screen.
Calendar. Google Calendar or Outlook. ICal if you are using a Mac.
Contacts. Separate Personal and Company contact lists make it easy to
quickly find the right person.
Head Up Display. Provides a single interface to manage incoming calls
from the desktop; views presence status of up to 100 users.
Dial pad. Dial a phone number to make calls from this screen.*
SMS text messaging. Send text messages to one person or a group.**
Online Meetings. Launch Online Meetings to collaborate and share
screens with remote colleagues or clients.
Audio Conference. Hold instant conference calls and easily invite up
to seven participants. **
Fax. Send faxes, schedule faxes, and select cover pages from this screen.
RingCentral App. Collaborate and share files with your team members.
Settings. Set your app preferences.
* Professional customers require a purchased number for making outbound
calls from the app.
** SMS, Online Meetings, and Audio Conference are available on selected
Office plans.
Call Log. Review all call activity on your account.

RingCentral Phone Desktop App | Contacts: Add or Update Your Contacts List
14
Contacts: Add or Update Your Contacts List
The Contacts list is your online address book. It stores your Company
contacts—everyone in your corporate directory—and your Personal
contacts—everyone else outside of the company, such as friends, family,
and even vendors. Your personal contact list is clearly separated from your
company contact list so there’s never any confusion when you’re looking
for the person you want to contact.
View Your Contacts
At the top of the screen, click to open your contacts. Click the Filter
icon to select All, Company, Personal, or Outlook contacts. Click on a
contact (Adrian Yang in this example) to see its Presence status.
Updating Your Contacts List
Good news! There’s no need to manually update your Company contacts.
Your corporate directory is synced to your company’s main RingCentral
account and continually updated so you always have the latest contact
information for your entire company.

RingCentral Phone Desktop App | Favorites: Create a List of Favorite Contacts
15
Favorites: Create a List of Favorite Contacts
The Favorites screen is a shortcut to your most frequently used contacts.
You can add up to 100 contacts from your Personal list or Company list.
Since it’s a shorter list, you can find the person you want faster.
Additionally, when you add a Company contact in your Favorites list, you
can see their phone Presence status. This status shows whether the person
is available to take calls. Presence status is available only from your
Favorites list and available only for Company contacts.
View Your Favorites List
At the top of the screen click . The Favorites screen opens, showing all
of your existing favorite contacts.
Make a Contact a Favorite
1. At the top of the screen, click or .
2. Click and select Personal or Company.
3. Click the name you want to add to your Favorites list.
Click next to the name. When the open star changes to a filled
star . Your contact was successfully added to your Favorites
list.
Google Contacts Integration
View your Google contacts from inside RingCentral Phone or select and
move Google contacts one at a time.
Remove a Favorite Contact
1. At the top of the screen, click . All your existing Favorites are
shown.
2. Click at the top right of the screen.
3. Find the person you want to remove and click next to the name.
The contact is removed from the screen, but you can still find them in
your Personal or Company list.

RingCentral Phone Desktop App | Favorites: Create a List of Favorite Contacts
16
View Presence Status of a Favorite Contact
The Presence status lets you know if one of your Company contacts is
available to take a call or not. Presence status can only be shown on your
Favorites screen so you can’t see Presence status from your Company
contact list.
To view Presence status:
1. At the top of the screen, click . All of your existing Favorites are
shown.
2. Look under the contact: name
• A green dot ( ) means the person is available. Go ahead and
give them a call.
• A red dot ( ) means the person is busy, often already on a call.
• A red dot with a white bar ( ) means Do Not Disturb.
• A gray dot ( ) means the person is invisible (off-line).

RingCentral Phone Desktop App | Adding a Photo Avatar to any Contact
17
Adding a Photo Avatar to any Contact
RingCentral Phone seamlessly integrates with Microsoft Outlook and Mac
Address Book so you can easily import contacts into your Desktop
contacts. If there are pictures in these contacts, the photos will display in
your Contacts list.
When you have a lot of contacts, sometimes it’s easier to recognize the
contact you want when you have a visual hint to jog your memory.
RingCentral Phone lets you upload any photo or graphic to use as an avatar,
which displays next to the name of the contact. For example, you can
upload a photo of the person or an image file, like a logo or animal, to
represent the person to you.
The avatar is visible only to you, while you’re using RingCentral Phone. Any
image you use won’t be seen by the person you’ve contacted. This is
different from a profile image you might have used to display publicly. This
avatar is for your personal recognition use only.*
Add an Avatar
1. At the top of the screen, click .
2. Click the filter icon and select All, Company, Personal, or Outlook.
3. Click the name of the contact which you want to assign an avatar.
4. Click next to the name. The Add Photo screen opens.
5. Click to add photo. Find the image file you want to use.
6. Click Save. You should now see the uploaded image next to the
contact name.
Note: Your personal profile image will be synced across RingCentral Cloud,
desktop and mobile applications. Your profile image in company contacts
will also be synced to the RingCentral Phone application.
However, your newly added photo will not automatically replace the one
for you that was manually added earlier by your contacts. Cloud contacts
added locally do not affect Favorites from external sources such as MS
Outlook and OS X contacts.

RingCentral Phone Desktop App | Updating Your Personal Contacts List
18
Updating Your Personal Contacts List
Your personal contacts may already be synced to your mobile phone or
Microsoft Outlook, but you can also manually add, edit, or remove a
Personal contact at any time.
Add a Contact
1. At the top of the screen, click .
2. Click the filter and select Personal.
3. Click at the top right corner to open the Add Contact screen.
4. Fill in any of the information fields you want, such as name, email
address, and a phone number or two. You can always come back and
add more details later.
5. Click Save. The page refreshes and displays a summary of the contact
details.
6. Click to return to the full list of Personal contacts.
Edit a Contact
1. At the top of the screen, click
2. Click the Personal tab.
3. Click the name you want to edit.
4. On the Contact Details screen, click at the top right of the screen.
5. Make the changes you want to any of the contact details.
6. Click Save.
Delete a Contact
1. At the top of the screen, click .
2. Click the Personal tab.
3. Click the name you want to remove.
4. On the Contact Details screen, click .
5. Click Delete.
6. In the confirmation box, click Delete again. The contact is
permanently removed from your personal contacts list.

RingCentral Phone Desktop App | Make a Call
19
Make a Call
You can use the dial pad to make a call, either to a person in your Contacts
list or by manually dialing a phone number.
To make a call:
1. Click at the top menu to bring up the Dial Pad.
• In the To field, either click to select a contact, or click the
digits on the dial pad to manually dial a phone number.
• In the Caller ID field click the caret to select the phone
number you want displayed to the receiver of the call.
2. Select the number.
3. Click the green call button to place the call.
4. When the call goes through, the caller’s screen will change to Active
Call, shown at right, and display either the called phone number or
extension number if the call is to an internal number.
TIP: You can always make a call directly from your Contacts screen, too.
Just click the name you want to call and your call will connect from the
screen.
Caller ID
The Outbound Caller ID is set to your company name by default.
In some geographic areas, your ability to use your user name (first name,
last name) for the outbound caller ID is enabled. This is not supported in
the United States. To use this feature, users must contact RingCentral
Support to enable. When enabled, the tick box appears in your software.
RingCentral Phone Desktop App | Make a Call
20
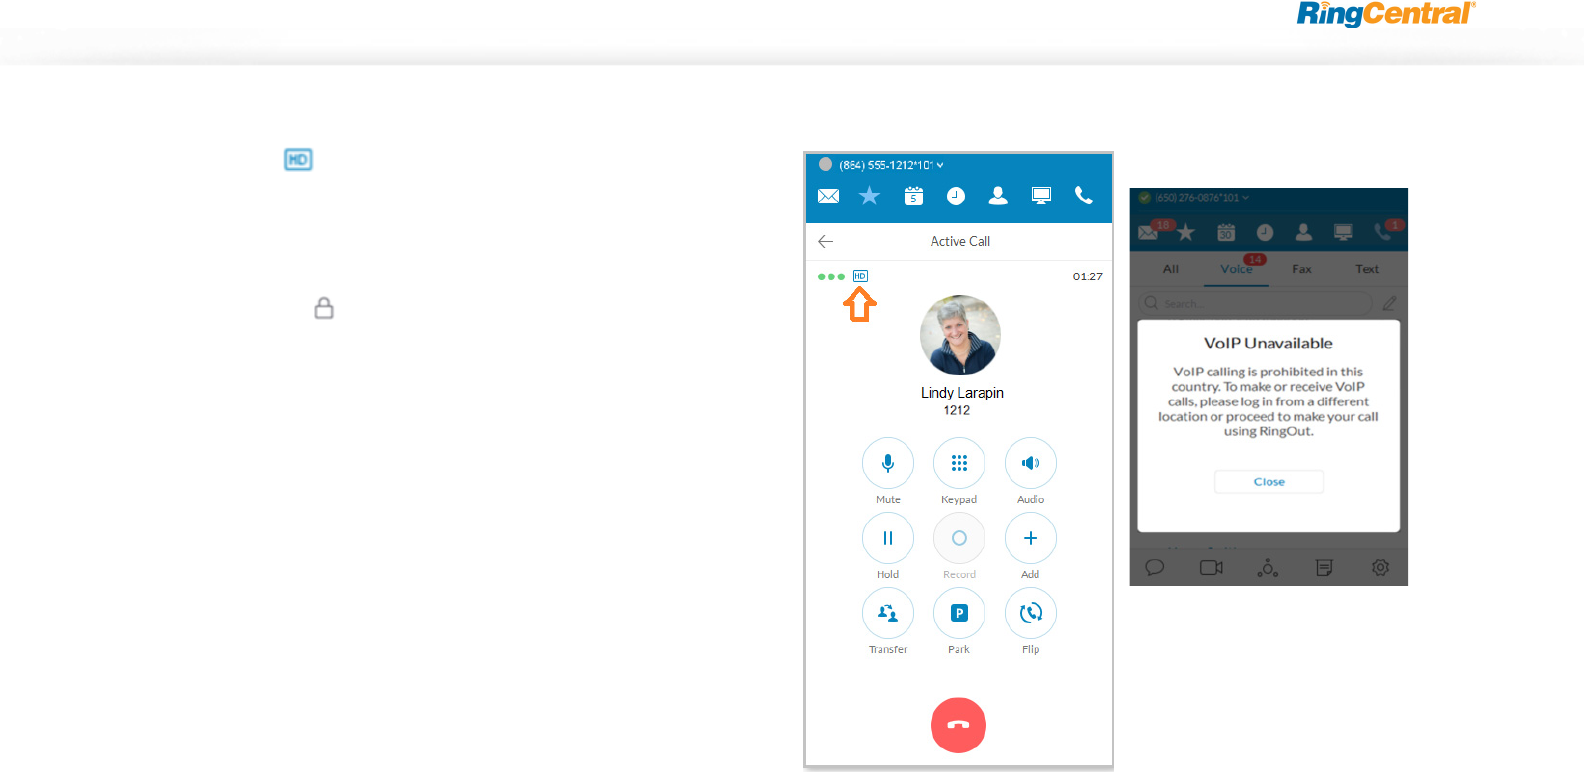
HD Voice and Secure Call Indicators
• HD Voice provides optimum call quality automatically
between devices that support high definition.
RingCentral employs the Opus codec, which provides greater
voice clarity, especially in limited bandwidth and network
environments.
• Secure Voice calls are supported between devices capable of
that feature.*
*Secure Voice can be obtained after contacting your account
manager at RingCentral.
VoIP Unavailable
A warning shows when VoIP calling is unavailable.

RingCentral Phone Desktop App | Call Management
21
Call Management
Call Management features display of a Current Call and a Call on Hold.
From the screens, these quick actions available:
• Resume or answer a call
• Join a held call to a current call
• Add a call to a conference
• Transfer a call to another extension
• Record a call
• Mute a call
• Activate your speaker
• Place a call on hold
• Park a call in the cloud
• Flip a call to a forwarding number in your extension
• End a call

RingCentral Phone Desktop App | Answer a Call
22
Answer a Call
When a call comes in, your RingCentral Phone screen automatically
changes to the Incoming Call screen so you know someone is calling you
even when you don’t have the sound turned up on your computer. The
Incoming Call screen shows the phone number (or internal extension) of
the person calling, as well as the name and photo of the person, when it’s
available. A user has the option of answering the call:
• Forwarding the call to another extension
• Replying with a text message
• Sending it directly to voicemail
• Ignoring the call
If ignored, it is handled according to the call handling rules set up by
the extension owner.
From here, you can decide how you want to answer the call.
Pick up the call
From the Incoming Call screen, click to pick up the call. The
volume on your computer is automatically switched on. If you like, you
might want to have your headset handy so you can use it for the call.New
Window for Each Incoming Call.
All incoming calls are presented in a separate window when they come
in.This window appears when you have more than one incoming call.

RingCentral Phone Desktop App | Answer a Call
23
Respond with a Courtesy Message
When you can’t take the incoming call right away, you can provide a
courtesy response. RingCentral Phone has automatic text-to-voice
options. You can select a prepared message or type your own custom
message, and RingCentral Phone will convert it to voice and relay the
message to your caller.
To respond with a prepared message
1. From the Incoming Call screen, click Reply.
2. A popup screen opens with three different messages, such as: Call
me back in.
3. Click the message you want to use. If Call me back in, then enter a
time limit.
4. Click Send. RingCentral Phone relays the message to your caller.
To respond with a custom message
1. From the Incoming Call screen, click Reply.
2. Click Custom Message. A popup screen opens with message options.
3. Enter the response you want to send.
4. Click Send. RingCentral Phone relays the message to your caller.
To respond to an urgent request
When an urgent request is received, and replied to with a custom message,
the requester may press 5 on their phone and enter an “urgent” call back
number that is instantly received.

RingCentral Phone Desktop App | Answer a Call
24
Screen Voicemail
When you’re not sure if you want to pick up the call, you can screen the call.
RingCentral Phone allows you to send the caller to voicemail, but you can
hear the message the caller is leaving you. At any time while the caller is
leaving you the message, you can pick up the call, and talk to the person.
Voicemail is automatically stopped and your call becomes live again.
Screen the call
1. From the Incoming Call screen, click To Voicemail > Screen
Voicemail.
2. You can hear the caller leaving you a message.
3. To answer the call in progress, click Pick Up.
4. To stop screening and let the call continue to voicemail,
click Stop Listening.
Send the Call to Voicemail
When you can’t take a call right away, you can send it to voicemail so the
caller can leave you a message. To do so, from the Incoming Call screen,
click To Voicemail.
Forward the call
When a call comes in and you think someone else might want to take it, you
can forward the call. Here’s how:
1. From the Incoming Call screen, click Forward.
A popup screen opens with phone number options.
2. To Call Forward
• Click the phone number where you want the call forwarded.
or
• Click Custom and type the phone number you want.
3. Click Forward.
RingCentral Phone transfers the call to the new phone number.
4. Click Ignore to stop ringing on your app and allow call forwarding
rules to take effect.

RingCentral Phone Desktop App | Answer a Call
25
Call Switch
If you are finishing an urgent phone call taken
on your RingCentral Phone, but you must go
into a meeting, you can instantly switch the call
from your desktop client to your mobile client
and not miss a beat in the ongoing
conversation. Any screen of an active
RingCentral Phone prompts a 2-click process
that enables instant call handover between
endpoints. You do not have to wait for the
incoming call on your receiving device to pick
up. You can engage the receiving endpoint with
2 clicks while still on your call and immediately
pick up the conversation. This minimizes
interruptions to on-going calls and reduces
time needed to switch and pick up a call on a
receiving device.

RingCentral Phone Desktop App | Call Screening
26
Call Screening
When Call Screening is enabled, users answering a call are able to hear the
caller’s recorded name an use the IVR prompt to answer the call.

RingCentral Phone Desktop App | Switchboard Support
27
Switchboard Support
Provides live answer capability to inbound
calls. (Additional call information is exposed
when in use.)
• After live answer to call, attendant can
see all destination into which the
customer is calling and can quickly find
the correct person.
• A recent call list contains the top 10
recent numbers used for transfer.
• Search and filter options that allow the
user to view contacts from different sites
or filter the full list of sites and access
contacts at a lower level in the hierarchy.
• The use of this feature depends on multi-
location availability for a specific account.
• Filtering available by searching through
particular Sites.

RingCentral Phone Desktop App | Call Recordings
28
Call Recordings
Call recordings can now be accessed from your RingCentral Phone call log. The small red dot indicates calls that have been recorded. The tiny arrows indicate
whether the call is inbound or outbound. Selecting Recordings shows which calls can be played or deleted (images 2 and 3).

RingCentral Phone Desktop App | View or Listen to a Message
29
View or Listen to a Message
The Messages screen lists all of your messages in one place so you can
prioritize the ones you want to open first. You can see your voicemail, fax,
and text messages on this screen. Your messages are automatically synced
from your online account and mobile app, so this message list is always
current.
By default, you’re shown all messages, but you can click on any tab at the
top of the screen to narrow your view to only one type of message. The red
numbers next to the tabs tell you how many new messages you have.
To View Your Messages
At the top of the screen, click . The Messages screen opens. All of your
messages are listed on the screen.
Voicemail-to-Text Transcription
When enabled, your voicemail messages will be converted to text and
displayed. Office Ultimate customers can also enable Voicemail from the
Messages and Notifications settings.
Voicemail Preview is limited to the first 60 seconds of the message; short
messages of less than 5-6 seconds will not be converted. Accuracy is not
100% and is influenced by the speaker’s accent and connection factors.

RingCentral Phone Desktop App | View or Listen to a Message
30
To Listen to a Voicemail Message
Voicemail messages are shown with this icon: . Click the message you
want to hear. Then click on the audio bar to start the message.
When you’ve finished listening to the message, you can:
Click To do this
Call the person back.
Text the person a message.
Delete the message. It is permanently removed from
your account.
Save the files to the cloud.
Flag a message you’ve already heard.
Block this number from your account so you no lon-
ger receive calls.
Add this person to your contact list.

RingCentral Phone Desktop App | Send or Receive a Text Message
31
Send or Receive a Text Message
RingCentral Phone lets you send a text
message to anyone you want, even if the
person isn’t in your company network, so you
can communicate easily with clients, friends,
and family. You can send a text to one person at
a time, multiple people listed together, or an
existing group (of people) already set up in your
Contacts list. When you’re texting multiple
people or a group from your company
directory, you can see the entire conversation
thread from everyone participating in the
thread.
To send and receive a text message:
1. At the bottom left of the screen,
click . The New Message screen
opens.
2. In the To field, either click to search
for contacts, or type the phone numbers
you want.
3. Select the Caller ID.
4. In the Type message field, enter your
message.
5. Click Send. Your message is sent.
• Keep the screen open and you’ll see
any responding text messages. You
can send another text and keep the
conversation going for as long as you
want.
• If you miss a responding text, the
Message screen will keep count of
unread texts and save them there so
you can read them at your
convenience.
International SMS
Enables customers to send/receive
international SMS from non-international
numbers. SMS messaging functions both inside
and outside the company. For US and Canada
only. Contact your account representative for
availability.
Your rate information is shown in the Admin
Portal under Billing > International Calling.
An admin can view the usage from Billing >
Service Plan > Usage Info.
You cannot enable or disable the International
SMS-only feature.
• Business SMS and International calling
must both be enabled.
• If you disable international calling,
international SMS is also disabled.

RingCentral Phone Desktop App | Hold an Audio Conference Call
32
Hold an Audio Conference Call
You can hold an audio conference call at any
time directly from RingCentral Phone.
Conference calls can be held immediately, with
no need to schedule one ahead of time. Every
RingCentral user is assigned a unique
conference line so you can have a conference
call whenever you need one without worrying
about network congestion.
Conference calls are a great way to get
multiple people on the same call so you can
discuss a topic. This is an audio-only
connection. If you want to have a video
meeting, use RingCentral Online Meetings
instead.
Your Host Access number is the phone number
you dial to start the conference call. The
Participant Access number is the phone
number your guests will dial to join your
conference call.
The host of a multi-way conference call can
disconnect any party in the call.
Premium Conference Numbers
If an international dial-in number for
RingCentral audio conferencing does not offer
toll-free access, you can purchase a toll-free or
international number for a conference bridge.
This is enabled through RingCentral Self-
Service or by submitting a ticket.
To Hold an Audio Conference Call
1. At the bottom of the screen, click .
The Conferencing screen opens, listing
your Host Access and Participant Access
numbers.
2. If you have international participants,
turn on Include additional dial-in
numbers. This option lets you include
local numbers in other countries so your
participants won’t be charged
international fees. Once you turn on this
option, you can select the countries you
would like to include in the invitation.
3. Decide if you want to invite people by
text message or by email. Then click
either Invite with Text or Invite with
Email. The screen will switch to the email
form or a text message.
4. In the To field, find the contacts you
want, or type their phone numbers.
Notice that an invitation message,
complete with dial-in numbers, is
automatically created for you. You can
tack on a personal message if you like.
5. Click Send, and your invitations are sent
to your participants.
6. Now, click Join as Host to start the
conference call. The Active Call screen
opens so you can manage your
conference call as needed. The Mute,
Record, and Add+ (persons) options are
especially useful during a call.
7. When you’re finished with your
conference call, click End Call to stop the
conference call for everyone and hang u

RingCentral Phone Desktop App | Launch an Online Meeting
33
Launch an Online Meeting
You can hold an online video meeting at any time using RingCentral Online
Meetings and start it directly from RingCentral Phone. Online Meetings
can be held immediately, with no need to schedule one ahead of time,
unless you want to. Every RingCentral user is assigned a unique
RingCentral Online Meetings ID and password, so you can hold as many
online meetings as you want.
Online meetings are a great way to reach multiple remote people to discuss
a topic as if you’re all in the same room. You have access to video views
from web cameras so you can see people face-to-face, and screen shares, so
you can easily share presentations or other documents on your computer
with everyone in the online meeting.
To join or schedule RingCentral Online Meetings:
1. At the bottom of the screen, click . RingCentral Meetings opens in
a separate window on your computer.
2. Click Join a Meeting if you have been invited to a meeting, or click
Sign In if you want to set up an online meeting.
3. On the Sign In screen, select your country and enter your credentials.
4. Click Schedule Meeting if you want to set up an online meeting.
5. Or click Join a meeting if you’re connecting to a meeting set up by
someone else.
For more information on how to use all the RingCentral Meetings features
to make your online meeting more productive, see the RingCentral
Meetings User Guide.

RingCentral Phone Desktop App | Send or Receive a Fax
34
Send or Receive a Fax
You can send and receive online faxes directly in RingCentral Phone so
you’ll never have to walk to your separate fax machine again. Your phone
number is also your fax number, so you only have to remember one
number. You can fax to one or more people at the same time.
Send a fax:
1. At the bottom of the screen, click . The Send Fax screen opens.
2. In the To field, either click to search all the contacts you want to
fax, or type all the fax numbers.
3. To add the contact to the fax To: field,
• Click the contact’s caller ID or phone number. The contact is
automatically added.
• Begin entering the contact’s name in the To : field. When it
matches a contact in the list, you can click the name that appears.
4. Decide if you want to include a cover page. The default is Blank. Click
the blue caret next to Blank to see your cover page options.
5. Or click the blue plus icon , then scroll to the bottom to see
instructions on how to create your own custom cover page and add it
to the list.
6. Click at the top right of the screen to save your selection.
7. Back on the Send Fax screen, in the Note field, add a comment or
message, if you want.
8. Attach any files you want to send. Click to browse and upload your
attachment. Or drag-n-drop files from your desktop onto the dotted
field (up to 20 MB).
9. You can also click to scan and attach a document from the
scanner you have selected in Settings > Messaging so long as the
scanner is installed, powered on, and connected to your computer.*
10. Click Send now to send your fax now, or click Send later and set the
date and time when the fax will be sent.
ASCII and non-ASCII characters are supported.

RingCentral Phone Desktop App | Send or Receive a Fax
35
Set Caller ID for Faxes
Set the Caller ID for faxes by using these steps:
1. Click the Settings icon .
2. Click Outgoing.
3. In Fax Direct number, enter the phone number.

RingCentral Phone Desktop App | View Your Call Activity Records
36
View Your Call Activity Records
You can easily review your call activity directly from RingCentral Phone. All
call transactions (outgoing and incoming/missed) calls to your phone
number are listed so you can check them when you want.
To view your call activity records:
1. At the top of the screen, click . The call log screen opens, showing
all of your incoming and outgoing calls.
2. Here’s how you can read the log:
Means a missed call
Means an outgoing call you made
Means the call is selected for deletion.
Did you know?
Double-click on any call listed in the log to call the person again. Or click
to see more options, such as adding the person to your Contacts list.

RingCentral Phone Desktop App | Personalize RingCentral Phone
37
Personalize RingCentral Phone
RingCentral Phone is ready to use as soon as you install it on your computer
and log in. But it’s nice to personalize the app.
Settings screens are from the Windows app; Mac screens are similar.
Note: RingCentral Phone follows the user’s device language when
available. Users can set their language of choice in the Language dropdown
menu on the Settings > General page.
Here’s how you can personalize RingCentral Phone.
1. At the bottom of most app screens, click .
The Settings screen opens in a separate window.
2. In the left menu, select your preference for any of the following:
Click To do this
General Set as a default faxing and calling application. Clicking
the Apply button changes the status to “Currently set
as default faxing and calling application..”
Return to previous setting by:..
Automatically launch this application on startup: ON
or OFF
Run application minimized: ON or OFF.
Keep application in foreground: ON or OFF. Set this
switch to ON to keep the application running on top of
all other applications.
RingCentral product alerts: Informs customers of
new features and service offerings.
Access my account online:
Clicking My Extension Settings opens your RingCen-
tral application where you may review your or change
your settings.
Clicking Phone System opens your RingCentral appli-
cation where you may review or change your phone
settings.
Clicking Billing opens your RingCentral application
where you may review your service plan and interna-
tional call settings.
Note: Phone System and Billing are accessible only to
Administrators.

RingCentral Phone Desktop App | Personalize RingCentral Phone
38
Sound Menu
Use the Sound menu to manage your Microphone, Speaker, and Ringer
style and volume. If installed, the Plantronics Headset can be switched ON
or OFF from the Sound menu.
Click To do this
Sound Microphone
Use the Sound menu to manage your microphone
type and level.
Automatically adjust microphone settings.
Switch this OFF to manually adjust your microphone.
Speaker
Use the drop-down to select Speakers/Headphones. If
the Plantronics Headset is installed in your system,
you can select it here.
Ringer
Users who prefer the desktop application not to ring
during an incoming call can turn off the ringer. This
can be configured on the RingCentral Phone App at
Settings > Audio > Ringer.
Volume
Set your speaker or handset volume with the slide bar.
Plantronics Headset
Switch the Plantronics Headset ON or OFF from the
Sound menu. (Headset must be installed.)
Ringtone
Choose a ringtone you prefer. Click to hear the sound
or click Add New to upload a custom ringtone.

RingCentral Phone Desktop App | Calls Menu - General
39
Calls Menu - General
The Calls menu allows quick access to many RingCentral Phone settings.
See the General menu for HUD, Call Quality, and Blocked numbers. Click To do this
Calls Menu
General
HUD
Monitor your contacts, view presence status, and call
or text them.
Ring when and user I am monitoring receives an
incoming call.
Call Quality
Use high bandwidth whenever possible.
Blocked Numbers
Click the + sign to open a field into which you can list
phone numbers that you want to block from reaching
your extensions.

RingCentral Phone Desktop App | Calls Menu - General
40
Calls Menu - Incoming
The Calls menu allows quick access to many RingCentral Phone settings.
Mac users can choose to automatically pause iTunes when a call comes in.
Click To do this
Calls Menu
Incoming
Display incoming call in the standalone window.
Launch an external application or URL on incoming
call.
Auto answer
Switch ON to select the number of seconds to wait
before an incoming call forwards to voicemail or
another extension. This can range from 5 to 30 seconds.

RingCentral Phone Desktop App | Calls Menu - General
41
Calls Menu - Outgoing
The Calls menu allows quick access to RingCentral Phone settings.
Click To do this
Calls Menu-
Outgoing
Calling mode /Direct Dial
Direct Dial is visible only when a digital line is assigned
to the computer where the desktop app is installed.
Calling mode /RingOut
Ring me on a specific device first, then connect the call.
Prompt me to dial 1 before connecting the call.
Switch OFF for the call come directly to your extension
without delay.
Default number
This is a direct or company number to be displayed on
profile screen and application status bar. The default
number does not affect the displayed number of a per-
son to whom the user is calling. You select this default
number is selected in the user profile.
Local Dialing
Dial local calls without dialing the country and area
code first. Select your Country or Area code from the
given menus.
Outbound caller ID
Select the number you want to display when you make
outgoing calls or texts.
Calls
From the drop-down menu, select a number from which
your calls will originate. All numbers on the Service Web
are available.
Texts
From the drop-down menu, select a number from which
your texts will originate.
Call Quality
Use High bandwidth whenever possible.
Click To do this

RingCentral Phone Desktop App | Calls Menu - General
42
Messaging Menu
Use the Messaging menu to manage incoming calls to the RingCentral
Phone.
Click To do this
Messaging Play notification sound for fax and text messages
Convert direct numbers to extensions when I try to
send a message to several recipients
Extensions are sometimes easier to recognize between
colleagues. Decide when you’d like to do a conversion
like this. Default action: Ask me; or Do not convert; or
Convert.
Install RingCentral Internet fax to add attachments
from external applications
Installs RingCentral Internet fax driver to a printer.
When you send a document to this printer, it is added to
the fax as an attachment.
When Automatically print incoming faxes is ON. a list
of printers will appear for selection (Windows only). The
default setting is OFF

RingCentral Phone Desktop App | Calls Menu - General
43
Contacts Menu - Integrate with Microsoft Outlook
RingCentral Phone seamlessly integrates with Microsoft Outlook so you
can conveniently call, fax, or text all of your contacts while you’re in
Outlook. Available for Microsoft Windows users only.
Click To do this
Contacts View Google Contacts
Enable to view Google contacts
Outlook plugin
Enable to download Outlook plugin.
View Outlook contacts
Enable to select from Outlook folders.
Select profile
Select from available profiles.

RingCentral Phone Desktop App | Calls Menu - General
44
Contacts Menu - Integrate with Mac Address Book
RingCentral Phone seamlessly integrates with Mac Address Book so you
can conveniently call, fax, or text all of your contacts while you’re in your
Mac Address Book. Available for Mac users only.
Click To do this
Contacts To set up your Mac Address Book to sync with Ring-
Central Phone:
1. At the bottom of the app screen, click the Settings
icon. The Settings screen opens in a separate
window.
2. From the left menu, click Contacts.
3. Set the View Contacts from “Contacts” option to
ON.
If this is your first time syncing you Mac Address Book
with RingCentral Phone, you will be asked to allow
RingCentral Phone to access your Mac Address book.

RingCentral Phone Desktop App | Calls Menu - General
45
Join Now
Join Now integrates with Google, Outlook (Win), and iCal (Mac) calendars,
so you can identify and join meetings and conferences, and make calls from
calendar events.
Click To do this
Join Now • Identify meetings and conferences, and make calls
from calendar events.
• Connect to Google Calendar or Outlook.
• Configure calendar source and notifications.

RingCentral Phone Desktop App | Calls Menu - General
46
Hotkeys for Microsoft Windows
These hotkeys are available for Microsoft Windows users.
*Hotkeys on your RingCentral Phone will work if the app is minimized, but
the app must be active for them to function. This allows you to perform
specific actions with just a touch of a key on your Windows PC. You can set
hotkeys to pick up a call or to send a text message.
Click To do this
Hotkeys
for
Windows
Hotkeys*
• Mute/unmute
• Hold/unhold
• End call
• Pick up the call
• Sending new text
• Sending new fax
Shift + Ctrl +M
Shift + Ctrl + H
Ctrl + E
None; Ctrl + Enter; Enter
Ctrl + N
Ctrl + J
Advanced Hotkeys*
• Outgoing call
• Outgoing fax
• Send text message using Enter
• Park
• Transfer
• Dialpad
F6
F8
Ctrl + Enter
Shift + Ctrl +P
Ctrl +T
Ctrl +D
Access my account online
• Extension settings
• Phone system
• Billing (requires login to your
online account)

RingCentral Phone Desktop App | Calls Menu - General
47
Hotkeys for Mac
These hotkeys are available for Mac users.
Click To do this
Hotkeys
for Mac
Hotkeys*
• Pick up the call
• End call
• Mute/unmute
• Hold/unhold
• Transfer
• Park
None; Cmd + Enter; Enter
Cmd + E
Shift + Cmd + M
Shift + Cmd + H
Cmd +T
Shift + Cmd + P
Advanced Hotkeys*
• Outgoing call
• Outgoing fax
• Send message using
• New text message
• New fax
• Dialpad
F6
F8
Enter; Cmd + Enter
Cmd+ N
Cmd +J
Ctrl +D
Access my account online
• Extension settings
• Phone system
• Billing (requires login to your online account)


RingCentral Phone Desktop App | About
49
About
RingCentral Phone is a complete communications hub on your computer
desktop that lets you talk, text, fax, and conference from one friendly app.
The message below your About screen appears when you click Check for
Updates if your installed version of RingCentral Phone is up-to-date.
Click To do this
About About RingCentral Phone
RingCentral Phone is a complete communications hub
that lets you talk, text, fax and conference from one
convenient app on your computer desktop.
Take a tour
Learn about the latest features in the easy-to-use,
friendly desktop application.
Check for Updates
The current version of the RingCentral Phone app
installed on your computer system is shown here.
• Click Check for Updates to determine if you have
the latest version installed.
• Use this button to download updates to your
desktop application.
Release Notes
Lists the new features in this release.

RingCentral Phone Desktop App | Head Up Display
50
Head Up Display
Head Up Display (HUD) is a call management feature that allows you to
monitor and interact with up to 100 user extensions that you can add to a
HUD list, which is displayed alphabetically.
With HUD you can view the presence status of each extension on the list in
real time. You can also transfer active calls to any extension in your system,
and add users to active calls. If you have permission, you can pick up
incoming calls on behalf of other extensions.
To enable HUD, follow these steps:
1. Click the HUD icon at the top of most app pages.
2. Welcome to the HUD will appear if you have not set up your
Presence appearance in your online account; otherwise your HUD
list will sync automatically to the extensions in your Presence
appearance.

RingCentral Phone Desktop App | Head Up Display
51
To add extensions to the HUD, follow these steps:
1. Click the green Create button (previous page). The Select a Contact
screen opens.
2. On the Select a Contact screen, place a check mark next to users you
want to add to your HUD list, and click Add.
3. Click Save. You may see the warning message below. The warning
alerts you that you will also change the settings in your online
account for Presence appearance if you continue.
4. If you click Continue, your HUD list will appear as shown on the
screen at right.
5. Click Save
Note: If the Presence Appearance is defined in the user’s Office account,
the HUD list will be set up automatically and synchronized to the user's
Contacts list (User > Phones & Numbers > Presence > Appearance).
Click the Edit icon ; then the Add icon on the HUD list to add more
contacts.

RingCentral Phone Desktop App | Head Up Display
52
There are many ways you can manage calls with HUD:
1. On the new HUD list, mouse over a name to place a call or send a text
message to the extension. Example: Lee Lock, Ext: 2222.

RingCentral Phone Desktop App | Head Up Display
53
2. Click the Undock icon to see the complete HUD list in a separate
screen for easy call handling. The HUD list can contain up to 100
extensions.

RingCentral Phone Desktop App | Head Up Display
54
3. During an active call, mouse over the extension (Ben Smith, Ext: 106)
to see additional options you can perform with HUD. These are Call,
Text, Transfer, and Conference.
4. You can transfer your active call to another extension by Warm
Transfer, Blind Transfer, or To Voicemail.
5. With HUD you can also instantly add (conference in) users to
your active calls; for example, adding Mary Goss to your current call
with Ben Smith.
HUD options

RingCentral Phone Desktop App | Head Up Display
55
6. To pick up an incoming call to an extension you have permission to
monitor (example Ben Smith, Ext: 106), mouse over the extension to
reveal the Pickup option. Click the Pickup icon to handle the call.
7. On the pop-up that follows, the person monitoring an extension can
Forward the call; Reply to the call with text; Ignore the call; or
Pickup the call and answer it on behalf of the extension owner.
Ignoring the call will cause it to be handled by the call forwarding
rules set up by the extension owner, such as going to voicemail, being
forwarded to another phone, or forwarded to a colleague.

RingCentral Phone Desktop App | Head Up Display
56
HUD Call Monitoring
Incoming calls to an extension within the HUD list can be monitored if the
extension owner has granted permission to the person who wishes to
monitor that extension.
For example, when an agent is on a call, a supervisor in the same monitoring
group can mouse over the extension to start monitoring the call.
The supervisor can listen in and Whisper only to the agent; Barge in and be
heard by both Agent and caller, or Takeover the call.
Agent Charlie Lee takes a call from a client.
Charlie’s supervisor mouses over Charlie’s extension
and clicks Monitor to listen in.
Charlie’s supervisor has the option to
Whisper to Charlie, Barge in, or Takeover the call.

RingCentral Phone Desktop App | Head Up Display
57
Active Call Layout
This screen for conference calls provides:
• Improved layout for all local calls in conference
• An updated design that displays all parties in conference
• Improved user interface and structure

RingCentral Phone Desktop App | Head Up Display
58
Park Locations at HUD
Park Locations is a feature on the Desktop App HUD that allows you to park a call privately that can only be answered by users within the group. This provides
increased security as only selected employees can pick up the parked call.
Users within the designated group can pick up a parked call anywhere within RingCentral Phone, even when away from their desk.
During an active call, click the Park Location group on the HUD; then mouse over the location to Park the active call. Answer parked calls by mousing over the
Park Location extension and clicking Pickup.
Available Park Location is boldface.
Mouse over Park Location
and click it.
Call from 650-555-1555 is parked. Mouse over parked call
and click Pickup.

RingCentral Phone Desktop App | Check for Updates
59
Check for Updates
Click the View Settings icon . Click near the bottom left of the
Settings screen.
Next to Current Version: Click to determine whether
you have the latest version of the RingCentral Phone application installed.
RingCentral Phone Desktop App | Give Us Feedback
60
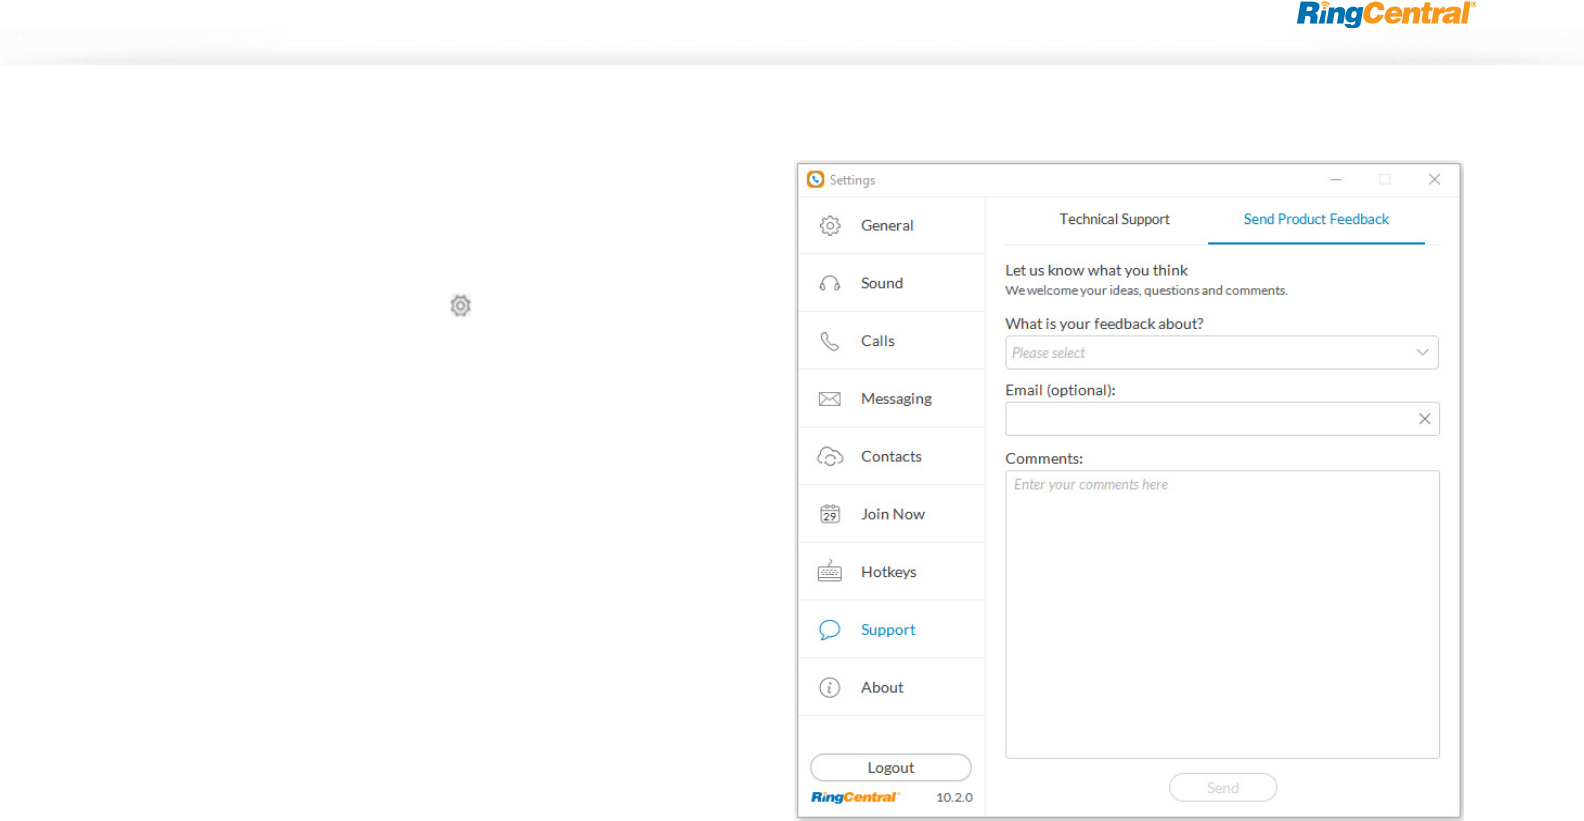
Give Us Feedback
We love hearing from you! Your comments help us improve RingCentral
Phone, so don’t be shy about telling us what’s on your mind. We want to
hear the good and the bad.
Here’s how you can get in touch with us:
1. At the bottom of the screen, click . The Settings screen opens in a
separate window.
2. From the left menu, click Support > Send Product Feedback.
3. In the What is your feedback about field, select the topic of your
correspondence.
4. In the Email field, type your email address if you’d like us to respond
to you.
5. In the Comments field, type your feedback. Go all out. Let us know
what’s on your mind. We are happy to hear whatever you have to say.
6. When you’re done having your say, click Send.
Your feedback is sent around to the teams at RingCentral. While you
might not get a response right away, rest assured that we hear you.
We review every bit of feedback that comes our way. If you included
your email address, we might contact you for more details.
7. Please send feedback as often as you like!

RingCentral Phone Desktop App | Log Out of RingCentral Phone
61
Log Out of RingCentral Phone
When you’re done with work for the day, you can log out of RingCentral
Phone. Here’s how:
1. At the top of the screen, click . The Settings screen opens in a
separate window.
2. From the left menu, click Log out.
3. A confirmation message displays. Click Log out again.
You’ve now successfully logged out and closed your RingCentral Phone
working session. See you tomorrow!
©2018 RingCentral, Inc. All Rights Reserved. RingCentral, RingCentral Office, RingCentral Meetings, and the RingCentral logo are registered trademarks of
RingCentral, Inc. RingCentral Rooms is a trademark of RingCentral, Inc. Other third-party marks and logos displayed in this document are the trademarks of
their respective owners. Rel. 10.2 PDOC-12517
