
DOCUMENT RESUME
ED 404 790
EC 305 294
AUTHOR
Spicker, Howard H.; Aamidor, Shirley E.
TITLE
Project Spring II: Science Curriculum Modifications
for Rural Disadvantaged Gifted Students.
INSTITUTION
Indiana Univ., Bloomington.
SPONS AGENCY
Department of Education, Washington, DC.
PUB DATE
96
CONTRACT
R206A20011
NOTE
78p.; For related documents, see EC 305 293 and EC
305 295.
PUB TYPE
Guides
Classroom Use
Teaching Guides (For
Teacher)
(052)
EDRS PRICE
MF01/PC04 Plus Postage.
DESCRIPTORS
*Curriculum Development; *Economically Disadvantaged;
Elementary Education; Evaluation Methods; Field
Instruction; *Gifted Disadvantaged; Inservice Teacher
Education; *Minority Group Children; Program
Implementation; *Rural Education; *Science
Curriculum; Science Instruction; Student Evaluation;
Talent; Videotape Recorders; Workshops
IDENTIFIERS
Multiple Intelligences
ABSTRACT
This manual is an overview of the science curriculum
intervention that occurred in a federally funded project to identify
and serve the needs of gifted and talented economically disadvantaged
students (grades 3-8) from minority populations. An introduction
discusses the training in curriculum development and methodology,
based on Bloom's Taxonomy and Gardner's Theory of Multiple
Intelligences, that was provided at teacher workshops. Examples of
how the multiple intelligence model can be used in the curriculum are
given. The importance of providing a differentiated-experiential
curriculum and how this might be accomplished are discussed next.
Following, the curriculum intervention at each of the project's three
sites is reviewed, and actual examples are provided for the water
unit and forestry unit, as well as project modifications. Classroom
activities are described, including an explanation of how to use a
videoportfolio and an artifact box exchange network. A section on
junior high school science curriculum describes labs and projects
that can be used to further instruction. Appendices include a more
detailed explanation of theories on the major categories in the
cognitive domain and multiple intelligences, why field experiences
should be provided and how to prepare for them, possible assessment
measures and evaluation techniques for rural gifted students, and a
science curriculum matrix. (Author/CR)
***********************************************************************
Reproductions supplied by EDRS are the best that can be made
from the original document.
***********************************************************************
U.S. DEPARTMENT OF EDUCATION
Off i e of Educational Research and Improvement
ED
ATIONAL RESOURCES INFORMATION
CENTER (ERIC)
his document has been reproduced as
received from the person or organization
originating it.
Minor changes have been made to
improve reproduction quality.
Points of view or opinions stated in this
document do not necessarily represent
official OERI position or policy.
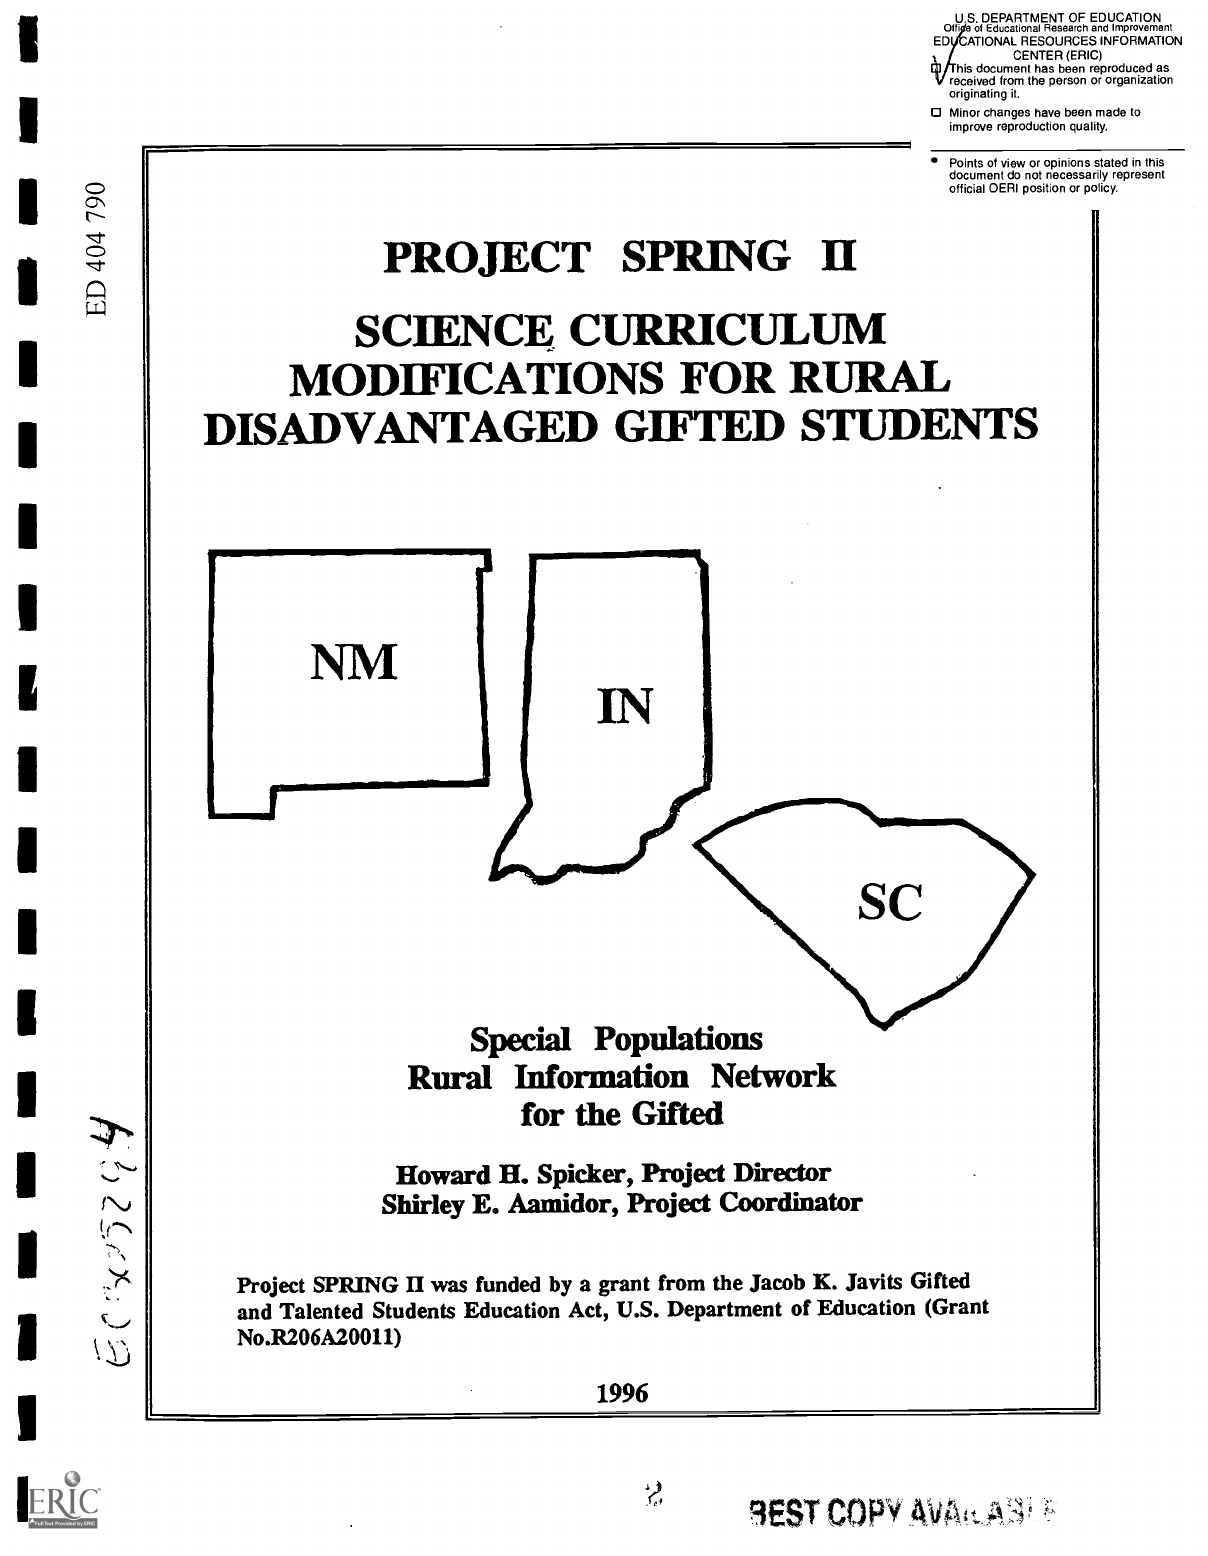
PROJECT SPRING II
SCIENCE CURRICULUM
MODIFICATIONS FOR RURAL
DISADVANTAGED GIFTED STUDENTS
AP
NM
4
Special Populations
Rural Information Network
for the Gifted
Howard H. Spicker, Project Director
Shirley E. Aamidor, Project Coordinator
Project SPRING II was funded by a grant from the Jacob K. Javits Gifted
and Talented Students Education Act, U.S. Department of Education (Grant
No.R206A20011)
1996
9EST COP,
PROJECT SPRING II
SCIENCE CURRICULUM MODIFICATIONS
FOR RURAL
DISADVANTAGED GIFTED STUDENTS
Special Populations
Rural Information Network
for the Gifted
Howard H. Spicker, Project Director
Shirley E. Aamidor, Project Coordinator
Project SPRING II was funded by a grant from the Jacob K. Javits Gifted and
Talented Students Education Act, U.S. Department of Education (Grant
No.R206A20011)
1996
3

TABLE OF CONTENTS
page
I. PREFACE
iii
H. ACKNOWLEDGEMENTS
iv
INTRODUCTION
1
IV.
ELEMENTARY SCHOOL - DIFFERENTIATED CURRICULUM
7
V.
ELEMENTS OF THE WATER UNIT
9
Introduction to the Water Quality Curriculum
10
Identifying Specialists for the Water Quality Unit
10
Resources
11
Ichthyology Specialists
13
Earth Science Specialists
14
VI.
WATER UNIT - NEW MEXICO MODIFICATIONS
16
Does soil from different areas absorb water at the same rate?
17
What is splash erosion?
18
How does water erode the soil?
19
How does the velocity of water effect erosion?
20
What can you test in a water sample?
21
VII.
FORESTRY UNIT
23
Introductory Activities
24
The Life Cycle of Trees in the Forest
25
Discovery Camp
27
VIII. VIDEO PORTFOLIO
29
Cinematography Techniques
31
Interview Techniques
33
Student Autobiographies
35
IX.
ARTIFACT BOX EXCHANGE NETWORK
39
4

1
X.
JUNIOR HIGH SCHOOL SCIENCE CURRICULUM
44
Weekly Labs
45
Developing Science Skills
46
Planned Experiments
47
Science Fair Projects
49
Modifications to the Textbook
49
XL
APPENDICES
Appendix A Bloom's Taxonomy
53
Appendix B Gardner's Multiple Intelligence Theory
56
Appendix C Why Provide Field Experience
58
Appendix D Evaluation and Assessment Measures
63
Appendix E New Mexico Science Curriculum Matrix
67
ii
PREFACE
This manual is an overview of the curriculum intervention that occurred in Project
SPRING II (Special Populations Rural Information Network for the Gifted). This intervention
was implemented in southern Indiana, rural New Mexico, and rural South Carolina.
The Teacher Workshop section briefly provides information on the training teachers
received. Bloom's Taxonomy and Gardner's Multiple Intelligence theory provided much of the
background. Both are easily understood, and can be applied in various settings. Examples of
how the multiple intelligence model can be used in the curriculum are given. The importance of
providing a differentiated - experiential curriculum, and how this might be accomplished is
discussed next. Science goals from The National Committee on Science Education Standards
and Assessment guide this section.
The curriculum intervention at each of the three sites is reviewed, and actual examples
are provided. Examples of the Water Unit, Forestry Unit, are given, as well as modifications
made in New Mexico and South Carolina.
At the junior high school level, the curriculum intervention consisted of projects, labs,
and hands-on activities to augment subject content in the science textbook. Examples of the
intervention are provided.
The Appendices include additional information on materials and activities used in teacher
workshops. A more detailed explanation of Bloom's Taxonomy and Gardner's Multiple
Intelligence Theory is provided. Why Provide Field Experience is a "How-To" for conducting
successful field research. Evaluation and Assessment Measures considers methods for evaluating
rural disadvantaged gifted children, as well as providing other ways teachers might assess what
a student has learned. The Science Curriculum Matrix, developed in New Mexico is in
Appendix E.
The Project Director and State Coordinators for Project SPRING II and their addresses
are:
Dr. Howard H. Spicker
SPRING II Project
Director & Indiana Site
Coordinator
Indiana University
Smith Research Center
2805 East Tenth Street
Bloomington, Indiana
47405
Tel: (812)855-4438
Fax: (812 855-8545
Dr. Nancy S. Breard
SPRING II South Carolina
Site Coordinator
Department of Education
Converse College
174
Spartanburg, South
Carolina 29302
Tel: (864) 596-9732
Fax: (864) 596-9221
6
Dr. Elba I. Reyes
SPRING II New Mexico
Site Coordinator
Special Education and
Rehabilitation
School of Education
University of Arizona
1430 East Second Street
Tucson, Arizona 85721
Tel: (520) 621-0937
Fax: (602) 621-3821

ACKNOWLEDGEMENTS
Project SPRING II is the result of the cooperative efforts of numerous persons who devoted their
time and expertise to the project during its three-year funding cycle.
Heartfelt appreciation goes to Shirley Aamidor, the project's highly skilled and dedicated overall
project coordinator, who efficiently organized and monitored day-to-day operations across the three sites.
Shirley was also instrumental in the development of the identification and curriculum manuals.
Appreciation is expressed to SPRING's talented consultants: Sam Guskin, external evaluation; Linda
Shepard, statistical analysis; Duane Busick, video technology; and Lisa Blank, science curriculum.
Special thanks to Lisa Killion for her enthusiasm and skill as SPRING's administrative assistant, and to
Valerie Savage for her capable editing and typing of our manuscripts.
At the Indiana site, a special acknowledgement goes to the demonstration-school site leaders:
Martha Nice and Walda Tower (Paoli), and Diane Wilson (Crawford County). They were instrumental
in developing innovative curriculum materials and practices, and directing the implementation of those
innovations.
In South Carolina, under the capable leadership of Nancy Breard, we owe a debt of gratitude to
our on-site demonstration-school support teachers and administrators: June
Moorehead (Daisy), Judy
Lambert (Elloree), and Melba McKenzie and Myra Rivers (Estill); to our highly skilled staff development
consultants, Judy Beard, Carolyn Powell, Runnelle Gainey, and Judy Gosser; and to Nancy's loyal
administrative assistants, Shawn Rudd and Natalie Dean.
In New Mexico, under the direction of Elba Reyes, special thanks are extended to Bruce Carter,
whose computer skills managed the New Mexico data, and to Mary Saxton, whose curriculum knowledge
and enthusiastic teaching styles provided demonstration-school teachers with the support they needed to
make necessary curriculum modifications for SPRING II students.
Finally, Project SPRING II could not have been conducted without the generous assistance of
demonstration site teachers, administrators, and students. Our heartfelt thanks to all of you.
Howard H. Spicker
Project Director
7
1

Introduction
Project SPRING II
(Special Populations Rural Information Network for the Gifted), in
collaboration with teachers in rural school districts in Indiana, New Mexico, and South Carolina, has
conceived and implemented an experiential science curriculum that supports the unique characteristics of
rural, gifted disadvantaged children.
An interdisciplinary Water Unit utilizing the natural environment, community resources, and the
distinctive cultural characteristics of rural areas, developed in SPRING I (1990-1992), became the model
for a subsequent unit on Forestry, and the basis for innovative science curriculum in rural New Mexico,
and rural South Carolina.
Rural disadvantaged gifted children experience accomplishment and self efficacy within the
context of their outdoor environment. An interdisciplinary science unit where outdoor activities are
essential components, and where teachers encourage and value the contributions of rural students,
promote individual competency and success in curriculum.
Such a connection provides rural gifted
students opportunities to transfer their outdoor skills into the traditional academic mainstream. When
placed in the proper environment, they:
Show leadership skills
Are more accountable for activities, especially field study experiences outside of the
classroom
Are more aware of the environment and their area of study
Are more likely to write about outdoor experiences
Are motivated to follow up; they bring in hands-on items, artifacts, samples from home,
and/or continue independent study at home
Are able to retain past field study information and will volunteer, share in discussion
Will make connections, transfer knowledge with a physical concrete reminder of the
hands-on experience
Will attempt reading far beyond levels of ability, if associated with an activity that has
real life applications, i.e., water testing.
The National Committee on Science Education Standards and Assessment in developing a set of
standards for planning, implementing, and assessing science education, assert that the goals of school
science education must provide experiences that:
Are personally and socially rewarding;
Call for a wide range of knowledge, methods, and approaches to analyze personal and
societal issues critically;
8
1
Encourage students to act in ways that reflect their understanding of the impact of
scientific knowledge on their lives, society and the world;
Encourage students' appreciation of the scientific endeavor and their excitement and
pleasure in its pursuit;
Develop in students an appreciation of the beauty and order of the natural world.
To accomplish these goals, the National Committee on Science Education Standards maintain that
science curriculum, teaching, and assessment standards will have to consider:
The diversity of the student population.
The students' disparate interests.
The students' motivational levels and experience.
The student's individual way of learning about and understanding science.
Too often, school science programs disregard or overlook these influences when developing
science curriculum, and don't take into account the demographic, geographic, or cultural characteristics
of students. Within the area of culture and region, it is important to remember that the traditions and
customs of cultures need to be considered when developing lessons for the culturally diverse classroom.
For example, Project SPRING teachers in New Mexico were made aware that "packaged" lesson plans
(as those supplied by book publishers) were often not appropriate for their students. One such lesson
required students to record the amount of water collected from an open faucet as they brushed their teeth.
However, in one community in Project SPRING II, many of the students did not have piped-in water in
their homes. Another lesson talked about letting the water run to determine how long it took for the
water to get hot. Teachers observed that in the desert, the water already came out of the faucets hot.
Thus, it became important to consider the concepts being addressed in the lessons and then to adapt the
lesson to the students' cultural experiences.
A science program that considers cultural and geographic characteristics when planning
curriculum, extends student's experiences, and promotes their understanding of science.
Teacher Workshops
Parents, administrators, and popular opinion, regularly advise teachers to provide challenging
science content for students.
Educational theorists recommend that teachers incorporate innovative
teaching strategies into their curriculum.
At the same time, teachers are urged to follow the state
mandated curriculum, and admonished when they don't.
Finding a balance between content and
innovation comes at a time when more and more, teachers are held accountable for outcomes. These
outcomes are usually assessed using a standardized test, and teachers are held responsible for their
student's less than stellar performance. Under such circumstances, it is little wonder that teachers become
frustrated, and revert to using textbooks adopted by the district. Unfortunately, science textbooks are
cluttered and dense with facts, information, and data that are introduced absent a societal or philosophic
context. Student assignments lack personal relevance, require simple recall of information, meaningless
applications of concepts, and involve expensive science apparatus that many rural schools cannot provide.
9
2
Acknowledging the goals and purpose stated in the National Committee on
Science Education
Standards, but also mindful of practical constraints teachers encounter,
Project SPRING II has developed
science units that correspond with the national science goals.
To effect any innovation in science, teachers were considered
integral to the process. Training
in curriculum development and methodology was conducted at
the school sites.
This training
demonstrated for teachers how to apply higher level thinking skills in the
classroom, how to implement
innovative learning models, and how to extend the traditional
curriculum beyond the basic knowledge and
comprehension level.
The following models, used in gifted education, were shown to have
impressive results with rural
gifted students from diverse backgrounds. Teachers of 3rd and
4th grade Hispanic gifted children in New
Mexico, and teachers of African American gifted 2nd and 3rd grade
children in South Carolina, were
introduced to Bloom's Taxonomy and Gardner's Theory of Multiple
Intelligences. Teachers developed
structured, open-ended questioning techniques directed toward
promoting discussion at a higher cognitive
level.
Definitions and examples were given to terminology such as
interdisciplinary and differentiated
curriculum, and at a later workshop, these terms were applied to
curricula units.
An overview of these concepts are presented below. A more
detailed explanation is given in
Appendix A and Appendix B respectively.
Major Categories in the Cognitive Domain of the Taxonomy
of Educational Objectives (Bloom, 1956).
Knowledge: represents the lowest level of learning outcomes in the
cognitive domain.
Comprehension: the ability to grasp the meaning of material.
Application: the ability to use learned materials in new and concrete
situations.
Analysis: the ability to break down material into its component parts so
that its
organizational structure may be understood.
Synthesis: the ability to put parts together to form a new whole.
Evaluation: the ability to judge the value of material for a given purpose.
In many classrooms, direct teaching, subject assignments, and
the assessment of student
outcomes, operate at the knowledge and comprehension
levels only.
Students are quite capable of
performing at a higher cognitive stage, even those youngsters in the early
elementary grades.
Think of
the responses a teacher might receive if she asked students to create a device
for measuring trees, as
opposed to simply listing, or stating ways trees are measured.
Similarly, requiring students to compare
and/or contrast the impact of the automobile or elevator on society today, versus
the pre-automobile,
elevator period, will provide more than a list of differences.
Moreover, assignments which promote
consideration of complex issues, move students towards thinking for themselves about
the consequences
of human actions.
To gain practice using Bloom's Taxonomy, teachers selected a chapter
from a science or social
studies textbook they typically used, and applied the six levels of the taxonomy,
and behavioral terms to
activities and assignments. The results were, increased student engagement,
less reliance on a teacher
as the conveyor of knowledge, and the awareness
that learning is a dynamic process, rather than a
passive-submissive act.
1 0
3

One elementary teacher used Bloom's Taxonomy to develop a thematic unit about the small town
where many of his students lived. This community was making preparations to physically move the town
from a flood land area to higher ground. Previous flooding in the area had made living there untenable.
The unit, Transition, generated many ideas from students, and long time community residents, and
produced a unique and innovative unit. Examples follow:
Knowledge and Comprehension:
Map Study of Crawford County, Indiana
Read information on erosion and pollution
Guest speaker on the past, local author, E.B. Roberts
Research the steps English took to prevent flooding 1959 - present
Discuss what could have been done
compile and list options
Application and Analysis
Develop a timeline that shows population concentrations of Crawford County, decade to
decade.
On the playground, relate roof runoff to continental divide, and to watersheds in
Crawford County. Map the path of the runoff from each side of the gym to the stream.
Mark off scale map of county on playground.
Write a newspaper account of the Great Flood of 1990.
Identify and discuss the harmony and rhythm among stream organisms and the effect
flooding has on this ecosystem.
Synthesis and Evaluation:
Write an editorial about the ills of over-grazing, over-development, and excessive timber
cutting.
Compare population densities in various geographic regions, i.e., east coast, western plains.
Determine reasons for different communities emergence and development.
Field Trip - Examine effects of extensive logging on the community (increases runoff).
Explain reason for soil erosion. What are the results of soil erosion on our community?
Gardner's Multiple Intelligence Theory acknowledges the numerous ways students can succeed
in school, and recognizes students' wide range of abilities used in learning, problem solving, and creating
products valued in diverse cultural groups. The seven categories of Gardner's multiple intelligences are
listed below, and a more detailed explanation is in Appendix B. .
11
4

Linguistic: Learn best by seeing, saying hearing language
Logical-Mathematical: Learn by forming concepts, looking for patterns, relationships
Musical: Learn concepts by putting information to music
Visual-Spatial: Learn visually and need to be taught through images, pictures, color
Bodily-Kinesthetic: Learn through role-play, drama, creative movement
Intrapersonal: Learn through own inner speech and imagery
Interpersonal: Learn best by relating, cooperating, and dynamic interactions with others
The following is one example of how a fifth-grade teacher used Gardner's model to frame the
science curriculum. Consider whether these activities are in concert with the goals recommended by The
National Committee on Science Education Standards and Assessment.
Community Service Project
Conduct interviews with guest speakers
Introductory Activities:
Observations, Brainstorming
Use Creative Problem Solving Process to complete plan of action
Linguistic:
Write a grant to apply for funding for service project, complete research
Make oral presentation of plan to committee
Logical-Mathematical:
List materials needed
Develop questions for guest speakers in relation to determining amount of materials, type
of supplies needed, lumber weight, paint mixture, etc.
Visual-Spatial:
Take photos of visual damage, and needed repairs
Create diagram of plan
Learn various art techniques appropriate for project
Bodily-Kinesthetic:
Learn to use appropriate methods of measuring for materials, supplies
Learn to operate various shop machines in a supervised setting to create various products
Musical:
Learn to identify patterns in tone, rhythms, beats, sounds
Exhibit understanding of timing, volume, pacing of pattern in orchestration
Intrapersonal:
Make a list of "Things I could do for our community"
Share with class and discuss group vs. individual projects
12
5

Interpersonal:
Brainstorm
in
a group
setting
"Things
that need
to be improved
at
the park"
Discuss problems that could be encountered. Use a grid to narrow focus and establish
most feasible projects
Assign duties in plan of action to everyone in the group
Students submitted a proposal to local agencies requesting funds to restore a local community
park, made a presentation to the local school board, and promoted the restoration project within the
community. Students received funding, and went on to make their proposed improvements to the park.
The ideas and activities using Gardner's multiple intelligence, were developed by Janice Apple, and her
fifth-grade class at Throop Elementary School, Paoli, Indiana.
In New Mexico and South Carolina, Gardner's model applied to the curriculum, was especially
effective with 2nd, 3rd and 4th grade students. The active, hands-on approach is compatible with how
young children learn. This pro-active method allows young children to construct
knowledge about their
world, formulate and test out ideas. Examples follow:
Linguistic:
Students wrote stories, presented information orally, drafted outlines for research, and
assisted peers understand concepts and instructions.
Logical-Mathematical:
Students developed hypotheses; recorded, compared, and analyzed data; worked with
measurements, manipulated numbers, charted information, and drew conclusions
Visual-Spatial:
Students developed and drew space shuttles to scale; paced out, to scale in their school
yard, the distances between the planets; drew a mural of great classical music composers
who most impressed them, or developed banners and posters during a school campaign
for water conservation.
Bodily-Kinesthetic:
Students engaged in such activities as "walking among the planets" as they walked from
planet to planet in the school's yard; learning how heat, pressure, and layering form
sedimentary rocks; formed layers of soil; examined soil erosion, and explored and
climbed geological formations in their community.
Musical learners:
Students learned and made musical mnemonics for learning information, wrote songs
inspired by the information they were learning, and explored rhythm in their
environment.
Intrapersonal:
Students learned about themselves as they matched their abilities to the labs they chose,
and they learned about others
Interpersonal:
Students learned to negotiate responsibilities and get tasks done within their small groups.
13
6

Elementary School
Differentiated Curriculum
14
7
A curriculum with levels of complexity that allows students to move through subject content at
their own pace, has been shown to be effective in classrooms where students are at varying achievement
levels. With teacher training and administrative support, differentiation can be successfully implemented.
A differentiated curriculum must be purposeful, so as to motivate students to explore issues and concepts
across the curriculum, as well as follow a process/research/ product design that will stimulate divergent
thinking and in-depth learning. For rural, disadvantaged gifted students, who may exhibit patterns of
uneven achievement, differentiation can be an effective way to direct the curriculum, and moderate
academic weaknesses by emphasizing content strength.
Project SPRING II, teachers in New Mexico and South Carolina, adapted the regular science
curriculum by differentiating the curriculum and incorporating Gardner's multiple intelligences model.
It was further differentiated by incorporating concepts already familiar to the students through their
culture and community. For example, in the area of multiple intelligences, teachers presented information
in various modalities and students were encouraged to develop their own method of presenting what they
had learned.
Because the science content capitalized on children's natural curiosity within the context of their
physical environment, the development of inquiry skills, and awareness of the scientific method evolved.
Simple, but quite relevant research tasks, assigned to early elementary, as well as upper elementary
participants were implemented with enthusiasm.
These nascent skills are the foundation for further
science experiences. When children view science inquiry in a positive manner, this perception directly
influences their achievement, and encourages them to develop complex science skills such as:
formulate usable questions
plan experiments
conduct systematic observations
interpret and analyze data
draw conclusions
communicate information
coordinate and implement a full investigation
By the end of twelfth grade, all students should be able to put these skills to appropriate use, according
to the National Committee on Science Standard and Assessment.
Evidence from Project SPRING II
suggests that using an experiential curriculum, early elementary students are very capable of applying
these skills, from the fundamental to the more advanced levels of science inquiry.
The skills students learn as the first step in conducting science projects and research can provide
unexpected outcomes. In New Mexico, science skills were found to facilitate first and second language
development for students with limited language skills. For example, observation skills required students
to make inferences, comparisons, and associations with their cultural baseline knowledge, and helped
focus the students' language as they explained what they saw and did. Furthermore, scientific equipment
(e.g., microscopes, measuring tools, etc.) required in the various experiments and labs were physically
shown, named, and their proper use demonstrated. These activities transcended language barriers and
assisted students in their English language development.
The collection of activities that follow,
illustrates how a differentiated, interdisciplinary
curriculum is applied to science.
Environmentally significant content, along with diverse ranges of
difficulty, appeal to students and teachers alike.
It was developed by Martha Nice, Gifted/Talented
Coordinator, Walda Tower and Gayle Florence, Paoli Community School Corporation, Paoli, Indiana
15
8
Water Unit
This curriculum is designed to be used in a variety of methods. It can be used as an enrichment
model with activities selected to supplement existing units and textbooks, or it could be the basis
for a
full-time science curriculum.
Nine units of study were developed:
the Introduction Section develops in students a general awareness of the water cycle and
the scientific process;
seven "specialist" units with activities for classroom settings
and for field study; and
the final unit concludes with the synthesis and evaluation of data acquired throughout the
year.
Because of the longitudinal nature of the study and the importance of the concept of cycles, the
unit is designed for implementation throughout the school year. However, it would be very easy to select
a given unit or a variety of activities selected from each unit.
There is also much flexibility in where the curriculum can be implemented. All students can do
some of the activities. Some could extend their interests through
field study or additional research. Time
can also be scheduled for small groups to work in a resource room or
outdoor lab setting with experts
and support staff.
Classroom aquariums can become mini labs, with students recording data on a daily basis. Each
unit (with the exception of the introduction and conclusion) has two parts; classroom and field study.
The classroom folders have activities to provide a general background knowledge base and depending on
the independence of the students participating, could be implemented with teacher guidance or by small
group discovery. It is not necessary to do all of the activities. They
should be chosen according to need
and student learning styles.
Field study folders concentrate on process skills and open-ended laboratory experiences. They
should be implemented by an experienced teacher or field expert.
Science seminars can be organized for additional discussion, analysis of a specific experience or
issue. These can take place in a resource room or in a corner of the classroom. Students should have
a representative sample of all scientists or partial group to offer their
perspective on an issue or problem.
At times, all students role-playing one scientific area should be grouped together to compare data and
share knowledge. Forcing communication is important as students become aware that data or knowledge
in one field might also be relevant to their study. As the units progress students become more adept at
organizing themselves into groups according to need, rather than being categorized by an adult.
16
9

Introduction to the Water Ouality Curriculum:
Getting Ready:
Water Information Reference Table:
collect books and pamphlets from the library and other sources about Water Chemistry,
Ichthyology, Entomology, Biology, History, Earth Science and other pertinent water
related information.
Current Affairs:
Encourage students to constantly search for "water" information. Set up a bulletin board
especially for newspaper and magazine articles that the students find.
Word Bank:
"water" vocabulary words can be displayed on the wall as they are used.
Set up a Working Fresh Water Aquarium:
Explain what is needed for a successful fresh water aquarium.
Pass out folders for students to decorate and to keep records about their rivers.
As a class, or as individuals, brainstorm all ideas that students think of which pertain to water. This may
be recorded on a chalkboard or chart paper. This will show what students are most interested in and will
indicate water knowledge. This may be used as a pre-test.
Introduce the Water Cycle
Water: Where it Comes From, Where it Goes.
Develop a survey which identifies the most common uses of water in the home.
Students take home and share with parents.
Students locate where they live on a county map and pin their initials on the position.
They should locate which river, creek or stream they are closest to.
First Field Trip to Selected Creek or River
Visit your chosen stream for observation purposes
Collect fish, amphibians, insects, rocks, and plants for your fresh water aquarium.
Identifying Specialists for the Water Ouality Curriculum:
Define and discuss the following areas of specialization with the students.
Entomology (bugs)
17
10

Geology (rocks)
Ichthyology (fish)
Conservation (laws, abuse)
Zoology (animals near water)
Botany (plants)
History (people)
Ground Water Chemistry (water content, minerals, etc.)
Surface Water Chemistry (water content, bacteria, etc.)
Microbiology (tiny animals in water)
Agronomy (soil)
Discuss how scientist in these professions would relate to the field of water quality.
Have students sign up to study one area in depth (remind them it is important to look at the total
environment, so the class must have representatives in all areas).
Once they have identified which area they want to study, introduce each group to the Specialists Packets
for their chosen area.
Each group will report information back to the class that they have learned. This will give the class a
full picture of the water quality of their stream.
Exploration of Water:
1.
General Awareness
2. Areas to be studied: Adopt a lake or river
3.
Field trip: Observations, collections - classroom aquariums
4. Questions provide study areas/topics
5. Vocabulary
6.
Scientists-Students
7.
Resources
a. People
b. Teaching Materials List Overview (resources section)
18
11

1) Audio Visual
2) People
3) Field Trips
4) Books
5) Articles
6) Kits
7) Text
8) Units
9) Simulations
10) Computer Materials
8.
Schedules
9.
Questions, activities, worksheets (last section tagged Resources)
Resources:
Entomology: State Board of Health
Ground Water/Surface Water:
Department of Environmental Management
Water Treatment Plants
Ichthyology and Botany:
Biological Studies Section
Water Quality Surveillance and Standards Branch
Office of Water Management Branch
State Fish Hatchery
Department of Natural Resources
Geology and History:
Geological Survey
Local Farmers and Citizens
Local Businesses
Agronomy:
Soil Conservation Service
Local Extension Office
Conservation and Zoology:
County Conservation Officer
Certified Scuba Diver
Department of Natural Resources
Local Extension Office
State Park Services
Local Businesses
19
12

Process:
Locating Resources
Contacting Resource People
Developing Interview Skills
Operating Video and Audio Equipment
Operating Microscope, Making Slides
Skill Development:
Map reading skills (political, geological survey, soil survey, etc.)
Taxonomy skills (classification)
Graph, survey Interpretation Skills
Methods for collecting raw data: (electrofishing, seining, D netting, soil testing procedures,
chemical testing, plaster casting)
Products:
County Map (pin location of home, identify water source)
Classroom Aquarium (LOG to observe, describe graph changes)
Survey (family water usage)
Mural (observations: made with water colors using water source being studied)
Water Quality Chart (with data, conclusions)
Videos (as resources)
Video Documentary (oral history)
Adaptations
Ichthyology Specialists
Classroom Activities:
Objectives - Ideas to be Understood
Students will be able to identify the major species of fish that live in their area.
Supporting Activities:
1.Each student will make a list of as many different kinds of fish as possible that live in
their stream.
2.Make a "biography" of each fish
a. Name - common and scientific
b. Where it lives
c. Habitat
d. What the fish needs for survival
e. Other interesting information
3.Make a drawing of the fish (painting or sketch) and an illustration of its habitat large
enough to be easily seen in a wall display.
13
20

4.Make a three dimensional replica of some of the fish. Hang the models from the
classroom ceiling.
Evaluation:
1.Name five species of fish that live in your stream and describe their habitats.
2.List and describe a variety of reasons that fish are important.
Ichthyology Specialists
Field Study:
Objectives
Ideas to be Understood
Students will understand the relationship between fish species diversity and overall water
quality.
Supporting Activities Field Study:
1.Introduction to fish collecting
a. seine
2.0n site data collection
a. location of fish
b. length of fish
c. weight of fish
d. date each species found
e. number of each species found
3.Biologists from the Department of Environmental Management will assist with fish
collection data.
Materials:
Seine, boots, scale, ruler, buckets
Evaluation:
1.Students will be able to identify the different species of fish found, and their role as
indicators of stream quality.
Earth Science Specialists: Rocks and Soils
Classroom Activities:
Objectives Ideas to be Understood:
Students will be able to identify the different kinds of rocks, fossils and soils along their
streams.
Students will understand how erosion affects stream quality.
21
Supporting Activities:
1.Students will define the following kinds of rocks and show examples of each rock.
a.Sedimentary
b .
Igneous
c.Metamorphic
2.The students will be able to identify the following fossils and give examples of each
type of fossil.
a. Chrinoids
b.Blastoids
c.Bryozoans
d.Anthozoa
3.The student Earth Scientists will complete the activities enclosed in the packed
"Earth
Scientists Classroom Activities".
a.Soil Formation - Making Soil
b.Soil Conservation - Contouring
c.Soil Conservation - Soil Texture
d.Soil Conservation - Soil Compaction and Permeability
Evaluation:
1.Identify the different kinds of rocks and fossils and give examples of each.
2.Students will be able to show the different kinds of soil and it structure.
3.Students will draw a picture of contour farming and explain how it reduces erosion.
Earth Science Specialists - Rocks and Soils
Field Study:
Objectives - Ideas to be Understood:
Students will make a rock and fossil collection of the various kinds of rocks found along
"their" stream.
Students will be able to recognize stream erosion and show how to control it.
Supporting Activities:
1.Brief introduction to rock and fossil collecting.
2.Introduction to mapping stream.
3.On-site rock and fossil collecting.
a.Location of where rock or fossil was found
b.Name of rock or fossil
c.Date collected
22

4.Draw a picture or take pictures of your stream and label the factors which control or
help increase erosion.
5.A geologist from the Indiana Geological Survey will assist in identifying specific rocks
found along the stream, and explain the geological events that caused their formation.
6.Soil Scientists from Soil Conservation Service will help in locating erosion control
methods used along the stream and tell why they are important.
Materials:
Hammer, chisel, knife, acid (HCL), hand lens, collecting bag, notebook, pencil
Evaluation:
1.Students will present the erosion control map they made to the class, and explain the
various techniques they observed.
2.Students will identify and display their rock and fossil collections
Water Unit - New Mexico Modifications
In considering how the Water Unit might be utilized in New Mexico, a state where
the average
annual rainfall is less than 20 inches, it became apparent that in such an arid land, water
might be
discussed within the framework of its importance to agricultural use. This idea was made more
credible
by the fact that many parents, and children, earn their living from working on the land.
They know what
is needed to care for crops, and the efficiency of various irrigation techniques. They
observe weather
changes,sometimes even more accurately than the local meteorologist. To apply the Water Unit to
the
agriculture of the local community helped SPRING students apply what they know about water and
agriculture, within an academic model.
Similar to Indiana, the Water Unit curriculum in New Mexico used a concept or thematic
approach.
The integrated, concept approach makes evident, the interrelationship among the several
science disciplines. A unifying concept represents a repeatedly occurring theme, and provides a context
for explaining facts and events. The theme of water in the selections above, and the agriculture
theme
in New Mexico are such examples.
This model encourages vertical as well as horizontal development among the topics and the
different science disciplines the teachers were able to plan across and within science areas.
Students and teachers experienced a range diverse topics and science disciplines covered in the
curriculum
(See New Mexico Matrix: Project SPRING II - Science Curriculum in Appendix B).
The following labs have been chosen to represent the various characteristics of the curriculum
as it was implemented in New Mexico.
16
23

Activity 1: Does soil from different areas absorb water at the same rate?
Background information:
Crops use lots of water. To produce one ear of corn takes over a barrel of water. Cotton, which is
grown in many of the southwestern states, takes 800,000 gallons per acre.
Organic matter within the
soil helps it to store more water and this helps prevent erosion and produce better crops.
The increased water holding capacity of soils high in organic matter makes a big difference in the intake
of water. Water is stored in the soil for plants to use.
Soils that have organic matter are crumbly and
can absorb lots of water.
The humus acts like a sponge.
Much of the soil in areas not used for
agriculture is packed together. This cloddy sail has few air spaces so particles do not cling together in
granules. The lack of organic matter means that it weighs more than an equal amount of crumbly soil
from a well tilled plot.
Objective:
Compare the water absorption rate of several different soil sites and soil conditions.
Understand the relationship between soil type and compaction on absorption rates.
Materials:
Tin cans of equal size and cut the tops and bottoms out of both cans. The cans should
now be tubes.
Stopwatch or a watch with a second hand.
Graph paper and pencil
One or two cup measuring cup
Procedure:
Find as many different soil types and land sites as possible.
Test the soil in an area that is seldom walked on.
Test packed down soil on a much-used path or area.
Test the other sites that have different elevations
What other sites can you test?
For each site do the following:
Mark one inch from the top of the can. When the water is poured into the can, it is
important that it does not overflow.
Pour a total of two cups of water, a little at a time, into each can.
Use a stopwatch or other timepiece to accurately measure the time.
Read the time it takes the soil to absorb the water and record it.
Record your data on a graph with the time on the y axis and the test site on the x axis.
Find out the other groups' results and graph all the data.
Questions and Follow-up:
Which area absorbed the water faster? Why?
What was the soil composition of the site where the water absorbed the fastest?
17
24

What type of vegetation was growing at that site?
What other areas could you test?
What are your conclusions of the importance of improving soil to have a greater water
holding capacity?
You have just learned how deep water penetrates the soil.
What can you say about the difference in texture of the soil?
What do you think allows the air to penetrate the soil?
How do you think you can measure the air spaces in soil?
How do air spaces affect the water absorption of soil?
Activity 2: What is splash erosion?
Background information:
The first step in the erosion process is the wearing away of soil particles or detachment by raindrops.
The force exerted by falling rain is so great that soil granules are not only loosened and detached, but
may also be beaten to pieces. This is called splash erosion and is very damaging to the productivity of
soils.
Objective:
Find out what soil types are eroded or dispersed more by water.
Evaluate what different natural materials help control erosion.
Materials:
Soil samples from lab "What is in Soil?"
Several quart size jars, all the same size, with lids
Large sheets of paper, ( approx. 3 ft. square)
Grass clipping
Masking tape
Ruler
Large nail
Hammer
Sprinkling can
Water
Procedure:
For each sample of soil to be tested, do the following:
(use the soil from the "soil
layers" lab:
clay, sandy soil, soil from forest, farm field, and whatever else was
collected.
Punch about 15 holes in the jar lids with hammer and nail.
Place the lid upside down on the jar and tape securely in place.
Fill one jar lid with potting soil and level off with a ruler.
18
25

Place the jar in the center of the paper.
Slowly sprinkle (like rain) about 1 quart of water over each jar from a height of 3 to 6
inches.
Replace the white paper and repeat the experiment with the different soil types, adding
grass clippings
Questions and Follow-up:
How much water was collected into the jar?
How much soil was left in the lid?
How far did the soil splash onto the paper?
Did the grass clippings make a difference?
What else did you observe? What are your conclusions?
Activity 3: How does water erode the soil?
Background information:
Farmers use contour farming to control erosion. Curved lines of furrows are used instead of straight
rows. Farmer's leave the roots and stubble of harvested crops on the field to prevent erosion.
Objective:
To simulate water erosion on different types of mountain terrain.
Evaluate what landscaping and materials help control erosion.
Materials:
Sand, or whatever soil type you have outside your school.
Watering can and water.
Popsicle sticks with every ih inch marked.
Procedure:
Every group's mountain should be the same size.
Make several types of soil mountains:
Plain bare mountain with just fine dirt.
Terraced circular contour ridges on the mountain.
Vertical indented ridges on the mountain.
Mountain covered with a thin even layer of grass clippings.
Mountain with sticks placed in the mountain.
Place the marker sticks into the mountain on different sides,only the top mark should
be showing.
Measure and record the height and diameter of the mountain.
19
26
Sprinkle the top of the mountain gently like rainfall.
Measure again, record and draw how the mountain looks now.
Questions and Follow up:
How many marks show on each stick?
Where did the erosion occur the most (top, sides, bottom)?
Did miniature arroyo, streams, canyons or landslides occur?
What did this tell you about the affects of rain on bare soil?
What contour design controlled the erosion best?
What effect do rocks, and grass have on erosion prevention?
Discuss and compare your observations and your drawings of your mountains.
What are your
conclusions?
Activity 4: How does the velocity of water affect erosion?
Background information:
The force and velocity of water falling on the earth would increase with the greater height of the downfall
of the water. This would be applicable if a field was irrigated with a sprinkler type system.
Objective:
To distinguish the relationship between the amount of erosion and the velocity of the
water causing the erosion.
Materials:
One measuring cup
Water
Bare spot of earth
Procedure:
Find three areas of bare soil that have no plant growth or stones.
Draw with a stick, a three foot diameter circle and label the circles.
Pour one cup of water onto circle A from a height of 18 inches.
Pour one cup of water onto circle B from a height of 36 inches.
Pour one cup of water onto circle C from a height of 50 inches.
Take measurements on the total diameter that the dirt splattered.
Measure the depth of each eroded spot where the water was poured.
Place this data on a spreadsheet.
Make a chart that compares the differences in the three places.
27
20
Questions and Follow up:
How far did the dirt splatter when you poured the water from a height of 18 inches?
How far did the dirt splatter when you poured from a height of 36 inches and a
height
of 50 inches?
How deep is each eroded place? How wide?
Can you relate this to the increased force and velocity of the water being poured
from
different heights?
Would storm clouds generate more velocity the higher the altitude of the clouds?
Activity 5: What can you test in a water sample?
Background information:
At a drinking water treatment plant, technicians perform many tests every day to
make sure that the water
we drink is safe. Several factors affect the water we
drink. Sediments, animal waste, petroleum products,
organic wastes, inorganic compounds, heated water, pesticides, and acidity of water are
just some of the
pollutant problems that our water waste system has to test for. You can test for some water
quality tests
by making your own water test kit. Sometimes we obtain our water from wells and
need to perform our
own water tests.
Objective:
Learn the importance of clean water by performing the tests and judging the acceptability
of various water samples.
Materials:
carrying case (an insulated school lunch bag, for example)
small paper cups
baby food jar with lid.
dispenser of wide range pH paper
two 25 x 200 mm test tubes
250 ml plastic bottle of distilled water
several 7 x 13 mm black or white poster board cards
30 ml. dropper bottle of soap solution
three 13 x 100 mm test tubes
conductivity tester
Procedure:
Before using the kit, your need to become familiar with each test.
Write the directions on file cards and include them with the materials for quick reference
out in the field.
Test samples from the school drinking fountain, the water faucet, a well site, your
animals drinking dish, and other sources you can think of. Record your findings.
Testing pH quality
pH paper is easy to use.
It has a color code chart to check the pH level. Dip the paper
in the water and remove immediately.
21
28

After 20 seconds, compare the wet pH test strip with the chart on the pH chart on the pH
strip bottle container. Water considered fit to drink has a pH between 6.5 and 8.5. The
pH of distilled water is 7, which is neutral with no acidity or alkalinity. Test and record
samples from the suggested sources.
Turbidity test
Water that is cloudy contains suspended solids of dust that cause the water to be turbid.
Drinking water has a requirement not to surpass a certain turbidity level.
Fill one of the large test tubes to within one centimeter of the top with a water sample.
Pour distilled water up to the same level into the other large test tube. Holding both
tubes side by side, look down into them against a colored poster board card background.
Is the sample water clear or cloudy? What was the purpose of comparing it to distilled
water?
Find out your areas requirement and dilute your sample with distilled water until it
measures the turbidity level limit.
Before making your dilutions, be sure the water
samples are well mixed.
Record how many milliliters of water were needed to dilute the different water samples
to obtain the required limit for turbid?
What did you find out about turbidity and dilutions?
Water hardness
The two most common substances that contribute to hardness in water are calcium and
magnesium ions. These ions react with the soap molecules to form soap scum instead
of suds. Hard water takes longer to make suds. Hard water may be acceptable for
drinking purposes, but soap in hard water does not clean as effectively as it does in soft
water.
To test for hardness, you will need to make a soap solution of one part liquid soap and
five parts distilled water. Keep a supply of this solution in a 30m1, dropper bottle in the
test kit.
Fill a small test tube one fourth full with a water sample.
Add one drop of soap solution. Hold your forefinger over the top of the tube and shake
vigorously. What happened?
If there are not many suds, add another drop of soap solution and shake again. Continue
until you have determined the number of drops of soap solution required to produce
good, sudsy water.
Record your findings.
Compare this sample with testing distilled water with one soap solution drop and seeing
if soap suds are produced when it is shaken. Keep repeating the procedure until soap
suds form.
29
22

What were your findings about water hardness from different water sources? If there
was a difference in the water hardness what do you thing caused it?
What methods do people use to reduce water hardness in their cleaning water? What ions
bind magnesium and calcium? Can you find this information out from your water
company?
Conductance test
The conductance test estimates the quantity of dissolved solids present in a water supply
and is a test of that water's ability to conduct electricity due to the presence of ions. The
greater the quantity of dissolved solids present, the greater the electric current the
solution can pass.
Fill a small test tube one fourth full with a water sample. To perform the test, simply
immerse the conductivity tester electrodes into the water sample. A light emitting diode
will blink rapidly and brightly for good conduction and will blink feebly or not at all for
poor conduction.
Fill a small test tube one fourth full with a water sample. What would happen if you
tested distilled water?
Additional information on this unit, may be directed to the New Mexico Site
Coordinator, Dr. Elba Reyes.
Forestry Unit
Because the experiential method was so successful for teaching science, and to continue the theme
of cycles in the Water Unit, a unit on forestry was developed and implemented in Indiana -Cycles of
Nature: Life Cycles in the Forest.
Two strands comprise this unit:
The first explores the forest through the eyes of man, viewing it environmentally,
historically, and economically in a scientific method.
The second unit explores the forest through the eyes of its inhabitants and discovers the
interrelationships of all life cycles in the forest.
Background:
Forests are an important part of life to rural students. They are resources, a playground, and
often, a major industry. Many students will continue to make the forest a part of their lives and need
to study it from all points of view.
The Trees Unit allowed students to use the scientific method to identify species, beginning with
observation activities. Forestry and environmental experts provided background information and process
instruction so that students could later work in small groups to carry out activities such as mapping,
calculating volume, diameter, height, etc. Students toured and interviewed local woodworking industries
to discover the economic and social implications of forestry use. Final products included written and oral
reports, charts and displays, videotapes and a final debate with students articulating how man views the
forest.
23
30

Content:
Everything on earth operates in cycles.
Today, scientists know that all of earth's cycles are
connected, each influencing the other. The word "cycle" comes from cyclus, meaning a circle or wheel.
It is described as a course or series of events that recur regularly and lead back to a starting point.
Nature "recycles" to keep the cycle going.
It involves many variables and processes, each
affecting the other. The question for us to consider is "What happens to the forest as it participates in
the process?"
Process:
Scientific investigation is at the heart of the curriculum.
The knowledge for the real-world
exploration came from experts in each area of study. To provide a model, these professionals applied
the scientific content with the proper process of investigation. The outdoors became their laboratory with
three types of experiences developed
observation, inquiry, and discovery. As students became trained
in the types of laboratory experiences, they were able to expand to higher levels of research.
Products:
Scientific logs and journals allow students to document data over a period of time. Care should
be taken to provide opportunities to share data in a variety of ways.
Observations can be drawn or
written. Worksheets, with a fill-in-the-blank approach to recording data, serves a purpose in initiating
students to format. Finally, through webbing and mind-mapping, students will be able to create their own
data-recording devices and system of evaluation.
Videotaping is an excellent method of "note-taking" The information is recorded and requires
logging and playback to obtain the information needed.
It also provides a picture of the data, often to
be scrutinized at a later date for further observation and analyses. Sharing of information can be in a
written formal research report, chart or graph form, oral presentation, video documentary, etc. (See
Video Portfolio section for details.)
Introductory Activities:
Visit a nearby forest and "adopt a plot" to investigate throughout the year. Have students mark
area and complete observation charts of what they see, hear, smell, etc.
Mapping Activity:
Look at the vegetation in your designated area.
Estimate the height and the area it
covers. Map your area.
This does not need to be to scale but try to use proportions.
Use a compass rose and make a map key. Indicate the approximate color of each type
of vegetation. Meter sticks are available should you feel the need. Example: your area
has both low vegetation and tall trees. Show the low vegetation and indicate the trees as
being trunks in order to make the map in perspective. Indicate the approximate size of
the area you are mapping.
Listen Carefully:
Describe what you hear. Do not include sounds made by humans. Make a list of all the
things you can hear when listening quietly.
24
31

Touch:
Select something to feel. Describe how it feels to you.
Smell:
Describe the odors or smells you encounter in your area. Tell about it. Example: Does
it smell wet or dry and dusty?
Find an Animal:
Watch it as closely as you can. Look at it's color, form and body shape as if it were an
outline against the sky.
Close your eyes and try to reconstruct the animal in your mind. See its shape and color.
Now draw the shape of the animal as you would if you saw it against the sky.
Sometimes it helps to look at the animal and not at the paper when you are drawing it.
The outline is done. That's the hardest part. Now fill in the details of the animal. Now
fill in some of the details of the area surrounding the animal. Fill in as many details as
you like of the surrounding area.
Questions About Wildlife:
Height
Running, stationary
Food supply
Area of support
Meat-eater, plant-eater
Hindrance or help
Number of legs
Alone or with others
Huntability
Game animal
Pet, wild, domestic
Predator
Where does it live?
Reproduction
Color
Hibernation
Fur,feathers
Value
Disease
Weight
Species
Male/Female
The Life Cycles of Trees in the Forest
Interdependence:
The Role of the Forest in Society:
The Historical Impact
The Environmental Impact
The Economic Impact
Rationale:
The wood-working industry is the major industry in our community. Most likely many of the students
will one day be employed in this or related industries.
Goal:
Students will develop an awareness of the importance of trees, the wide variety of trees, and the many
ways trees are valued and utilized by everyone.
25
32

Objectives:
To identify the following types of trees by observing the bark: Sycamore, Black Walnut,
Beech, Tulip, Ash, Shagbark Hickory, and White Oak.
To know the different economic values of trees
To know how to calculate volume (board feet) in a log.
To know names of tree parts and their functions.
To be aware of the uses of trees:
To be used as recreational areas
To be used as lumber
To be used as fuel
To be used for cooling and shade
To provide oxygen
Skills:
Students will be able to identify many different types of trees.
Students will be able to estimate the height of a tree, and determine the diameter.
Students will be able to follow trails on a map.
Students will be able to read contour maps.
Questions to be Answered:
How much can a tree be worth?
In general, how much money would one acre of trees be worth?
What trees are used to make paper?
What other trees besides persimmon have male and female trees?
How many different kinds of maple trees can be used to make maple syrup?
What is graphite?
Activities:
Students invited the president of the Protect Our Woods organization to the class to speak
about the life cycles in the forest.
Issues discussed included logging, clear-cutting,
recreational, management plans for the forest, highways, economic factors to consider
when planning for the future of forests.
Students worked in small groups to plan trips to local factories that use wood in their
products. Students made arrangements for trip, prepared questions to ask, and reported
their findings to the rest of the sixth grade.
26
33

Following the interview, students brought back samples, pictures, videotape and compiled
a report which they shared with other classrooms and
with the community on the school
television channel.
Students created a data base to share data with local government and civic groups.
Students arranged a take a "back-to-life" field trip to return all living species from
terrarium to natural habitat.
Students conducted a formal debate on major issues involving forest, i.e., "Resolved,
that
our government should spend more money on protecting our
nation's forests," or
"Resolved, that new materials and methods should be designed to replace products made
of wood."
Discovery Camp
The second unit is an interactive Discovery Camp. Students spent two days (overnight) in the
forest exploring the interdependence of nature. They used the scientific method and worked
closely with
professionals in a variety of fields.
Students became botanists, biologists, zoologists and geologists as they broke into small groups
to study the following: herbaceous angiosperms, woody angiosperms, gymnosperms,
geology and
agronomy, invertebrates and vertebrates.
Collection of data, proper scientific procedures, and use of quality resources were stressed.
Students then regrouped and shared their findings and products, which included charts, maps,
models, prints, and artifacts from nature. New groups were established with representatives from
each
of the areas of science studied. A final product included a skit illustrating the effects of various events
on forest life, from seasonal changes to natural and manmade
disasters. The interdependence of each
group made the life cycle complete.
Zoologists
The Study of Vertebrate Animals:
Why Does The Forest Need Animals?
Activities:
Look for flattened grass, holes through hedges, narrow paths and tunnels through long
grass. These are regularly used "runs."
Look for nuts, and fir cones that have been gnawed or split, and for pieces of bark torn
from trees. Note any piles of feathers or bits of fur showing where a predator has made
a kill.
Search hedge and roadside verges for animal remains. You can identify them from the
skulls using a good field guide. Wear gloves to pick up the specimen and, as soon as
possible, place it in strong bleach for a day to disinfect it. Examine any bottles you find
in a hedge. Small animals often climb inside and become trapped. Bleach the contents
overnight and then rinse the bones.
Make a field log and record the following information:
Date, time, weather, location
What did you fmd?
27
34

Did you see the animal?
What were your thoughts or impressions at that moment?
Additional Activities:
Carding a snake skin
Writing poetry or a short story
Making a plaster cast of animal tracks
Other Specialists and Expertise:
Zoologists: The Study of Invertebrates
Why does the Forest Need Animals?
Geologists: The Study of Geology, Agronomy
Why Does the Forest Need Soil?
Botanists: The Study of Woody Angiosperms (Trees)
Why Do Forests Need Trees?
Botanists: The Study of Herbaceous Angiosperms (Flowering Plants)
Why Does the Forest Need Flowers?
Botanists: The Study of Gymnosperms
Why Does the Forest Need Non-Flowering Plants?
Students living in rural areas are much more comfortable with nature than they are
with a
classroom setting. Their interests, and activities are outdoors. The Water Unit and Forest
Unit, of which
the above are examples, provide students the opportunity to pursue that interest with more
depth and
understanding of the order of nature and its interdependence.
Additional information on the Water Unit and the Forestry Unit may be directed to the Project
Director, Dr. Howard H. Spicker, Indiana University.
35
28

Video Portfolio
29
35

Video Portfolio
The video portfolio is used in the following specific instances, but can also be used any time an event
should be recorded, for example, a student giving an oral report, a class play, or discussion.
1.
Student Pre/Post Interviews
2.
Student Documentary of Home and Family
3.
Contest Interviews to evaluate critical thinking
4.
Product Evaluation
The video portfolio section is introduced as follows:
1.
Camcorder Techniques for Students
A. Directions on how to videotape
B. Safety and care of camcorders (for taking home)
2.
Interview Techniques
3.
Documentary Directions
30
37

Cinematography Techniques
Brief Description:
Cinematography Techniques is a short program designed to instruct students in the use of the camcorder,
and teach students the skills of using simple cinematography styles and shots.
Objectives:
1. To teach simple camcorder technology.
2. To demonstrate the purposes and techniques of using different cinematic shots.
Materials:
Camcorder
Tripod
Blank tape for each child
Handouts: Lights! Camera! Learn! Cinematography: Type of Shots
Procedure:
Students should have opportunities to experiment with the equipment before a project is
begun. Initial experience should include practicing to focus, zoom in and out, load, stop
and start the camera, and rolling the tripod around the room. This minimal training will
enable them to gain confidence before filming begins. Additionally, students should be
familiar with connecting a microphone, and establishing the correct lighting conditions.
If time permits, students in small groups can practice operating the camcorder and
shooting various shots by doing a "scavenger hunt". For example, they can be required
to find five indoor and five outdoor shots, or, nature shots, people shots, building shots
etc. using the cinematographic techniques in their handout.
Evaluation:
Using the criteria listed above, students show their completed tape to the rest of the class
for feedback and evaluation.
31
38
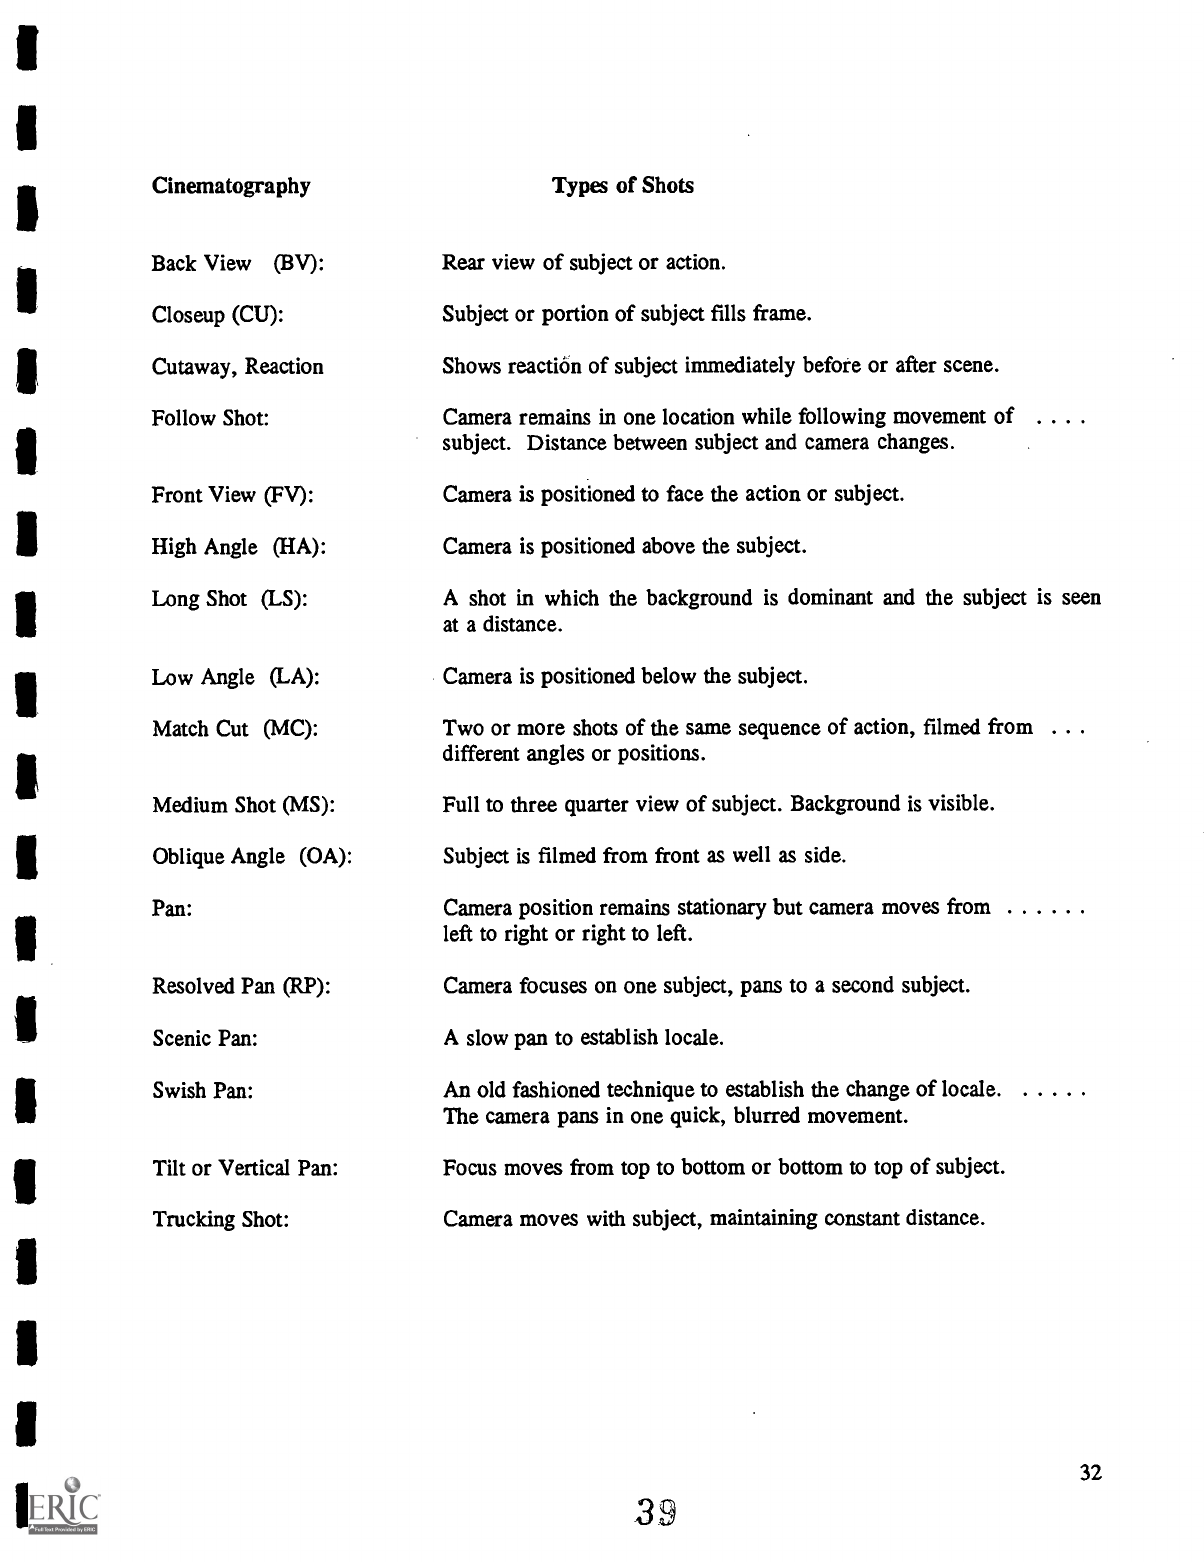
Cinematography
Types of Shots
Back View
(BV):
Rear view of subject or action.
Closeup (CU):
Subject or portion of subject fills frame.
Cutaway, Reaction
Shows reaction of subject immediately before or after scene.
Follow Shot:
Camera remains in one location while following movement of
subject. Distance between subject and camera changes.
Front View (FV):
Camera is positioned to face the action or subject.
High Angle (HA):
Camera is positioned above the subject.
Long Shot (LS):
A shot in which the background is dominant and the subject is seen
at a distance.
Low Angle (LA):
Camera is positioned below the subject.
Match Cut (MC):
Two or more shots of the same sequence of action, filmed from
different angles or positions.
Medium Shot (MS):
Full to three quarter view of subject. Background is visible.
Oblique Angle (OA):
Subject is filmed from front as well as side.
Pan:
Camera position remains stationary but camera moves from
left to right or right to left.
Resolved Pan (RP):
Camera focuses on one subject, pans to a second subject.
Scenic Pan:
A slow pan to establish locale.
Swish Pan:
An old fashioned technique to establish the change of locale.
The camera pans in one quick, blurred movement.
Tilt or Vertical Pan:
Focus moves from top to bottom or bottom to top of subject.
Trucking Shot:
Camera moves with subject, maintaining constant distance.
32
39
Interview Techniques
Brief Description
Interview Techniques is a short program designed with strategies and activities to teach students
the
process of interviewing.
Objectives:
1. To demonstrate the purposes and techniques of interviewing.
2. To teach questioning strategies.
3. To relate critical thinking techniques to interviewing.
Materials:
Resource person - newspaper or TV reporter
Interviews from TV news programs
Procedure:
1.Students need to understand the difference between interviews and conversations.
Definitions:
Interview - a meeting in which a person is asked about personal views, activities,
etc.; a taped or filmed or published account of such a meeting.
Conversation
the act or an instance of talking together (familiar talk, verbal
exchange of ideas, opinions, etc.)
2.Discuss the purpose of interviews when and when they would be used.
3. Background information needed about the subject; research the topic if not enough
information is known or is current.
4. Contact the individual who you wish to interview. Phone or write a letter stating the
time, place, subject to be covered in the interview.
5. Demonstrate writing questions to use in an interview, with grouping the questions into
categories or areas for a logical progression.
Example: Interview the principal on the topic of the school cafeteria.
Possible topic areas from which to develop questions:
Scheduling for class eating times
Movement and rules for the cafeteria
Menus and food procurement
Money and the price of lunches
Government and Health regulations
6. Learn how to summarize and evaluate the interview.
7. Use different types of media for the interviews, i.e., newspapers, video tape.
40
33
8. Contact a resource person to come and talk to the class about how s/he conducts
interviews (newspaper or TV reporter).
9. Practice Activities:
a. Interview another student in the class. Video tape the actual interview
and then
analyze the results.
b. Interview your favorite TV personality or character. Write the topics and
questions you would ask.
c. Use a current event to stimulate discussion. Select a person to interview about
the situation. Write the topics and questions.
d. Discuss a research topic. Plan an interview of a person who could give a lot
of information to you about the topic.
e. Plan an interview for someone to interview you. Give the questions to a fellow
student and conduct the interview. Did you leave out any areas? Evaluate the
results.
f. How and why would you interview your parents? See if you could outline an
interview with them.
Evaluation:
1. Paper pencil: Discuss a situation. Have the students write the topics and questions
to be used in an interview with a person you suggest.
2. Students will evaluate the interviews conducted by other students in the class.
3. Students will do a self-evaluation of their own interviews.
4. Teacher observation of presentation and questioning techniques.
41
Documentaries: Student Autobiographies on Videotape
Objectives:
1. To observe children's hobbies, interests, and abilities outside of the school setting.
2.To teach children interview skills and organization.
3.To collect data from parents concerning feelings about school, education, and ambitions
for their children
Brainstorm with the students what, where and who will be in the documentary. Each student will make
an outline which includes the following:
A.Outline
1.What do you want to show in your documentary?
2.Who are you going to tape?
3.Where (settings) will you tape?
4.What sequence or order will you use?
5.Organize your ideas into a story with a beginning, middle and end.
B.Storyboard Use Storyboard sheets
1.Using the documentary outline above, begin to visualize how the documentary
will be videotaped.
2.Draw stick figures for each setting on the storyboard sheets.
3.Write who is in the scene and what they are talking about. Write a script if necessary.
4.Do each scene (setting) in the same way.
5.How will the documentary end?
C.Produce Your Video
35
42

Storyboard
Materials: Storyboard Sheets
In planning the self-documentaries, it is a good idea to let each student brainstorm with you on how s/he
is going to shoot the documentary. This is especially important when productions are to be edited in the
camera (as most of these are).
From the brainstorming session should come-an outline as to how the student will do her/his production.
Thought should be given as to who will be watching this video and how the student can best establish the
setting of the self-documentary. This is the first step toward making a visual interpretation of the ideas
developed during brainstorming.
Visualizing shots and planning sequences is called storyboarding. A sequence is a series of connected
shots at one location. In storyboarding, you map out the important elements, analyze the sequences and
what is going to happen, and decide what shots are best to use.
From your storyboard you can go on and create a list of the shots you will need to do your production
and also expand your story outline into a shooting script.
A script is really just an extension of the storyboard. There are full scripts and there are partial scripts.
It is not realistic for most people in a home video to memorize a full script of dialogue and at the same
time appear natural on video. In most cases an outline of the shots and sequences with a description of
the story content is sufficient.
43
36

Interview Your Parents
Objectives:
1.To demonstrate parent attitudes toward education of their child
2.To obtain information about parental aspiration for their child
3.To develop parent involvement in The child's documentary
Procedure:
After instruction in the use of the camcorder and interview techniques, the student takes
the camcorder home to film his/her documentary, which includes a parent interview. The
student has a copy of the questions.
1.Please tell me about our family.
2.What do you remember about me while I was growing up?
3.Would you tell about what I like to do, and what kind of person I am?
4.Am I like anyone else in the family?
5.What do you want me to be when I grow up?
6.What do you like about schools today?
7.Is there anything you would like to change in the schools?
37
44

Child Interview
Description:
1.Please tell about yourself: your name, age, family.
Interests and Activities:
1.What do you like to do outside of school? Tell me more about (collections, games,
etc. - whatever the student is interested in).
2.If you have some free time to do anything you would like to do, what would it be?
Why?
3.What activities do you like to do with friends?
Self Concept:
1.What are you really good at?
2.Are there any areas in which you don't do very well? What are those?
Aspirations:
1.If you could be anybody in the world, living or dead, who would you be, and why?
2.What would you like to do when you grow up? Why?
3.What do you see yourself doing when you grow up? Why?
4.How will you be able to do this? (How will you achieve this?)
5.Who do you think will help you to achieve your goals?
Attitudes toward school:
1.What do you like about school? What are your favorite subjects, and how well do you
do?
2.What don't you like about school? Why?
Closure:
1.What would you like to tell me about yourself that I haven't asked, or that you want
me to know?
45

The Artifact Box
39
46

The Artifact Box Exchange Network
Overview:
The Artifact Box Exchange Network is a biannual interschool project that involves students in
the development of advanced research, reference, and reasoning skills through the use of a hands-on
simulation activity.
Borrowing content from the disciplines of archaeology, geography and science, the Network
serves as a vehicle that allows students to collect, tag, reference, and exchange a set of Artifacts that are
representative of their locale.
Using a checklist of twenty-four locally available objects, each participating class is responsible
for conducting an academic scavenger hunt to locate such items as a picture of a local landmark, a sample
of a food product that is grown or produced in their region, a set of seasonal weather reports from the
town newspaper, or a two-inch portion of an area roadmap.
This collection of Artifacts, complete with accompanying suggestions for finding appropriate
references that might be used to identify their region, state or province, or city, is then assembled and
packaged as an "Artifact Box". The box is exchanged with an unknown partner classroom in a distant
locale, the identity of which is known only to each classroom's teacher.
Without revealing the location from which these Artifacts were collected, the receiving teacher displays
the box's contents to student researcher in the partner school. These students are then assigned the task
of finding and using available reference books and nonprint resources to identify the country, state or
province, and town from which these Artifacts were gathered.
The Artifact Box has proven to be a unique and motivating project that affords students first hand
experiences with basic geography, science and research concepts.
Purpose:
The Artifact Box Exchange Network was designed as a simulation activity that allows
students to transfer learned research and reference skills to applied science and social
studies content. The goals of the project include the following:
Student Objectives:
Participating students will:
a.
Develop creative and critical thinking skills.
b. Compare their culture with communities in distant locations.
c.
Become motivated to skillfully utilize advanced reference and non print resources.
d.
Gain knowledge of the content and processes utilized by geographers,
archaeologists, and anthropologists.
e.
Improve their attitude toward social studies and science instruction.
f.
Locate and interview human resources for fmding information.
g.
Appreciate the importance of cooperation in groups activities.
h.
Appreciate the need to plan and organize one's work.
47
40
Teacher Objective:
As a result of participation in this activity, teachers will have the opportunity to:
a.
Provide their students with a meaningful activity that will allow them to transfer
and apply learned research and reference skills.
b.
Supplement textbook instruction in social studies and science with a hands-on
activity.
c.
Involve community resources with a classroom based enrichment project.
d.
Facilitate student involvement in a motivating and enjoyable educational project.
These lists of objectives are by no means comprehensive. Innovative teachers from all over North
America have devised teaching techniques and extension activities that can greatly enhance the program's
stated intentions.
Activities such as conducting a school-wide contest for solving the contents of an
Artifact Box, grade two youngsters teaching grade eight students how to complete a box, and a class of
students visiting their partner school in Pennsylvania are but a few of the creative extensions implemented
by teachers.
It is the Network's hope that you will also create exciting learning opportunities that will
extend the objectives of the program. We would be most interested in hearing of your experiences so
that we may share them with others.
Brief Description:
The Artifact Box is a hands-on simulation of a scavenger hunt with students using content
from archaeology, geography, and science to collect Artifacts which represent their
locale. On completion, the Artifact Box is exchanged with those from other locations
around the country. These regional Artifacts, presented as clues in the "mystery" box,
are decoded by student research and reasoning.
Objectives:
1. To stimulate the development of advanced research , reference, and reasoning skills
for varied academic levels.
2. To provide motivation for creative products
3. To improve attitudes and behaviors in non-traditional gifted students in academic
areas.
Materials:
The Artifact Box Exchange Network Teacher Guide Scott Johnson, Director. The Artifact
Box Exchange Network, P.O. Box 9402 Bolton, CT 06043
For Information (203) 643-0090
Procedures:
Refer to Teacher's Guide
Evaluation:
1. Video Portfolio:
Product descriptions by each student on individual student
videotapes, describing each clue and product that were produced individually or as a
group project.
2. Teacher Observation:
Observations of students recorded in a LOG from both the
student videos (Video Portfolio) and from classroom observation.
Observations will include the following:
41
48

a. number and description of products.
b. attitude description (specify changes).
c. behavior description (specify changes, i.e., doing in-depth research, collecting,
reading extensively, writing letters, writing stories).
3. Student Tests: Paper and pencil assessment of student knowledge of research skills.
Resources and Skills for Students:
Soil Analysis: You might want to bring in someone from a greenhouse or garden center
to work with students on how to analyze soil samples. Also, check high school science
teachers for teaching soil analysis.
Conducting Interviews: A reporter from the local newspaper could discuss with the class
how to do interview.
Graphing
Conducting Surveys
Using Reader's Guide
Microfilm if available
Computer Data Bases
Scientific Names
Brainstorming Techniques
Suggestions for Creative Clues:
Art Work
Slides
Computers
Overheads
Ideas and Suggestions:
Photography
Video
Crossword puzzles
Pamphlets/brochures
Film Strips
Word Searches
Collages
Games
I.Don't give answers while students are creating and solving the Artifacts box. Let them
analyze and evaluate for themselves.
2.Divide clues up into three smaller boxes. One marked regional, one state, and one
local.
3.Decorate your Artifact Boxes. Make them look mysterious!
4.You may send more than one item for each clue. Example, sending 3 or more non
edible plants from region so finder can see where they overlap.
5.Encourage kids to create their own original objects when possible, or send real items.
6.Use zip lock bags to place items in.
Staple clue cards on outside of bag.
7.You might define region as any state that boarders on your state or pick a circle so
many miles in a circle around your community.
49
42
8.You might include a DO NOT OPEN until mystery is solved and include students
letters for pen pals, word searches, crossword puzzles, pamphlets about your community,
etc.
9.Do not just blacken out names with a marker. Kids will read through them. Cut out
anything you don't want them to see. Don't forget to check the back of clues. Have
kids go over everything with a fine tooth comb.
10.Supply reference books which will include maps where artifacts could be located.
11.Students should have references to prove their Artifact is from where they say it is.
12.When the box arrives, and before you let students begin to solve the clues, go through
the box for very obvious clues and edit or change the order.
50
43

Junior
High
School
Science Curriculum
44
51

Junior High School
As students move from self-contained classes in elementary school to subject departmentalism
at the junior high school, they accommodate to the academic conditions and expectations imposed by
teachers, the prescriptive quality of the curriculum, as well as conform to the social standards of peers.
At a time when the curriculum becomes less motivating and challenging for many students,
extracurricular interests begin to compete with academics for a student's time, energy, and interest. For
many students, the decision to maintain the minimum, or slightly above minimum
standards, is made
when day after day they sit through a curriculum with lackluster content.
The daily schedule at the junior high level; class periods usually lasting 50 minutes, along with
subject departmentalism, frustrates teachers who must parcel classes into prescribed time/content portions.
This arrangement precludes field trips, science labs that take longer than the time allowed, and projects
that require intense involvement on the part of student and teacher.
Science teachers, even the most
innovative, must present content within the constraints noted above.
It is not surprising then, that
teachers rely on the textbook to define what the curriculum will be, and how the curriculum will be
taught. When textbooks drive the curriculum, the outcome is usually didactic and predictable instruction
which follows the textbook outline; overview, review of concepts and key terms, reading text, followed
by a written test or quiz - fill in the blank, multiple choice, or short answer.
The National Committee on Science Education Standards and Assessment regard grades 5 through
8 as a transitional period in school science.
As students move from an experiential science program
evident in the early elementary grades, the middle school science program, should build on previous
experiences and emerging concept development, and at the same time, assist students in formulating
concepts or models, to explain natural phenomena. This linking prepares students for the more serious
emphasis on science principles and theories expected in grades 9 through 12. Unfortunately, for many
junior high school students, interest in science ends between 7th and 8th grade.
Science Curriculum
Teachers who do develop eclectic and innovative science programs, invest many hours in planning
the curriculum, actively engaging students during class and at other times, then spend additional hours
evaluating reports, products and projects from students.
Rural gifted 7th and 8th grade students, participating in Project SPRING II, worked with teachers
who developed innovative curriculum strategies, within the context of their regular curriculum. Below
are examples of how this was accomplished.
Weekly Labs:
Activity Problem Statement
You are responsible for the maintenance of your local community pool: as a high school student
you feel proud to have this as your first summer job. You soon discover,
though, that your neighbors
are very difficult to please. After a long, hot weekend, the mothers among them always
complain that
the baby pool is filthy, full of algae and debris.
After a cool weekend, though, its water is clear but
slippery; the mothers complain that it smells of chlorine and dries their babies' skin. Usually, you are
not around on weekends; you do your maintenance work on Mondays, Wednesdays, and Fridays. You
suspect that something about the way you treat the pool water on Fridays causes these problems. You
45
52

know that the pH of the water is important, so you decide to see if it is varying unacceptably as the
weekend goes on.
Activity #1:
1. How could you determine whether the pH of the pool varies on different kinds of weekends?
Describe the equipment you would need, the procedure you would use to test the pH, and the data you
would need to collect in order to answer this question.
2. You check the pH of the chemicals you normally add to the pool and discover that they are very basic.
You notice that right after you add the pool chemicals on Fridays, the pool water is slippery and smells
of chlorine. What does this suggest to you about what might be going wrong on cool weekends?
3. Based on what you learned in this unit, what does the presence of algae in the pool after a long hot
weekend suggest to you about the pool pH after a long hot weekend?
Remember that your pool chemicals are very basic. Describe an experiment that would allow you to see
if your hypothesis is correct. Include your hypothesis, the materials you would need, the protocol you
would use, and describe the data you would collect in this experiment.
4. How could you decide what the right pH for the pool should be?
Activity #2:
1. You can think of the pool as a system. Diagram the parts of the system.
What are its boundaries and elements? What is the input into the system over the course of a hot
weekend? What is the input into the system over the course of a cool weekend? How does the input
differ from a hot weekend to a cool weekend? How does the input interact with system component to
effect the system on a hot weekend? How does the input effect the system over the course of a cool
weekend? What is the output from the system on a hot weekend? On a cool weekend? You should have
been able to think of several different kinds of input for each kind of weekend.
Describe an experiment to test whether one of these kinds of input affects the pH of the pool.
Using your own paper, draw a System Diagram of the pool.
On that paper draw a large circle.
Everything that is a part of the system should be drawn or listed inside a large circle; everything outside
the system should be drawn or written outside the circle. The circle itself represents the boundary system
Developing Science Skills:
Designing an Experiment
How would you do a fair test of this question?
Are earthworms attracted to light?
In other words, do earthworms like light?
Tell how you
would test this question. Be as scientific as you can as you write about your test. Write down the steps
you would take to find out if earthworms like light.
46
3
One student responded in this manner:
Purpose:
To find out if earthworms are attracted to light
Hypothesis:
My hypothesis is that they are not attracted to light because they are almost always down
in the ground, or under something.
Procedure:
First I would take a couple of worms outside on a sunny day and lay them on the ground.
Second Leave them out for a while and see if they go into the ground.
Third If they didn't go into the ground they would be attracted to light.
Results:
If they went into the ground, they're not attracted to light.
Conclusion:
That if the day was cloudy and dark they would come out of the ground and out from
under stuff.
Planned Experiments:
In Planned Experiments, a student's experience with science exploration is advanced.
The following example is from Facets (Foundations and Challenge to Encourage Technology-Based
Science), a special integrated science curriculum for seventh and eighth grades students.
Facets is
designed to be a dynamic curriculum in that it addresses current concerns, issues, and scientific findings.
Climate Controlled Seed Growth
Focus Question: How does climate control plant growth
Setting the scene:
A plant's environment consists of several factors. These factors include such things as:
the amount of light
soil composition
the amount of nutrients
climate conditions
Together, these natural factors help select the type of plants most suitable for a given situation.
Temperature is one climate condition that has a great influence on the success of a plant.
In this activity, you are going to focus on temperature. You will investigate how temperature
affects the germination of seeds and the growth and development of plants. It will take time to do this.
Plants need time to grow. So, you will monitor the progress of the seeds over the whole duration of this
section. Near the end of this section, you will work with the data that you have obtained. In this way,
47
54

you will be able to observe first hand the limits of temperature on
germination of seeds. This is the first
stage in the development of a plant.
You will need:
Four 2-liter plastic bottles with the top cut off
4 thermometers
topsoil
12 sunflower seeds, 12 castor bean seeds, and 12 corn seeds
metric ruler
black construction paper
tape
newspaper
How to go about it:
Step 1:
Spread newspaper on top of your working area to make for easy clean-up. Put enough
topsoil into each of the containers. Make sure that there is about 9 centimeters of space
from the top of the containers to the surface of the soil.
Step 2:
Cover the sides of the containers with tubes made of construction paper.
Step 3:
Place three seeds from each species in a group in each container. Make sure the seeds
are planted near the outside edges of the container.
Step 4:
Put tape on the outside of the container to mark the location of each of the type of seeds.
Label the seed type on the tape.
Step 5:
Cover the seeds so that they are buried at a depth of about 1 centimeter.
Place a
thermometer in each container. Be sure to keep the soil evenly moist at all time with
equal amounts of room temperature water.
Step 6:
Put one container in a very cold place.
Place another in a very warm place.
Place
another in a moderately cool place.
Place the last one in a moderately warm place.
Your teacher will help you select suitable places.
Step 7:
Turn the containers one third rotation each day. This is to ensure that the temperatures
remain evenly distributed throughout the experiment.
Step 8:
Remove the construction paper long enough to make observations once each day. Read
the temperature for each container three times a day.
Devise your own log for recording data. Design it carefully.
It will have to contain
record data about:
temperatures
germination dates
plant heights
root size
48
55

Leave room for any other measurements or observations you may wish to make.
Continue making and recording observations until you can see plant leaves forming.
Facets (Foundation and Challenges to Encourage Technology-Based Science) Module Ten: In the
Farmlands Climate and Farming American Chemical Society (1992)
Science Fair Projects
Involvement in science fair projects can be an effective method for individual examination of a
topic or idea. However, Project SPRING II students first had to overcome the psychological barrier that
science fairs are for " brains," that only highly specialized science projects are considered, and that
precise equipment is required. As students received affirmation that their project ideas were valid, then
science fair participation increased significantly. Project SPRING II students selected topics of inquiry
that had purpose to them, and projects that could be accomplished using materials and equipment that
were easily available. Although simple in their conception, the projects applied the
scientific method,
and were proficiently performed.
Science Fair Topics:
Why Ice Cream Causes Headaches
A Homemade Telescope
Which Detergent is Best?
Pedal Power Garbage Disposal
Textbook Modification
Modifying the science textbook can challenge students and provide a range of activity choices.
For many science teachers, this may be one of the most pragmatic methods for extending standard
science curriculum found in textbooks.
Using relevant activities to augment the curriculum has the following effects; may benefit students
who learn best using hands-on experiences, demonstrates abstract concepts of science in a concrete
manner, and, students are better positioned to construct concepts and perceptions about science that can
be corroborated.
The examples that follow illustrate how a scientific axiom found in most textbooks, can be
investigated in a relatively short time period, and using readily available materials.
Electric Charge
Bend the Water Stream
Materials:
A large plastic comb
A wool, flannel, or felt cloth
A small water stream (from tap or small hole in can)
49
5

Procedure:
1. Open the tap and adjust it such that a small stream of water runs out of the tap (or
hold a leaking can with water above a bucket)
2. Rub the comb with a wool, flannel or felt cloth and hold the back of the comb about
2 cm from the stream (move the comb slowly closer to the stream if it is not attracted
to it)
3. Make sure that students observe the stream being bent, as a side view. In order to do
this, approach the stream from different sides.
Questions:
1. Why did the water stream bend towards the comb?
2. Was it a magnetic force that attracted the water?
3. What other materials can we use instead of the comb?
4. Would a large stream of water also bend?
5. What would happen if the charge comb got wet?
Explanation:
The charged comb induces an opposite charge in the water stream and this is attracted
by the comb. The mass has to be small enough for the electrostatic charge to move the
mass.
The static attraction force is relatively small and thus larger masses are not
moved. This is why the water stream has to be small so that it can be attracted by the
charged comb. A larger stream needs a much larger static charge to bend.
It is suggested not to get the comb wet. The water would take away all charges and it
would be very hard to get the comb recharged with static electricity. Other materials that
can be used instead of the comb are: a balloon, a ruler, a glass rod rubbed by silk.
Static Electricity - The Electroscope
The Balloon Electroscope
Materials:
1. Two identically shaped balloons
2. A wool cloth and thread
3. A water sprayer
Procedure:
1. Blow two identical balloons up to about the same size and tie a thread to each of them.
2. Hold the two threads together and show that the balloons will hang against each other
(without any rubbing beforehand).
3. Now let a student hold the threads, rub the balloons with wool cloth, and let them
hang back (balloons will not touch).
5?

4. Spray a mist of water against the balloons (they will fall back against each other).
Questions:
1. Why did the balloons repel each other after the rubbing?
2. Why did the balloons fall back against each other after spraying?
3. How else could we let the balloons fall back against each other?
4. What needs to be done to have the balloon fall back?
5. During which time of the year would it be best to do experiments on static electricity?
6. What is damp weather doing to the electric charges?
Explanation:
After rubbing the balloons, they were charged with the same charge and thus they repelled each
other. By spraying water droplets in their vicinity the water droplets carry the charges away from
the
balloons, rendering them neutral, with the result that they fall against each other.
Another way to neutralize the charges on the balloons is to touch them with a damp or moist
hand.
Electricity Flow
The Liquid Battery
Materials:
1. A copper and a zinc or magnesium strip.
2. Dilute sulfuric acid, copper wire leads.
3. A beaker, a flash bulb and holder (or 0.2 V bulb)
Procedure:
1. Fill the beaker half full with water and add dilute sulfuric acid till the beaker is 3/4 full.
2. Make small nail holes in one end of each of the electrodes and connect the copper
wires from each of the electrodes to the two terminals of the bulb holder (do not dip the
electrodes in the beaker yet!).
3. Stand a book in front of the flash bulb (to prevent students from getting blinded by the
flash of light).
4. Hold the two electrodes, one in each hand, let students observe, and immerse the
electrodes quickly in the liquid. (The electrodes should be gleaming clean: scraping with
sand paper may help.)
Questions:
1. What made the flash bulb light?
2. What materials made up the source of the electric current?
3. Why was a shield necessary between the bulb and the observer?
4. What triggers the flash in a camera flash?
51
58
Explanation:
This battery is normally called a wet cell, because liquid is involved. Car batteries are usually
wet cells: sulfuric acid and water acting as the electrolyte and lead (lead oxide) as the electrodes. In this
case the copper and zinc strips were the electrodes. Zinc or magnesium having more of a tendency to
lose electrons compared to the copper, act together with the H2SO4 electrolyte as the source of electron
flow.
Without the book as a shield, students might get temporarily blinded by the bright flash,
especially when they look directly at the bulb.
It is a good precaution to use a shield, as the flash is
bright enough to be seen without directly looking at the bulb. When using a regular small bulb, this
shielding is not necessary.
52
55

APPENDIX A
Bloom's Taxonomy
53
60
Major Categories in the Cognitive Domain
of the Taxonomy of Educational Objectives (Bloom, 1956).
Knowledge:
Knowledge is defined as the remembering of previously learned material. This may involve the recall
of a wide range of materials, from specific facts to complete theories, but all that is required is the
bringing to mind the appropriate information.
Knowledge represents the lowest level of learning
outcomes in the cognitive domain.
Behavioral Terms:
Defines, describes, identifies, labels, lists, matches, names, outlines, reproduces, selects, states.
Comprehension:
Comprehension is defined as the ability to grasp the meaning of material.
This may be shown by
translating material from one form to another (words to numbers), by interpreting material (explaining
or summarizing), and by estimating future trends (predicting consequences or
effects). These learning
outcomes go one step beyond the simple remembering of material, and represent the lowest
level of
understanding.
Behavioral Terms:
Converts, defends, distinguishes, estimates, explains, extends, generalizes, gives examples, infers,
paraphrases, predicts, rewrites, summarizes.
Application:
Application refers to the ability to use learned materials in new and concrete situations. This may include
the application of such things as rules, methods, concepts, principles, laws and theories.
Learning
outcomes in this area require a higher level of understanding than those under comprehension.
Behavioral Terms:
Changes, computes, demonstrates, discovers, manipulates, modifies, operates, predicts, prepares,
produces, relates, shows, solves, uses.
Analysis:
Analysis refers to the ability to break down material into its component parts so that its organizational
structure may be understood. This may include the identification of the parts, analysis of the relationships
between parts, and recognition of the organizational principles involved.
Learning outcomes here
represent a higher intellectual level than comprehension and application because they require an
understanding of both the content and the structural form of the material.
Behavioral Terms:
Breaks down, diagrams, differentiates, discriminates, distinguishes, identifies, illustrates, infers, outlines,
points out, relates, selects, separates, subdivides.
Synthesis:
Synthesis refers to the ability to put parts together to form a new whole. This may involve the production
of a unique communication (theme or speech), a plan of operations (research proposal) or a set of abstract
relations (scheme for classifying information). Learning outcomes in this area stress creative behaviors,
with major emphasis on the formulation of new patterns or structures.
54
61

Behavioral Terms:
Categorizes, combines, compiles, composes, creates, devises, assigns, explains, generates, modifies,
organizes, plans, rearranges, reconstructs, relates, reorganizes, revises, rewrites, summarizes, tells,
writes.
Evaluation:
Evaluation is concerned with the ability to judge the value of material (statement, novel, poem, research
report) for a given purpose. The judgements are to be based on defuiite criteria (relevant to the purpose),
and the student may determine the criteria or be given them. Learning outcomes in this area are highest
in the cognitive hierarchy because they contain elements of all of the other categories, plus conscious
value judgements based on clearly defined criteria.
Behavioral Terms:
Appraises, compares, concludes, contrasts, criticizes, describes, discriminates, explains, justifies,
interprets, relates, summarizes, supports.
55
62
APPENDIX B
Gardner's Multiple Intelligence Theory
56
63
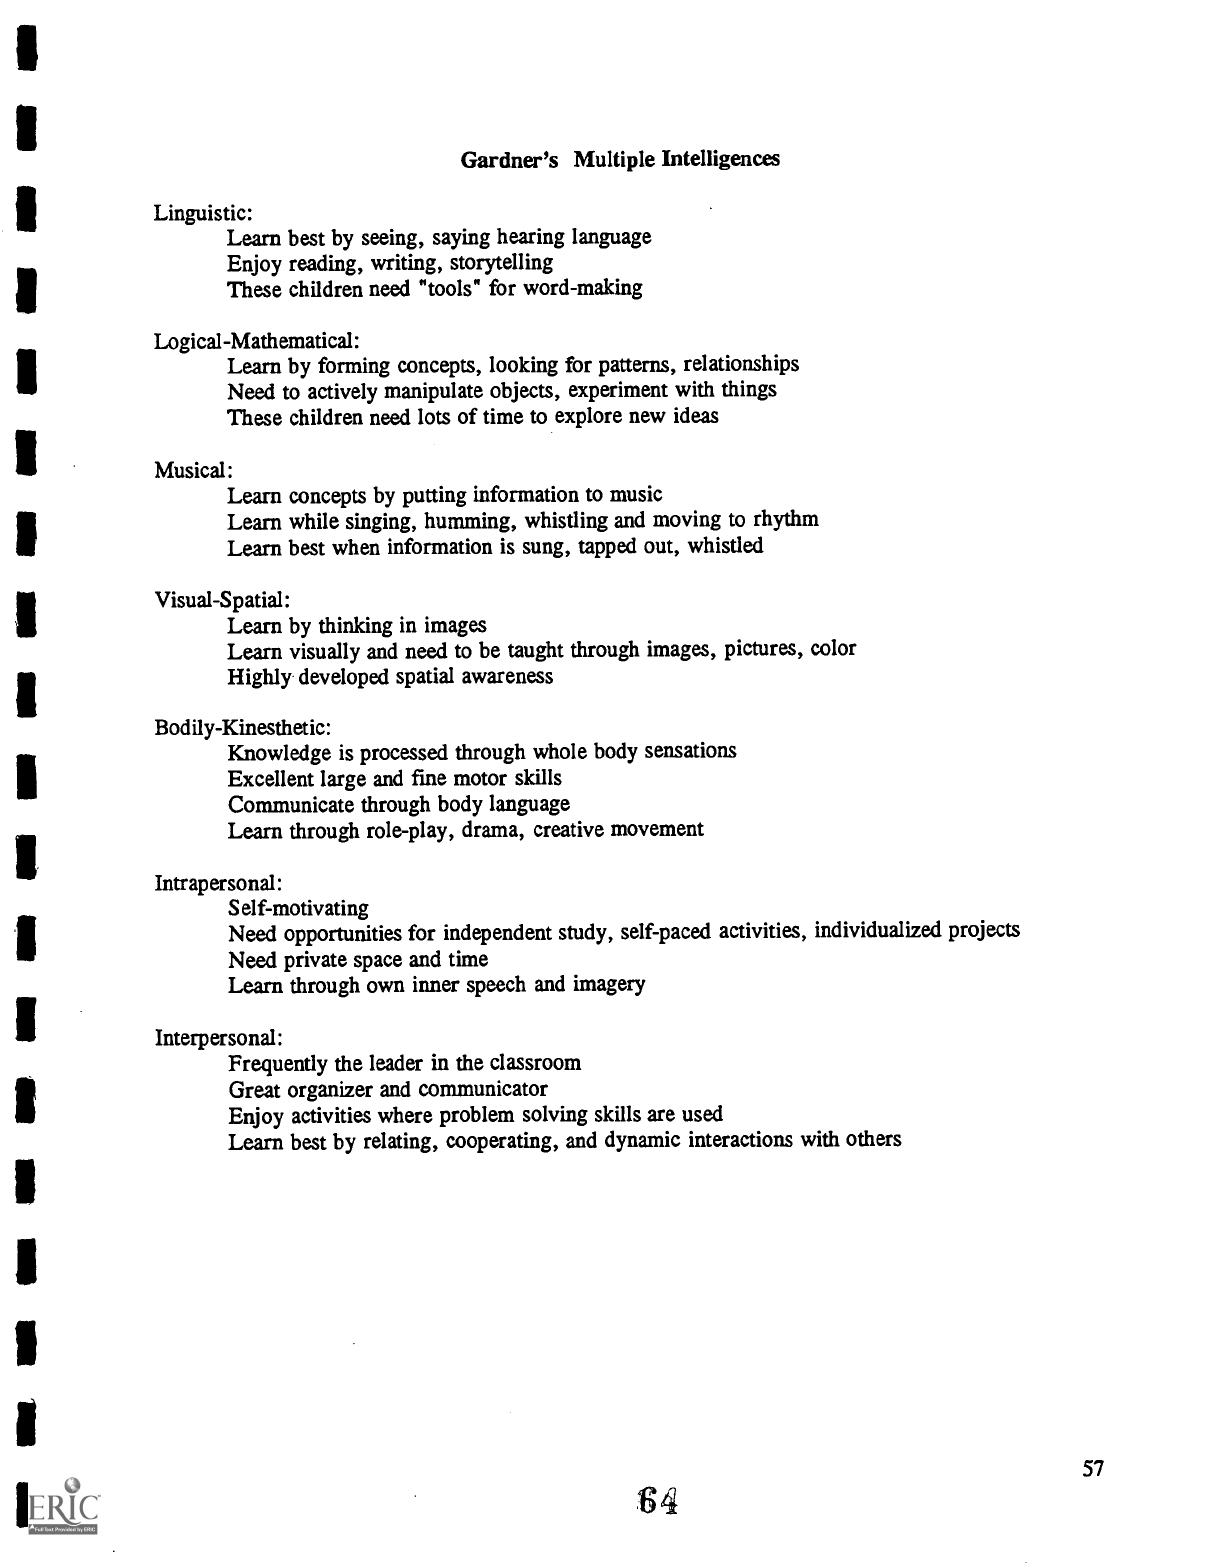
Gardner's Multiple Intelligences
Linguistic:
Learn best by seeing, saying hearing language
Enjoy reading, writing, storytelling
These children need "tools" for word-making
Logical-Mathematical:
Learn by forming concepts, looking for patterns, relationships
Need to actively manipulate objects, experiment with things
These children need lots of time to explore new ideas
Musical:
Learn concepts by putting information to music
Learn while singing, humming, whistling and moving to rhythm
Learn best when information is sung, tapped out, whistled
Visual-Spatial:
Learn by thinking in images
Learn visually and need to be taught through images, pictures, color
Highly developed spatial awareness
Bodily-Kinesthetic:
Knowledge is processed through whole body sensations
Excellent large and fine motor skills
Communicate through body language
Learn through role-play, drama, creative movement
Intrapersonal:
Self-motivating
Need opportunities for independent study, self-paced activities, individualized projects
Need private space and time
Learn through own inner speech and imagery
Interpersonal:
Frequently the leader in the classroom
Great organizer and communicator
Enjoy activities where problem solving skills are used
Learn best by relating, cooperating, and dynamic interactions with others
57
4

APPENDIX C
Why Provide Field Experience?
58
65

Why Provide Field Experience?
The following are important reasons for utilizing and exploring your local environment to extend and
enhance the environmental project that you do in your classroom.
1.To awaken curiosity in preparation for a new area or unit of study. (The teacher, of course, must
expect to do something with this newly aroused curiosity upon returning to the classroom.
2.To stimulate additional interest in a giveh area or unit of study.
(Students now will have some
background in the area under study and can ask more penetrating questions.)
3.To culminate an area or unit of study. (Specific learning on the trip may clarify vague or unclear ideas
as well as rekindle interest in further study.)
4.To provide field investigations away from the classroom to collect specimens to bring back for
additional study.
5.To provide field investigations for observing and recording data, collected both descriptively and
quantitatively in the field.
6.To gain an aesthetic appreciation of our natural or cultural environment by studying the site where the
phenomena occurred.
7.To better understand and interpret the world about us. (Small facts or bits and pieces become integral
parts of the total picture as one's horizon is raised.)
8.To provide students with a chance to be involved with planning their own learning experiences in the
project.
9.To allow students to explore areas and be involved with situations that they have not previously been
exposed to.

Preparing Students for the Field Experience
Students are keenly interested in trips away from the school and they are highly motivating. Carry-over
may be great if measured by the enthusiasm of the students, but careful planning between students and
teacher is necessary for the maximum benefit. Prepare your students well.
1.Help the students understand the reasons for the trip.
(Students need to have some basic concepts
relevant to the problems at hand. They need to have some general background knowledge to help better
understand how this out-of-school experience related to their total school program.
2.Much of the value of the field work lies in carefully preparing the students to observe carefully, make
accurate recordings and make critical reviews and appraisals. (Prior practice along these lines is needed
for one cannot teach students how to accomplish these things in a few minutes.)
3.Students need a purpose for learning. Research indicates that the ability to attain and keep a specific
concept depends, to a large measure, in the meeting of the same concept in a variety of situations, upon
relating facts to principles, and in using these concepts in different contexts. (Thus field experiences tend
to transfer the inquiry skills of school into an out-of-doors situation.)
4.The experience must be such that the children feel that it was interesting and worthwhile, not just
another lesson or group of facts.
5.Involve each student. Every member of the class should have a specific responsibility and a job to do.
(Some can be recorders, others observers, guides, feelers. smellers, etc.)
6.Set up standards of behavior or conduct with the class.
(If all phases of the trip are discussed, the
students will better understand what is expected of them and realize why certain rules must be followed.
Students can list many cautions to be observed when visiting a known site.)
7.Use a buddy system or a small group team approach to help keep track of the students. Sometimes you
will find that students work better in small groups anyway.
8.Allow enough time for the observations and data recording, but keep the pace lively and varied.
67
60

Teacher Preparation for Field Experience
Nothing can turn a great deal into a disaster faster than a lack of planning. Consider any of the following
tips as you begin to consider doing a site exploration or field trip. Tips for planning range from the usual
safety precautions through parental permission and student involvement in the planning.
1.Try a "dry-run" or personal visit prior to the actual trip with the class. (Some problems will become
obvious. Some things to see and do as well is to avoid may appear.)
2.Meet the host or guide and discuss the purpose of the visit, age of the students, kinds of questions that
they are likely to ask, how long s/he is to talk and what material s/he is to cover.
3.Check the material needs for the trip such as special equipment, clothing for the students, food and
drink and any expense money needed. (Rest or comfort stops are needed for long trips)
4.Plan activities for the students for the time of travel both to and from the place of the field experience.
(This may include observations, recording information and time logs.)
5.Secure approval for the trip from the proper school authorities, the owner of the site to be visited, as
well as the parents of the students involved. (Have each of the parties involved been informed about the
purposes of the trip; where, when, and how you will travel; what costs will be encountered and how will
expenses be handled?)
6.Plan adequate supervision of the students at all times. (The school principal or other school personnel
might be invited. Parents and other interested persons may be able to accompany the groups. A ratio
of one adult per eight students is often recommended. Provide each chaperon a list of the students for
whom s/he will be responsible. A briefing session prior to the trip helps to establish guidelines as to
what is expected of the chaperons and students.)
7.Prepare for follow-up and evaluation of the field experience.
(It will be evident that many purposes
other than those specifically planned for were also fulfilled.
The experiences shared by the teacher,
students and the chaperons can be among the most important and lasting of the entire trip.)
BB
61

After the field Experience: Evaluation and Follow-up
The follow up of the field experience may be its most important phase. When the leader shows no
interest in what the students did or fails to encourage them to express their thought, s/he indirectly tells
them that the entire thing is of no consequence.
Evaluating the experience (through the eyes of the
learners) may help to determine if the specific visitation or experience should be undertaken at another
time or with another group.
1.Build upon the field experiences and encourage the learners to seek answers to problems encountered.
Begin immediately to follow-up.
2.Parents want to know about the experience.
(Written exercises describing events and activities help
to convey ideas to the parents and to others.)
3.Recognize that the social experience of being with persons other than one's family and the actual ride
on the bus may be enjoyable aspects of the trip. Don't overlook the possible discussions about group
dynamics.
4.Relate personal observations and investigations to the classroom activities individually through reports,
projects, demonstrations or displays, and through group presentations. (A list of things learned by the
students is not enough. The ideas must be tied to the on-going classroom program.)
5.Ideas or questions that were raised or unanswered help determine if additional excursions or study are
needed. (Data gathered should be investigated and analyzed and then hypotheses made in terms of the
problems under study.)
6.A written evaluation should be made and filed for future reference. This evaluation could be a joint
venture between students, teachers, or leaders, and other chaperons.
(It may help others at a later date
in planning another trip. This evaluation should include suggestions for changes or items for additional
emphasis.)
7.Factual information as to routes, sites used, person to contact, etc., should be made a part of the
permanent record. (After a few varied trip have been recorded the school has the beginnings of a
Resource Guide to Field Studies.)
8.Involve the students in sending thank-you notes to people who helped provide, plan or pay for the field
experience.
69
62

APPENDIX D
Evaluation and Assessment Measures
63
70

Evaluation and Assessment Measures
Possible Assessment Measures for Rural Gifted Science Program
Informal Assessment
Portfolios: Process and Product
Field Study journals, logs
Science Seminar Reflections
Data Recording and Inferences
Independent Projects Using the Scientific Method
Rating Scales: Teacher, Parent, Self, and Others
Video Portfolios
School Products
Science Fair Projects
Interviews
Formal Assessment
Test Scores
Science Process
71
64

A Variety of Evaluation Techniques
Directed Observation
Group Discussion
Individual Interview
Checklists
Inventories
Charts
Diaries
Scrapbooks
Samples of Work
Group Made Tests
Sociometric Tests
Case Studies
Tape Recordings
Profiles
Flow-of-Discussion Chart
Evaluative Criteria
Informal Observations
Small-Group Interview
Individual Conferences
Rating Scales
Questionnaires
Logs
Autobiographies
Collections
Standardized Tests
Anecdotal Records
Activity Records
Cumulative Records
Sociograms
Behavior Journals
Pupil Graphs
72
Joyce Van Tassel-Baska,
College of William and Mary
65
PRODUCTS
A LETTER
A LESSON
ADVERTISEMENT
AMMONIA IMPRINT
ANIMATED MOVIE
ANNOTATED BIBLIOGRAPHY
ART GALLERY
BLOCK PICTURE STORY
BULLETIN BOARD
CHART
CHORAL READING
CLAY SCULPTURE
COLLAGE COLLECTION
COMIC STRIP
COMPUTER PROGRAM
COSTUMES
CROSSWORD PUZZLE
DEBATE
DEMONSTRATION
DETAILED ILLUSTRATION
DIORAMA
DISPLAY
EDITORIAL ESSAY
ETCHING EXPERIMENT
FACT TILE
FAIRY TALE
FAMILY TREE
FILM
FILMSTRIP
FLIP BOOK
GAME
GRAPH
HIDDEN PICTURE
ILLUSTRATED STORY
INTERVIEW
LABELED DIAGRAM
LARGE SCALE DRAWING
LEARNING CENTER
LETTER TO THE EDITOR
MAP WITH LEGEND
MOBILE
MODEL
MURAL
MUSEUM EXHIBIT
MUSICAL INSTRUMENTS
NEEDLEWORK
NEWSPAPER STORY
ORAL REPORT
PAINTING
PAMPHLET
PAPIER MACHE
PETITION
PHOTO ESSAY
PICTURES
PICTURE STORY FOR CHILDREN
PLASTER OF PARIS MODEL
PLAY
POP-UP BOOK
PRESS CONFERENCE
PROJECT CUBE
PUPPET
PUPPET SHOW
PUZZLE
RADIO PROGRAM
REBUS STORY
RIDDLE
SCIENCE FICTION STORY
SCULPTURE
SKIT
SLIDE SHOW
SLOGAN
SURVEY
TAPES
TELEVISION PROGRAM
TRANSPARENCIES
TRAVEL BROCHURE
WRITE A NEW LAW
73
66

APPENDIX E
New Mexico: Science Curriculum Matrix
67
74

11I
=I OM
MN
III
MI
=I
75
Project SPRING II
Science Curriculum
.4iCir
s..
`:211
A?:.'..
'f'"
1,-.7-,,,
f.'
$14- -V
'''
ft..'
f,...s
_7.'4, -,nii
4
,,- .,.11,n,P r
4-
,4.101:44%
.
citglIg.
.`" A ...
V
.. J4nd
1,.. !,..
land formation land development
food production
soil pH
fire impact
crop rotation
erosion
soil types
mining
fossils
soil composition/types
weathering water absorption
conservation of natural
resources
health issues/pollution
corn festivals
mineral rights
petroglyphs
Ilifiefeii:::;::
.:;I:i.7,7-7....
....i....r....dt .0-.
.....--...f,:
farm sewage seepage
water purification
water sources/water cycles
water quality
irrigation/penetration
water as liquids, solids & gas in
plants
effects of freezing
water rights
rain dance
consumption
.
likitthat.:,
....,
seasons:
wind/snow/rain/drought
cycles
erosion/flash flood & safety
plant growth
behavior effects on man &
animals
energy sources; solar wind,
hydro power
climates
changing land forms
erosion/flash floods
crop damage
ozone
acid rain
lightning
forces causing erosion
compare historical weather data
folk predictions
shOter/safety
folklore /astrology
moon phases & planting
schedules
Pignut
,4.
z sq(4
'
:,,e,
,..
..
io
1
:". ...... 'is
natural selection/adaptation
germination/pollination
seeds/plant parts
medicinal plants
photosynthesis
ecosystems
soil and plant
growth/interaction
regional plants/river plants
plants' effect on land
weeds/hardiness
root stress
insects/animals
poisonous plants,
herbs/medicine
pesticides, insecticides
decorative art & crafts/dyes
war paint/cosmetics/furniture
religious drugs/herbs/furniture
Native Am. land mgt. techniques
Antaittlir-
..,
,,;11.
'-
.:,;&I.
...
life cycles/reproduction
food chain
adaptability native &
introduced
preditor/prey
habitats in arid lands
endangered species
impact of overgrazing
physical appearance as
adaptation to arid climate
pesticide effects
animal waste/disease
health/respiritory effects on
humans
treatment of animals:
work, farm, range, pets
state fair
animals in myths
Huthaliii,:::
1,;
..1.!.
adaptability: clothing
homes, solar, adobe
careers
ag trivia/awareness
farms/farm facts
land management
military
grazing
conservation efforts
polluting chemicals
pesticides, insecticides,
fertilizers
allergies
identify cultures that settled the
NM area
adaptability to environment
conservation of natural
resources
video documentary
BEST COPY
AVAILABLE
76

NM INN
NM
MO OM MO MI MN MI MI MN MI MEI MI NM MO
SPRING II Project
Science Curriculum Lab examples
.r7."1""
r
, 4.11.0
,-
W",;0411tA-,f'
4
/1. 7;
r
Ml
01.., .,
4,, - ,
17--
'Vc).s`:,`
,=1:4,X0
- , -
r'j
1 '
w._.,zwpwc,
vi
0.
w4.0 u;-1/ro3
, ;1, ;-.
, Aki):4'34
(441.2T
ASS
,
747,
1
,it LI,
,t*TC,'IA '''
.'i 4;
.fr'''
hts,:t: i
..,;.%
.,
..,
i
Soil layers and pH
Forest habitat
Desert habitat
Changes in the landscape
Dance like a rock
Sand dunes
Making soil
Water absoption of soil
3-D map of New Mexico
Archeology Discovering
Ancient Cultures
I"
i'L.1:P
1.
. do.,... , -.,
. ,...,.,.. ---,
.
............. a>,..,
li
cif
..........
. ..
Testing the water Splash erosion
Mountain erosion
Velocity of water
Water has three forms
Water absorption of soil
Water consumption:
How much water do you
use?
Water cycle and water
conservation
" 1....1,,,
0
..
>,
,,.,
hl
Weather forecasting
Oxidation of Metal
Physical vs. Chemical
Weathering of
Newspaper
Velocity of Water
"
,
-.\ ...
K
.
''
.1
'$.
Desert & Forest habitat
Watch roots grow
Plant roots hold soil
Will bean plants grow in
salty water?
Mountain erosion
Design and plant your
own garden
.iiiii 0;
1
,,,,
S.
, ..+
v,
X
What do you know about
eggs?
'a
, 1 ,,
. .;.
' ' .
..
,..
P
Crashed on the moon
Nickelodeon space suit
Earth's Journey around
the sun
Solar system distances
Demonstrating the solar
system
Mapping magnetic fields
Discovering the space
shuttle
SAREX communications
Nickelodean spacesuit
lab
77
BEST COPY AVAILABLE
78

gi/
(9/92)
U.S. DEPARTMENT OF EDUCATION
Office of Educational Research and improvement (OERI)
Educational Resources Information Center (ERIC)
NOTICE
REPRODUCTION BASIS
This document is covered by a signed "Reproduction Release
(Blanket)" form (on file within the ERIC system), encompassing all
or classes of documents from its source organization and, therefore,
does not require a "Specific Document" Release form.
This document is Federally-funded, or carries its own permission to
reproduce, or is otherwise in the public domain and, therefore, may
be reproduced by ERIC without a signed Reproduction Release
form (either "Specific Document" or "Blanket").
